

Jetpack Compose: Navigating to a Detail View (Part III)
source link: https://www.waseefakhtar.com/android/jetpack-compose-navigating-to-a-detail-view/
Go to the source link to view the article. You can view the picture content, updated content and better typesetting reading experience. If the link is broken, please click the button below to view the snapshot at that time.

Jetpack Compose: Navigating to a Detail View (Part III)
If you're new to Jetpack Compose and looking at all the cool UI screens and animations around the internet like me, you're probably a bit overwhelmed but also curious about how things work in compose.
Waseef Akhtar
If you've been following my series of posts regarding RecyclerView (LazyColumn) in Jetpack Compose, chances are, you might have already accomplished most of what we wanted to achieve with the Puppy Adoption app.
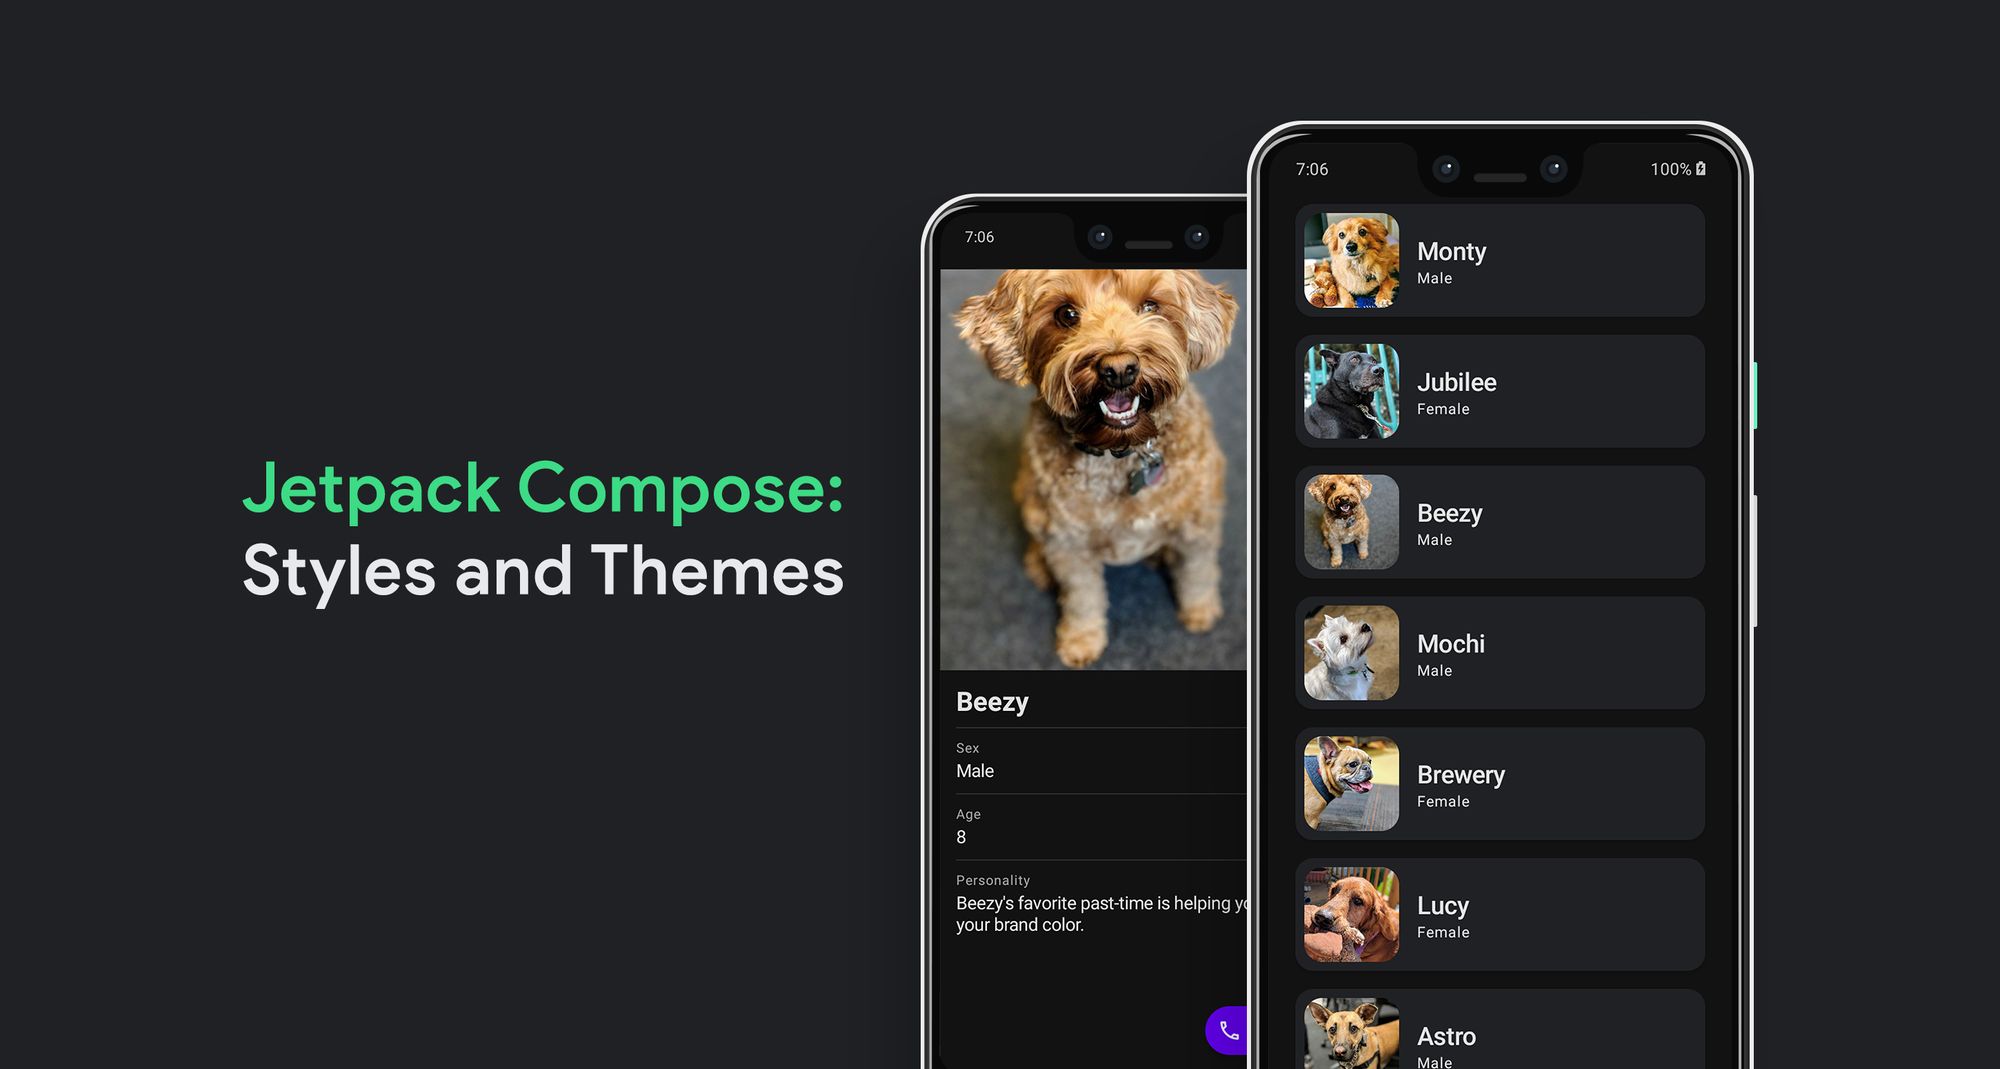
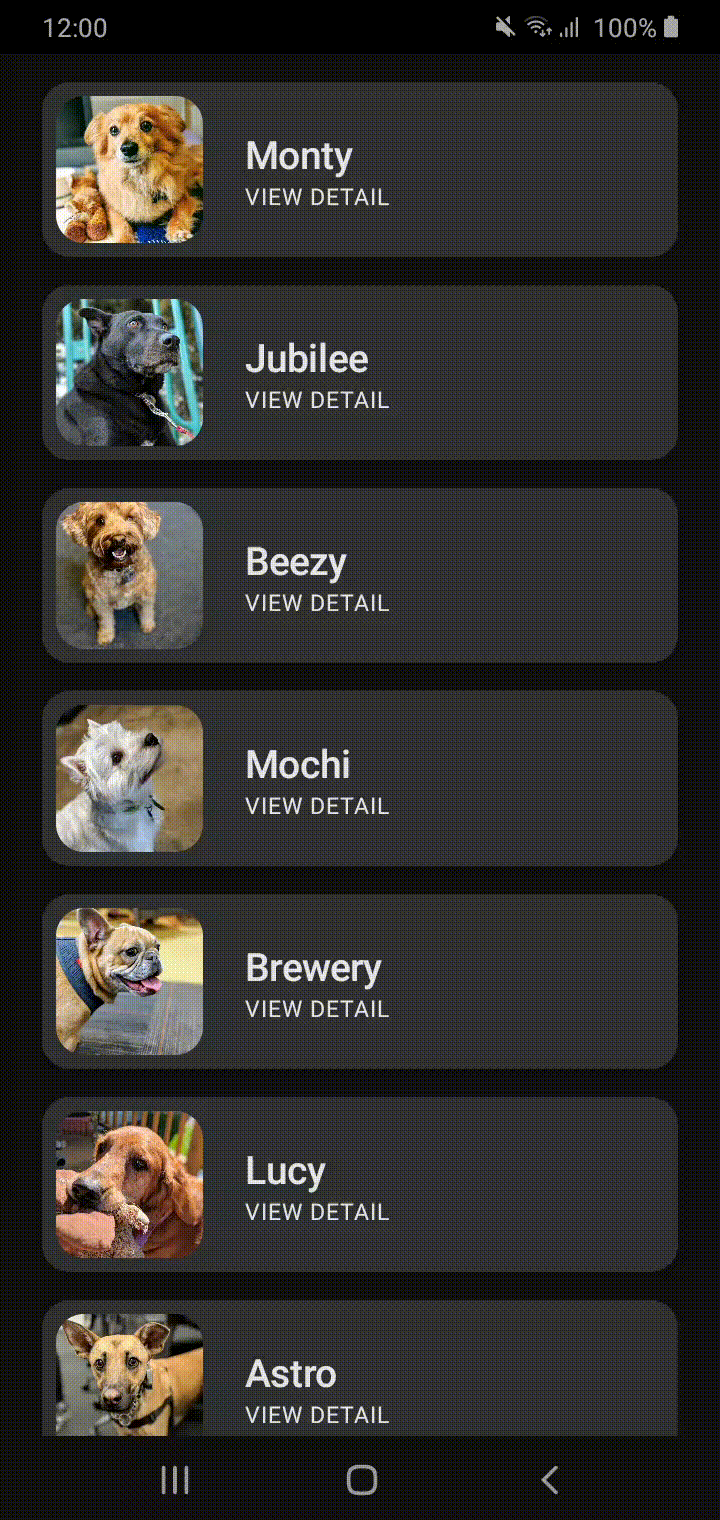
For a quick recap, here's where we left our app after styling it in Part II:
What's left to achieve, you ask? Adding a detail view that our list view navigates to when clicked on a puppy item.
If you aren't sure exactly what I am referring to, please go through my two previous posts in order to understand better.
Previous Posts
 Waseef AkhtarWaseef Akhtar
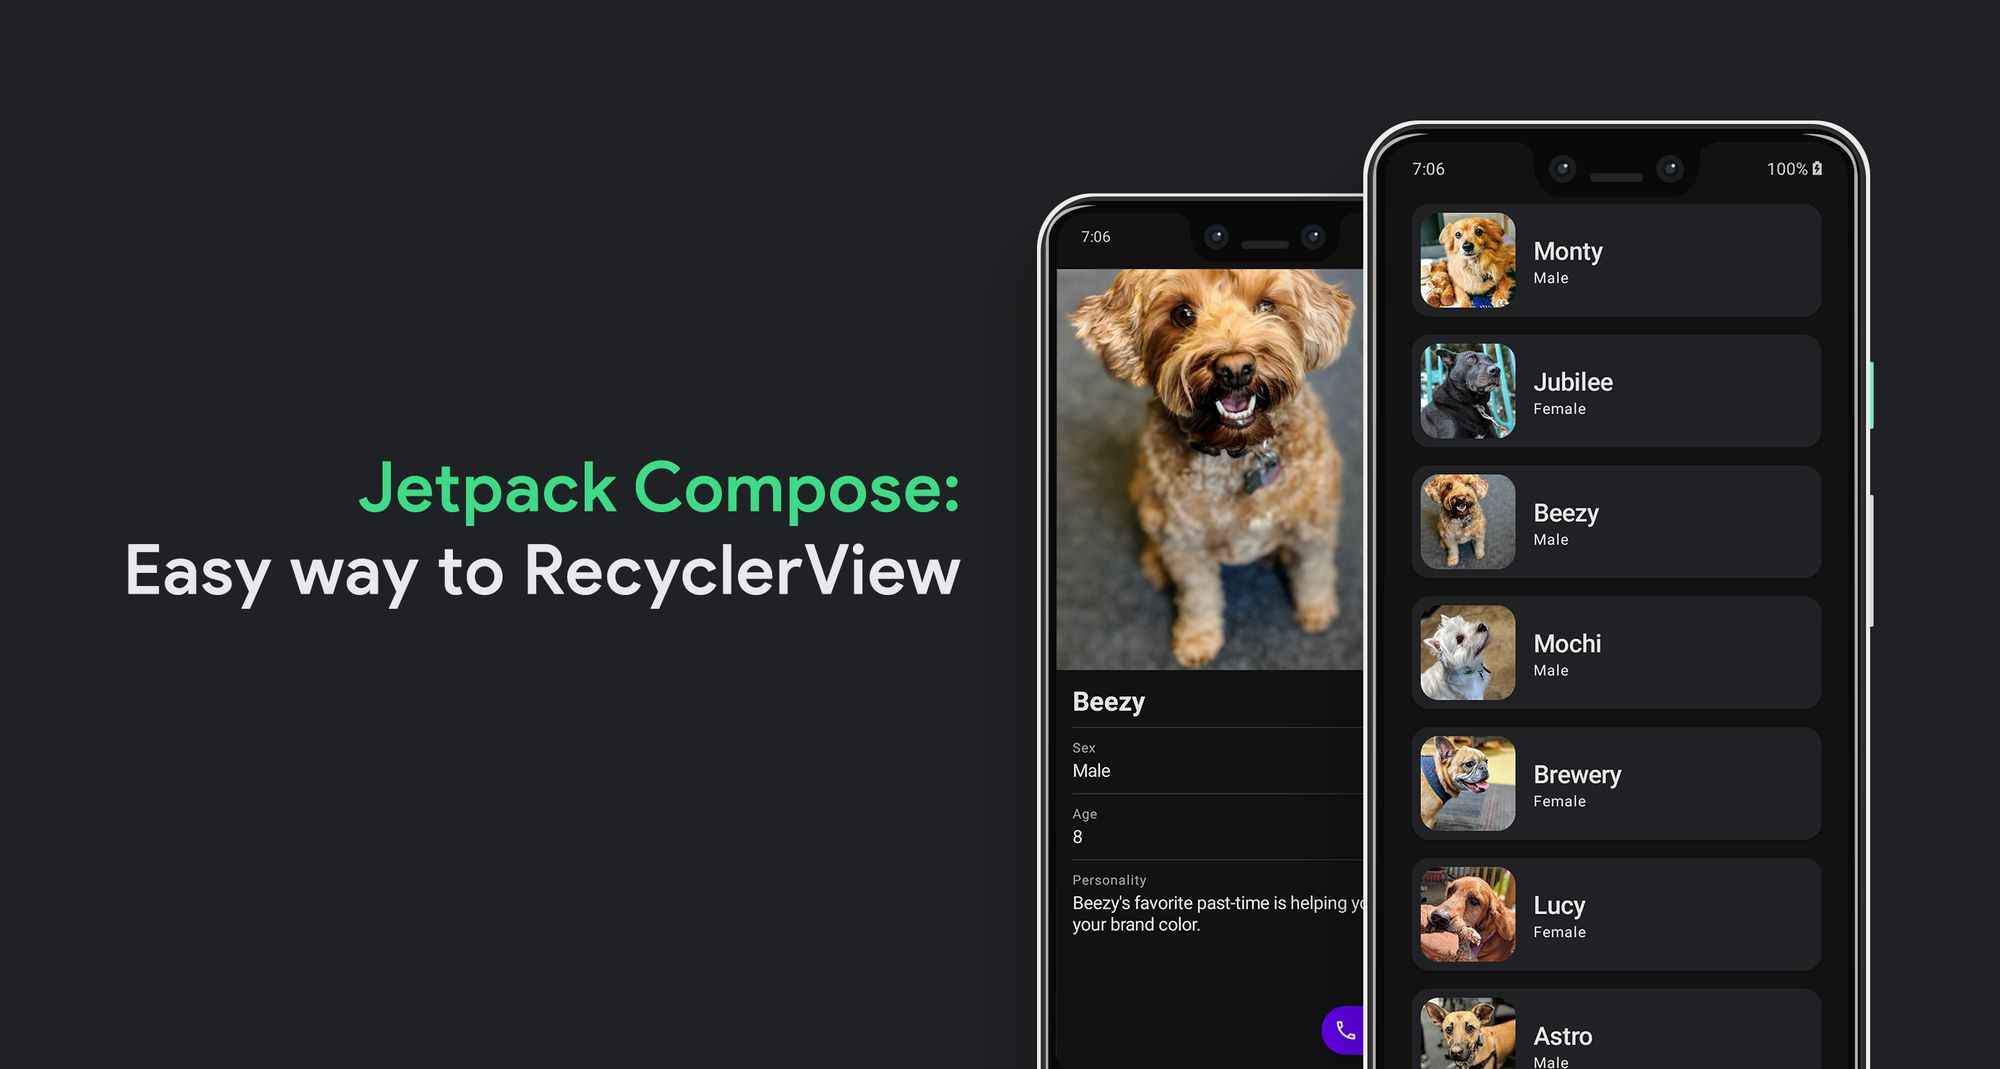
The Detail View 🖼
In order to create a detail view for a puppy list, here are some things that we need to do:
- Create a click handler that is triggered upon tapping a puppy item in the list.
- Implement a new Profile screen for puppies that is shown after clicking on the puppy item.
Note: Since showing a new screen (an activity) is still done by our dear ol'
startActivity()method (which can only be called from an activity or when we have a context), we need to refactor our code a bit to pass in our click handler up the flow to our MainActivity in order to call thestartActivity()method and open the new Profile screen.
Refactoring 🎛
Let's get started by refactoring our code a bit to add a click handler to our Row composable function and pass it up the flow to our MainActivity:
- Open
PuppyListItem.kt. - Pass a new lambda as an argument to our
PuppyListItemcomposable function:navigateToProfile: (Puppy) -> Unit.
Note: We pass in the Puppy object to our
navigateToProfilelambda in order to know which Puppy item was clicked, in order to show the correct profile information for the clicked puppy item.
3. Add a Modifier.clickable parameter to our Row composable function and call the lambda that we created, passing in the Puppy object as an argument: Modifier.clickable {navigateToProfile(puppy) }.
That makes your PuppyListItem function now look like this:
@Composable fun PuppyListItem(puppy: Puppy, navigateToProfile: (Puppy) -> Unit) { Card( modifier = Modifier.padding(horizontal = 8.dp, vertical = 8.dp).fillMaxWidth(), elevation = 2.dp, shape = RoundedCornerShape(corner = CornerSize(16.dp))
) { Row(Modifier.clickable { navigateToProfile(puppy) }) { PuppyImage(puppy) Column( modifier = Modifier .padding(16.dp) .fillMaxWidth() .align(Alignment.CenterVertically)) { Text(text = puppy.title, style = typography.h6) Text(text = "VIEW DETAIL", style = typography.caption) } } } }
If you run the app at this time, you will face a build error that says:
e: BarkHome.kt: (19, 41): No value passed for parameter 'navigateToProfile'
Meaning we've added a new argument to our PuppyListItem function but haven't yet passed any parameter to it where we call it from, i.e. BarkHome.kt.
So similar to our refactoring above, we update other functions that's related to PuppyListItem, as well.
- Open
BarkHome.kt. - Pass a new lambda as an argument to our
BarkHomeContentfunction:navigateToProfile: (Puppy) -> Unit. - Inside the same function, we now update our call to
PuppyListItemby passing in the lambda parameter:PuppyListItem(puppy = it, navigateToProfile).
The new changes make our function now look like this:
@Composable fun BarkHomeContent(navigateToProfile: (Puppy) -> Unit) { val puppies = remember { DataProvider.puppyList } LazyColumn( contentPadding = PaddingValues(horizontal = 16.dp, vertical = 8.dp) ) { items( items = puppies, itemContent = { PuppyListItem(puppy = it, navigateToProfile) }) } }
The error is now fixed. However, if you run the app again, you get another error saying:
e: MainActivity.kt: (29, 29): No value passed for parameter 'navigateToProfile'
Meaning we added a new argument to the function BarkHomeContent but we haven't passed anything to it when called from MainActivity.
Similarly, we need to now update our functions in MainActivity, as well:
- Open
MainActivity.kt. - Pass a new lambda as an argument to our
MyAppfunction:navigateToProfile: (Puppy) -> Unit. - Pass it as a parameter to the
BarkHomeContentfunction that we're calling insideMyApp:BarkHomeContent(navigateToProfile = navigateToProfile)
This makes our updated function look like below:
@Composable fun MyApp(navigateToProfile: (Puppy) -> Unit) { Scaffold( content = { BarkHomeContent(navigateToProfile = navigateToProfile) } ) }
To get our heads around what we've achieved so far, we started building our click handler from bottom up, passing in our Puppy object so that we notify our MainActivity that a click is triggered by a user. The MainActivity then helps us call the next activity, which is the Profile screen for that particular puppy.
In order to achieve that, we made use of Kotlin Lambdas that work as anonymous functions that we can pass as arguments to our functions in order for us to perform a lambda expression in another function once the lambda is called.
In our case, we pass in our lambda in the following way:
PuppyListItem > BarkHomeContent > MyApp > onCreateSo far, we've achieved passing the lambda up until MyApp, we now need to update our onCreate method inside MainActivity where we call MyApp and call our dear ol' startActivity() method to start a new activity.
But before we do so, let's create our ProfileActivity screen first.
Creating a Profile Screen 🐾
- Right click on our /bark directory and go to New > Activity > Empty Activity.
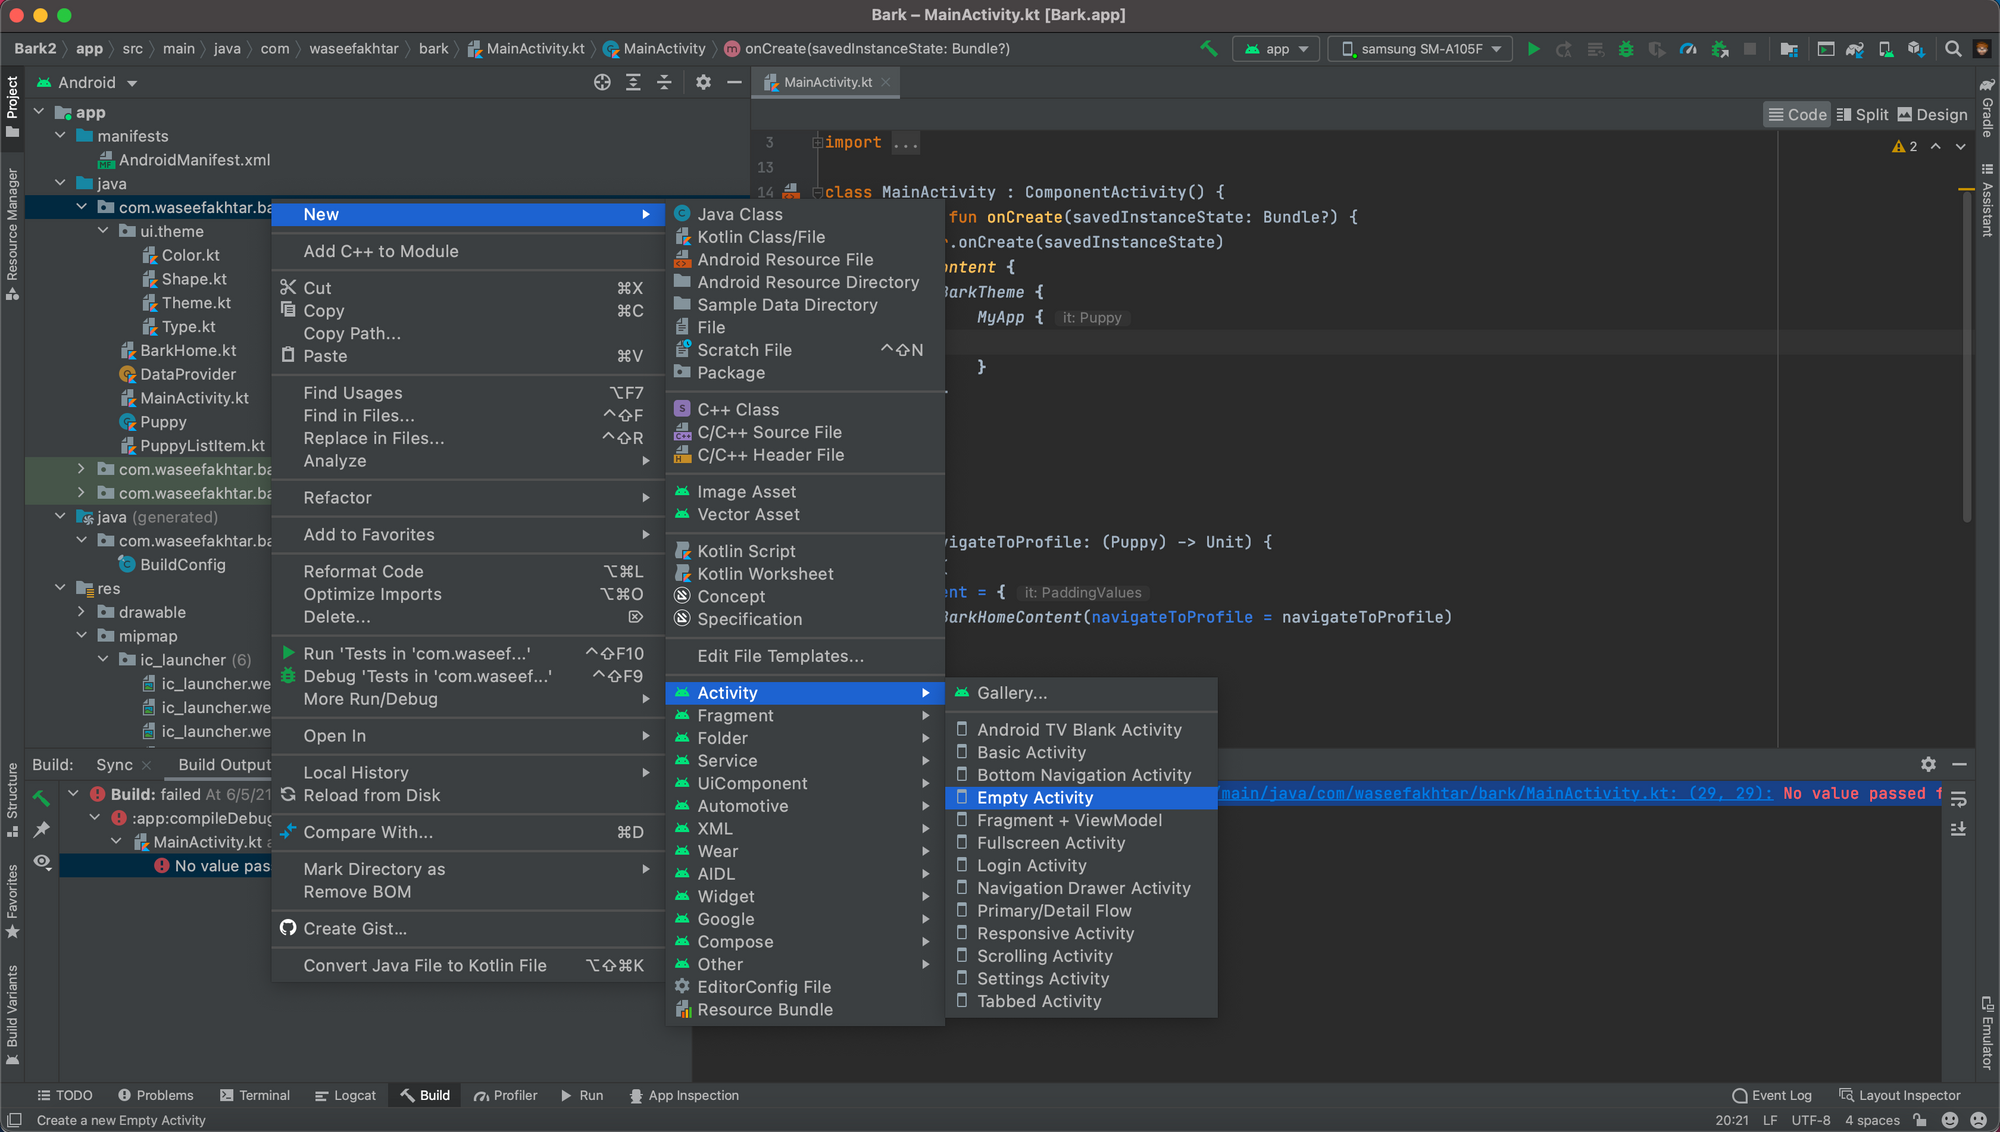
2. Give your activity the name, ProfileActivity and uncheck Generate a Layout file.
3. Click Finish.
Your new profile screen is now created without an XML layout file (since we're all about Jetpack Compose 😉).
Let's try to quickly setup our Profile screen content so we don't run into errors when we build our project so we know we've refactored and set up everything correctly:
- Open
ProfileActivity.kt. - Inside
onCreate()method, aftersuper.onCreate, callsetupContent(i.e. a parent composition that starts the flow of all Composable function). - Inside
setupContent, we start a lambda expression where we first setup the theme of the screen, in our caseBarkTheme. - Inside
BarkTheme, we call our built-inTextcomposable to test our screen.
With the changes, this is how your onCreate method looks:
override fun onCreate(savedInstanceState: Bundle?) { super.onCreate(savedInstanceState) setContent { BarkTheme { Text(text = "Hello World!") } } }
With everything setup, let's get back to calling our ProfileActivity from MainActivity.
Showing the Profile Screen 🎩
- Open
MainActivity.kt. - Inside
onCreatemethod, underMyApp, define a lambda expression by calling the new activity, like so:
override fun onCreate(savedInstanceState: Bundle?) { super.onCreate(savedInstanceState) setContent { BarkTheme { MyApp { startActivity(Intent(this, ProfileActivity::class.java)) } } } }
Finally, run the app now to see the new changes.
You might wonder what made us pass in the Puppy object when we're not even using it inside our lambda expression.
This is where we need to test passing our Puppy object to the Profile screen to see that all our refactoring of code works perfectly.
Passing a puppy to the Detail View 🐶
In order to pass an object to a detail screen, these steps are the best practices to achieve it:
- Open
ProfileActivity.kt. - Create a new companion object.
- Inside the companion object, create a new
PUPPY_IDconstant that works as a key when sending and retrieving objects via Intent. - While still inside the companion object, create a public function
newIntentthat creates the Intent for opening our profile screen, taking incontextand apuppyas arguments.
companion object { private const val PUPPY_ID = "puppy_id" fun newIntent(context: Context, puppy: Puppy) = Intent(context, ProfileActivity::class.java).apply { putExtra(PUPPY_ID, puppy) } }
You might notice that when we call putExtra, it is underlined red and has an error message:
None of the following functions can be called with the arguments supplied.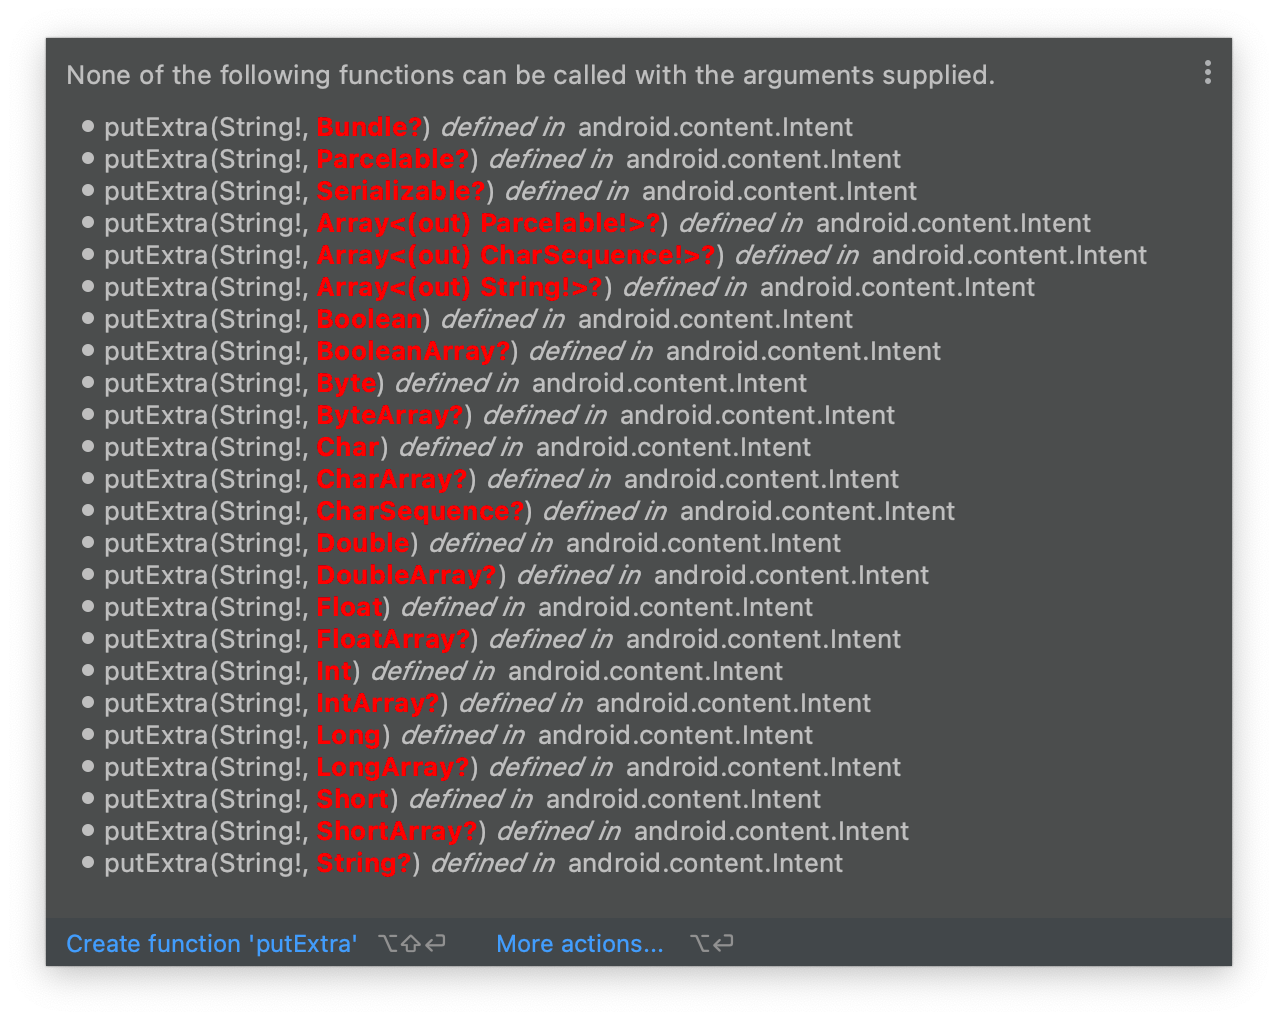
This is because our Puppy model class extend from neither of the mentioned types that Intent supports when sending/retrieving an extra. In order to solve this, we need to extend our class from the Serializable to make it supportable by Intent to carry.
In order to do so:
5. Open Puppy.kt.
6. Extend it from the Serializable class, like so:
data class Puppy( val id: Int, val title: String, val description: String, val puppyImageId: Int = 0 ) : Serializable
Note: If the
Serializableclass is not detectable by Android Studio, simply addimport java.io.Serializableat the top of the class.
If you notice in ProfileActivity.kt now, the red underline under putExtra should be gone.
7. Now, create a new field in ProfileActivity.kt called puppy, that actually retrieves the puppy object (as a Serializable) from the intent when the the ProfileActivity runs.
private val puppy: Puppy by lazy { intent?.getSerializableExtra(PUPPY_ID) as Puppy }
8. Let's now modify our Text composable inside onCreate to say hello to the puppy that is clicked on.
Text(text = "Hello ${puppy.title}")
9. Finally, we modify our startActivity method in MainActivity to call the newIntent method that we just created in ProfileActivity.
startActivity(ProfileActivity.newIntent(this, it))
Let's finally run the app now to see the new changes.

And.. there you go! As you can now see, each puppy item that you click, you're directed to a profile screen where it greets that particular puppy.
Give yourself a pat on the back at this point for having now learnt how navigation works in Compose. 👏
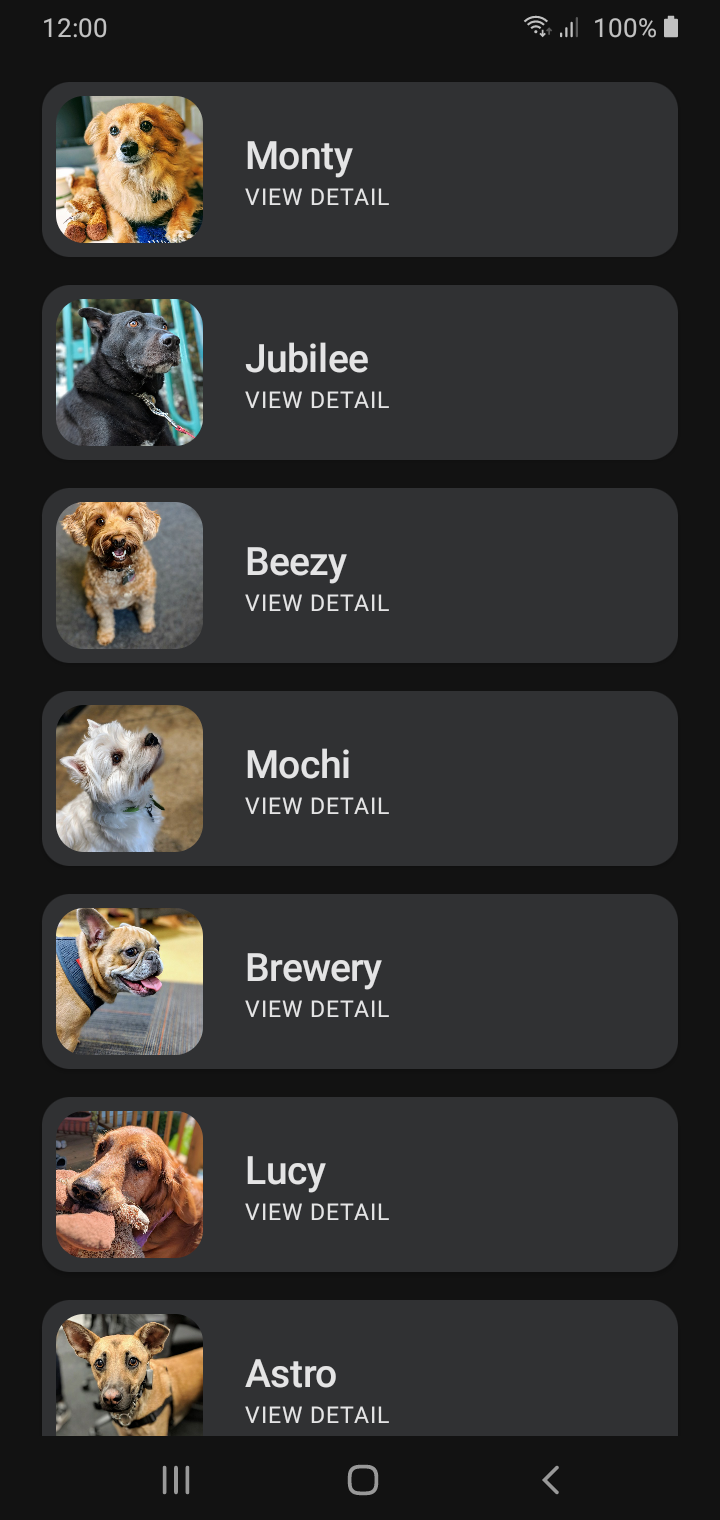
We've come really far from where we started, but.. we're not done here, because we've yet to implement a complete UI for the Profile screen, to make our app look like the one below. 👇
Up Next
For the next post, we'll look into how to:
- Implement a complete UI for the Profile screen.
You can find it available in the upcoming weeks. Until then, give yourself a pat on the back, and..
Happy coding! 💻
Source code for the Final Version
 GitHubwaseefakhtar
Awesome that you came this far! 👏 Now I'd love to know what the most annoying part of this post was or if it was of any help to you. Either ways, you can drop me a DM on: www.twitter.com/waseefakhtar ✌️
Recommend
-
8
Welcome back to the second article in my series about migrating design systems to Jetpack Compose, where I talk about our experiences at
-
11
Android Jetpack Compose: An easy way to RecyclerView (Part I) If you're new to Jetpack Compose and looking at all the cool UI screens and animations around the...
-
9
Android Jetpack Compose: Styles and Themes (Part II) If you're new to Jetpack Compose and looking at all the cool UI screens and animations around the internet...
-
8
Navigating in Jetpack ComposeIf you are working on a mobile app, chances are you need some form of navigation. Getting navigation right isn’t easy with many challenges at hand: back stack handling, lifecycles, state saving...
-
10
Compose / Jetpack / Testing Compose: List...
-
29
ResponsesThere are currently no responses for this story.Be the first to respond.Navigating with Animations in Jetpack Compose
-
5
Navigating through multi-module Jetpack Compose applicationsDesigning a scalable architecture for multi-module Jetpack Compose appsJetpack Compose, navigation, multi-module architecture, API a...
-
6
下面是视频内容的脚本整理稿。如果你看了视频,那下面的文稿就不用看了。 「学 Compose 还是学自定义 View?」这个问题从去年初我发第一个 Compose 主题的视频到现在,一直有人问我。这个问题的背后表达了一种担忧:会不会等我...
-
6
Faster Jetpack Compose <-> View interop with App Startup and baseline profile
-
4
Jetpack Compose: A use case for view interop migration strategy
About Joyk
Aggregate valuable and interesting links.
Joyk means Joy of geeK