

FreeBSD Desktop – Part 26 – Configuration – Conferencing and Meetings | 𝚟𝚎𝚛𝚖𝚊𝚍𝚎𝚗
source link: https://vermaden.wordpress.com/2021/05/26/freebsd-desktop-part-26-configuration-conferencing-and-meetings/
Go to the source link to view the article. You can view the picture content, updated content and better typesetting reading experience. If the link is broken, please click the button below to view the snapshot at that time.
FreeBSD Desktop – Part 26 – Configuration – Conferencing and Meetings
For years I thought that online video conferencing and/or meetings would not be possible on FreeBSD. One of the first things I done on each of my laptops was to disable Camera and Microphone (along with Bluetooth) to save some battery time. While the Microphone would probably work I did not even tried to use it – did not had such needs to record anything with my laptop.
As time passed by I thought that maybe I will try what is the state of using Camera on FreeBSD and also how it is doing in the video conferencing/meetings space.

I was really astonished by the results … at least on my ThinkPad W520.
You may want to check other articles in the FreeBSD Desktop series on the FreeBSD Desktop – Global Page where you will find links to all episodes of the series along with table of contents for each episode’s contents.
Camera Setup
I enabled Camera and Microphone in the BIOS (leaving Bluetooth disabled) and booted up my FreeBSD 13.0 as usual.
I then installed needed packages which are:
- multimedia/v4l-utils – Video4Linux utilities
- multimedia/v4l_compat – Video4Linux IOCTL header files
- multimedia/pwcview – Video4Linux PWC webcam viewer
- multimedia/webcamd – port of Linux USB webcam and DVB drivers
We will also need to load cuse.ko kernel module at each boot. We will use /etc/rc.conf for that.
# pkg install v4l-utils v4l_compat webcamd pwcview

# vi /etc/rc.conf

  kld_list="${kld_list} cuse"

:wq
My Camera is listed at the end of the usbconfig(8) command.
% usbconfig
ugen1.1: <0x1912 XHCI root HUB> at usbus1, cfg=0 md=HOST spd=SUPER (5.0Gbps) pwr=SAVE (0mA)
ugen2.1: <0x1033 XHCI root HUB> at usbus2, cfg=0 md=HOST spd=SUPER (5.0Gbps) pwr=SAVE (0mA)
ugen3.1: <intel ehci="" root="" hub=""> at usbus3, cfg=0 md=HOST spd=HIGH (480Mbps) pwr=SAVE (0mA)
ugen0.1: <intel ehci="" root="" hub=""> at usbus0, cfg=0 md=HOST spd=HIGH (480Mbps) pwr=SAVE (0mA)
ugen3.2: <vendor 0x8087="" product="" 0x0024=""> at usbus3, cfg=0 md=HOST spd=HIGH (480Mbps) pwr=SAVE (0mA)
ugen0.2: <vendor 0x8087="" product="" 0x0024=""> at usbus0, cfg=0 md=HOST spd=HIGH (480Mbps) pwr=SAVE (0mA)
ugen0.3: <vendor 0x0765="" product="" 0x5001=""> at usbus0, cfg=0 md=HOST spd=LOW (1.5Mbps) pwr=ON (100mA)
ugen0.4: <logitech usb="" receiver=""> at usbus0, cfg=0 md=HOST spd=FULL (12Mbps) pwr=ON (98mA)
ugen0.5: <chicony electronics="" co.,="" ltd.="" integrated="" camera=""> at usbus0, cfg=0 md=HOST spd=HIGH (480Mbps) pwr=ON (200mA)
We can also use webcamd(8) to list available cameras in the system.
% webcamd -l
Available device(s):
webcamd [-d ugen1.1] -N 0x1912-XHCI-root-HUB -S unknown -M 0
webcamd [-d ugen2.1] -N 0x1033-XHCI-root-HUB -S unknown -M 0
webcamd [-d ugen3.1] -N Intel-EHCI-root-HUB -S unknown -M 0
webcamd [-d ugen0.1] -N Intel-EHCI-root-HUB -S unknown -M 1
webcamd [-d ugen3.2] -N vendor-0x8087-product-0x0024 -S unknown -M 0
webcamd [-d ugen0.2] -N vendor-0x8087-product-0x0024 -S unknown -M 1
webcamd [-d ugen0.3] -N vendor-0x0765-product-0x5001 -S unknown -M 0
webcamd [-d ugen0.4] -N Logitech-USB-Receiver -S unknown -M 0
webcamd [-d ugen0.5] -N Chicony-Electronics-Co---Ltd--Integrated-Camera -S unknown -M 0
Show webcamd usage:
webcamd -h
We will use above webcamd(8) output to add needed webcamd_0_flags in the /etc/rc.conf file.
# vi /etc/rc.conf

  webcamd_enable=YES
  webcamd_0_flags="-d ugen0.5"

:wq
We also need to add ourselves to the webcamd group.
# pw groupmod webcamd -m vermaden

# grep webcamd /etc/group
webcamd:*:145:vermaden
We can now start the webcamd(8) daemon.
# service webcamd start
Starting webcamd.
webcamd 99884 - - Attached to ugen0.5[0]

# ls -l /dev/video*
crw-rw---- 1 webcamd operator 2, 5 2021-05-09 11:36 /dev/video0
crw-rw---- 1 webcamd operator 2, 6 2021-05-09 11:36 /dev/video1
We will now use pwcview(1) to check how the Camera works.
% pwcview
Webcam set to: 320x240 (sif) at 5 fps
Here is how it looks.

Works! I pixelised the output as I do not have an instagrammer soul …
You can start pwcview(1) with larger resolution when needed.
Camera at mine ThinkPad W520 tops at 1280×720 resolution (HD) and 30 fps for refresh rate.
% pwcview -d /dev/video0 -f 30 -s uxga
Webcam set to: 1280x720 (uxga) at 30 fps
Here is the list of most popular resolutions.
FORMAT    RESOLUTION (NOTES)
========= ========== ===============
CGA        320x200
SIF        352x240
CIF        352x288
EGA        640x350
VGA        640x480
4SIF/QSIF  704x480   (Quad SIC)
4CIF/QCIF  704x576   (Quad CIF)
SVGA       800x600
XGA       1024x768
720p      1280x720   (HD)
SXGA      1280x1024  (1.3 Megapixel)
WXGA      1366x768   (HD+)
SXGA+     1400x1050
16CIF 	  1408x1152
WSXGA     1600x1024
UXGA      1600x1200  (2.0 Megapixel)
WSXGA+    1680x1050
1080p     1920x1080  (FullHD)
WUXGA     1920x1200
QXGA      2048x1536  (3.0 Megapixel)
QSXGA     2560x2048  (5.0 Megapixel)
WQSXGA    3200x2048
QUXGA     3200x2400
2160p     3840x2160  (4K)
WQUXGA	  3840x2400
You may also try multimedia/cheese which has more ‘desktop’ interface when plain and simple pwcview(1) tool.
# pkg install multimedia/cheese
% cheese

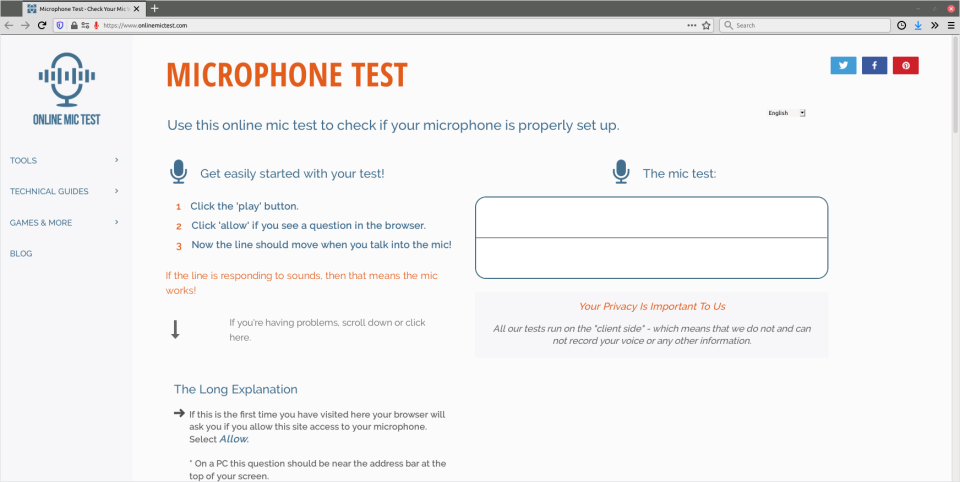
You may also test your camera online – https://www.onlinemictest.com/webcam-test/ – for example here.

Microphone Setup
You may test your microphone with audio/audacity or multimedia/ffmpeg(1)for example.
You as well use the – https://www.onlinemictest.com/ – online test for your mic.
You can also use audio/sox to record your sound in the terminal.
# pkg install sox celluloid

% pkg which -o $( which rec )
/usr/local/bin/rec was installed by package audio/sox

% rec test.wav

Input File     : 'default' (ossdsp)
Channels       : 2
Sample Rate    : 48000
Precision      : 16-bit
Sample Encoding: 16-bit Signed Integer PCM

In:0.00% 00:00:06.66 [00:00:00.00] Out:315k  [ =====|===== ] Hd:1.9 Clip:0    ^C
Aborted.

% celluloid test.wav
You hear your recording for example in the celluloid(1) player.

ThinkPad Microphone Easter Egg
After I successfully tested the Camera on my ThinkPad W520 I then moved to Microphone testing … to just find out that my microphone is totally deaf. I could not record any sound with audacity(1) or ffmpeg(1).
At the beginning I first suspected it was a FreeBSD problem … unjustifiably fortunately.
Switching Microphone to [Enabled] in the ThinkPad W520 BIOS requires special procedure as shown on the BIOS screenshot below 
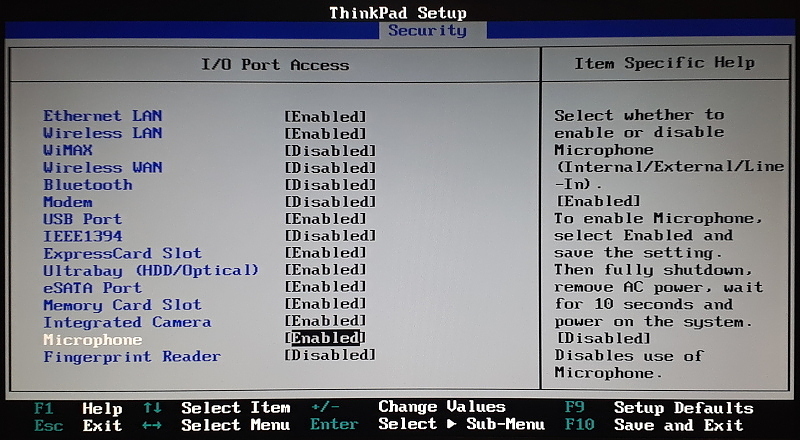
1. Set the Microphone to [Enabled].
2. Select Save and Exit option in BIOS.
3. Power off laptop.
4. Disconnect AC power for at least 10 seconds (battery can be attached).
5. Power on laptop.
6. Boot FreeBSD as usual and now recording on Microphone works like a charm
Why so strange enabling procedure? Some people suggested that it needs to be that complicated to make sure that any third party will not enable your Microphone without your knowledge. Security concerns. Makes sense.
Meetings
I was able to successfully start/join Google Meet and Zoom and also Teams meetings with this setup.
Sometimes it just required to use www/chromium instead of my default www/firefox browser.
Here is the detailed list of what works where.
- https://teams.live.com/
Works at Chromium.
Does not work at Firefox.
- https://meet.google.com/
Works at Chromium.
Does not work at Firefox.
- https://zoom.us/
Works at Chromium.
Works at Firefox.
Closing Thoughts
Hope that will helps some of you to use join your meetings on FreeBSD system.
Recommend
About Joyk
Aggregate valuable and interesting links.
Joyk means Joy of geeK