

deepin 15.11 安装 tensorflow or pytorch GPU 版本
source link: https://www.jansora.com/notes/288
Go to the source link to view the article. You can view the picture content, updated content and better typesetting reading experience. If the link is broken, please click the button below to view the snapshot at that time.
deepin 15.11 安装 tensorflow or pytorch GPU 版本
主机: 台式机
CPU: amd 3600 GPU: GTX 2060
不同电脑(尤指双显卡的笔记本)的显卡驱动安装方式可能不太一样,但安装显卡后后续步骤应该通用。
本文仅供参考~~
安装成功后的最终版本如下,仅供参考:
nvidia 驱动:  430.50
tensorflow: 2.0
Cuda: 10.1
cuDNN: 7.6.4
参考连接:
deepin15.8+NVIDIA_390.87+cuda9.0+cudnn7.4+tensorflow-gpu_1.9配置血泪史 deepin 15.10.2 安装 Python3.6.9 deepin 15.10.2 安装 Jupyter-notebook
安装显卡驱动
此处有参考这里 Deepin 下安装 Nvidia 驱动
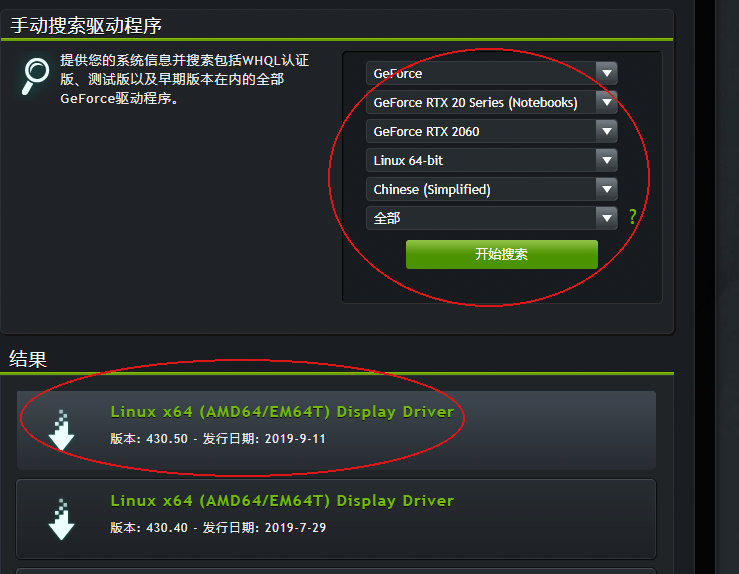
在 https://www.geforce.cn/drivers 找到合适的驱动并下载,
下载完好放到在主目录(NVIDIA-Linux-x86_64-430.50.run)
禁用nouveau驱动
# 先安装一个pluma编辑器,或者你可以手动进目录去编辑
sudo apt-get install pluma
sudo pluma /etc/modprobe.d/blacklist.conf

## 或者通过文件夹右键管理员打开,然后手动打开对应的文件(可能需要新建blacklist.conf)
## 然后在文件中写入内容如下---:
blacklist nouveau
blacklist lbm-nouveau
options nouveau modeset=0
alias nouveau off
alias lbm-nouveau off
接下来需要把刚才更改的这个生效
sudo update-initramfs -u
重启系统,再次进入系统
安装显卡驱动
关闭用户操作界面
sudo service lightdm stop
命令行模式下输入账号密码登录后,需要进入字符命令模式
sudo init 3
给与目标nvidia驱动可执行权限--注意路径一定要正确
chmod 777 ./NVI.............run
安装显卡驱动, 这里需要注意的是,安装过程中会出现很多弹框提示,如果懂的话,按照步骤操作即可,如果不懂的话,一路选择 YES 即可
sudo ./NVI.............run
不出意外的话,这里是能够安装成功的。如果失败的话也没关系,继续开启下面的用户界面,再寻找其他教程安装显卡驱动吧。显卡驱动下面的步骤依然适用 :)
开启用户界面
sudo service lightdm start
判断显卡驱动是否安装成功
第一种:安装成功之后,系统分辨率应该是变成你显示器支持的最大分辨率的。
第二种:命令行输入 nvidia-smi, 出现以下类似界面
jansora@jansora-PC:~$ nvidia-smi
Fri Oct 18 15:37:06 2019
+-----------------------------------------------------------------------------+
| NVIDIA-SMI 430.50       Driver Version: 430.50       CUDA Version: 10.1     |
|-------------------------------+----------------------+----------------------+
| GPU  Name        Persistence-M| Bus-Id        Disp.A | Volatile Uncorr. ECC |
| Fan  Temp  Perf  Pwr:Usage/Cap|         Memory-Usage | GPU-Util  Compute M. |
|===============================+======================+======================|
|   0  GeForce RTX 2060    Off  | 00000000:08:00.0  On |                  N/A |
| 34%   33C    P8    21W / 165W |     91MiB /  5931MiB |      0%      Default |
+-------------------------------+----------------------+----------------------+

+-----------------------------------------------------------------------------+
| Processes:                                                       GPU Memory |
|  GPU       PID   Type   Process name                             Usage      |
|=============================================================================|
|    0      4279      G   /usr/lib/xorg/Xorg                            60MiB |
|    0      4733      G   kwin_x11                                      17MiB |
+-----------------------------------------------------------------------------+
安装 cuda 10.1
请确保你的显卡驱动支持
cuda10.1(CUDA 10.1 requires 418.x or higher.)
下载 cuda 10.1
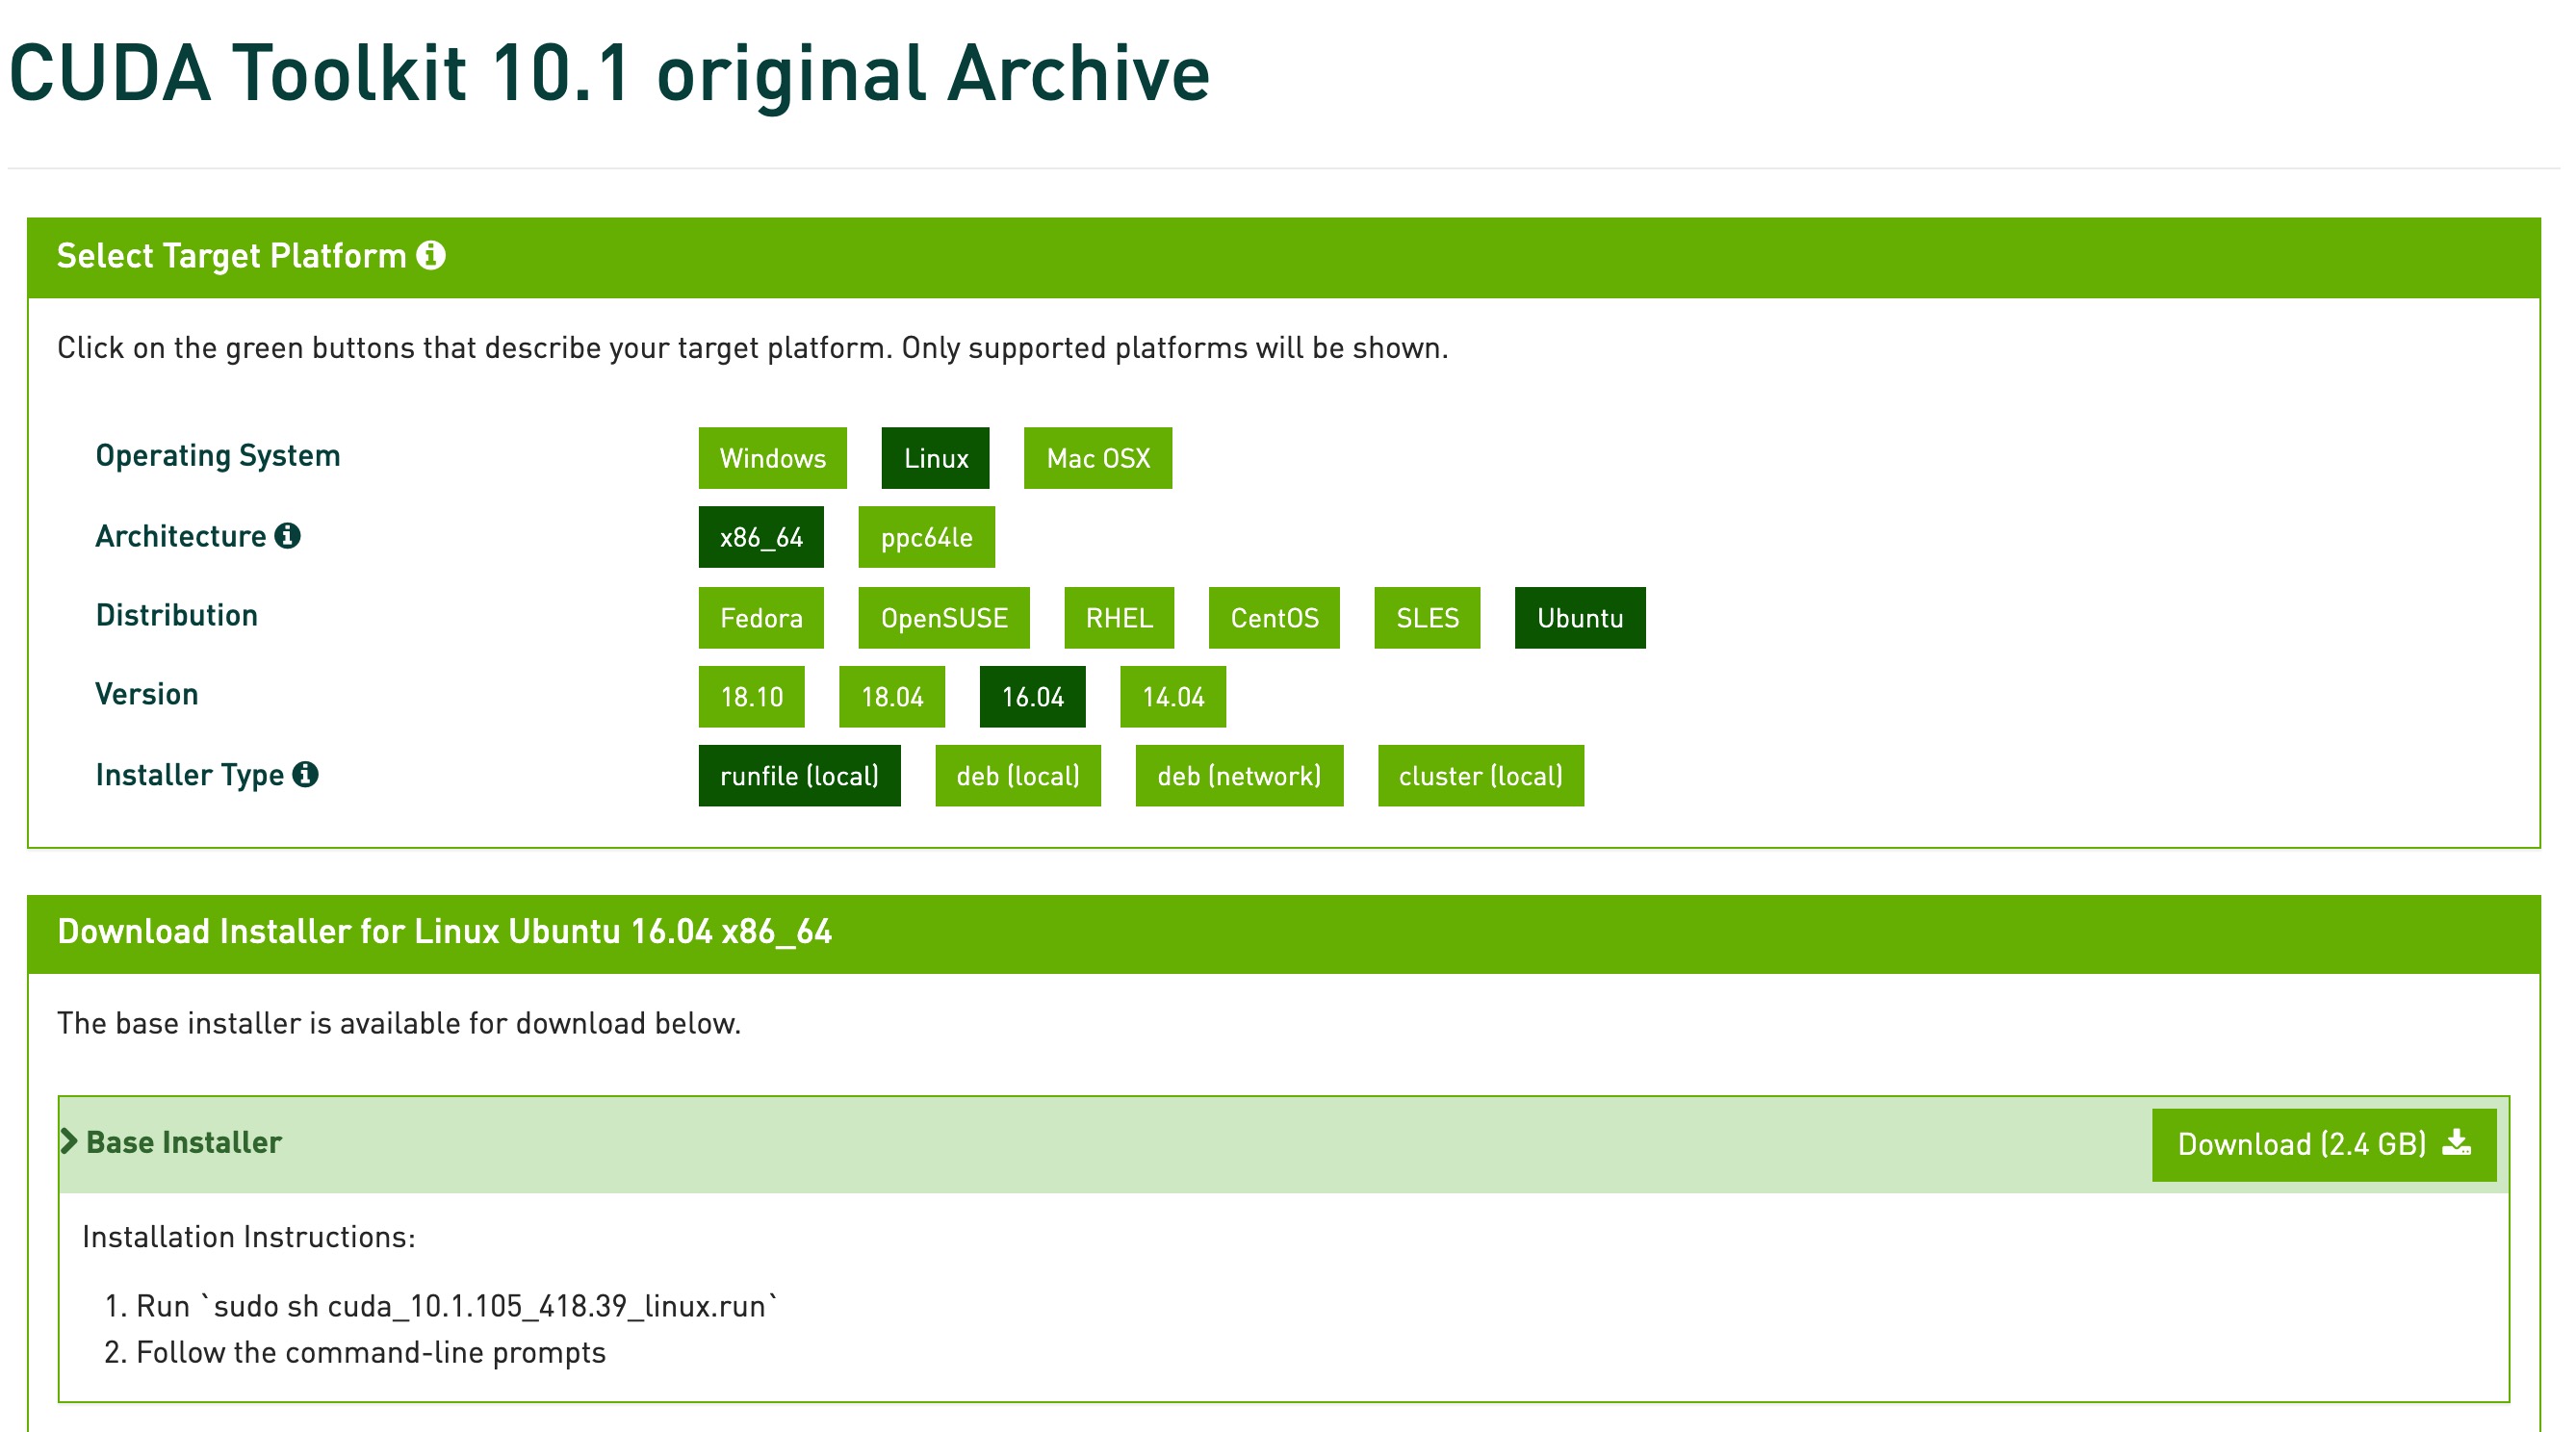
赋予执行权限
chmod 755 cuda_10.1.243_418.87.00_linux.run
开始安装 cuda10.1
deepin 15.11 安装cuda10.1不能使用sudo 执行root权限来安装, 否则会抛出 跟
/var/log/nvidia/.uninstallManifests相关的 error,这里不过多赘述该原因了,
可以通过安装到用户目录下后,再移动到/usr/local方式来绕过这个error,详情请看以下步骤
创建安装到的文件夹
cd ~
mkdir cuda-10.1
执行安装文件, 安装到 ~/cuda-10.1 目录下.
执行后会有阅读指南,按 [[q]] 跳过指南. 输入 [[accept]] 开始安装
./cuda_10.1.243_418.87.00_linux.run --toolkitpath=$HOME/cuda-10.1 --defaultroot=$HOME/cuda-10.1
选择 CUDA Toolkit 10.1 即可,其他都去掉 [[X]] 号
┌──────────────────────────────────────────────────────────────────────────────┐
│ CUDA Installer                                                               │
│ - [ ] Driver                                                                 │
│      [ ] 418.87.00                                                           │
│ + [X] CUDA Toolkit 10.1                                                      │
│   [ ] CUDA Samples 10.1                                                      │
│   [ ] CUDA Demo Suite 10.1                                                   │
│   [ ] CUDA Documentation 10.1                                                │
│   Options                                                                    │
│   Install                                                                    │
│ Up/Down: Move | Left/Right: Expand | 'Enter': Select | 'A': Advanced options │
└──────────────────────────────────────────────────────────────────────────────┘
不出意外的话,这里是能够安装成功的
移动到 /usr/local 下
sudo mv cuda-10.1 /usr/local/
配置软连接
sudo ln -sv /usr/local/cuda-10.1/ /usr/local/cuda
配置Cuda环境变量
配置到 ~/.bashrc 或 /etc/profile 都可以, 建议配置到 /etc/profile
sudo vim /etc/profile , 加入以下内容
export LD_LIBRARY_PATH=/usr/local/cuda/lib64/:$LD_LIBRARY_PATH
export PATH=/usr/local/cuda/bin:$PATH
使环境变量配置生效
source /etc/profile
检测安装是否成功
nvcc -V
出现以下类似信息,即安装成功。
nvcc: NVIDIA (R) Cuda compiler driver
Copyright (c) 2005-2019 NVIDIA Corporation Built on Sun_Jul_28_19:07:16_PDT_2019 Cuda compilation tools, release 10.1, V10.1.243
安装cuDNN 7.6
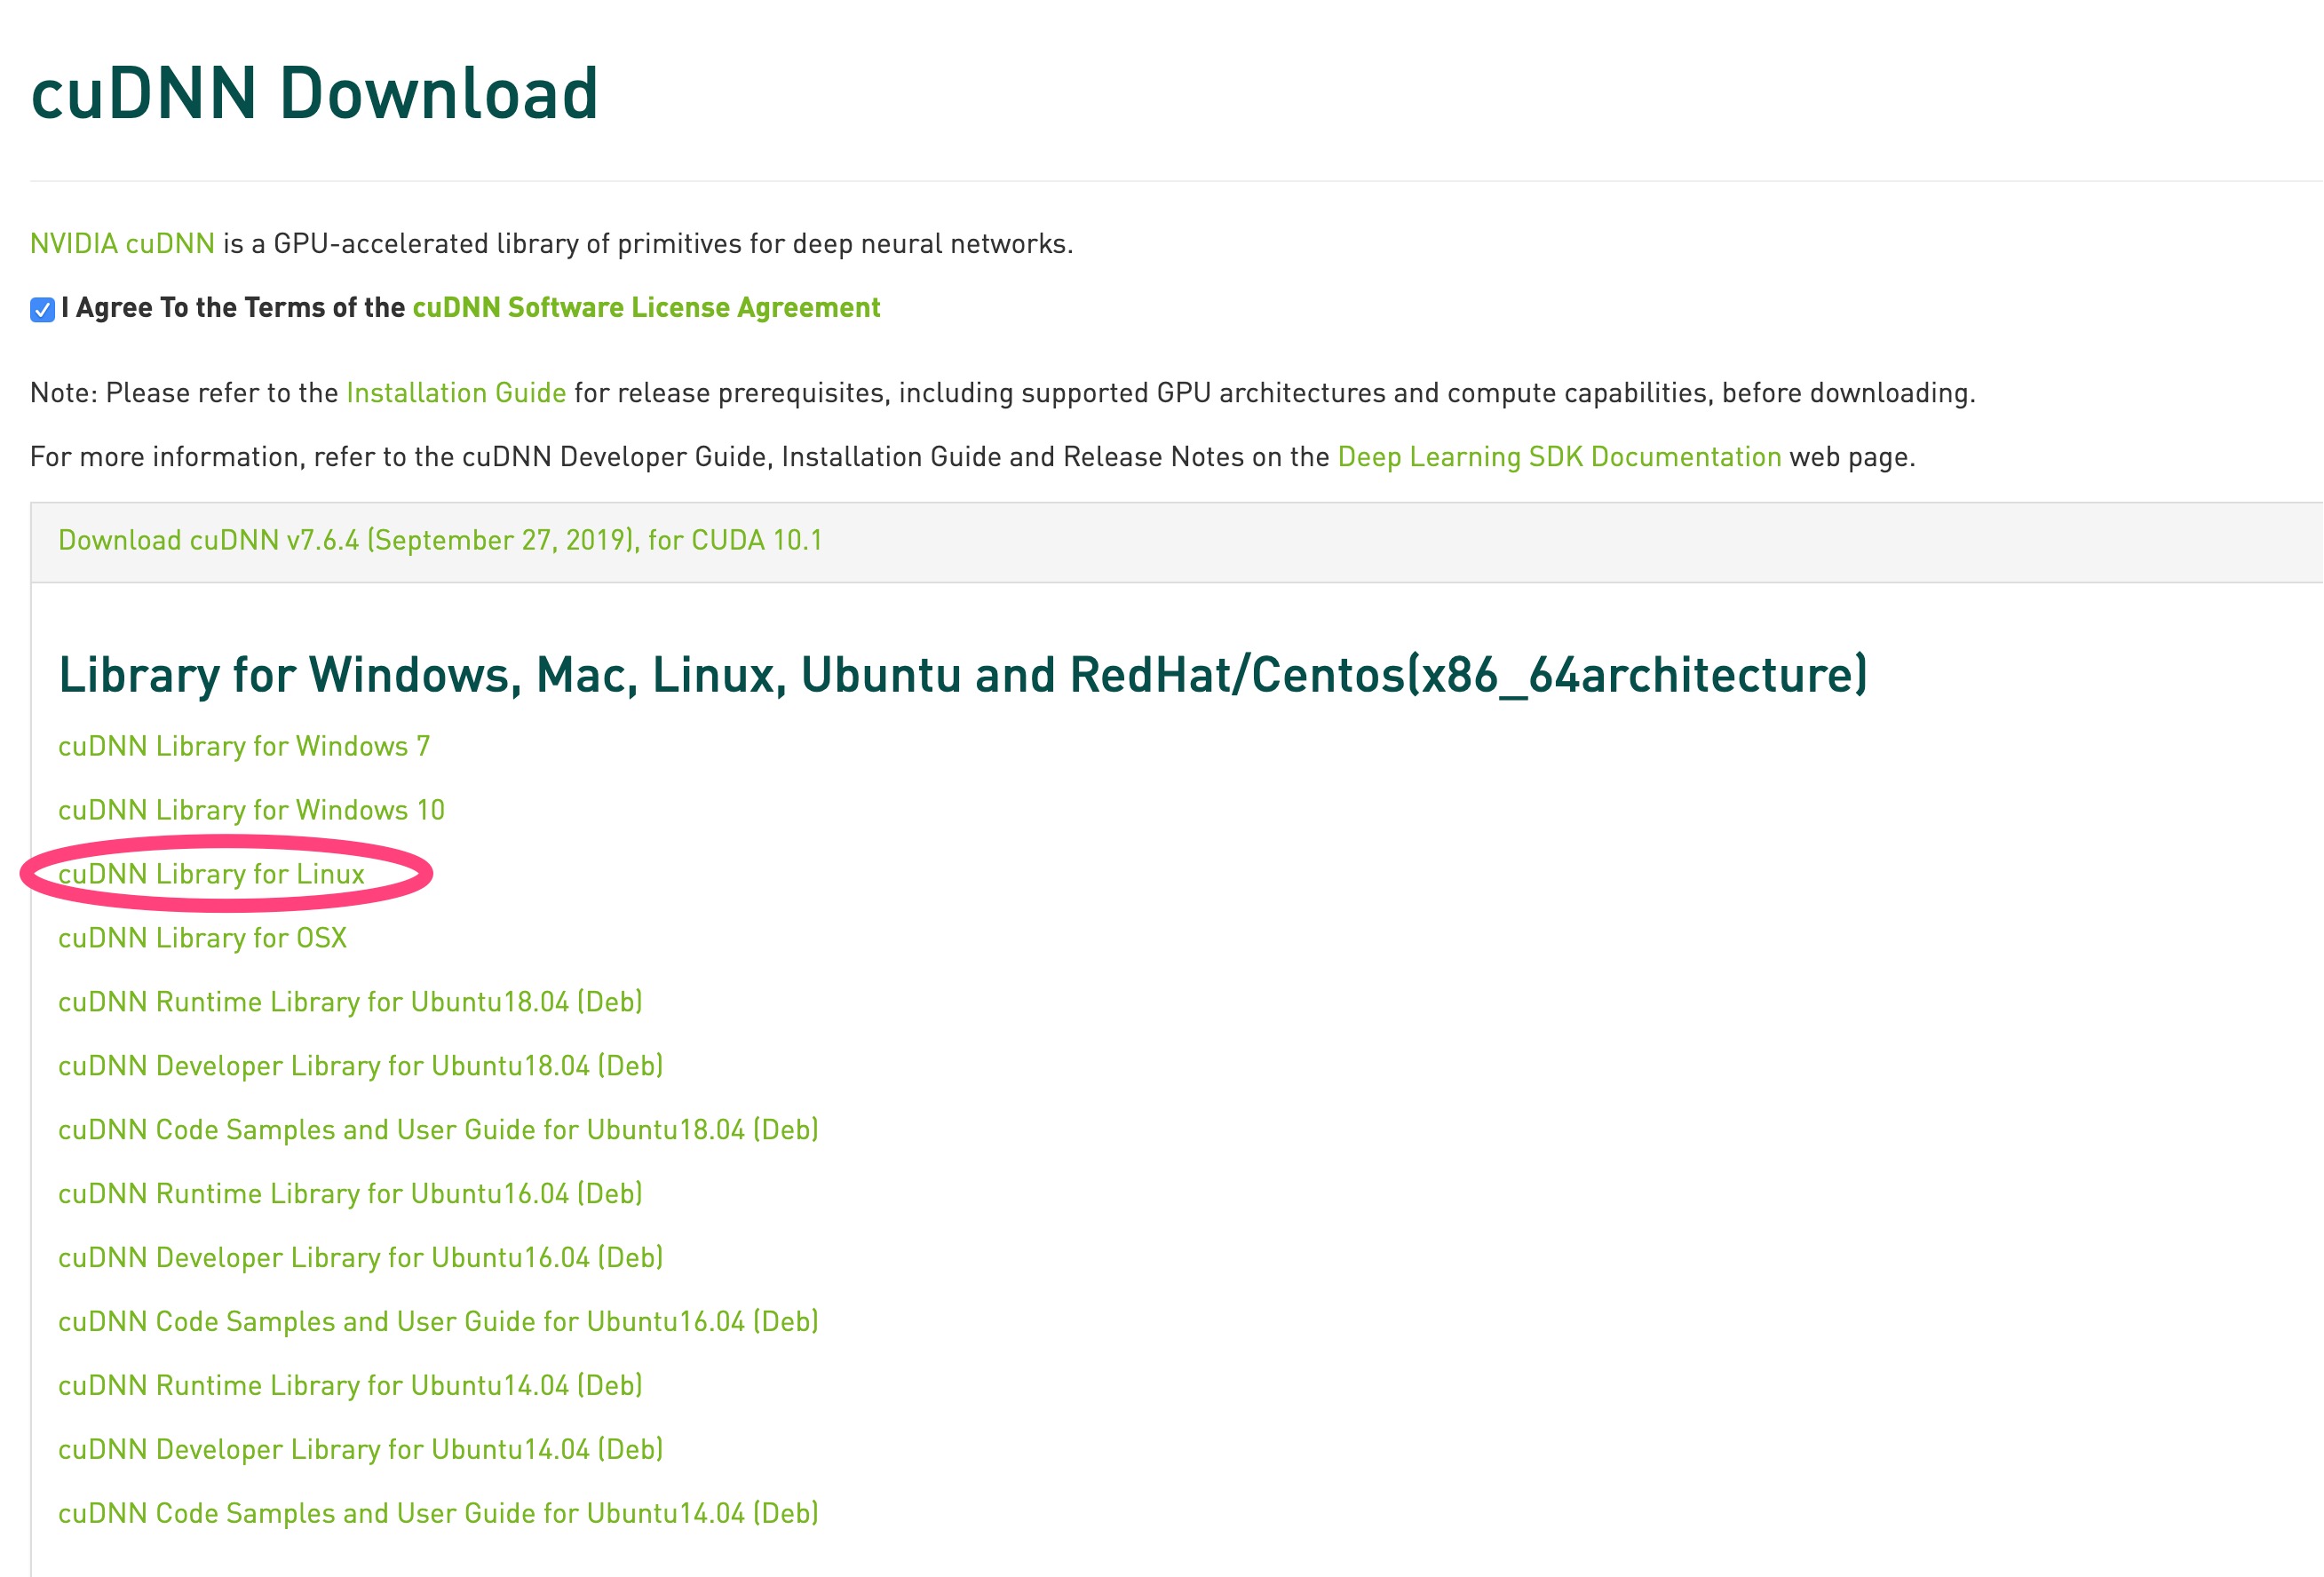
下载 cuDNN 7.6
需要登陆账号才能下载,选择使用QQ登陆就好了
下载地址 https://developer.nvidia.com/rdp/cudnn-download
选择 cuDNN Library for Linux 下载即可,如图所示
tar xvf cudnn-*.tgz
cd cuda
sudo cp include/* /usr/local/cuda/include/
sudo cp lib64/libcudnn.so.7.6.4 lib64/libcudnn_static.a /usr/local/cuda/lib64/
cd /usr/lib/x86_64-linux-gnu
sudo ln -s libcudnn.so.7.6.4 libcudnn.so.7
sudo ln -s libcudnn.so.7 libcudnn.so
配置环境变量
配置到 ~/.bashrc 或 /etc/profile 都可以
sudo vim /etc/profile , 加入以下内容
export LD_LIBRARY_PATH="$LD_LIBRARY_PATH:/usr/local/cuda/lib64:/usr/local/cuda/extras/CUPTI/lib64"
export CUDA_HOME=/usr/local/cuda
export PATH="$CUDA_HOME/bin:$PATH"
安装 NCCL 2.4.8
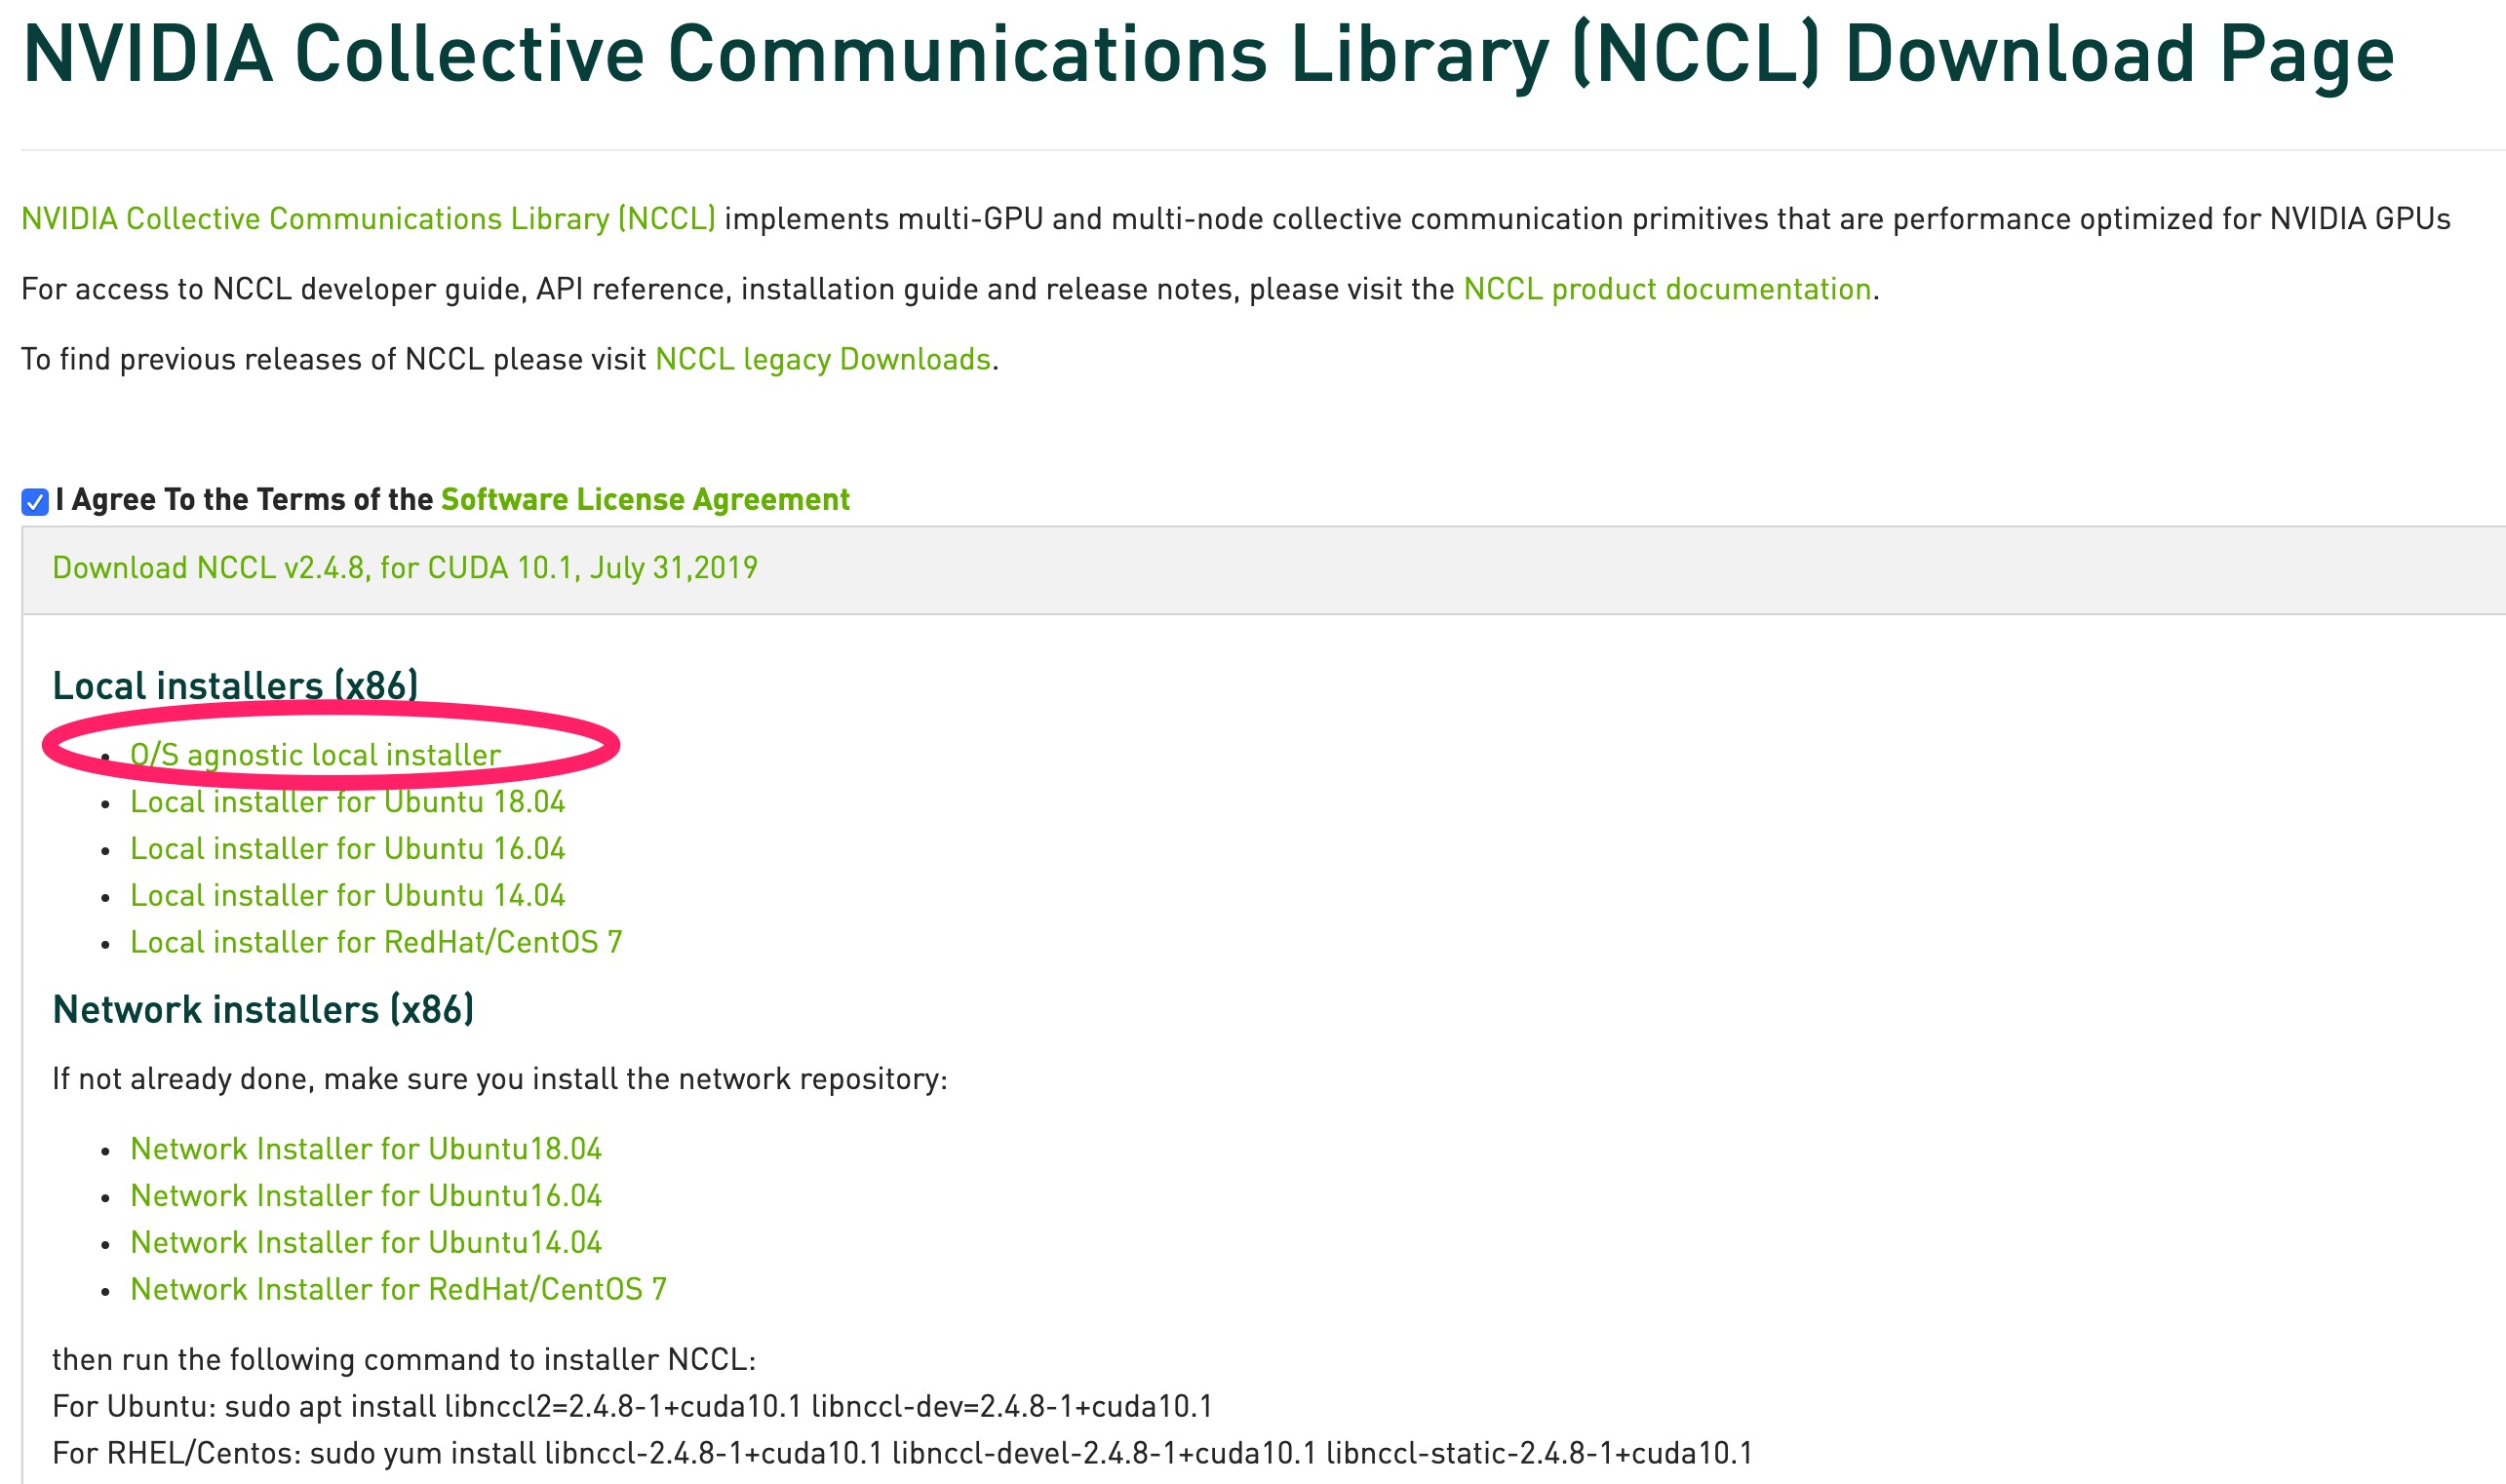
下载 NCCL 2.4.8
https://developer.nvidia.com/nccl/nccl-download
tar xvf nccl_2.4.8-1+cuda10.1_x86_64.txz
cd nccl_2.4.8-1+cuda10.1_x86_64
sudo mkdir -p /usr/local/cuda/nccl/lib /usr/local/cuda/nccl/include
sudo cp *.txt /usr/local/cuda/nccl
sudo cp include/*.h /usr/include/
sudo cp lib/libnccl.so.2.4.8 lib/libnccl_static.a /usr/lib/x86_64-linux-gnu/
sudo ln -s /usr/include/nccl.h /usr/local/cuda/nccl/include/nccl.h
cd /usr/lib/x86_64-linux-gnu
sudo ln -s libnccl.so.2.4.8 libnccl.so.2
sudo ln -s libnccl.so.2 libnccl.so
for i in libnccl*; do sudo ln -s /usr/lib/x86_64-linux-gnu/$i /usr/local/cuda/nccl/lib/$i; done
如果不需要手动编译 tensorflow, JDK, Babel无需安装
安装JDK8
sudo apt install openjdk-8-jdk
安装babel 0.26.1
babel 版本不能高于 0.26.1,否则会提示
Please downgrade your bazel installation to version 0.26.1 or lower to build TensorFlow! To downgrade: download the installer for the old version (from https://github.com/bazelbuild/bazel/releases) then run the installer.
下载 babel 0.26.1
https://github.com/bazelbuild/bazel/releases/download/0.26.1/bazel-0.26.1-installer-linux-x86_64.sh
安装 babel 0.26.1
bazel 安装的时候不能放在中文文件夹下
sudo chmod 755 ./bazel-0.26.1-installer-linux-x86_64.sh
 ./bazel-0.26.1-installer-linux-x86_64.sh --user
配置环境变量
- 编辑脚本
sudo vim ~/.bashrc - 追加以下内容:
export PATH="$PATH:$HOME/bin" #放在文件末尾
- 使配置生效
source ~/.bashrc
检测babel 安装成功
bazel version
出现以下内容就算成功
WARNING: --batch mode is deprecated. Please instead explicitly shut down your Bazel server using the command "bazel shutdown".
Build label: 0.26.1 Build target: bazel-out/k8-opt/bin/src/main/java/com/google/devtools/build/lib/bazel/BazelServer_deploy.jar Build time: Thu Jun 6 11:05:05 2019 (1559819105) Build timestamp: 1559819105 Build timestamp as int: 1559819105
编译安装 tensorflow 2.0
不建议手动编译pip包, 因为国内的网络问题, download github 文件时基本会失败
下载 tensorflow 2.0
https://github.com/tensorflow/tensorflow/archive/r2.0.zip
你可能还需要安装解压 zip 文件的软件, 执行该命令安装
sudo apt install unzip
unzip  tensorflow-r2.0.zip
cd tensorflow-r2.0
configure
WARNING: --batch mode is deprecated. Please instead explicitly shut down your Bazel server using the command "bazel shutdown".
You have bazel 0.26.1 installed.
Please specify the location of python. [Default is /usr/bin/python]: /usr/local/bin/python3

Found possible Python library paths:
  /usr/local/lib/python3.8/site-packages
Please input the desired Python library path to use.  Default is [/usr/local/lib/python3.8/site-packages]

Do you wish to build TensorFlow with XLA JIT support? [Y/n]:
XLA JIT support will be enabled for TensorFlow.

Do you wish to build TensorFlow with OpenCL SYCL support? [y/N]:
No OpenCL SYCL support will be enabled for TensorFlow.

Do you wish to build TensorFlow with ROCm support? [y/N]:
No ROCm support will be enabled for TensorFlow.

Do you wish to build TensorFlow with CUDA support? [y/N]: y
CUDA support will be enabled for TensorFlow.

Do you wish to build TensorFlow with TensorRT support? [y/N]:
No TensorRT support will be enabled for TensorFlow.

Found CUDA 10.1 in:
    /usr/local/cuda/lib64
    /usr/local/cuda/include
Found cuDNN 7 in:
    /usr/local/cuda/lib64
    /usr/local/cuda/include


Please specify a list of comma-separated CUDA compute capabilities you want to build with.
You can find the compute capability of your device at: https://developer.nvidia.com/cuda-gpus.
Please note that each additional compute capability significantly increases your build time and binary size, and that TensorFlow only supports compute capabilities >= 3.5 [Default is: 3.5,7.0]: 7.5


Do you want to use clang as CUDA compiler? [y/N]:
nvcc will be used as CUDA compiler.

Please specify which gcc should be used by nvcc as the host compiler. [Default is /usr/bin/gcc]:


Do you wish to build TensorFlow with MPI support? [y/N]:
No MPI support will be enabled for TensorFlow.

Please specify optimization flags to use during compilation when bazel option "--config=opt" is specified [Default is -march=native -Wno-sign-compare]:


Would you like to interactively configure ./WORKSPACE for Android builds? [y/N]:
Not configuring the WORKSPACE for Android builds.

Preconfigured Bazel build configs. You can use any of the below by adding "--config=<>" to your build command. See .bazelrc for more details.
        --config=mkl            # Build with MKL support.
        --config=monolithic     # Config for mostly static monolithic build.
        --config=gdr            # Build with GDR support.
        --config=verbs          # Build with libverbs support.
        --config=ngraph         # Build with Intel nGraph support.
        --config=numa           # Build with NUMA support.
        --config=dynamic_kernels        # (Experimental) Build kernels into separate shared objects.
        --config=v2             # Build TensorFlow 2.x instead of 1.x.
Preconfigured Bazel build configs to DISABLE default on features:
        --config=noaws          # Disable AWS S3 filesystem support.
        --config=nogcp          # Disable GCP support.
        --config=nohdfs         # Disable HDFS support.
        --config=noignite       # Disable Apache Ignite support.
        --config=nokafka        # Disable Apache Kafka support.
        --config=nonccl         # Disable NVIDIA NCCL support.
Configuration finished
手动编译 pip 包
bazel build --config=opt --config=cuda --config=v2 //tensorflow/tools/pip_package:build_pip_package
pip 安装 tensorflow-gpu
截止本文发表日期时, tensorflow2.0 尚不支持GPU版本
pip3 instal tensorflow-gpu
pip 安装 pytorch
pip3 install torch torchvision
GPU版本tensorflow pytorch 安装完毕
Recommend
About Joyk
Aggregate valuable and interesting links.
Joyk means Joy of geeK