

深入学习定时器
source link: http://www.alloyteam.com/2021/03/15389/
Go to the source link to view the article. You can view the picture content, updated content and better typesetting reading experience. If the link is broken, please click the button below to view the snapshot at that time.
或许在生活中大家都讨厌定时器,比如周一早上的闹钟、承诺老板第二天一早给报告的 deadline;但是在代码的世界里,定时器扮演着不可或缺的角色:定时任务、超时判断、帧同步等等。
那定时器的本质是什么?我们使用的定时能力背后又暗藏着什么玄机,请继续往下看。
注意:由于博客系统问题导致排版有点异常,接受不了的可以看 https://github.com/vorshen/blog/blob/master/timer/index.md
定时能力需要什么
信号
POSIX Timer
多路复用
定时能力需要什么
javascript 的定时器能力应该是使用最为方便,默认的上下文捕获,函数式编程。
我们可以把 setTimeout 的执行,拆解一下,主要是以下的流程。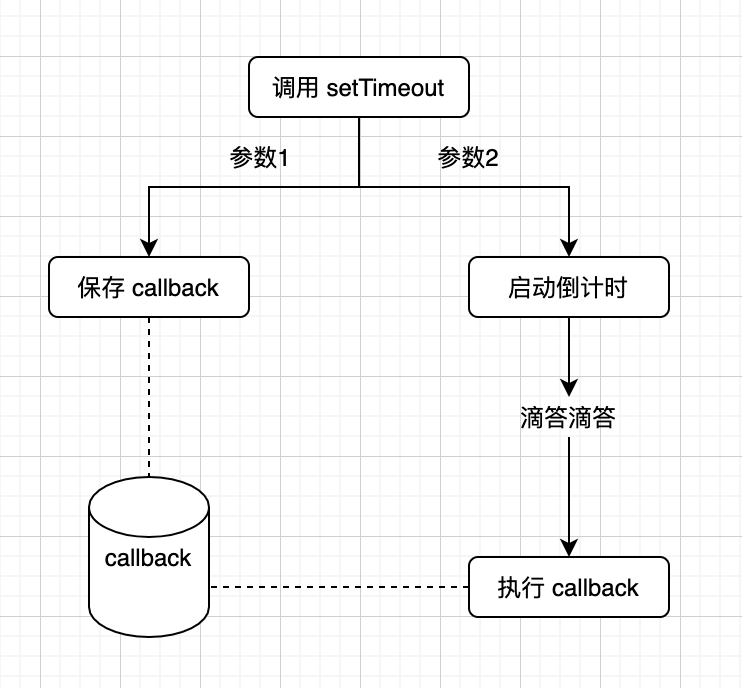
主要有三个环节:
- 存放 callback
- 启动一个倒计时
- 倒计时结束,取出存好的 callback,RUN!
BTW: JS 中定时器这么方便,不仅仅是 v8 的功劳,还需要执行环境 (eg: chrome、node) 给予支持。如果用 d8 去调试,会发现 setTimeout 并没有定时执行。
核心需要解决 1,2 两个问题,先看存放 callback,这里总结一下存放的特点:
- 上层设置定时任务的顺序是不确定的,而最终的执行是有顺序的,这里涉及到排序行为
- 设置定时器的动作可能是多次的
满足由上条件,我们可以使用一个小根堆的数据结构来存放 callback。
BTW: 也有一种时间轮的方案,libco 中采取时间轮方案。
那么该如何启动一个倒计时的钟摆呢?从编程语言层面是没有倒计时相关 api 的,还好操作系统内核给了我们一些解决方案。
BTW: 就好比说到 Linux 上定时任务,大家基本上都会想到 crontab,这也是内核给我们的能力的一种表现。
内核中具体的时钟能力如何实现,不是我们的重点,这会涉及到 CPU 时钟中断,再底层还有硬件相关,感兴趣的同学可以自行查阅。我们重点放在代码中如何去使用操作系统提供的时钟能力。
对于程序来说,我们的诉求就是设定了一个时间,当该时间到达(可以理解为超时),内核可以通知到应用程序。那么有哪些通知方式呢?
那么我们先看信号的方案,一说到信号,可能就会想到 alarm(sleep 走开),这里举个简单的 。
。
结果就不截图了,代码比较好理解,核心就是围绕 SIGALRM 的监听和触发。
不过这里有一些问题,我们一一来看下
Q1: 精度问题,秒为精度,这太草了,肯定不能接受
A1: 不过我们可以用其他函数代替,比如 setitimer (精度为毫秒)
Q2: 无法多次调用 alrm
A2: 我们需要包装一层,处理多次调用的情况。
不过上面两个个问题还算好解决,针对以上两个问题解法,这里有个改为 setitimer 优化版本,可见这里。
结果如下图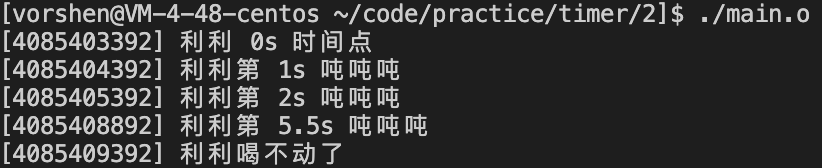
可以看到精度提高了,并且支持了多次调用。
但是别高兴的太早!问题还没有结束!
Q3: 多线程情况下怎么办?
A3: 信号在多线程下就是不灵活,一般做法需要用单独的线程去监听信号,其他线程屏蔽,写起来很麻烦。
Q4: 信号可靠性?无论是 alrm 还是 setitimer 都是发送非实时信号。
A4: ???这太致命了,虽然是概率性的,但是总有在机场等艘船的感觉。
总结一下: 使用信号整体问题较多,虽然我们尝试了一些解决方案,但是还是会存在无解的问题,所以这里也没有真实使用信号的例子。
POSIX
针对刚刚的 Q1 到 Q4,根本性在于 alrm 和 setitmer 都不够完善,为此 POSIX Timer 相关函数提供了解决方案。这一小节,我们主要看一下 POSIX Timer 相关函数,都是如何解决刚刚那些问题的。
-
精度问题
POSIX Timer 支持程度更高,支持到纳秒级别。 -
无法多次调用
一个进程可以多次创建 Timer,相互独立。#include <unistd.h>#include <stdio.h>#include <signal.h>#include <stdlib.h>#include <pthread.h>decltype(SIGRTMIN) SIG_DRINK = SIGRTMIN + 1;void drink(u_int32_t second) {struct sigevent evp;timer_t timer;evp.sigev_notify = SIGEV_SIGNAL;evp.sigev_value.sival_ptr = &timer;evp.sigev_signo = SIG_DRINK; // 自定义信号int ret = timer_create(CLOCK_REALTIME, &evp, &timer); // 创建定时器if (ret) {printf("timer_create error\n");struct itimerspec ts;ts.it_value.tv_sec = second / 1000;ts.it_value.tv_nsec = (second % 1000) * 1000;ts.it_interval.tv_sec = 0;ts.it_interval.tv_nsec = 0;ret = timer_settime(timer, CLOCK_REALTIME, &ts, nullptr); // 设置定时器if (ret) {printf("timer_settime error\n");int main(int argc, char* argv[]) {signal(SIG_DRINK, [](int sig) {printf("利利吨吨吨\n");drink(3000);drink(2000);drink(1000);while (1) {pause();return 0;可以看到这里并不需要自己去处理多次调用,直接走创建定时器,设置定时器的流程就行。
-
多线程
POSIX Timer 提供了默认能力,当定时器结束的时候,可以启动线程执行对应的函数。而且在 Linux 下,还扩展提供了往指定线程发送信号的能力。 -
信号可靠性
POSIX Timer 也可以指定信号,不过不再局限于非实时信号,可以选择实时信号, ️。
️。
针对 POSIX Timer 的调用,下面画了一张图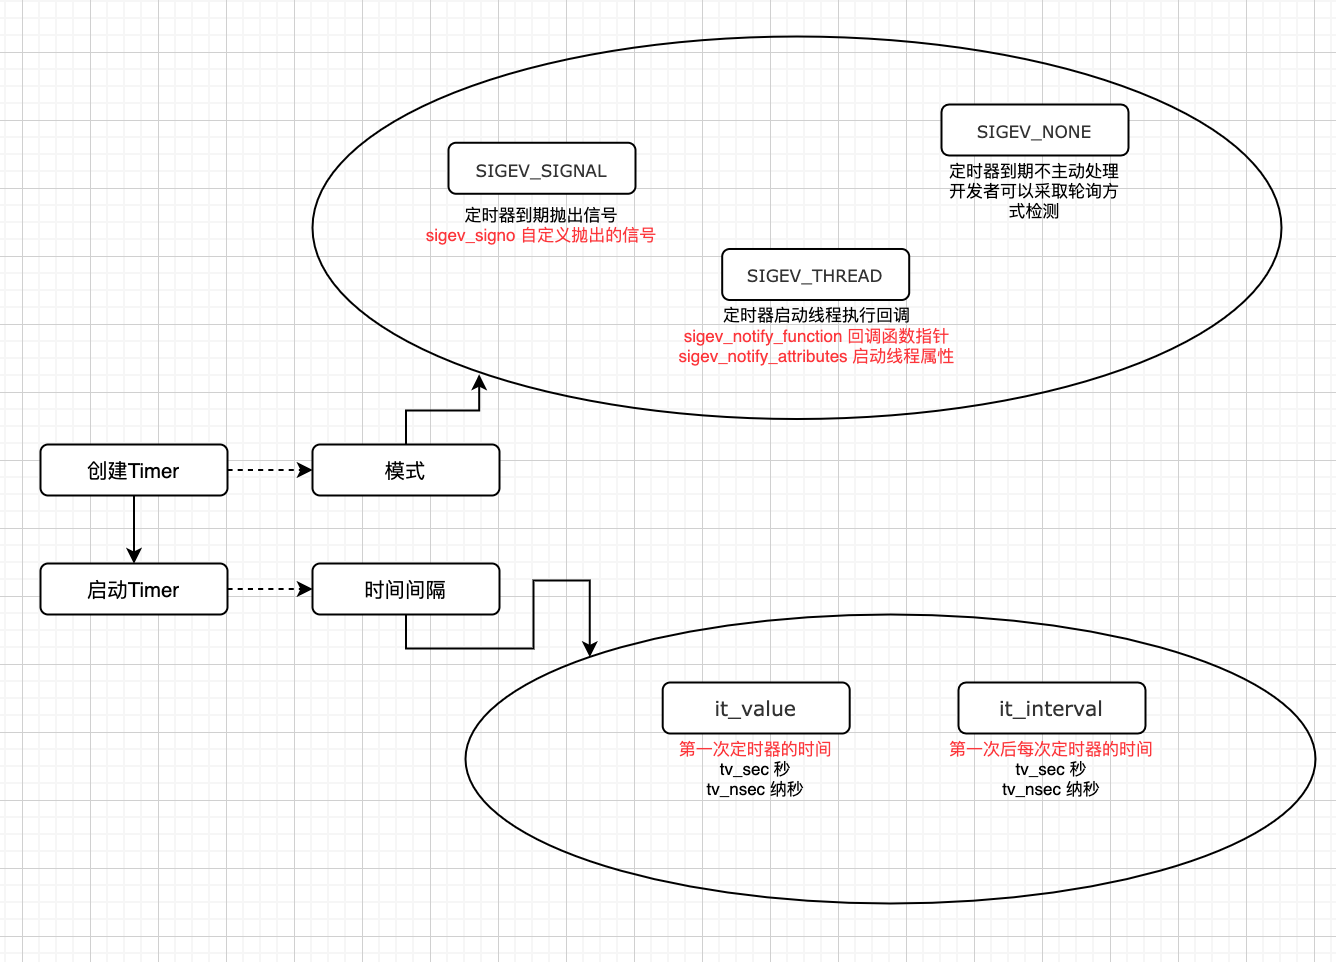
具体函数使用、结构等可以看官方文档,这里也给了一个简易封装的例子 posix 封装为 setTimeout。
BTW: 其实本质上 POSIX Timer 也是信号方案,可以观察进程信息中信号捕获。SIGEV_THREAD 模式下,会启动一个辅助线程,然后也是监听到 SIGTIMER 信号,再做后续处理,源码可见 https://code.woboq.org/userspace/glibc/sysdeps/unix/sysv/linux/timer_routines.c.html。
稍微总结一下,POSIX Timer 的方案,相比较之前已经完善了很多,不过还有一些缺点。
- 封装处理较为麻烦
- 必须依赖 librt
使用该方案的开源项目有 gperftools,核心的代码位置在 https://github.com/gperftools/gperftools/blob/master/src/profile-handler.cc#L282。
封装方式和上文中的例子差不多,只是模式不一样,这里就不详细讲解了。
多路复用本身是为了解决服务器针对多连接时的阻塞问题,不过 select/poll/epoll 都提供了超时时间,而这一特性可以让我们使用到定时器中。
以 boost 的 timer 为例,看如下代码
代码很好理解,我们看一下 boost 是如何实现一个同步的 timer.wait 能力的,顺着 deadline_timer_service 可以找到最后源码位置在 https://github.com/boostorg/asio/blob/develop/include/boost/asio/detail/impl/socket_ops.ipp#L2162,简单到无需多余讲解。
BTW: 并且这里只用超时能力,不用担心 select 本身在多路复用中的性能问题。
boost 中的异步定时器,也是采用了多路复用的方案,使用的是 epoll,其中用到了 timer_fd,先简单的说一下 timer_fd。
timer_fd 是 linux2.6.25 后增加的 api,算是官方形式将定时能力和 IO 事件结合了起来。
异步定时器相比较同步复杂很多,所以我们通过分析 boost 中异步定时器的源码来详细展开下。
先画个图: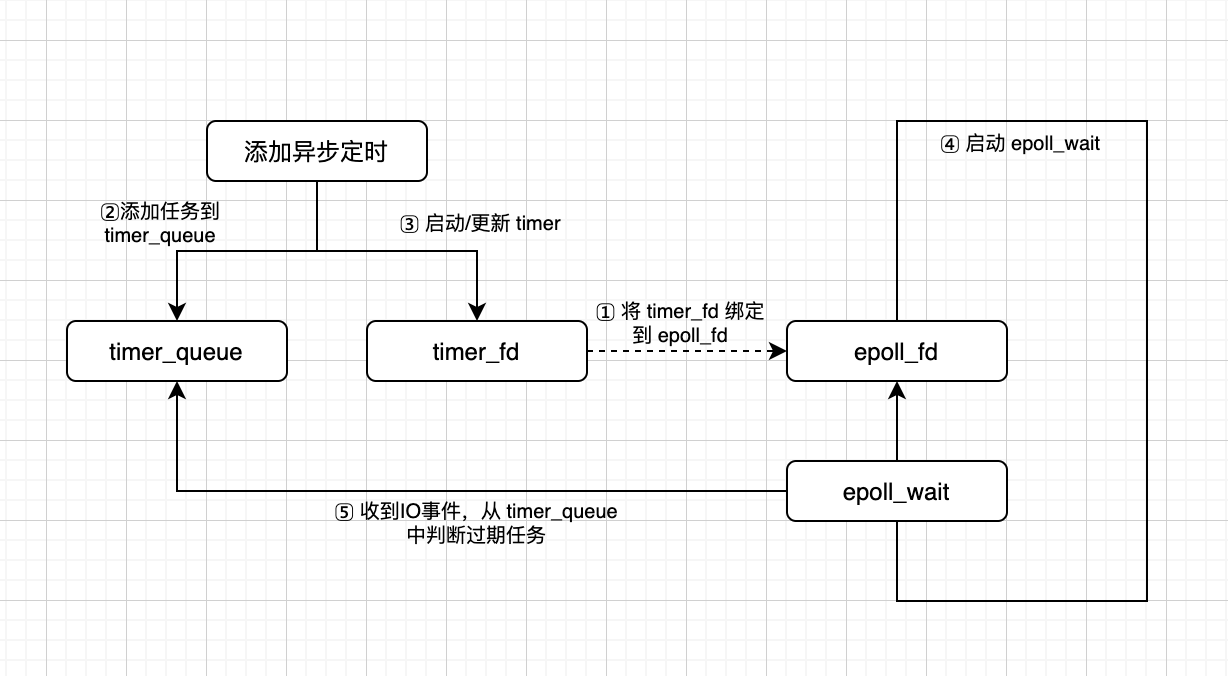
然后我们依次看一下。
-
将 timer_fd 绑定到 epoll_fd 上
epoll 使用一个文件描述符 (epoll_fd) 管理多个描述符 (例如这里的 timer_fd),这样在用户空间和内核空间的 copy 只需一次。
切记:这里 timer_fd 也需要进行复用,如果每次一个定时任务,都用一个新的 timer_fd,会有严重的性能浪费。// epoll_reactor.ippepoll_reactor::epoll_reactor(boost::asio::execution_context& ctx): execution_context_service_base<epoll_reactor>(ctx),scheduler_(use_service<scheduler>(ctx)),mutex_(BOOST_ASIO_CONCURRENCY_HINT_IS_LOCKING(REACTOR_REGISTRATION, scheduler_.concurrency_hint())),interrupter_(),epoll_fd_(do_epoll_create()), // 创建了 epoll_fd(epoll_create)timer_fd_(do_timerfd_create()), //创建了 timer_fdshutdown_(false),registered_descriptors_mutex_(mutex_.enabled())// Add the interrupter's descriptor to epoll.epoll_event ev = { 0, { 0 } };ev.events = EPOLLIN | EPOLLERR | EPOLLET;ev.data.ptr = &interrupter_;epoll_ctl(epoll_fd_, EPOLL_CTL_ADD, interrupter_.read_descriptor(), &ev);interrupter_.interrupt();// Add the timer descriptor to epoll.if (timer_fd_ != -1)ev.events = EPOLLIN | EPOLLERR;ev.data.ptr = &timer_fd_;epoll_ctl(epoll_fd_, EPOLL_CTL_ADD, timer_fd_, &ev); //关联 timer_fd 与 epoll_fd
整体较好理解,几个重要的点增加了注释
-
添加任务到 timer_queue
// timer_queue.hpp// Add a new timer to the queue. Returns true if this is the timer that is// earliest in the queue, in which case the reactor's event demultiplexing// function call may need to be interrupted and restarted.bool enqueue_timer(const time_type& time, per_timer_data& timer, wait_op* op)// Enqueue the timer object.// Enqueue the individual timer operation.timer.op_queue_.push(op);// Interrupt reactor only if newly added timer is first to expire.return timer.heap_index_ == 0 && timer.op_queue_.front() == op;// The heap of timers, with the earliest timer at the front.std::vector<heap_entry> heap_;enqueue_timer 里面大部分代码我省略掉了,也就是在维护一个小根堆,让最近的定时任务在前面,这样可以方便第三步启动和更新 timerfd。
BTW: 这里小根堆并不是像我们之前 demo 用了 priority_queue 方式,而是每次 push_back 会去 swap 修改 vector。 -
启动/更新 timerfd
结合上一节的代码,当 enqueue_timer 返回 true 的时候,就会去更新/启动定时器。// epoll_reactor.hppbool earliest = queue.enqueue_timer(time, timer, op);// ...if (earliest)update_timeout(); //更新定时器///////////////// epoll_reactor.ippvoid epoll_reactor::update_timeout()#if defined(BOOST_ASIO_HAS_TIMERFD)if (timer_fd_ != -1)itimerspec new_timeout;itimerspec old_timeout;int flags = get_timeout(new_timeout);timerfd_settime(timer_fd_, flags, &new_timeout, &old_timeout); //设置 timerfdreturn;#endif // defined(BOOST_ASIO_HAS_TIMERFD)interrupt();注意:如果不支持 timerfd,则会直接调用 epoll_ctl。
-
启动 epoll_wait
-
收到 IO 事件,从 timer_queue 中判断过期任务
这两步的代码位置太过相近,就放一起来说了。
核心check_timers 为 true 意味着需要检测定时器队列获取已经完成状态的事件并执行继续设置定时器重点的就是有标志的代码。
timer_queues 里面发现的过期事件会添加到 op_queue 里面去,如下:
op_queue 会在 scheduler.ipp 内进行执行。
以上就是 boost 中的异步定时器执行分解,感兴趣的同学也可以自己下源码来学习。
BTW: libevent 中定时任务做法与 boost 基本一致,chromium 底层的 message_pump 也有使用 libevent。
我们了解到需要实现一个定时器/定时任务,重点需要两块:
- 存放执行回调的地方
大部分选择是小根堆的方案,简单方便;也有时间轮的方案。 - 调用操作系统提供的定时能力
我们分析了「信号」「POSIX Timer」「多路复用」,信号 pass,后二者中更推荐多路复用一些。
分析了 boost asio 的源码,学习了多路复用能力用在定时方面的解决办法。
如果你还想了解的更多,可以学习 libevent、libco、chromium 中定时器方面采取的方案。
欢迎一起讨论研究~
Recommend
About Joyk
Aggregate valuable and interesting links.
Joyk means Joy of geeK