

YOLOv5目标检测
source link: https://xugaoxiang.com/2020/06/17/yolov5/
Go to the source link to view the article. You can view the picture content, updated content and better typesetting reading experience. If the link is broken, please click the button below to view the snapshot at that time.
软硬件环境
视频看这里
此处是youtube的播放链接,需要科学上网。喜欢我的视频,请记得订阅我的频道,打开旁边的小铃铛,点赞并分享,感谢您的支持。
YOLOv4还没有退热,YOLOv5就已经来了!
6月9日,Ultralytics公司开源了YOLOv5,离上一次YOLOv4发布不到50天,不过这一次的YOLOv5是基于PyTorch实现的,而不是之前版本的darknet!
根据官方给出的数字,YOLOv5的速度最快可以达到每秒140帧(FPS),但是权重文件只有YOLOv4的1/9,而且准确度更高。本次的发布的YOLOv5并不是一个单独的模型,而是一个模型家族,包括了YOLOv5s、YOLOv5m、YOLOv5l、YOLOv5x,要求Python 3.7和PyTorch 1.5以上版本。
关于YOLOv5这个版本,大家可以看看知乎中的讨论,链接放在文末的参考资料中
安装GPU环境
请参考之前的文章
安装pytorch的GPU版本
来到官网 https://pytorch.org/get-started/locally/,根据自己的环境,进行选择,网站会给出相应的安装命令。我这里的环境是linux、pip、cuda 10.1
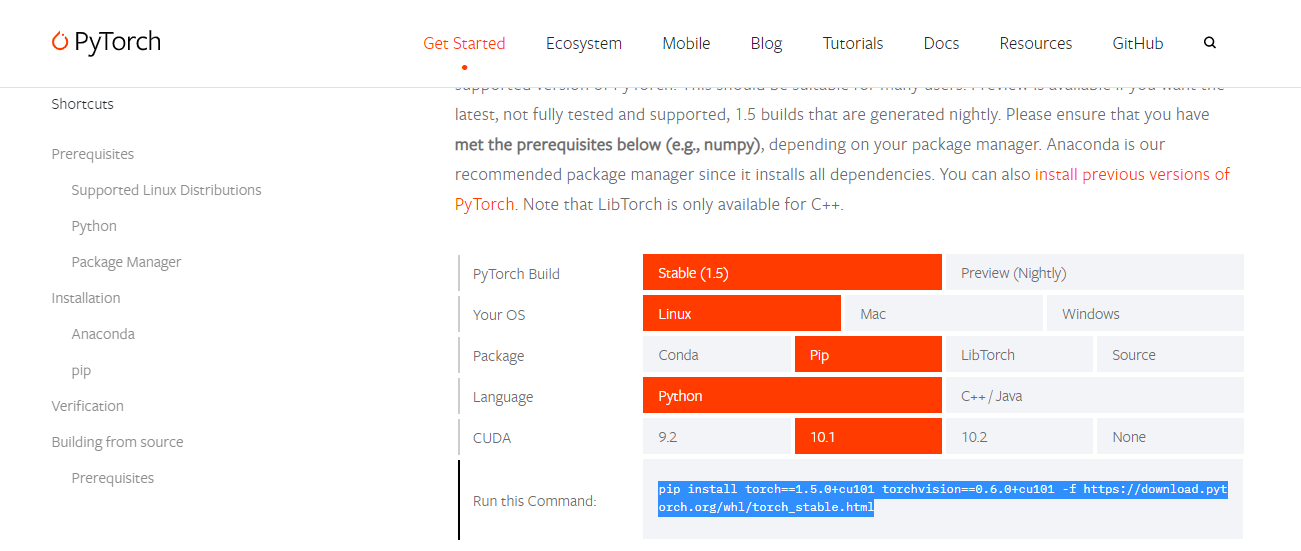
conda create -n pytorch python=3.7
conda activate pytorch
pip install torch==1.5.0+cu101 torchvision==0.6.0+cu101 -f https://download.pytorch.org/whl/torch_stable.html
pip install ipython
安装完pytorch后,我们在ipython中查看安装的结果
(pytorch) xugaoxiang@1070Ti:~/Works/github/yolov5$ ipython
Python 3.7.7 (default, May  7 2020, 21:25:33)
Type 'copyright', 'credits' or 'license' for more information
IPython 7.15.0 -- An enhanced Interactive Python. Type '?' for help.

In [1]: import torch

In [2]: torch.cuda.is_available()
Out[2]: True
说明GPU版本的pytorch安装成功
YOLOv5测试
首先还是把源码clone到本地
git clone https://github.com/ultralytics/yolov5.git
pip install -U -r requirements.txt
权重文件可以通过以下方式下载
下载权重文件后将权重文件保存在weights文件夹下
下面就可以开始测试了
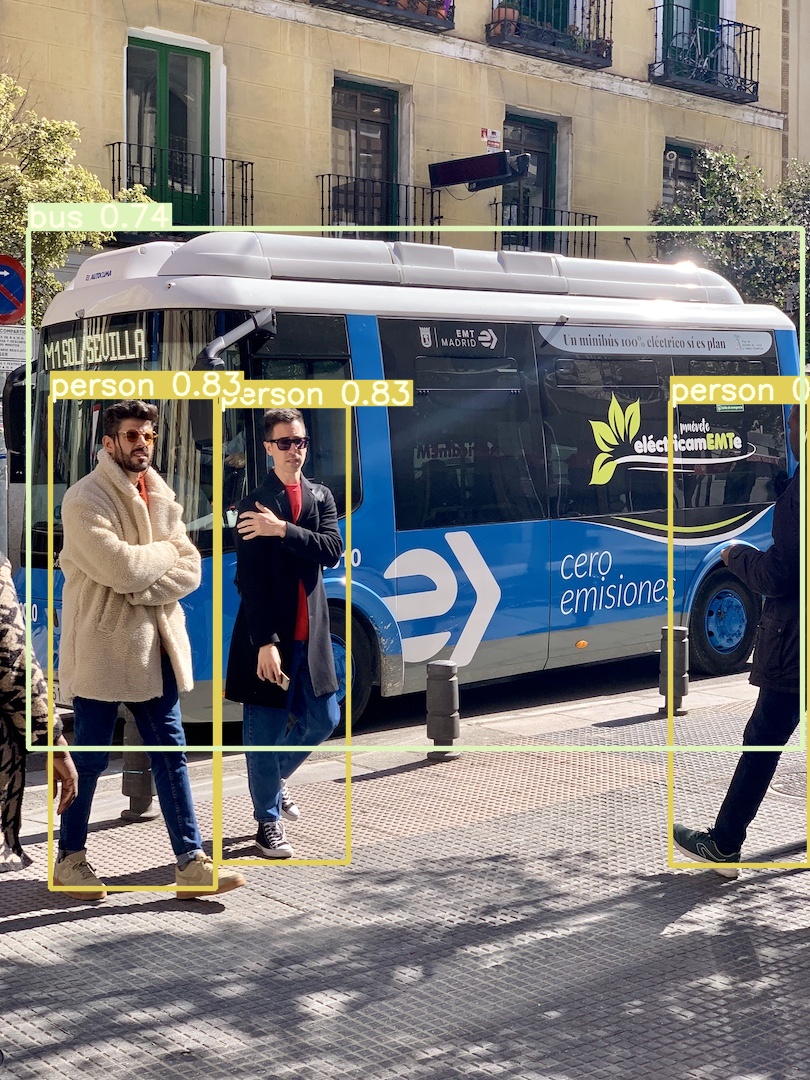
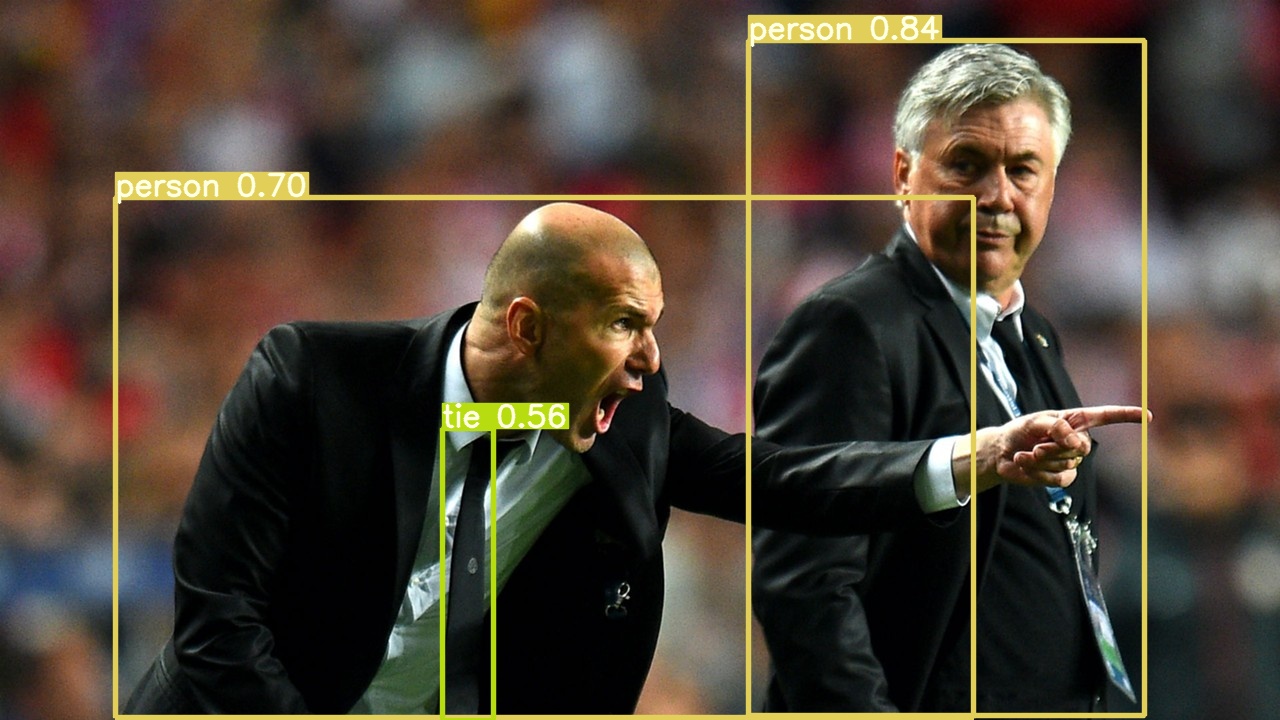
首先使用项目中自带的测试图片看看效果,命令是
python detect.py
默认情况下,脚本会去读取inference/images下的所有图片并进行目标检测,带有目标框的结果图片保存在inference/out下。如果是只检测某一张图片的话,可以执行命令python detect.py --source test.jpg
为了对比测试,我们把YOLO之前版本的测试图片也跑了一遍
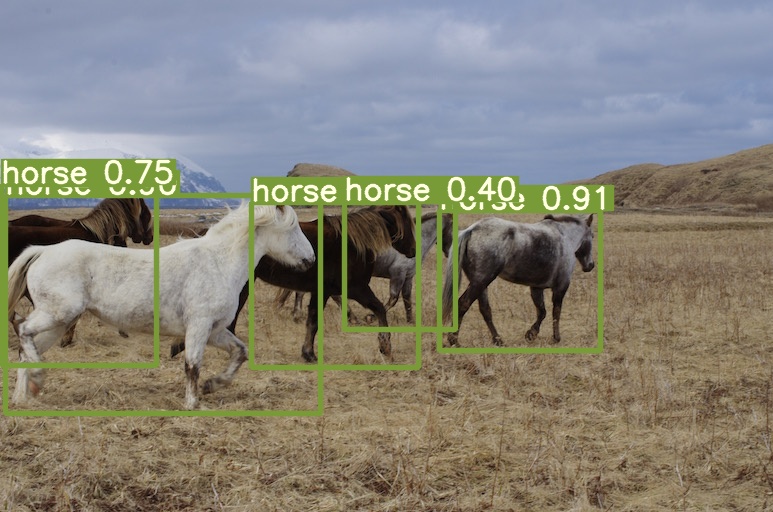
上图中马匹的检出率跟YOLOv4是一样的,满意
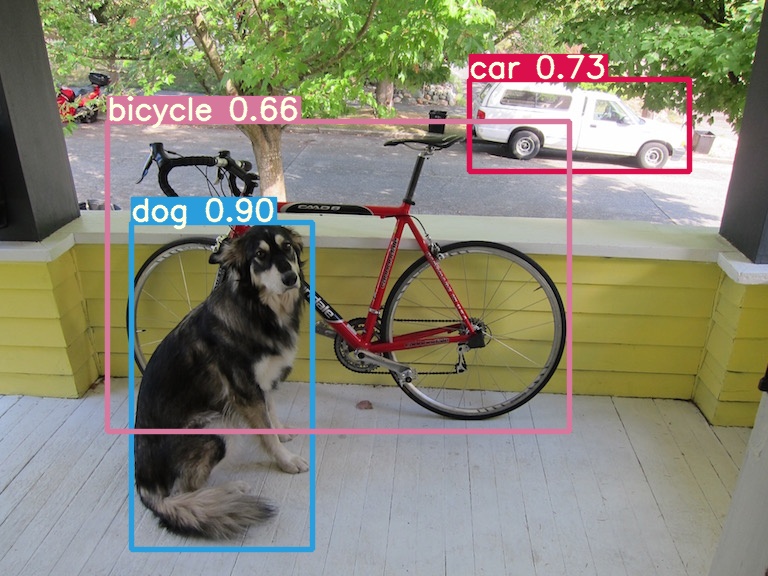
上图中右上角的垃圾桶没有被检出,这点不及YOLOv4
detect.py脚本同样支持视频的检测,包括本地摄像头、本地视频文件、m3u8播放地址和rtsp实时流,地址都是跟在参数--source后面
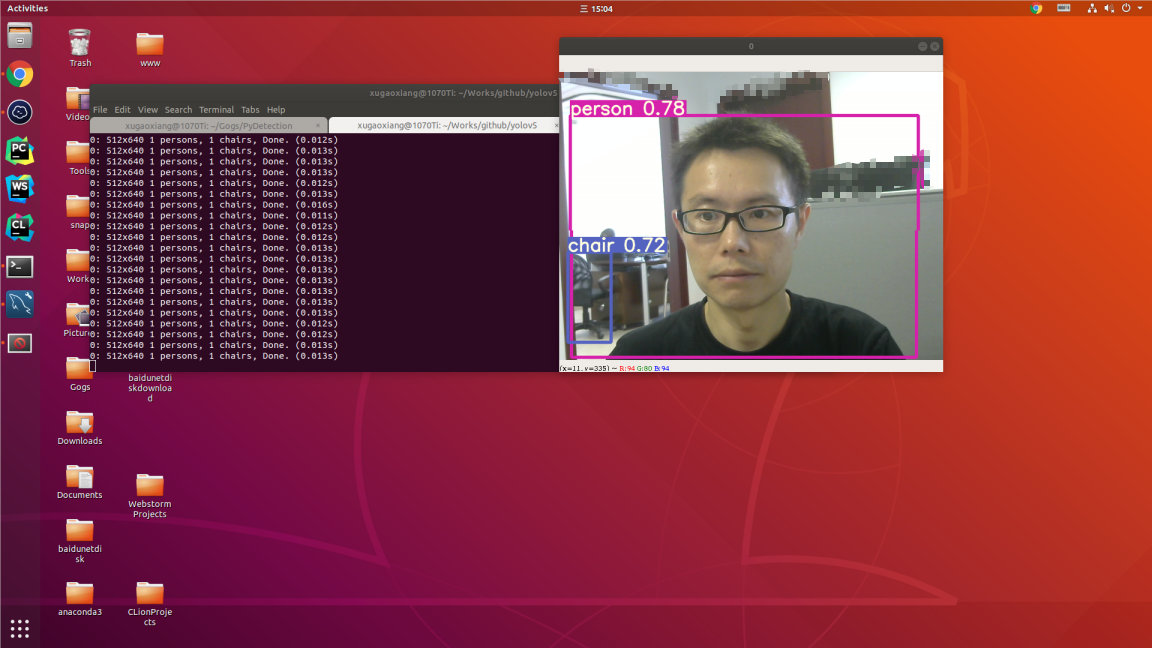
本地摄像头使用下面的命令
python detect.py --source 0
基于rtsp的网络摄像头使用下面的命令
python detect.py --source "rtsp://user:[email protected]:554/cam/realmonitor?channel=1&subtype=1"
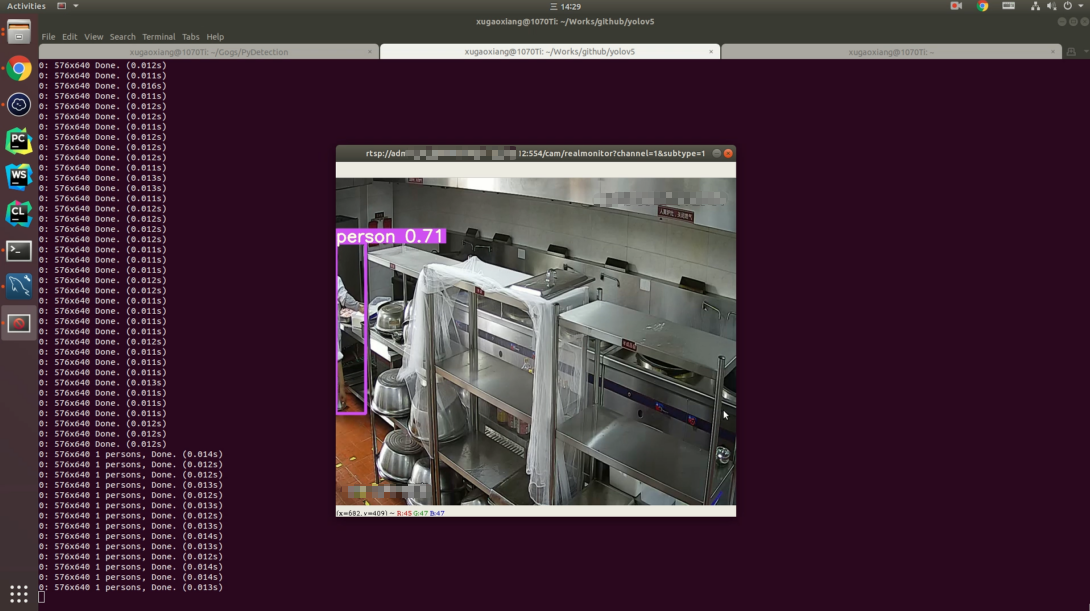
可以看到,使用1070Ti显卡,fps在80左右
如果你有多块显卡,可以选择具体使用哪块显示进行检测,0表示第一块,1表示第二块,cpu表示不使用gpu
python detect.py --device 0
detect.py中的参数很多,可以使用python detect.py -h进行查看
(base) xugaoxiang@1070Ti:~/Works/github/yolov5$ python detect.py -h
usage: detect.py [-h] [--weights WEIGHTS] [--source SOURCE] [--output OUTPUT]
                 [--img-size IMG_SIZE] [--conf-thres CONF_THRES]
                 [--iou-thres IOU_THRES] [--fourcc FOURCC] [--device DEVICE]
                 [--view-img] [--save-txt] [--classes CLASSES [CLASSES ...]]
                 [--agnostic-nms] [--augment]

optional arguments:
  -h, --help            show this help message and exit
  --weights WEIGHTS     model.pt path
  --source SOURCE       source
  --output OUTPUT       output folder
  --img-size IMG_SIZE   inference size (pixels)
  --conf-thres CONF_THRES
                        object confidence threshold
  --iou-thres IOU_THRES
                        IOU threshold for NMS
  --fourcc FOURCC       output video codec (verify ffmpeg support)
  --device DEVICE       cuda device, i.e. 0 or 0,1,2,3 or cpu
  --view-img            display results
  --save-txt            save results to *.txt
  --classes CLASSES [CLASSES ...]
                        filter by class
  --agnostic-nms        class-agnostic NMS
  --augment             augmented inference
以上测试都是基于yolov5s.pt权重文件,其它的权重请自行测试,指定--weights参数
v3.0版本
很多朋友反应,在执行python detect.py时出现下面的错误
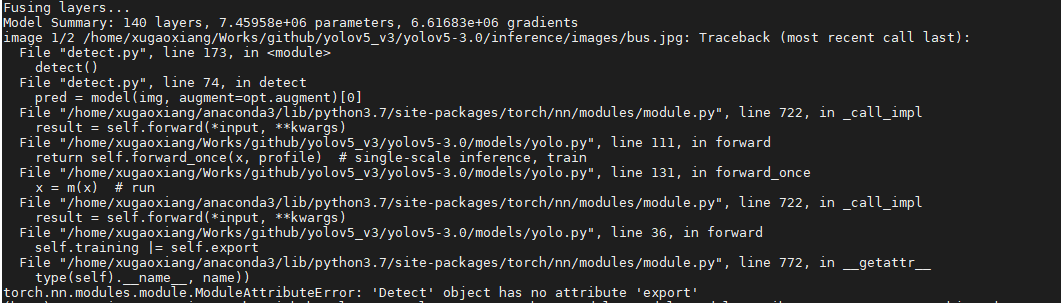
这个错误是由于YOLOv5源码与权重文件的不匹配引起的,升级到匹配的权重文件就好
Recommend
About Joyk
Aggregate valuable and interesting links.
Joyk means Joy of geeK