

Dubbo服务间的连接是怎么控制处理的?
source link: https://wangxin.io/2019/12/03/dubbo/dubbo-service-connection-count-control/
Go to the source link to view the article. You can view the picture content, updated content and better typesetting reading experience. If the link is broken, please click the button below to view the snapshot at that time.
Dubbo服务间的连接是怎么控制处理的?
最近被问到一个问题: 有依赖关系的两个dubbo服务。通过TCP进行连接时候,他们之间的连接是怎么控制的?怎么达到一个合理的数量?
我们从一个例子开始吧:一个订单服务 OrderService,IP为192.168.0.110 连接了商品服务 ProductService, ip 为192.168.0.111 ,其中订单服务中的方法比较多,并且很多请求也刚好路由到192.168.0.111的 ProductService 服务。那问题就来了:110机器作为客户端是怎么控制连接数的?会不会无限量地和111机器进行TCP连接?
我们先看一下Dubbo的官方文档对“连接控制”的说明文档 : http://dubbo.apache.org/zh-cn/docs/user/demos/config-connections.html 。
在xml配置方式中xml accepts="10" 和 connections="10" 分别在服务端和客户端进行了相应的连接控制。下面我们看一下源码,追一下连接控制的原理。
我们看一下DubboProtocol.java的创建客户端tcp连接的方法,int connectNum正是每个客户端对服务端的tcp连接数,默认是1,当然可以修改成更大。默认是1,这样一个客户端的调用service数最多也不会超过1000吧。这样就不会出现单机创建TCP连接数过多的问题。
/**
 * Bulk build client
 *
 * @param url
 * @param connectNum
 * @return
 */
private List<ReferenceCountExchangeClient> buildReferenceCountExchangeClientList(URL url, int connectNum) {
    List<ReferenceCountExchangeClient> clients = new ArrayList<>();

for (int i = 0; i < connectNum; i++) {
        clients.add(buildReferenceCountExchangeClient(url));
    }
    return clients;
}
客户端和服务端是一对一的,建立长连接,那么如果客户端并发访问,他们是怎么和服务端交互的呢?
经过看代码: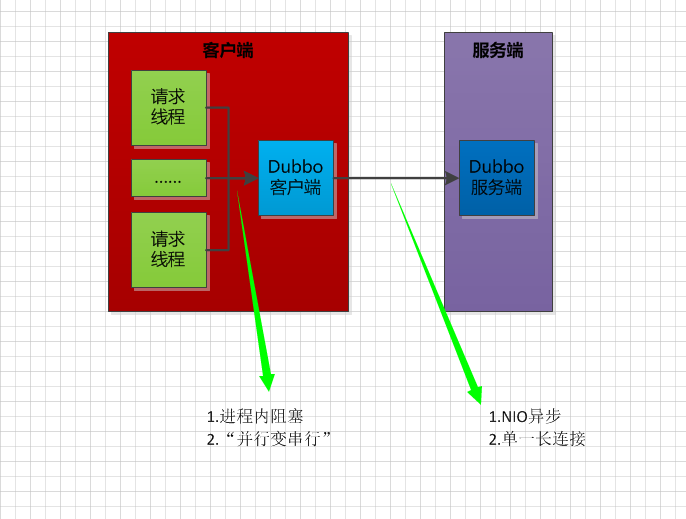
下面咱们试图从代码中找到痕迹。一路追踪,我们来到这个类:com.alibaba.dubbo.remoting.exchange.support.header.HeaderExchangeChannel.java,先来看看其中的request方法,大概在第101行左右:
  public ResponseFuture request(Object request, int timeout) throws RemotingException {
    if (closed) {
        throw new RemotingException(this.getLocalAddress(), null, "Failed to send request " + request + ", cause: The channel " + this + " is closed!");
    }
    // create request.
    Request req = new Request();
    req.setVersion("2.0.0");
    req.setTwoWay(true);
    req.setData(request);

//这个future就是前面我们提到的:客户端并发请求线程阻塞的对象
    DefaultFuture future = new DefaultFuture(channel, req, timeout);
    try{
        channel.send(req);  //非阻塞调用
    }catch (RemotingException e) {
        future.cancel();
        throw e;
    }
    return future;
}
注意这个方法返回的ResponseFuture对象,当前处理客户端请求的线程在经过一系列调用后,会拿到ResponseFuture对象,最终该线程会阻塞在这个对象的下面这个方法调用上,如下:
public Object get(int timeout) throws RemotingException {
    if (timeout <= 0) {
        timeout = Constants.DEFAULT_TIMEOUT;
    }
    if (! isDone()) {
        long start = System.currentTimeMillis();
        lock.lock();
        try {
            while (! isDone()) {    //无限连
                done.await(timeout, TimeUnit.MILLISECONDS);
                if (isDone() || System.currentTimeMillis() - start > timeout) {
                    break;
                }
            }
        } catch (InterruptedException e) {
            throw new RuntimeException(e);
        } finally {
            lock.unlock();
        }
        if (! isDone()) {
            throw new TimeoutException(sent > 0, channel, getTimeoutMessage(false));
        }
    }
    return returnFromResponse();
}
上面我已经看到请求线程已经阻塞,那么又是如何被唤醒的呢?再看一下com.alibaba.dubbo.remoting.exchange.support.header.HeaderExchangeHandler.java,其实所有实现了ChannelHandler接口的类都被设计为装饰器模式,所以你可以看到类似这样的代码:
  protected ChannelHandler wrapInternal(ChannelHandler handler, URL url) {
    return new MultiMessageHandler(
            new HeartbeatHandler(
                    ExtensionLoader.getExtensionLoader(Dispather.class).getAdaptiveExtension().dispath(handler, url)
            ));
}
现在来仔细看一下HeaderExchangeHandler类的定义,先看一下它定义的received方法,下面是代码片段:
public void received(Channel channel, Object message) throws RemotingException {
    channel.setAttribute(KEY_READ_TIMESTAMP, System.currentTimeMillis());
    ExchangeChannel exchangeChannel = HeaderExchangeChannel.getOrAddChannel(channel);
    try {
        if (message instanceof Request) {
          .....
        } else if (message instanceof Response) {
            //这里就是作为消费者的dubbo客户端在接收到响应后,触发通知对应等待线程的起点
            handleResponse(channel, (Response) message);
        } else if (message instanceof String) {
           .....
        } else {
            handler.received(exchangeChannel, message);
        }
    } finally {
        HeaderExchangeChannel.removeChannelIfDisconnected(channel);
    }
}
我们主要看中间的那个条件分支,它是用来处理响应消息的,也就是说当dubbo客户端接收到来自服务端的响应后会执行到这个分支,它简单的调用了handleResponse方法,我们追过去看看:
static void handleResponse(Channel channel, Response response) throws RemotingException {
    if (response != null && !response.isHeartbeat()) {  //排除心跳类型的响应
        DefaultFuture.received(channel, response);
    }
}
熟悉的身影:DefaultFuture,它是实现了我们上面说的ResponseFuture接口类型,实际上细心的童鞋应该可以看到,上面request方法中其实实例化的就是这个DefaultFutrue对象:
DefaultFuture future = new DefaultFuture(channel, req, timeout);
那么我们可以继续来看一下DefaultFuture.received方法的实现细节:
public static void received(Channel channel, Response response) {
    try {
        DefaultFuture future = FUTURES.remove(response.getId());
        if (future != null) {
            future.doReceived(response);
        } else {
            logger.warn("The timeout response finally returned at "
                        + (new SimpleDateFormat("yyyy-MM-dd HH:mm:ss.SSS").format(new Date()))
                        + ", response " + response
                        + (channel == null ? "" : ", channel: " + channel.getLocalAddress()
                            + " -> " + channel.getRemoteAddress()));
        }
    } finally {
        CHANNELS.remove(response.getId());
    }
}
留一下我们之前提到的id的作用,这里可以看到它已经开始发挥作用了。通过id,DefaultFuture.FUTURES可以拿到具体的那个DefaultFuture对象,它就是上面我们提到的,阻塞请求线程的那个对象。好,找到目标后,调用它的doReceived方法,这就是标准的java多线程编程知识了:
private void doReceived(Response res) {
    lock.lock();
    try {
        response = res;
        if (done != null) {
            done.signal();
        }
    } finally {
        lock.unlock();
    }
    if (callback != null) {
        invokeCallback(callback);
    }
}
这样我们就可以证实上图中左边的绿色箭头所标注的两点。
参考链接:https://blog.csdn.net/joeyon1985/article/details/51046548
Recommend
About Joyk
Aggregate valuable and interesting links.
Joyk means Joy of geeK