
鸿蒙开源第三方组件——连续滚动图像组件
source link: https://my.oschina.net/u/4857646/blog/5035461
Go to the source link to view the article. You can view the picture content, updated content and better typesetting reading experience. If the link is broken, please click the button below to view the snapshot at that time.
目录:
前言
基于安卓平台的连续滚动图像组件ContinuousScrollableImageView(https://github.com/Cutta/ContinuousScrollableImageView),实现了鸿蒙化迁移和重构,代码已经开源到(https://gitee.com/isrc_ohos/continuous-scrollable-image-view_ohos),欢迎各位开发者下载使用并提出宝贵意见!
背景
ContinuousScrollableImageView_ohos组件通过让图像连续滚动,来实现动画效果。组件支持对图像的滚动效果进行设置,包括:图像源、缩放类型、持续时间和方向等。该组件提供动态的视觉效果,可以用来开发应用的背景等。
组件效果展示
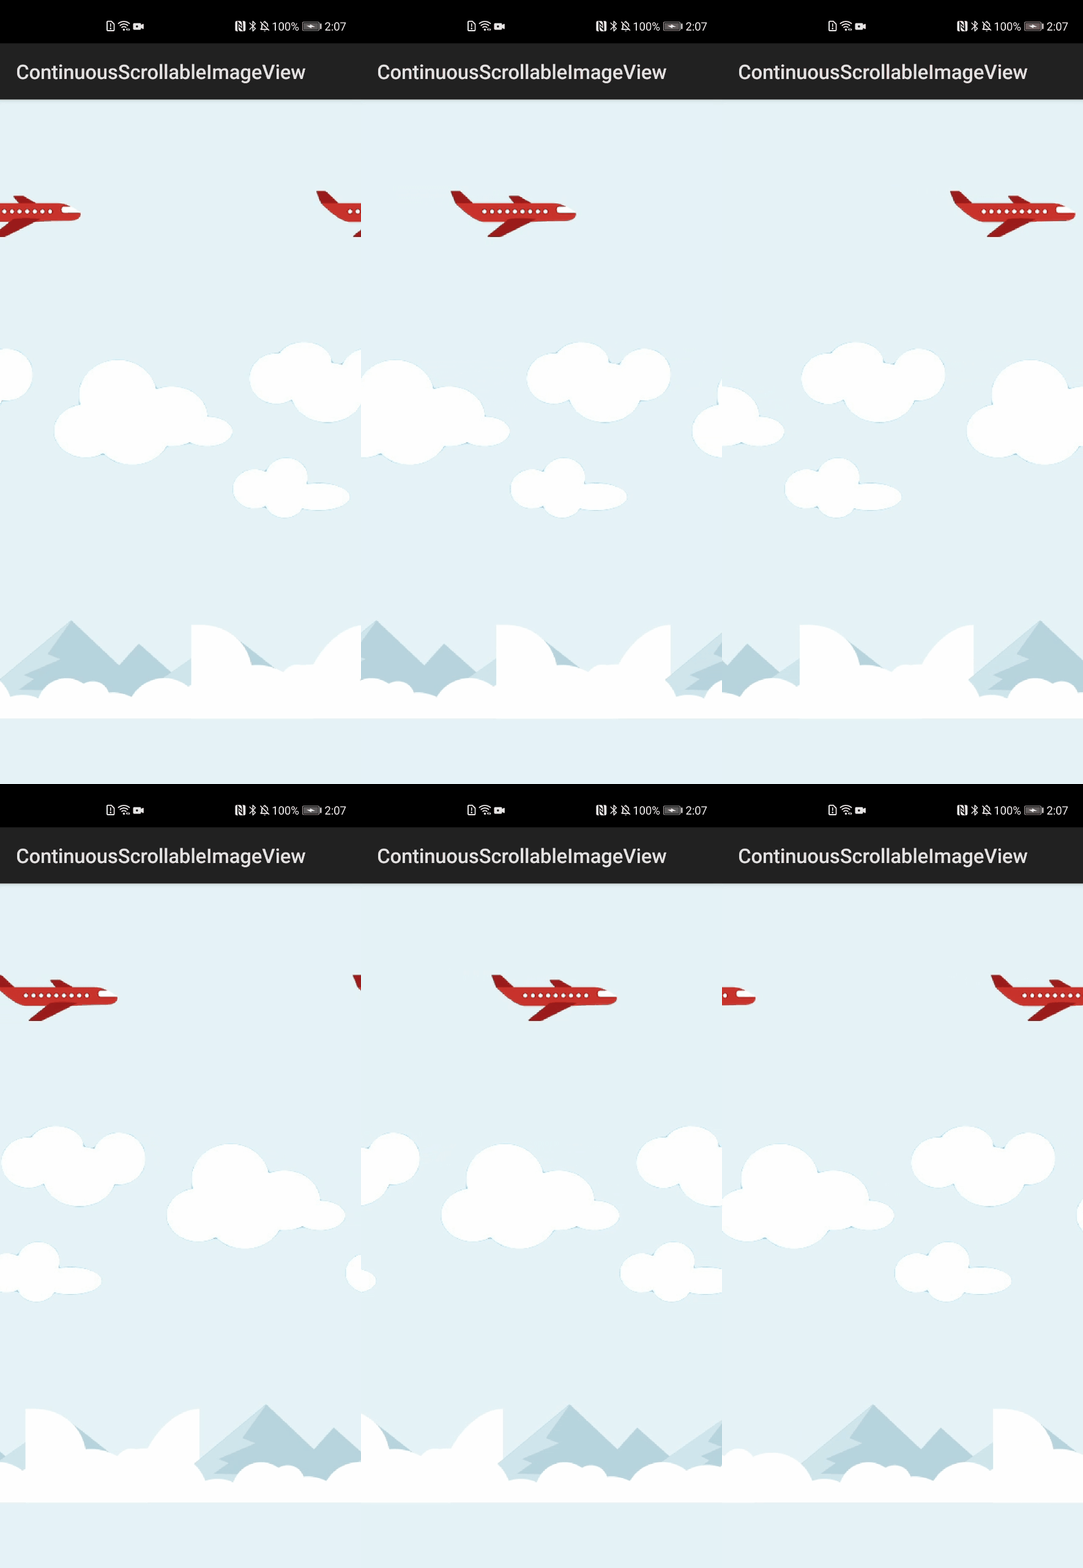
ContinuousScrollableImageView_ohos组件库中设置了飞机、云、山三种图像:飞机的滚动方向设置为“RIGHT”,向右侧滚动;云和山的滚动方向设置为“LEFT”,向左滚动。三者组合成一幅完整的、具有连续滚动效果的动画图像,如图1所示。

图1 ContinuousScrollableImageView_ohos组件运行效果图
Sample解析
Sample部分主要负责搭建整体的显示布局,并实例化飞机、云、山三种图像的对象。通过调用Library提供的接口,对三个对象的滚动效果进行属性设置。想要实现图1所示的动画效果,需要以下3个步骤:
步骤1. 导入ContinuousScrollableImageView类。
步骤2. 实例化类对象并设置各个对象的属性。
步骤3. 将对象添加到整体显示布局中。
下面我们来看一下每个步骤涉及的详细操作。
1、导入ContinuousScrollableImageView类
import com.cunoraz.continuousscrollable.ContinuousScrollableImageView;
2、实例化类对象并设置各个对象的属性
图1中的动画效果需要实例化3个ContinuousScrollableImageView对象分别代指包含飞机、云、山三种图像。
设置各对象属性的方式有两种:常用方式和Builder方式。常用方式是指通过对象单独调用类接口的方式;Builder方式即建造者模式。用户可根据个人需要,自行确定使用哪种方式设置对象属性。此处为了证明两种方式的有效性,飞机和云图像采用常用方式设置属性,山图像采用Builder方式设置属性。 ContinuousScrollableImageView对象的可设置属性有4个,包括:滚动方向、滚动周期、缩放类型、图像源。
(1)实例化飞机图像的对象并进行属性设置
// 实例化对象
ContinuousScrollableImageView plane=new ContinuousScrollableImageView(this);
// 采用常用方式进行属性设置
LayoutConfig planeConfig=new LayoutConfig(ComponentContainer.LayoutConfig.MATCH_PARENT,0,LayoutConfig.UNSPECIFIED_ALIGNMENT,1);
plane.setLayoutConfig(planeConfig);
plane.setDirection(ContinuousScrollableImageView.RIGHT);  //设置滚动方向向右
plane.setDuration(2500);   //设置滚动周期
plane.setScaleType(ContinuousScrollableImageView.CENTER_INSIDE);  //设置缩放类型
plane.setResourceId(ResourceTable.Media_plane);  // 设置图像源
(2)实例化云图像的对象并进行属性设置
// 实例化对象
ContinuousScrollableImageView cloud=new ContinuousScrollableImageView(this);
// 采用常用方法进行属性设置
LayoutConfig cloudConfig=new LayoutConfig(ComponentContainer.LayoutConfig.MATCH_PARENT,0,LayoutConfig.UNSPECIFIED_ALIGNMENT,1);
cloud.setLayoutConfig(cloudConfig);
cloud.setDirection(ContinuousScrollableImageView.LEFT);   //设置滚动方向向左
cloud.setDuration(4000);    //设置滚动周期
cloud.setResourceId(ResourceTable.Media_cloud);    //设置图像源
(3)实例化山图像的对象并进行属性设置
LayoutConfig mountainConfig=new LayoutConfig(ComponentContainer.LayoutConfig.MATCH_PARENT,0,LayoutConfig.UNSPECIFIED_ALIGNMENT,1);
//采用Builder方式进行对象创建和属性设置
ContinuousScrollableImageView mountain=new ContinuousScrollableImageView.Builder(this.getAbility())
        .setDirection(ContinuousScrollableImageView.LEFT)    //设置方向向左
        .setDuration(6000)    //设置时间间隔
        .setResourceId(ResourceTable.Media_mountain)    //设置图像源
        .build();
mountain.setLayoutConfig(mountainConfig);
3、对象添加到整体显示布局中
layout.addComponent(cloud); //飞机对象添加到布局
layout.addComponent(mountain); //云对象添加到布局
layout.addComponent(mountain);  //山对象添加到布局
Library解析
Library向开发者提供ContinuousScrollableImageView类对象的启动接口和属性设置接口。以图1的效果为例,通过调用启动接口,可以让飞机、云和山对象开始滚动;通过调用属性设置接口,可以改变上述对象的滚动效果。由Sample部分可知,ContinuousScrollableImageView类对象的属性设置有两种方式,本节将揭示,不同属性设置方式下属性设置接口的功能实现也存在差异。
1、ContinuousScrollableImageView类对象启动接口
该接口的功能实现内容较多,但主要逻辑较为清晰,主要可以分为四个部分:设置布局、创建数值动画、对不同的滚动方向设置监听和启动动画。
(1)设置布局

图2 两个布局依次出现
如图2所示,画面中所有的ContinuousScrollableImageView类对象都需要具有循环滚动的效果,以飞机为例:飞机滚动至最右侧时,逐渐显示的部分需要在最左侧重新出现。为此,设计了两个布局:firstImage和secondImage,二者布局相同且循环显示,其中一个布局显示另一个布局消失的部分。
private void setImages() {
    ......
    firstImage = (Image) this.findComponentById(ResourceTable.Id_first_image);
    secondImage = (Image) this.findComponentById(ResourceTable.Id_second_image);
    firstImage.setImageAndDecodeBounds(resourceId);
    secondImage.setImageAndDecodeBounds(resourceId);
    setScaleType(scaleType);
}
(2)创建数值动画
飞机、云和山都是静态的,想让实现滚动效果,需要借助动画类。此处采用的是数值动画的方式,来启动各对象。同时还需要设置动画的循环次数、线性变化、循环周期等属性。
animator.setLoopedCount(AnimatorValue.INFINITE);  //动画无限重复
animator.setCurveType(Animator.CurveType.LINEAR);  //动画线性变化
animator.setDuration(duration);   //动画的持续时间
(3)对不同的滚动方向设置监听
飞机、云和山都可以设置不同的滚动方向,针对不同的方向设置不同的值动画监听,以飞机为例:当飞机横向滚动时,通过设置firstImage和secondImage的横坐标变化,达到二者循环显示的目的。当飞机竖向滚动动,通过设置firstImage和secondImage的坐标变化,达到二者循环显示的目的。
switch (DEFAULT_ASYMPTOTE) {
    case HORIZONTAL:   // 横向滚动
        animator.setValueUpdateListener(new AnimatorValue.ValueUpdateListener() {       //值动画监听
            @Override
            public void onUpdate(AnimatorValue animatorValue, float v) {
                // firstImage和secondImage循环显示算法
                float progress;
                if (DIRECTION_MULTIPLIER == 1)
                    progress = DIRECTION_MULTIPLIER * (v);
                else
                    progress = DIRECTION_MULTIPLIER * (-v);
                float width = DIRECTION_MULTIPLIER * (-firstImage.getWidth());
                float translationX = width * progress;
                firstImage.setTranslationX(translationX);  //设置firstImage的横坐标
                secondImage.setTranslationX(translationX - width); //设置secondImage的横坐标
            }
        });
        break;
......
(4)启动动画
动画启动后,飞机、云和山的坐标就会发生变化,此时他们的动画效果就由静态的变成滚动的。
animator.start(); //动画启动2、常用方式下属性设置接口功能实现
飞机和云采用常用方式设置属性,其属性包含:滚动周期、滚动方向、图像源、图像缩放类型。各接口的功能实现较为简单,值得注意的是,在滚动方向和滚动周期功能实现中分别调用了启动接口,此处是为了适应下文即将指出的Builder方式,具体原因将在下文讲述。若开发者只采用常用方式进行属性设置,可以将启动接口从滚动方向和滚动周期功能实现中分离出来,通过飞机或者云的对象单独调用。
//设置滚动周期
public void setDuration(int duration) {
    this.duration = duration;
    isBuilt = false;
    build();
}
//设置方向
public void setDirection(@Directions int direction) {
    this.direction = direction;
    isBuilt = false;
    setDirectionFlags(direction);
    build();
}
//设置图像源
public void setResourceId(int resourceId) {
    this.resourceId = resourceId;
    firstImage.setImageAndDecodeBounds(this.resourceId);
    secondImage.setImageAndDecodeBounds(this.resourceId);
}
//设置图像缩放类型
public void setScaleType(@ScaleType int scaleType) {
    if (firstImage == null || secondImage == null) {
        throw new NullPointerException();
    }
    Image.ScaleMode type = Image.ScaleMode.CENTER;
    switch (scaleType) {
	···
    }
    this.scaleType = scaleType;
    firstImage.setScaleMode(type);
    secondImage.setScaleMode(type);
}
3、Builder方式设置属性
对山采用Builder方式进行属性设置,各属性在功能实现时分别调用了常用方式下的属性设置接口,但是缺少启动接口的调用。
为了在Builder方式下也能正常启动动画,常用方式下的滚动方向和滚动周期功能实现中包含了启动接口,这样当在Builder方式下调用上述接口时,就可以实现动画的启动。
public static final class Builder {
    private ContinuousScrollableImageView scrollableImage;
    public Builder(Ability ability) {
        scrollableImage = new ContinuousScrollableImageView(ability);
    }
    //设置滚动周期
    public Builder setDuration(int duration) {
        scrollableImage.setDuration(duration);
        return this;
    }
    //设置图像源
    public Builder setResourceId(int resourceId) {
        scrollableImage.setResourceId(resourceId);
        return this;
    }
   //设置滚动方向
    public Builder setDirection(@Directions int direction) {
        scrollableImage.setDirection(direction);
        return this;
    }
    //设置缩放类型
    public Builder setScaleType(@ScaleType int scaleType) {
        scrollableImage.setScaleType(scaleType);
        return this;
    }
    public ContinuousScrollableImageView build() {
        return scrollableImage;
    }
}
项目贡献人
刘磊 郑森文 朱伟 陈美汝 王佳思 张馨心
Recommend
About Joyk
Aggregate valuable and interesting links.
Joyk means Joy of geeK