

SpringCloud Alibaba微服务实战三十 | 统一资源服务器配置模块
source link: https://my.oschina.net/u/1388595/blog/5029820
Go to the source link to view the article. You can view the picture content, updated content and better typesetting reading experience. If the link is broken, please click the button below to view the snapshot at that time.

前面文章咱们对比过网关授权与微服务授权的区别,文章也提到了,如果要实现微服务授权,一般会构建一个独立的资源服务器配置模块,否则每个后端业务都需要进行资源服务器的配置,那本节内容我们就来完成此功能。
由于间隔时间较久,建议先阅读下面两篇相关文章回顾一下。
话不多说,我们直接开始代码改造。
认证服务器改造
首先我们需要改造认证服务器,需要认证服务器在构建用户权限的时候使用的是权限标识字段。对于代码而言只需要 UserDetailServiceImpl#loadUserByUsername()中修改即可。
@Override
public UserDetails loadUserByUsername(String userName) throws UsernameNotFoundException {
 //获取本地用户
 SysUser sysUser = sysUserMapper.selectByUserName(userName);
 if(sysUser != null){
  //获取当前用户的所有角色
  List<SysRole> roleList = sysRoleService.listRolesByUserId(sysUser.getId());
  sysUser.setRoles(roleList.stream().map(SysRole::getRoleCode).collect(Collectors.toList()));
  List<Integer> roleIds = roleList.stream().map(SysRole::getId).collect(Collectors.toList());
  //获取所有角色的权限
  List<SysPermission> permissionList = sysPermissionService.listPermissionsByRoles(roleIds);

  //基于方法拦截.只需放入用户权限标识即可
  List<String> permissionMethodList = permissionList.stream()
    .map(SysPermission::getPermission)
    .collect(Collectors.toList());
  sysUser.setPermissions(permissionMethodList);
  //构建oauth2的用户
  return buildUserDetails(sysUser);

 }else{
  throw  new UsernameNotFoundException("用户["+userName+"]不存在");
 }
}
网关服务器不再需要进行用户权限校验,所以我们需要将相关校验逻辑全部删除。
@Configuration
public class SecurityConfig {
    @Bean
    SecurityWebFilterChain webFluxSecurityFilterChain(ServerHttpSecurity http) throws Exception{

        http
   .httpBasic().disable()
   .csrf().disable();

        return http.build();
    }
}
独立资源服务器配置模块
完成了上面两步后就到了最重要的步骤了,需要建立一个独立的资源服务器配置模块,用于其他模块引用。
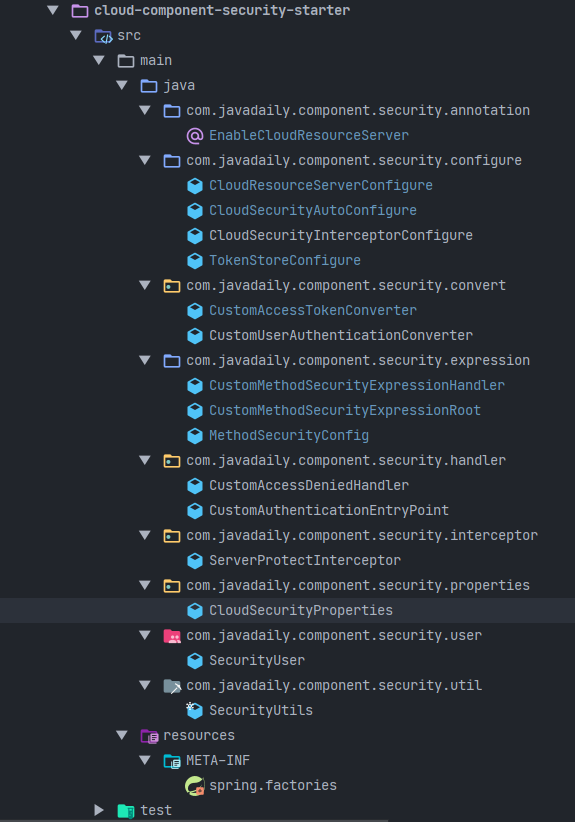
首先我们得建立一个单独的资源服务模块 cloud-component-security-starter ,如下为改造后的代码结构图。
然后,要让一个普通后端服务成为资源服务器,需要有一个配置类继承 ResourceServerConfigurerAdapter并进行相关配置,那在我们独立的资源服务器模块我们首先得创建一个这样的配置类,这个比较简单,只需从之前的模块中拷贝一份出来。
public class CloudResourceServerConfigure extends ResourceServerConfigurerAdapter {
    private CustomAccessDeniedHandler accessDeniedHandler;
    private CustomAuthenticationEntryPoint exceptionEntryPoint;

    private TokenStore tokenStore;

    @Value("${security.oauth2.resource.id}")
    private String resourceId ;

    @Autowired(required = false)
    public void setAccessDeniedHandler(CustomAccessDeniedHandler accessDeniedHandler) {
        this.accessDeniedHandler = accessDeniedHandler;
    }

    @Autowired(required = false)
    public void setExceptionEntryPoint(CustomAuthenticationEntryPoint exceptionEntryPoint) {
        this.exceptionEntryPoint = exceptionEntryPoint;
    }

    @Autowired(required = false)
    public void setTokenStore(TokenStore tokenStore) {
        this.tokenStore = tokenStore;
    }


    @Override
    public void configure(HttpSecurity http) throws Exception {
        http
                .authorizeRequests()
                .requestMatchers(EndpointRequest.toAnyEndpoint()).permitAll()
                .antMatchers(
                        "/v2/api-docs/**",
                        "/swagger-resources/**",
                        "/swagger-ui.html",
                        "/webjars/**"
                ).permitAll()
                .anyRequest().authenticated()
                .and()
                .csrf().disable();
    }


    @Override
    public void configure(ResourceServerSecurityConfigurer resources) {
        DefaultAccessTokenConverter accessTokenConverter = new DefaultAccessTokenConverter();
        UserAuthenticationConverter userTokenConverter = new CustomUserAuthenticationConverter();
        accessTokenConverter.setUserTokenConverter(userTokenConverter);

        if (exceptionEntryPoint != null) {
            resources.authenticationEntryPoint(exceptionEntryPoint);
        }
        if (accessDeniedHandler != null) {
            resources.accessDeniedHandler(accessDeniedHandler);
        }

        resources.resourceId(resourceId).tokenStore(tokenStore);
    }

}
现在有了资源服务器配置,那其他模块如何引入这个配置类呢?
这里我们可以借助SpringBoot的Enable模块驱动能力,通过@EnableXXX注解导入配置类。
我们创建一个自定义注解类 EnableCloudResourceServer,其他模块通过 @EnableCloudResourceServer注解即可导入资源服务器配置
@Target({ElementType.TYPE})
@Retention(RetentionPolicy.RUNTIME)
@Documented
@EnableResourceServer //开启资源服务器
@Import({CloudResourceServerConfigure.class, TokenStoreConfigure.class})
public @interface EnableCloudResourceServer {

}
最后我们知道微服务授权是基于方法拦截,基于方法拦截我们就需要开启 @EnableGlobalMethodSecurity,并且需要将我们自定义的权限注解功能迁移过来。所以我们再创建一个配置类用于配置上述功能。
@EnableGlobalMethodSecurity(prePostEnabled = true)
public class CloudSecurityAutoConfigure extends GlobalMethodSecurityConfiguration {

    @Bean
    @ConditionalOnMissingBean(name = "accessDeniedHandler")
    public CustomAccessDeniedHandler accessDeniedHandler() {
        return new CustomAccessDeniedHandler();
    }

    @Bean
    @ConditionalOnMissingBean(name = "authenticationEntryPoint")
    public CustomAuthenticationEntryPoint authenticationEntryPoint() {
        return new CustomAuthenticationEntryPoint();
    }

    @Override
    protected MethodSecurityExpressionHandler createExpressionHandler() {
        return new CustomMethodSecurityExpressionHandler();
    }

}
经过上面的改造,一个独立的资源服务器创建成功了,现在剩下的就是对微服务的改造。
微服务改造
-
在maven中删除原oauth2.0的相关配置,引入自定义
cloud-component-security-starter
<dependency>
 <groupId>com.jianzh5.cloud</groupId>
 <artifactId>cloud-component-security-starter</artifactId>
</dependency>
-
删除所有资源服务器相关代码(此过程略)
-
修改主启动类,通过
@EnableCloudResourceServer引入资源服务器配置
@EnableDiscoveryClient
@SpringCloudApplication
@EnableCloudResourceServer
public class AccountServiceApplication {
    public static void main(String[] args) {
        SpringApplication.run(AccountServiceApplication.class, args);
    }
}
-
在需要拦截的Controller方法中添加自定义权限拦截注解
@PreAuthorize("hasPrivilege('queryAccount')")
当然也可以使用SpringSecurity原生注解@PreAuthorize("hasAuthority('queryAccount')"),两者作用一样。
@GetMapping("/account/getByCode/{accountCode}")
@PreAuthorize("hasPrivilege('queryAccount')")
//@PreAuthorize("hasAuthority('queryAccount')")
public ResultData<AccountDTO> getByCode(@PathVariable(value = "accountCode") String accountCode){
 AccountDTO accountDTO = accountService.selectByCode(accountCode);
 return ResultData.success(accountDTO);
}
我们访问一个没有权限的方法会出现如下错误提示,表明独立资源服务器成功配置

{
  "status": 500,
  "message": "不允许访问",
  "data": null,
  "success": false,
  "timestamp": 1619052359563
}
提示:@PreAuthorize 注解的异常,抛出AccessDeniedException异常,不会被accessDeniedHandler捕获,而是会被全局异常捕获。
如果需要自定义
@PreAuthorize错误异常,可以通过全局的@RestControllerAdvice进行异常拦截
拦截后的自定义异常如下:
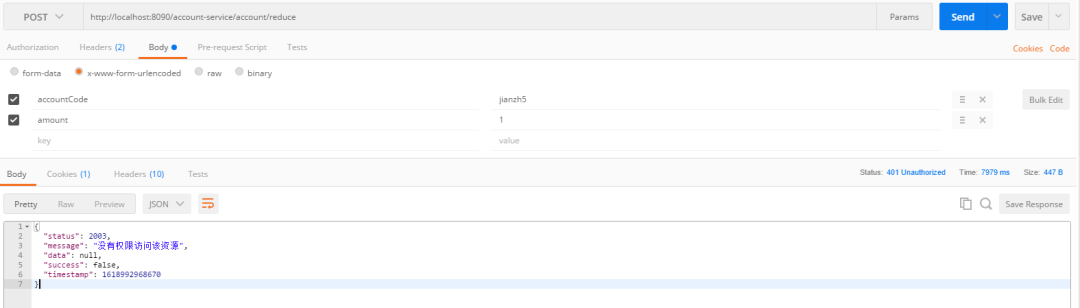
{
  "status": 2003,
  "message": "没有权限访问该资源",
  "data": null,
  "success": false,
  "timestamp": 1619052359563
}
以上,希望对你有所帮助!
这里为大家准备了一份小小的礼物,关注公众号,输入如下代码,即可获得百度网盘地址,无套路领取!
001:《程序员必读书籍》
002:《从无到有搭建中小型互联网公司后台服务架构与运维架构》
003:《互联网企业高并发解决方案》
004:《互联网架构教学视频》
006:《SpringBoot实现点餐系统》
007:《SpringSecurity实战视频》
008:《Hadoop实战教学视频》
009:《腾讯2019Techo开发者大会PPT》
010: 微信交流群

本文分享自微信公众号 - JAVA日知录(javadaily)。
如有侵权,请联系 [email protected] 删除。
本文参与“OSC源创计划”,欢迎正在阅读的你也加入,一起分享。
Recommend
-
14
SpringCloud Alibaba微服务实战二十三 - Feign 性能调优 ...
-
12
SpringCloud Alibaba微服务实战二十七 使用SpringCloud架构后我们希望所有的请求...
-
14
SpringCloud Alibaba实战二十六 今天内容主要是解决一位粉丝提的问题:在...
-
5
SpringCloud Alibaba微服务实战三十二 大家好,我是飘渺Jam,一名来自三流城市三流公司的三流程序员,这是我们的第159篇原创文章,如果你喜欢请记得给我一个点赞与转发。 这篇文章来源于粉丝...
-
7
SpringCloud微服务实战——搭建企业级开发框架(四十一):扩展JustAuth+SpringSecurity+Vue实现多租户系统微信扫码、钉钉扫...
-
7
SpringCloud微服务实战——搭建企业级开发框架(四十三):多租户可配置的电子邮件发送系统设计与实现 ...
-
7
1.1:nacos分级存储是什么1.3:为什么nacos 要引入这么一个服务分级1.3.1:服务跨集群调用问题2.1.1:修改文件yml,添加如下内容:2.1.2:在Nacos控制台可以看到集群变化:1,服务分级存储模型这个服务分级存储...
-
6
SpringCloud-Alibaba致力于提供微服务开发的一站式解决方案。此项目包含开发分布式应用服务的必需组件,方便开发者通过 Spring Cloud编程模型轻松使用这些组件来开发分布式应用服务。 依托 Spring Cloud Alibaba,您只需要添加一些注解和少量配置,就可以将 S...
-
7
SpringCloud-Alibaba致力于提供微服务开发的一站式解决方案。此项目包含开发分布式应用服务的必需组件,方便开发者通过 Spring Cloud编程模型轻松使用这些组件来开发分布式应用服务。依托 Spring Cloud Alibaba,您只需要添加一些注解和少量配置,就可以将 Sp...
-
8
【深入浅出Dubbo3原理及实战】「SpringCloud-Alibaba系列」基于Nacos作为注册中心进行发布SpringCloud-alibaba生态的RPC接口实战 精选 原创 ...
About Joyk
Aggregate valuable and interesting links.
Joyk means Joy of geeK