

Flutter 底部导航栏 / BottomNavigationBar
source link: https://www.bugcatt.com/archives/76
Go to the source link to view the article. You can view the picture content, updated content and better typesetting reading experience. If the link is broken, please click the button below to view the snapshot at that time.
几乎99%的应用类APP都需要一个底部导航栏. 这篇教程为 Flutter 语言中, 如何写一个主流的 底部导航栏 . 并使用 Flutter 官方提供的 BottomNavigationBar 组件. 几乎每一个APP都拥有一个底部导航栏, 所以这篇教程将会十分有用
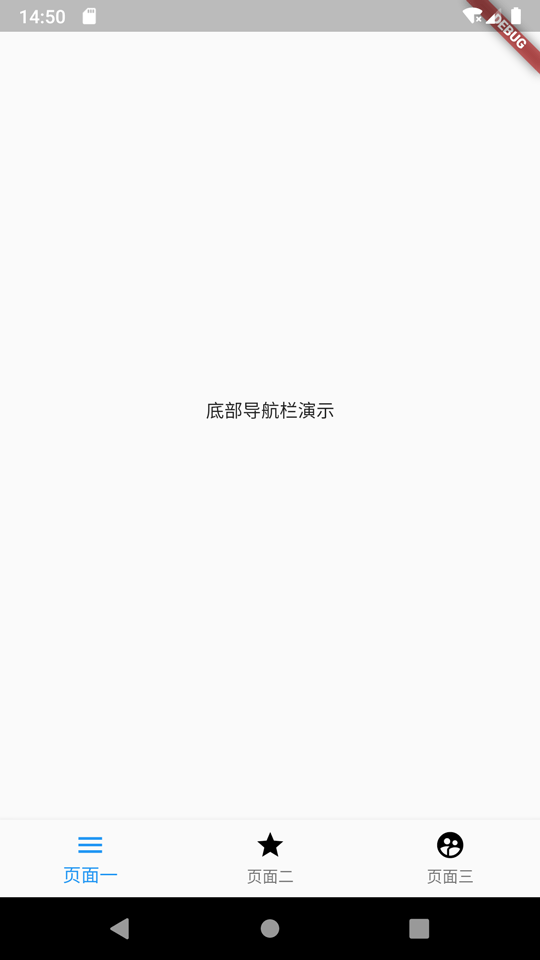
有图有真相, 我们本次要实现 底部导航栏 的最终效果如下 :
:
 底部导航栏最终效果
全部代码均已上传至开源仓库(含完整注释):
虽然如此普遍, 但我们还是要更直观的看下哪里需要用到底部导航栏, 如下图:
 用到底部导航栏的主流APP
可以得知, 最流行的、最主流的APP都需要导航栏
创建导航页面
创建lib/main.dart文件, 内容:
import 'package:flutter/material.dart';

void main() => runApp(MyApp());

class MyApp extends StatelessWidget {
  @override
  Widget build(BuildContext context) {
    return MaterialApp(
      title: 'Bottom Navigation',
      home: MyHomePage(),
    );
  }
}

class MyHomePage extends StatefulWidget {
  MyHomePage({Key key}) : super(key: key);
  @override
  _MyHomePageState createState() => _MyHomePageState();
}

class _MyHomePageState extends State {

  @override
  Widget build(BuildContext context) {
    return Scaffold(
      body: Center(
        child: Text(
          '底部导航栏演示',
        )
      ),
    );
  }
}
这个页面就作为我们的导航页了, 继续.
创建导航目标页面
也就是点击导航按钮要跳转到哪些页面, 我们分别创建三个文件:
lib/page_first.dartlib/page_second.dartlib/page_third.dart
三个文件的内容:
注意, 每个页面需要在注释处变更一下文字内容, 以便区分
import 'package:flutter/material.dart';

// 这里的class 名称分别为"PageFirst"、"PageSecond"以及"PageThird"
class PageFirst extends StatefulWidget {
  PageFirst({Key key}) : super(key: key);
  @override
  _PageFirstState createState() => _PageFirstState();
}

// 这里的class 名称分别为"_PageFirstState"、"_PageSecondState"以及"_PageThirdState"
class _PageFirstState extends State {

  @override
  Widget build(BuildContext context) {
    return Scaffold(
      body: Center(
        child: Text(
          // 这里分别改为"页面一"、"页面二"以及"页面三"
          '页面一',
        ),
      ),
    );
  }
}
使用 BottomNavigationBar 组件
BottomNavigationBar是一个原生的组件, 通常和Scaffold配合使用
我们来尝试使用一下, 在Scaffold中添加一个参数bottomNavigationBar:
class _MyHomePageState extends State {

  @override
  Widget build(BuildContext context) {
    return Scaffold(
      body: Center(
        child: Text(
          '底部导航栏演示',
        ),
      ),
      // 这里添加了NavigationBar
      bottomNavigationBar: BottomNavigationBar(),
    );
  }
}
此时, 你的IDE应该会提醒你, 缺少必填参数. 我们下面处理.
绘制 底部导航栏
导航组件BottomNavigationBarItem
我们在class _MyHomePageState中创建一个集合, 把三个目标页面装进去:
// 创建集合对象, 存储底部选项集合
List barItems = [
  BottomNavigationBarItem(
      // 图标(普通状态)
      icon: Icon(
        Icons.menu,
        color: Colors.black,
      ),
      // 图标(选中状态)
      activeIcon: Icon(
        Icons.menu,
        color: Colors.blue,
      ),
      // 文字内容
      title: Text("页面一"),
      // 背景色
      backgroundColor: Colors.blue),
  BottomNavigationBarItem(
      // 图标(普通状态)
      icon: Icon(
        Icons.grade,
        color: Colors.black,
      ),
      // 图标(选中状态)
      activeIcon: Icon(
        Icons.grade,
        color: Colors.blue,
      ),
      // 文字内容
      title: Text("页面二"),
      // 背景色
      backgroundColor: Colors.blue),
  BottomNavigationBarItem(
      // 图标(普通状态)
      icon: Icon(
        Icons.supervised_user_circle,
        color: Colors.black,
      ),
      // 图标(选中状态)
      activeIcon: Icon(
        Icons.supervised_user_circle,
        color: Colors.blue,
      ),
      // 文字内容
      title: Text("页面三"),
      // 背景色
      backgroundColor: Colors.blue),
];
当然, 这不是最优写法, 但这种方式能让你看到所有的参数说明!

构建 BottomNavigationBar
回到刚才的位置, 我们把刚刚创建的BottomNavigationBarItem集合放入BottomNavigationBar中:
@override
Widget build(BuildContext context) {
  return Scaffold(
    body: Center(
      child: Text(
        '底部导航栏演示',
      ),
    ),
    bottomNavigationBar: BottomNavigationBar(
      // 放在这里
      items: barItems,
    ),
  );
}
如果你上面的步骤没有问题, 那么效果应该是这样的:
 4.3 效果图
当然. 点击按钮还没有达到我们的最终效果.
绑定目标页面至导航栏
在_MyHomePageState中创建页面集合及变量:
// 导航目标页集合
final pages = [
  PageFirst(),
  PageSecond(),
  PageThird(),
];

/// 当前选中的导航下标, 默认第一个
int _currentNavIndex = 0;在_MyHomePageState中创建函数:
// 当点击导航栏按钮时, 触发此函数
void _changeCurrentNavIndex(int index){
  // 细节: 当用户点击的导航和当前一致, 则不发生变化, 节省系统资源
  if (index != _currentNavIndex) {
    // 切换导航下标
    _currentNavIndex = index;
    setState(() {});
  }
}修改build函数:
@override
Widget build(BuildContext context) {
  return Scaffold(
    body: pages[_currentNavIndex],
    bottomNavigationBar: BottomNavigationBar(
        items: barItems,
        // 当前下标
        currentIndex: _currentNavIndex,
        // 点击后进行何种操作, index为当前点击的导航按钮下标
        onTap: (index) {
          _changeCurrentNavIndex(index);
        }),
  );
}
大功告成!
若以上步骤没有问题, 再次运行应该是这样的:
 底部导航栏最终效果
进阶 – 水平滑动(左右滑动)
在某些app中, 导航页是可滑动的, 为了满足这个需求, 我们这里进行一下处理
 滑动最终效果
注意: 并非所有的APP都适用与滑动的导航栏! 某些APP会产生冲突(如QQ), 请考虑实际需求!
复制main.dart
复制一份我们之前的main.dart, 重命名为main_advanced_horizontal_scroll.dart
添加PageView控制器
在_MyHomePageState中添加实例变量:
/// pageView控制器
PageController _pageViewController = PageController();在_changeCurrentNavIndex()中, _currentNavIndex = index;下面添加:
_pageViewController.jumpToPage(index);替换翻页为PageView
在我们新创建的文件main_advanced_horizontal_scroll.dart中, 替换Scaffold的body:
@override
Widget build(BuildContext context) {
  return Scaffold(
    body: pages[_currentNavIndex],
    // ...
  );
}
@override
Widget build(BuildContext context) {
return Scaffold(
body: PageView(
// 这里绑定了控制器
controller: _pageViewController,
children: pages,
onPageChanged: (index) => _changeCurrentNavIndex(index),
),
// ...
);
}如果按上述操作, 运行起来的效果:
滑动最终效果是的, 就是这么简单
全部代码均已上传至开源仓库(含完整注释):
以上就是 Flutter 语言中, 如何写一个主流的 底部导航栏 . 并使用 Flutter 官方提供的 BottomNavigationBar 组件的全部内容了. 感谢阅读.
若有任何问题, 欢迎在下方回复, 作者会尽可能回复! 更多技术干货, 请访问阿航的技术小站主页
Recommend
About Joyk
Aggregate valuable and interesting links.
Joyk means Joy of geeK