

从零到一搭建React组件库
source link: https://segmentfault.com/a/1190000039852833
Go to the source link to view the article. You can view the picture content, updated content and better typesetting reading experience. If the link is broken, please click the button below to view the snapshot at that time.
最近一直在捣鼓如何搭建React组件库,至于为什么会产生这个想法,主要是因为组件库对于前端生态来说究极重要,每一个着眼于长远发展、看重开发效率的的互联网公司基本上都会量身定制自己的组件库,它的好处不用多说。对于前端工程师而言,去理解以及掌握它,可以让我们在今后的工作中以及应聘过程中多出一项特殊技能,并且对自身的纵向发展也就是很有利的。下面是我记录我在搭建组件库的过程。
初始化工程
搭建工程不打算采用create-react-app脚手架来搭建,因为脚手架封装好了很多东西,而有些东西对于组件库并不适用,用来搭建组件库过于臃肿,因此我不打算借助任何脚手架来搭建工程。
首先,先创建一个工程文件夹pony-react-ui,在该文件夹下执行如下命令:
npm init // 生成package.json
tsc --init // 生成tsconfig.json
然后,按照如下目录结构初始化工程:
pony-react-ui
├── src
    ├── assets
    ├── components
        ├── Button
            ├── Button.tsx
            └── index.ts
        └── Dialog
            ├── Dialog.tsx
            └── index.ts
    ├── styles
        ├── _button.scss
        ├── _dialog.scss
        ├── _mixins.scss
        ├── _variables.scss
        └── pony.scss
    └── index.ts // 打包的入口文件,引入pony.scss,抛出每一个组件
├── index.js // 主文件入口,package.json中main字段指定的文件
├── package.json
├── tsconfig.json // 指定了用来编译这个项目的根文件和编译选项
├── webpack.config.js
└── README.md
编写一个Button组件
Button组件应该满足一下需求:
Button.tsx
import React from 'react';
import classNames from 'classnames';

export interface IButtonProps {
  onClick?: React.MouseEventHandler;
  // 类型
  primary?: boolean;
  secondary?: boolean;
  outline?: boolean;
  dashed?: boolean;
  link?: boolean;
  text?: boolean;
  // 尺寸
  xLarge?: boolean;
  large?: boolean;
  small?: boolean;
  xSmall?: boolean;
  xxSmall?: boolean;
  // 颜色
  success?: boolean;
  warn?: boolean;
  danger?: boolean;
  // 禁用状态
  disabled?: boolean;
  className?: string;
  style?: React.CSSProperties;
  children?: React.ReactNode;
}

export const Button = (props: IButtonProps) => {
  const {
    className: tempClassName,
    style,
    onClick,
    children,
    primary,
    secondary,
    outline,
    dashed,
    link,
    text,
    xLarge,
    large,
    small,
    xSmall,
    xxSmall,
    success,
    danger,
    warn,
    disabled,
  } = props;


  const className = classNames(
    {
      'pony-button': true,
      'pony-button-primary': primary,
      'pony-button-secondary': secondary && !text,
      'pony-button-outline': outline,
      'pony-button-dashed': dashed,
      'pony-button-link': link,
      'pony-button-text': text && !secondary,
      'pony-button-text-secondary': secondary && text,
      'pony-button-round': round,
      'pony-button-rectangle': noRadius,
      'pony-button-fat': fat,
      'pony-button-xl': xLarge,
      'pony-button-lg': large,
      'pony-button-sm': small,
      'pony-button-xs': xSmall,
      'pony-button-xxs': xxSmall,
      'pony-button-long': long,
      'pony-button-short': short,
      'pony-button-success': success,
      'pony-button-warn': warn,
      'pony-button-danger': danger,
      'pony-button-disabled': disabled,
    },
    tempClassName
  );

  return (
    <button
      type="button"
      className={className}
      style={style}
      onClick={onClick}
      disabled={disabled}>
      <span className="pony-button__content">{children}</span>
    </button>
  );
}在Button/index.ts文件中抛出Button组件以及定义的类型
export * from './Button';这样,一个示例组件就基本完成了,有同学肯定会有这么一个疑问,为什么在Button.tsx中没有引入它的样式文件_button.scss,而是在使用时引入全局样式或者单独引入_button.scss呢?
// 单独引入组件样式
import { Button } from 'pony-react-ui';
import 'pony-react-ui/lib/styles/button.scss';

// 全局引入组件样式,打包时抽离出来的样式
import 'pony-react-ui/lib/styles/index.scss';这跟样式的权重有关,通过import引入的样式权重会低于JSX中className定义的样式,因此才可以在组件外部修改内部的样式。
举个实例:
import { Button } from 'pony-react-ui';

import 'pony-react-ui/lib/styles/button.scss';
import styles from './index.module.scss';

const Demo = () => (
  <div className={styles.btnBox}>
    <Button onClick={submit}>submit</Button>
  </div>
)引入组件库中的Button.scss和本地的index.module.scss在打包后会以<style></style>标签注入到页面中,而且顺序是:
<style type="text/css">
  // Button.scss的样式
</style>

<style type="text/css">
  // index.module.scss的样式
</style>因此,index.module.scss中的样式权重是高于Button.scss中的样式,可以在index.module.scss中修改Button.scss的样式
├── styles
    ├── _button.scss
    ├── _dialog.scss
    ├── _mixins.scss
    ├── _variables.scss
└── pony.scss我在style文件下存放所有的样式文件,与_button.scss、_dialog.scss类型的样式文件属于组件的样式文件,_mixins.scss用于存放mixin指令,提高样式逻辑复用
// _mixins.scss

@mixin colors($text, $border, $background) {
  color: $text;
  background-color: $background;
  border-color: $border;
}

// 设置按钮大小
@mixin button-size($padding-x, $height, $font-size) {
  height: $height;
  padding: 0 $padding-x;
  font-size: $font-size;
  line-height: ($height - 2);
}
比如,在_button.scss中使用
$values: #ff0000, #00ff00, #0000ff;
.primary {
  @include colors($values...);
}node-sass会将其编译成
.primary {
  color: #ff0000;
  background-color: #00ff00;
  border-color: #0000ff;
}_variables.scss用于存放一些样式常量,比如定义不同尺寸按钮的字体大小:
$button-font-size: 14px !default;
$button-xl-font-size: 16px !default;
$button-lg-font-size: 16px !default;
$button-sm-font-size: 12px !default;pony.scss会引入所有的样式文件,_mixins.scss、_variables.scss这类工具类样式文件需要置前引入,因为后面的组件样式文件可能依赖它们
@import 'variables';
@import 'mixins';
@import 'button';
@import 'dialog';
...
在对样式文件构建处理时,我没有使用css modules去避免样式重名,而是使用BEM规范书写样式规避这一问题。为什么我要这么做呢?
rules: [
  {
    test: /\.(sa|sc|c)ss$/,
    use: [
      loader: 'css-loader',
      options: {
        modules: false // 禁止css modules
      }
    ]
  }
]因为使用css modules导致无法从组件外部修改组件内部样式。通常,从外部修改组件样式一般会这样写:
<Button className="btn">按钮</Button>

// 修改Button内部样式,假如组件内部样式有个样式类名为pony-button-promary
.btn {
    :global {
        .pony-button-promary {
            color: #da2227;
        }
    }
}但是,采用了css modules后,pony-button-promary类名后面会多出一串hash值,而且在每次修改Button组件后,生成的hash都会不同,这将导致在深度遍历查找过程中找不到类名
.btn {
    :global {
        // 下次修改Button组件构建后,生成的hash不一定为sadf6756
        .pony-button-promary-sadf6756 {
            color: #da2227;
        }
    }
}
打包入口文件
src/index.ts为webpack构建入口文件
import './styles/pony.scss';

export * from './components/Button';
export * from './components/Dialog';这里会引入全局样式文件,在构建时MiniCssExtractPlugin会对样式进行抽离压缩,然后分离输出JS脚本和CSS脚本
打包输出UMD规范
在构建之前,我们必须明确组件库的使用场景。现在常见会通过es module以及CommonJS引入,有些场景下会直接使用 <script> 在 HTML 中引入,还有些极少数场景使用AMD(require.js)、CMD(sea.js)引入。作为组件库,应该兼容这些使用场景。组件库应该保持中立,不应该限定于某种使用方式。
为了支持多种使用场景,我们需要选择合适的打包格式。webpack提供多种打包输出方式,如下:
MyLibrary是由output.library 定义的变量名
libraryTarget: 'var':当library加载完成,入口起点的返回值将分配给一个变量var MyLibrary = _entry_return_; // 在一个单独的 script... MyLibrary.doSomething();libraryTarget: 'this':入口起点的返回值将分配给this的一个属性,this的含义取决于你this['MyLibrary'] = _entry_return_; // 在一个单独的 script... this.MyLibrary.doSomething(); MyLibrary.doSomething(); // 如果 this 是 windowlibraryTarget: 'window':入口起点的返回值分配给window对象的这个属性下window['MyLibrary'] = _entry_return_; window.MyLibrary.doSomething();libraryTarget: 'global':入口起点的返回值分配给global对象的这个属性下global['MyLibrary'] = _entry_return_; global.MyLibrary.doSomething();libraryTarget: 'commonjs':入口起点的返回值分配给exports对象。这个名称也意味着,模块用于CommonJS环境exports['MyLibrary'] = _entry_return_; require('MyLibrary').doSomething();libraryTarget: 'module':输出ES模块,需要注意的是,该功能还未完全支持libraryTarget: 'commonjs2':入口起点的返回值将分配给module.exports对象。这个名称也意味着模块用于CommonJS环境module.exports = _entry_return_; require('MyLibrary').doSomething();libraryTarget: 'amd':将你的library暴露为AMD模块。AMD模块要求入口chunk(例如使用标签加载的第一个脚本)通过特定的属性定义,例如define和require,它们通常由RequireJS或任何兼容的模块加载器提供(例如almond)。否则,直接加载生成的AMD bundle将导致报错,如define is not definedmodule.exports = { //... output: { library: 'MyLibrary', libraryTarget: 'amd', }, };生成的
output名称将被定义为"MyLibrary":define('MyLibrary', [], function () { return _entry_return_; });可以在
script标签中,将bundle作为一个模块整体引入,并且可以像这样调用bundle:require(['MyLibrary'], function (MyLibrary) { // Do something with the library... });如果
output.library未定义,将会生成以下内容。define([], function () { return _entry_return_; });libraryTarget: 'umd':将你的library暴露为所有的模块定义下都可运行的方式。它将在CommonJS, AMD环境下运行,或将模块导出到global下的变量module.exports = { //... output: { library: 'MyLibrary', libraryTarget: 'umd', }, };最终的输出结果为:
(function webpackUniversalModuleDefinition(root, factory) {
  if (typeof exports === 'object' && typeof module === 'object')
    module.exports = factory();
  else if (typeof define === 'function' && define.amd) define([], factory);
  else if (typeof exports === 'object') exports['MyLibrary'] = factory();
  else root['MyLibrary'] = factory();
})(typeof self !== 'undefined' ? self : this, function () {
  return _entry_return_;
});
根据上面描述,将libraryTarget="umd"设置umd打包格式。webpack处理脚本、样式以及字体文件的具体配置如下:
const path = require('path');
const webpack = require('webpack');
const MiniCssExtractPlugin = require('mini-css-extract-plugin');
// const UglifyJsPlugin = require('uglifyjs-webpack-plugin');
const TerserJSPlugin = require('terser-webpack-plugin');
const OptimizeCSSAssetsPlugin = require('optimize-css-assets-webpack-plugin');
// const SpeedMeasurePlugin = require('speed-measure-webpack-plugin')
// const { CleanWebpackPlugin } = require('clean-webpack-plugin');
// const LoadablePlugin = require('@loadable/webpack-plugin')

// const smp = new SpeedMeasurePlugin() // 测量构建速度
const devMode = process.env.NODE_ENV !== 'production';
const pkg = require('./package.json');

module.exports = ({
  mode: devMode ? 'development' : 'production',
  devtool: devMode ? 'inline-source-map' : 'hidden-source-map',
  entry: path.resolve(__dirname, './src/index.ts'),
  output: {
    path: path.resolve(__dirname, './dist'),
    filename: devMode ? 'pony.js' : 'pony.min.js',
    library: 'pony',
    libraryTarget: 'umd'
  },
  resolve: {
    // Add `.ts` and `.tsx` as a resolvable extension.
    extensions: ['.ts', '.tsx', '.js'],
    alias: {
    }
  },

  module: {
    rules: [
      // all files with a `.ts` or `.tsx` extension will be handled by `ts-loader`
      {
        test: /\.tsx?$/,
        use: [
          'babel-loader?cacheDirectory',
          {
            loader: 'ts-loader',
            options: {
              configFile: 'tsconfig.json'
            }
          }
        ]
      },
      {
        test: /\.(sa|sc|c)ss$/,
        use: [
          {
            loader: MiniCssExtractPlugin.loader // 抽取样式文件,将css样式文件用link标签引入,使用此loader就不需要用style-loader,即使用了也不会有效果
          },
          {
            loader: 'css-loader',
            options: {
              modules: {
                auto: true,
                localIdentName: '[path][name]__[local]'
              },
              importLoaders: 2, // 一个css中引入了另一个css,也会执行之前两个loader,即postcss-loader和sass-loader
            }
          },
          {
            // 使用 postcss 为 css 加上浏览器前缀
            loader: 'postcss-loader',
            options: {
              // options has an unknown property 'plugins';
              postcssOptions: {
                // PostCSS plugin autoprefixer requires PostCSS 8.将autoprefixer降到8.0.0版本
                plugins: [require('autoprefixer')]
              }
            }
          },
          {
            loader: 'sass-loader' // 使用 sass-loader 将 scss 转为 css
          }
        ]
      },
      {
        test: /(\.(eot|ttf|woff|woff2)|font)$/,
        loader: 'file-loader',
        options: { outputPath: 'fonts/' }
      },
      {
        test: /\.(png|jpg|gif|svg|jpeg)$/,
        loader: 'file-loader',
        options: { outputPath: 'images/' }
      }
    ]
  },
  plugins: [
    // new CleanWebpackPlugin(),
    // new LoadablePlugin(),
    // 该插件能够使得指定目录被忽略,从而使得打包变快,文件变小;下面忽略了包含’./locale/'该字段路径的文件目录,但是也使得我们使用的时候不能显示中文语言了,所以这个时候可以手动引入中文语言的目录
    new webpack.IgnorePlugin(/\.\/locale/, /moment/),
    // 主要用于对打包好的js文件的最开始处添加版权声明
    new webpack.BannerPlugin(`pony ${pkg.version}`),
    // 将CSS提取到单独的文件中
    new MiniCssExtractPlugin({
      // Options similar to the same options in webpackOptions.output
      // both options are optional
      filename: devMode ? 'pony.css' : 'pony.min.css',
      chunkFilename: '[id].css'
    })
    // devMode ? new webpack.HotModuleReplacementPlugin() : null
  ],
  optimization: {
    minimizer: devMode
      ? []
      : [
          // 压缩js代码
          // new UglifyJsPlugin({
          //   cache: true, // 启用文件缓存并设置缓存目录的路径
          //   parallel: true, // 使用多进程并行运行
          //   sourceMap: true // set to true if you want JS source maps
          // }),
          // webpack v5 使用内置的TerserJSPlugin替代UglifyJsPlugin,因为UglifyJsPlugin不支持ES6
          new TerserJSPlugin({
            // cache: true, // 启用文件缓存并设置缓存目录的路径
            parallel: true, // 使用多进程并行运行
            // sourceMap: true // set to true if you want JS source maps
          }),
          // 用于优化或者压缩CSS资源
          new OptimizeCSSAssetsPlugin({
            assetNameRegExp: /\.css$/g,
            cssProcessor: require('cssnano'), // 用于优化\最小化 CSS 的 CSS 处理器,默认为 cssnano
            cssProcessorOptions: { safe: true, discardComments: { removeAll: true } }, // 传递给 cssProcesso
            canPrint: true // 布尔值,指示插件是否可以将消息打印到控制台,默认为 true
          })
        ],
    sideEffects: false
  }
});
这里对上述配置做一个说明:
- 在将
scss转化成css后,使用postcss对样式做了一些加工,利用autoprefixer插件为样式加上浏览器前缀,防止有一些样式存在兼容性问题 - 使用
webpack内置插件BannerPlugin给构建后的文件开头加上版本号 - 工程使用
webpack 5.x版本进行构建,使用内置TerserJSPlugin对JS进行压缩;样式压缩采用OptimizeCSSAssetsPlugin插件。另外为了生成压缩和非压缩两个版本,通过cross-env插件在执行构建命令时注入环境变量控制是否压缩优化
配置如下构建命令:
"scripts": {
    "build:dev": "cross-env NODE_ENV=development webpack",
    "build:prod": "cross-env NODE_ENV=production webpack",
    "build": "npm run build:prod && npm run build:dev"
},当执行yarn build时,在dist目录下生成压缩和非压缩两个版本的脚本
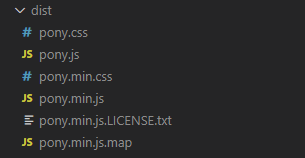
src/index.js为指向模块的入口程序,在开发环境引入的是dist/pony.js,在生产环境下引入的是dist/pony.min.js
if (!process.env.NODE_ENV || process.env.NODE_ENV === 'development') {
  module.exports = require('./dist/pony.js');
} else {
  module.exports = require('./dist/pony.min.js');
}
打包输出es module规范
webpack 5.x还未完全支持es module打包方式,处于实验室试用阶段。tsc编译器可以完成这件事,只需要按如下配置好编译选项,主要module属性为"ES6"或 "ES2015"
// tsconfig.json
{
  "compilerOptions": {
    "target": "es2015", // 指定ECMAScript目标版本 "ES3"(默认), "ES5", "ES6"/ "ES2015", "ES2016", "ES2017"或 "ESNext"
    "lib": [ // 编译过程中需要引入的库文件的列表
      "dom",
      "esnext"
    ],
    "module": "es2015", // 指定生成哪个模块系统代码:"None", "CommonJS", "AMD", "System", "UMD", "ES6"或 "ES2015"
    "allowJs": true, // 指定是否允许编译JS文件,默认false,即不编译JS文件
    "skipLibCheck": true,
    "esModuleInterop": true,
    "allowSyntheticDefaultImports": true,
    "strict": true,
    "forceConsistentCasingInFileNames": true,
    "noFallthroughCasesInSwitch": true,
    "moduleResolution": "node",
    "resolveJsonModule": true,
    "isolatedModules": true,
    "noEmit": false, // 不生成输出文件
    "jsx": "react", // 在 .tsx文件里支持JSX
    "newLine": "lf", // 当生成文件时指定行结束符: "crlf"(windows)或 "lf"(unix)
  },
  "include": [
    "src/**/*.ts",
    "src/**/*.tsx"
  ],
  "exclude": [
    "node_modules"
  ]
}
在typescript项目中还需要生成类型声明文件,我在根目录下新建tsconfig.build.json,继承tsconfig.json中的配置
// tsconfig.build.json
{
  "extends": "./tsconfig",
  "compilerOptions": {
    "declaration": true, // 指定是否在编译的时候生成相应的d.ts声明文件,如果设为true,编译每个ts文件之后会生成一个js文件和一个声明文件,但是declaration和allowJs不能同时设为true
    "declarationMap": false, // 指定编译时是否生成.map文件
    "sourceMap": true, // 编译时是否生成.map文件
  },
  "include": [
    "src/**/*.ts",
    "src/**/*.tsx"
  ],
  "exclude": [
    "node_modules"
  ]
}在scripts命令中增加
"scripts": {
    "build:dev": "cross-env NODE_ENV=development webpack",
    "build:prod": "cross-env NODE_ENV=production webpack",
    // 生成es module编译命令
    "build:tsc": "tsc -p tsconfig.build.json --target ES5 --outDir lib",
    "build": "npm run build:prod && npm run build:dev"
},当执行yarn build:tsc会编译生成es module规范脚本,如下所示

有同学肯定会问为什么不直接在tsconfig.json新增编译选项呢?
还记得构建脚本中编译tsx的配置项吗?
module: {
    rules: [
      // all files with a `.ts` or `.tsx` extension will be handled by `ts-loader`
      {
        test: /\.tsx?$/,
        use: [
          'babel-loader?cacheDirectory',
          {
            loader: 'ts-loader',
            options: {
              configFile: 'tsconfig.json'
            }
          }
        ]
      },
    ]
} 在使用webpack构建生成umd规范的脚本时不需要生成类型声明文件,在tsc编译生成es module规范脚本时需要生成,因此做了区分
生成es module规范脚本的同时,也做到了组件的按需加载,因为按需加载依赖es module
上面只生成了es module规范的Js脚本和类型声明文件,没有对于样式文件、静态资源文件没有做处理,这部分该怎么处理呢?
我没有对其做特殊处理,只是将assets、styles目录及其子目录copy到lib文件夹,先安装以下几个库:
yarn add rimraf make-dir-cli cpr --save-devnpm script 中涉及到的文件系统操作包括文件和目录的创建、删除、移动、复制等操作,而社区为这些基本操作也提供了跨平台兼容的包,列举如下:
rimraf或del-cli,用来删除文件和目录,实现类似于rm -rf的功能;cpr,用于拷贝、复制文件和目录,实现类似于cp -r的功能;make-dir-cli,用于创建目录,实现类似于mkdir -p的功能;
配置一下scripts命令:
"scripts": {
    "build:dev": "cross-env NODE_ENV=development webpack",
    "build:prod": "cross-env NODE_ENV=production webpack",
    "clean": "rimraf dist && rimraf lib",
    "build:tsc": "tsc -p tsconfig.build.json --target ES5 --outDir lib",
    "build:es": "cpr src/styles lib/styles -o && cpr src/assets lib/assets -o",
    "build": "npm run clean && npm run build:prod && npm run build:dev && npm run build:tsc && npm run build:es"
},当执行yarn build后会生成两种规范的脚本目录
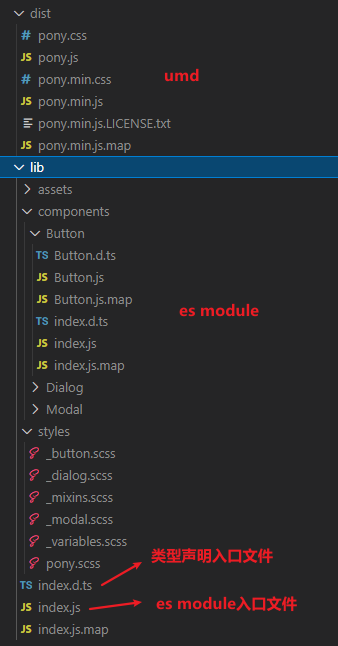
package.json配置
最后完善一下package.json的配置:
{
  "name": "pony-react-ui",
  "version": "1.0.2",
  "description": "React组件库",
  "main": "index.js", // 配置一个文件名指向模块的入口程序
  "module": "lib/index.js",
  "types": "lib/index.d.ts",
  "author": "[email protected]",
  "license": "MIT",
  "homepage": "",
  "keywords": [
    "react",
    "component"
  ],
  "scripts": {
    "build:dev": "cross-env NODE_ENV=development webpack",
    "build:prod": "cross-env NODE_ENV=production webpack",
    "clean": "rimraf dist && rimraf lib",
    "build:tsc": "tsc -p tsconfig.build.json --target ES5 --outDir lib",
    "build:es": "cpr src/styles lib/styles -o && cpr src/assets lib/assets -o",
    "build": "npm run clean && npm run build:prod && npm run build:dev && npm run build:tsc && npm run build:es"
  },
  "bugs": {
    "url": "https://github.com/Revelation2019/pony-react-ui/issues",
    "email": "[email protected]"
  },
  "repository": {
    "type": "git",
    "url": "https://github.com/Revelation2019/pony-react-ui.git"
  },
  "files": [
    "dist/*",
    "lib",
    "index.js",
    "package.json",
    "README.md"
  ],
  ...
}
main:定义commonjs规范的入口文件module:定义es module规范的入口文件types:定义类型声明入口文件files:指定这个包被install时候有哪些文件homepage:项目官网的url
docz生成组件使用文档
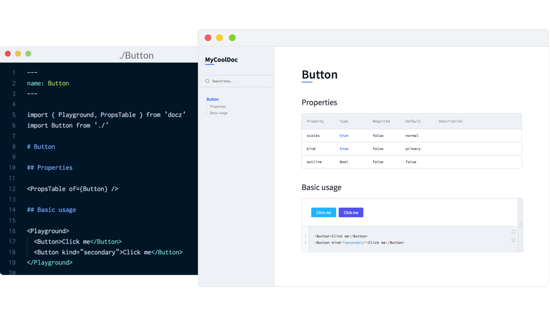
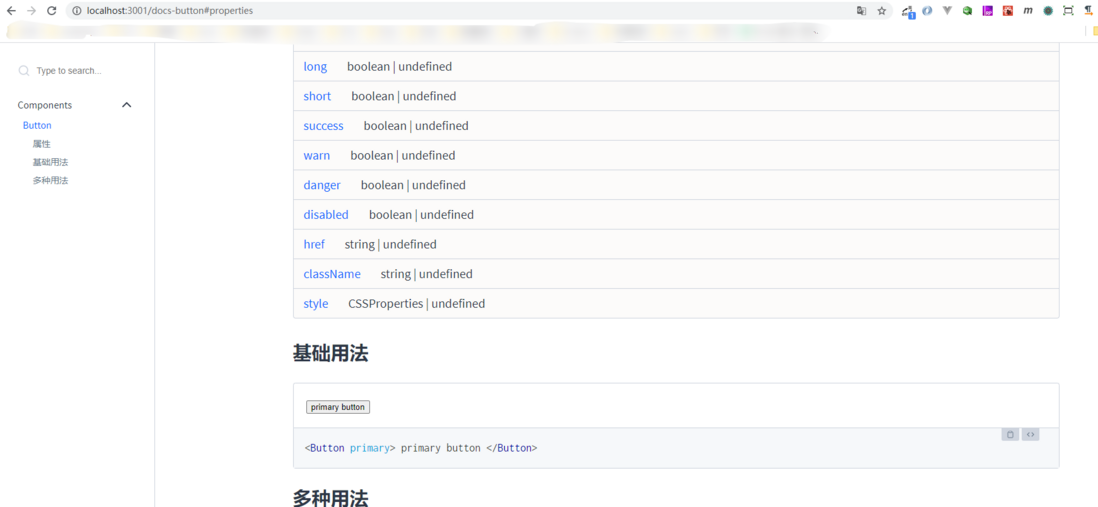
有了团队的 UI 组件库就少不了使用文档,毕竟文档还是比口口相传要靠谱的多。这里介绍一个可以快速创建 React UI 组件库使用、演示文档的项目: Docz 。 Docz 的特色是零配置、简单、快速,它使用 Markdown 语法的扩展 MDX (在 Markdown 里引入 React 组件并渲染出组件)来书写文档,对于熟悉 Markdown 的开发者是可以直接上手的。
!
左边是创建的 MDX 文档,右边是 Docz 渲染出的组件及组件代码。
是不是很方便?那下面简单介绍一下使用步骤
- 在你的项目里安装
Docz
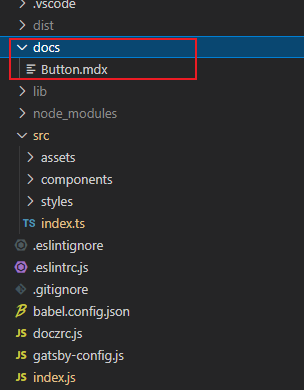
yarn add docz --dev 或者 npm install docz --save-dev- 在根目录下创建
docs文件夹存放mdx文件 编写
mdx文件
需要注意的是mdx中不能使用react hooks写法--- name: Button menu: Components --- import { Playground, Props } from "docz"; import { Button } from "../src/components/Button"; import "../src/styles/_button.scss"; # 按钮 ## Properties <Props of={Button} /> ## 基础用法 <Playground> <Button primary> primary button </Button> </Playground> ## 多种用法 <Playground> <Button secondary> danger button </Button> </Playground>在根目录下创建配置文件
doczrc.js,并写入如下配置:export default { title: 'pony-ui', // 网站的标题 typescript: true, // 如果需要在.mdx文件中引入Typescript组件,则使用此选项 dest: 'build-docs', // 指定docz构建的输出目录 files: 'docs/*.mdx', // Glob模式用于查找文件。默认情况下,Docz会在源文件夹中找到所有扩展名为.mdx的文件。 ignore: ['README.md', 'CHANGELOG.md'] // 用于忽略由docz解析的文件的选项 };docz使用gatsby来搭建静态站点展示组件说明文档,需要安装gatsby-plugin-sass使站点支持scss。在根目录下新建gatsby-config.js,添加如下配置:module.exports = { plugins: ['gatsby-plugin-sass'] };如果执行
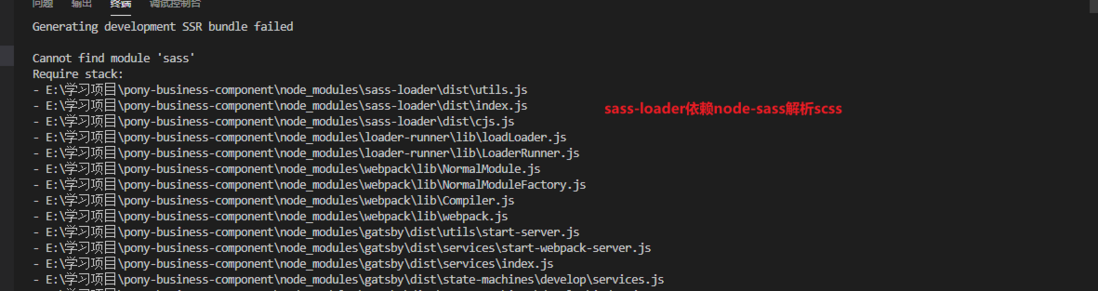
docz dev报如下错误:
这是因为gatsby-plugin-sass默认情况下,使用Dart实现的Sass(sass)。 要使用用Node(node-sass)编写的实现,您可以安装node-sass而不是sass并将其作为实现传递到选项中。yarn add node-sass --save-devmodule.exports = { plugins: [ { resolve: `gatsby-plugin-sass`, options: { implementation: require("node-sass"), }, } ], }配置
scripts命令
当执行docz dev后,会构建mdx文件,并且创建静态站点展示组件说明文档(这一过程会加载gatsby-config.js配置选项,使站点支持sass)"scripts": { "docz:dev": "docz dev", "docz:build": "docz build", "docz:serve": "docz build && docz serve", "build:dev": "cross-env NODE_ENV=development webpack", "build:prod": "cross-env NODE_ENV=production webpack", "clean": "rimraf dist && rimraf lib", "build:tsc": "tsc -p tsconfig.build.json --target ES5 --outDir lib", "build:es": "cpr src/styles lib/styles -o && cpr src/assets lib/assets -o", "build": "npm run clean && npm run build:prod && npm run build:dev && npm run build:tsc && npm run build:es" },
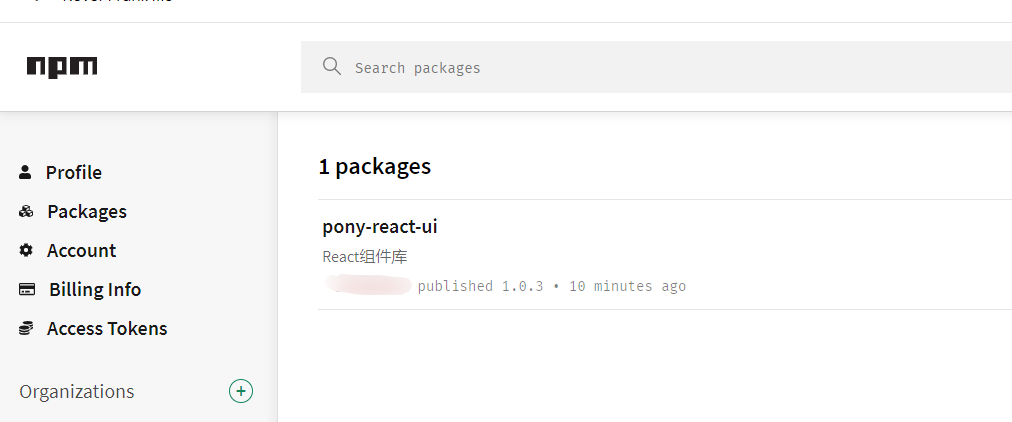
发布到npm仓库
首先登录npm,在终端输入npm login,跟着提示输入账户名、密码以及邮箱,如果报了如下错误:
npm ERR! 409 Conflict - PUT http://npm.dev.casstime.com/-/user/org.couchdb.user:xxx - user registration disabled这是因为镜像源使用的不是http://registry.npmjs.org/,我这里使用的公司的镜像源,要改成http://registry.npmjs.org/,执行如下命令即可,然后重新登录,构建后执行yarn publish即可(跟npm publish有些区别,这里不多讲)
npm config set registry=http://registry.npmjs.org/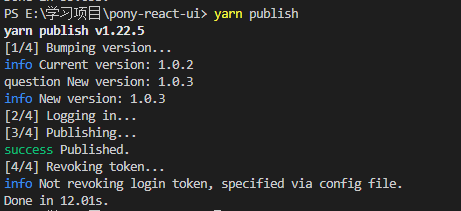
Recommend
About Joyk
Aggregate valuable and interesting links.
Joyk means Joy of geeK