

Service Registry and Discovery with Eureka
source link: https://blog.knoldus.com/service-registry-and-discovery/
Go to the source link to view the article. You can view the picture content, updated content and better typesetting reading experience. If the link is broken, please click the button below to view the snapshot at that time.

Service Registry and Discovery with Eureka
Reading Time: 8 minutes
Hi all. In this blog we will see how we can leverage spring boot and Eureka server to do a Service Registry and Discovery. In the world of microservices scalability and elasticity is mandatory. That means, we can scale our services both up and down to meet the variant load requirements. Typically, this includes creating and destroying the instances of our services.
Microservices communicate with each other through exposed endpoints/APIs. For this communication to take place, the dependent service should know the address of the supplier service so as to invoke its API through a REST call. Traditionally, we use to hardcode the addresses of the services and the dependent service would send a request using these addresses. However, with dynamic scaling of services in place it become hard to keep track of their addresses everytime a new instance was created or destroyed. To overcome this problem, we use naming servers. How we use naming servers and how they help us? We will explore that in this blog. So, let’s start.
Prerequisites
We are going to use the below-mentioned stack for demonstrating the use of a naming server. I would recommend you to go through them first if you are new to microservices development. So, here’s the list:
- Understanding of Java, preferably Java8.
- Understanding of reactive manifesto and reactive framework.
- Spring boot framework.
- Eureka server.
- Webclient and webflux.
- Microservice architecture.
- Maven, our prefered build tool
- Interservice communication
- Intellij idea
To clarify this is going to be a practical and theoretical post. So, I would recommend that you clone the sample project from here. And together, let’s start building our system that has service discovery and registry enabled.
System Overview
Here’s a top level view of how our system should look like:
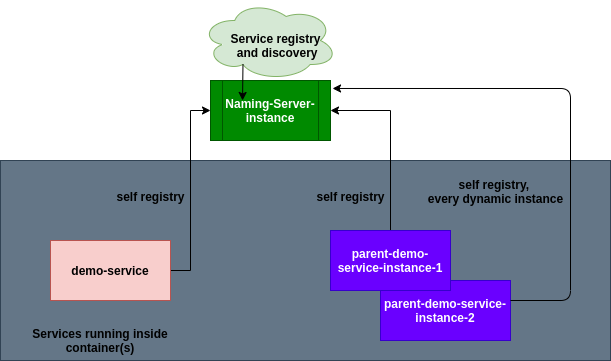 There’s an instance of the Naming server, to which every other service in our application would self-register/de-register to. All of it happens dynamically as soon as a instance of the service comes up or is destroyed.
Let’s start by defining the components in our system, that we are going to build.
- Naming Server: This is a small spring boot application with minimal amount of configuration to create and run an instance of eureka server. All the other services in our application would register themselves to the naming server. For the sake of simplicity, let’s name this application, naming-server.
- Microservices: We will create 2 small microservices in spring-boot using java8 & maven. For simplicity, let’s name them as demo-service & parent-demo-service. Moreover, demo-service depends on the parent-demo-service for some input. So, demo-service would do a REST call to parent-demo-service for retrieving the desired information. Further, we use webclient for inter service communications. In other words, this avoid the use of RestTemplates and synchronous communications.
Once you will clone the repository, I have shared above, you will find 3 separate modules inside. Instructions to run these could be found in the readme.md. So, let’s move ahead to Eureka now.
Service Registry & Discovery: Eureka
Service Registry & Discovery is one of the key tenets of a microservice-based architecture. Trying to hand-configure each client or some form of convention can be difficult to do and can be brittle. Eureka is the Netflix Service Discovery Server and Client. The server can be configured and deployed to be highly available, with each server replicating state about the registered services to the others.
Enabling Eureka clients
To include Eureka client in our project we just need to add a dependency to our spring boot application. For example, in our demo-service & parent-demo-service application’s pom.xml we add:
<dependency>
<groupId>org.springframework.cloud</groupId>
<artifactId>spring-cloud-starter-netflix-eureka-client</artifactId>
</dependency>
Next, we need to update the application.properties of our clients. We need to add the following to both the service:
spring.application.name=demo-service
server.port=9000
eureka.client.service-url.default-zone=http://localhost:8761/eureka
eureka.client.register-with-eureka=true
eureka.client.fetch-registry=true
spring.application.name=parent-demo-service
server.port=8000
eureka.client.service-url.default-zone=http://localhost:8761/eureka
eureka.client.register-with-eureka=true
eureka.client.fetch-registry=true
Where, http://localhost:8761/eureka is the address of our local eureka server instance. Eureka server runs on port 8761 by default, it is configurable though. Finally, we will annotate our client applications with an @EnableDiscoveryClient annotation.
@SpringBootApplication
@EnableDiscoveryClient
public class DemoServiceApplication {
public static void main(String[] args) {
SpringApplication.run(DemoServiceApplication.class, args);
}
}
That is all we need to add in our client services for enabling them to register themselves to the Eureka server. Next, let’s take a look at the server configuartion.
Enabling Eureka server
Our application: naming-server, is the Eureka server. Let’s see what config and properties we need to add to it for making it a Eureka server. Add, the below dependency to it’s pom.xml.
<dependency>
<groupId>org.springframework.cloud</groupId>
<artifactId>spring-cloud-starter-netflix-eureka-server</artifactId>
</dependency>
And, in the application.properties add the following:
spring.application.name=naming-Server
server.port=8761
eureka.client.register-with-eureka=false
eureka.client.fetch-registry=false
That’s all we need to add from dependency and configuration perspective in the server application. Next, we have to make our application a EurekaServer, and, for that we need to annotate our application’s main class with an @EnableEurekaServer annotation.
@SpringBootApplication
@EnableEurekaServer
public class NamingServerApplication {
public static void main(String[] args) {
SpringApplication.run(NamingServerApplication.class, args);
}
}
That is all, we are all set with the Eureka server.
Running the Server
Running the server is quite simple, move to the directory “naming-server” in a terminal. Hit the command mvn clean spring-boot:run and the server would start like any normal spring boot application. We can see the server is up by opening the url localhost:8761 in your browser. It would look like:
 As you can see the server is up, but no client is connected to it yet. Once we run the clients we will see the server picking them up and showing in the UI.
Running the clients
There is not much difference in running the clients from running the server. They all are spring-boot applications so we use the same command: mvn clean spring-boot:run. This will start running the demo-service at port 9000 and the parent-demo-service at port 8000. Now to show the dynamic registry we need to run another instance of parent-demo-service. Let’s run that at port 8001, and for that we would take help of Intellij. We will create a custom configuration like below in the IDE and would run the second instance from there. First, go to the toolbar, Run-> Edit Configurations, then follow the screenshots below.
 Set the defined parameters, and command argument to run the second instance of parent-demo-service.
 Next, provide the Vm options and server port to run the second instance on.
 Finally, run the service from the run icon shown next to the service name. That is all.
Final state
Once all the instances are up and running we can see the Eureka server UI picking them up as shown below.
 We can see the running instances of our services on the UI.
Till now, we have created a Eureka server and multiple clients to connect and register to this server. However, the interesting part is how the communication between these clients take place. Let’s see.
Inter-service communication leveraging Eureka server
We know the demo-service is dependent on parent-demo-service. Let say that it needs to invoke the endpoint “/admin” of the parent-demo-service. Firstly, we will understand what is required to invoke this endpoint from demo-service. Finally, we will see and understand the usage of naming server in such invocation.
What’s required?
Firstly, we will create a config provider for web client in the demo-service. It is shown below:
@Configuration
public class ConfigurationProvider {

@Bean
    @LoadBalanced
    public WebClient.Builder loadBalancedWebClientBuilder() {
        return WebClient.builder();
    }
}
Notice the @LoadBalanced annotation on the method. It is a must, if you want to use webclient with naming servers to do interservice communications. This tells Spring Cloud that we want to take advantage of its load balancing support. Next, we will inject this webclient into our MockWebClient class.
@Slf4j
@Component
public class MockWebClient {
    @Autowired
    private WebClient.Builder webClientBuilder;

private final String baseUrl = "http://parent-demo-service";

public Mono<String> getUserFromWebClient(String clientId) {
        Mono<String> result;
        if (clientId.equalsIgnoreCase("admin")) {
            result = webClientBuilder.baseUrl(baseUrl)
                    .build()
                    .get()
                    .uri("/admin")
                    .accept(MediaType.APPLICATION_JSON)
                    .retrieve()
                    .bodyToMono(String.class);
        } else {
log.error("Unable to get the response, passing default.");
            result = Mono.fromCallable(() -> "Error in call.");
        }

return result;
    }
}
At the end, we will just inject this MockWebClient in our demo-service controller and call its method. The method in turn will invoke a call to the service it is dependent upon.
Understanding the use of naming server
When we create baseUrl we used the name of the service on which demo-service was depending upon.
private final String baseUrl = "http://parent-demo-service";
In our case it is parent-demo-service thus we wrote http://parent-demo-service. This is the same name with which the service is registered in the Eureka server. Thus, with a naming server in place we just need to pass the name of service we were depending on. There’s no need to pass the addresses of the where the service would be running. In other words, Eureka takes care of service discovery for us, by just providing the name with which a service is registered to it. Let’s test this out. We have 2 instances of the parent-demo-service running, one runs on port 8000 & the other one on 8001. Let’s just hit the endpoint from demo-service(running on port 9000) in a browser/postman. The url is: localhost:9000/demo/greet.
Pay attention to the string we get as a response, it contains the port number from which the request was satisfied.
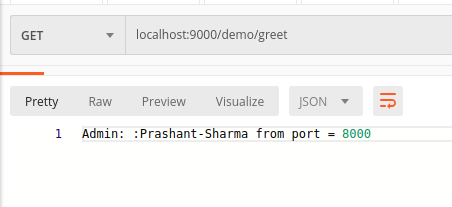 The first time we hit the endpoint we received the response from instance of parent-demo-service running on port 8000.
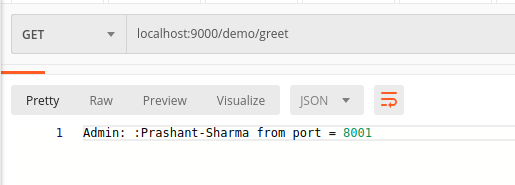 Next time, when we hit the same url we received response from the parent-demo-service instance running at port 8001.
Similarly, we could have created any number of instances of the parent-demo-service. Naturally, they would get registered to the Eureka server and then the load would be balanced among all the instances.
So, that’s how we configure a naming server with spring boot for service registry and discovery. Also, I hope you liked the content and it is useful. For more details, see the references and in case of doubts or suggestions please add them in the comments section. Certainly, you can find the complete code here.
Conclusion
Certainly, we went through a lot of stuff in this post. Starting from what elasticity and scalability means with microservices to how do we do dynamic service discovery. Firstly, we learnt the concept of dynamic service registry and discovery. Secondly, we saw how to use spring-boot and Eureka together to achieve our common goal. In addition to that, we saw how to use IDE to run configurable service instances on different ports. Finally, we saw how services would register themselves to the naming server on startup. As a result, we came to know how service registry & discovery could be acheived and used in Spring framework. That said, we also end up with a running practical implementation of the goal we had in mind.
References
Recommend
-
40
README.md Nomulus
-
40
In this article, we will discuss how to do Microservice Registry Discovery using Netflix Eureka. We will see an example of a Microservice and als...
-
67
One of the main tenets of the microservice architecture pattern is that a set of loosely-coupled, collaborating services works together to form a cohesive, whole application. In this way, it’s not so…
-
18
``` docker pull microsoft-iot-opc-registry-service ``` # Featured Tags * `latest` * `docker pull mcr.microsoft.com/iot/opc-registry-service:latest` * `preview` * `docker pull mcr.microsoft.com/iot/opc-registry-service:preview` # Featur...
-
10
New features and storage options in Red Hat Integration Service Registry 1.1 GA
-
16
Posted Sep 42020-09-04T02:20:00-05:00 by remotephone Move over docker hubYou might have heard Docker changed their pricing plans and free tier storage allowances recently. It caused quite the fuss and...
-
4
Blogs Kubernetes Service Discovery and Selection with Stork Kubernetes Service Discovery and Selection wi...
-
7
Introduction Netflix Eureka is one of the most popular Serice Discovery Framework for micro service system. It's very easy to use based on Spring Cloud. With all the clients registering to the Eureka server, they can talk to each oth...
-
4
Part 3 : Spring Cloud Service Registry and DiscoverySkip to contentShare this:In the microservices world,...
-
6
HBO Max and Discovery+ to merge as one streaming service
About Joyk
Aggregate valuable and interesting links.
Joyk means Joy of geeK