
2

Zabbix-agent的的安装与配置
source link: https://blog.csdn.net/Jason160918/article/details/115701666
Go to the source link to view the article. You can view the picture content, updated content and better typesetting reading experience. If the link is broken, please click the button below to view the snapshot at that time.
Zabbix-agent的的安装与配置
agent的安装比较简单,
大致分为四大步 (生产环境基本为内网环境)上传agent包→yum安装→修改配置文件后启动→web配置
第一步
上传agent包到/usr/local/src下
推荐一个国内yum源(清华源)下载速度快,稳定,包含所有版本agent包
https://mirrors.tuna.tsinghua.edu.cn/zabbix/zabbix/3.0/rhel/7/x86_64/
#3版本链接
https://mirrors.tuna.tsinghua.edu.cn/zabbix/zabbix/4.0/rhel/7/x86_64/
#4版本连接
https://mirrors.tuna.tsinghua.edu.cn/zabbix/zabbix/5.0/rhel/7/x86_64/
#5版本链接
第二步
在/usr/local/src路径下执行 yum -y localinstall agent包名
[root@dpi31 src]$ ls
zabbix-agent-3.0.32-1.el7.x86_64.rpm
[root@dpi31 src]$ yum  -y   localinstall  zabbix-agent-3.0.32-1.el7.x86_64.rpm
第三步
修改配置文件 配置文件默认路径在/etc/zabbix/
[root@dpi31 src]# cd  /etc/zabbix/
[root@dpi31 zabbix]# vi  zabbix_agentd.conf
打开把里面内容全部清空然后加入如下代码
需要修改里面的代码内容
Server=192.168.66.66
#指定Server或代理的ip(主备指定VIP),公网访问需要指定公网ip和对应端口,
代码内多写入一行 ServerPort=公网端口
ServerActive=192.168.66.66 #主动模式 同Server=ip保持一致
SourceIP=172.26.122.226 #填写本机的ip即可
PidFile=/var/run/zabbix/zabbix_agentd.pid
LogFile=/var/log/zabbix/zabbix_agentd.log
LogFileSize=100
Server=192.168.66.66
StartAgents=16
DebugLevel=3
ServerActive=192.168.66.66
SourceIP=172.26.122.226
HostnameItem=system.hostname
RefreshActiveChecks=90
BufferSend=30
BufferSize=2048
Timeout=9
AllowRoot=0
Include=/etc/zabbix/zabbix_agentd.d/
启动并查看日志有无报错信息
systemctl start zabbix-agent
tailf /var/log/zabbix/zabbix_agentd.log
[root@dpi31 zabbix]#  systemctl   start   zabbix-agent
[root@dpi31 zabbix]# tailf   /var/log/zabbix/zabbix_agentd.log
 17358:20210414:153745.435 agent #7 started [listener #6]
 17363:20210414:153745.435 agent #12 started [listener #11]
 17364:20210414:153745.437 agent #13 started [listener #12]
 17365:20210414:153745.437 agent #14 started [listener #13]
 17361:20210414:153745.438 agent #10 started [listener #9]
 17366:20210414:153745.439 agent #15 started [listener #14]
 17367:20210414:153745.439 agent #16 started [listener #15]
 17368:20210414:153745.440 agent #17 started [listener #16]
 17369:20210414:153745.441 agent #18 started [active checks #1]
web端的agent配置
创建主机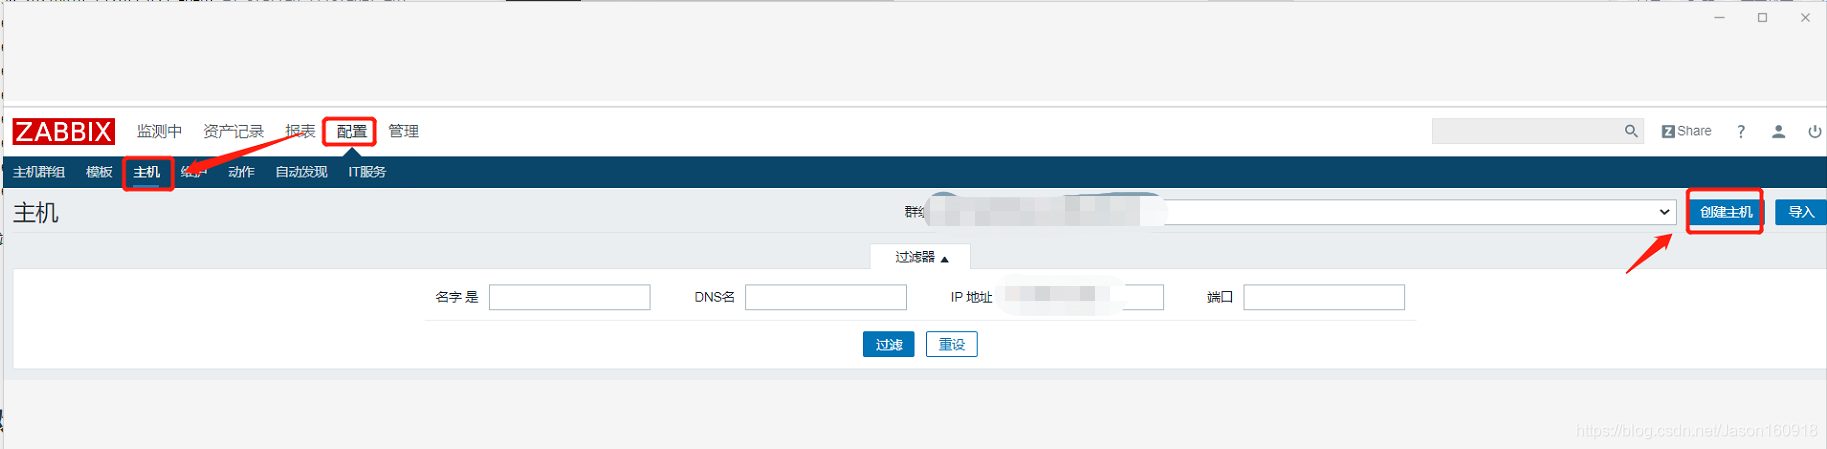
指定主机数据传输地址,群组,可见名称
链接基础模板(OS linux ,icmp ping, NTP )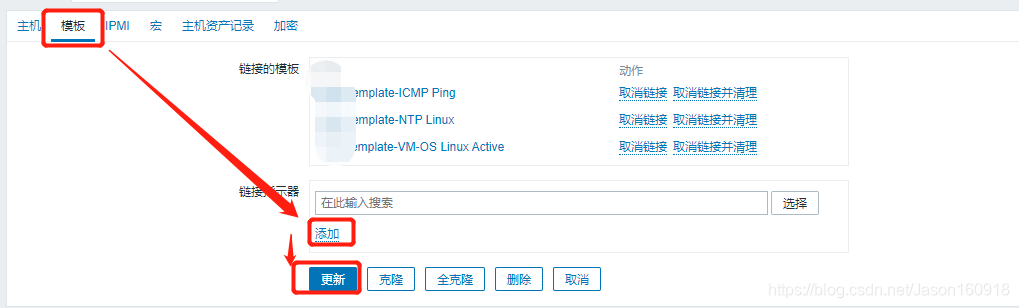
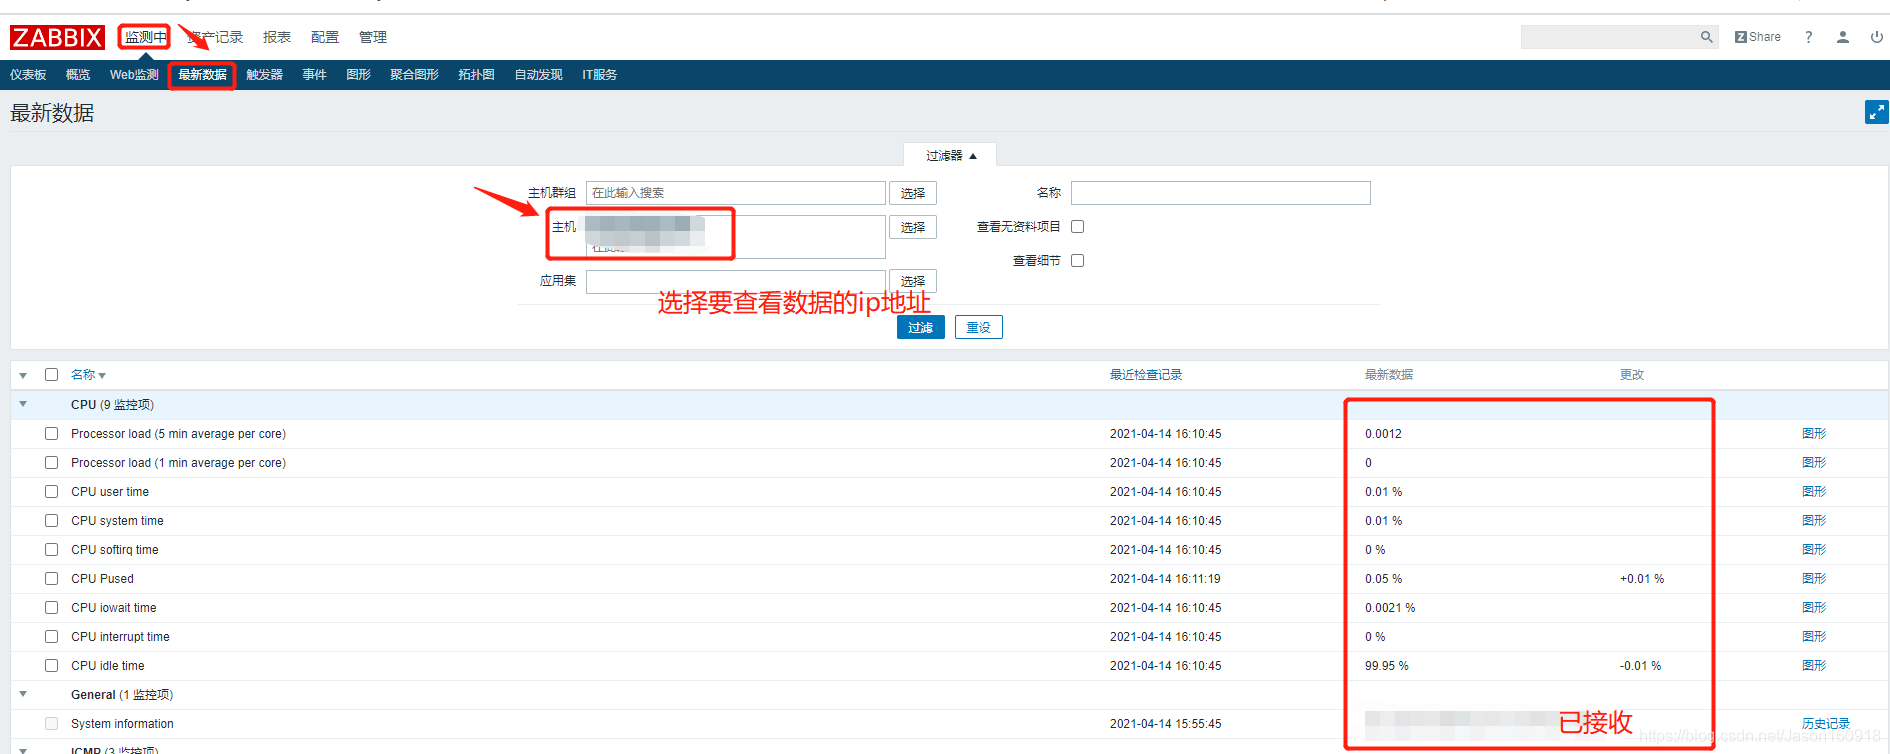
查看数据是否正常接收
完结
Recommend
About Joyk
Aggregate valuable and interesting links.
Joyk means Joy of geeK