

一文了解react中定义样式(css/less/sass)的常用方法
source link: https://segmentfault.com/a/1190000039824670
Go to the source link to view the article. You can view the picture content, updated content and better typesetting reading experience. If the link is broken, please click the button below to view the snapshot at that time.
一文了解react中定义样式(css/less/sass)的常用方法
react中通过jsx的语法方式,将html标签和js语法联系在一起,而css的编写方式,没有明确的指定编写方式,目前就有很多不同方法,每个方式各有其优缺点,我们一起来看看常用的定义方式有哪些。
最基础也是最简单的方式就是如html当中编写样式一样,直接内联使用,区别在于jsx中内联使用样式需要用小驼峰命名,不可使用短横线 -,jsx中编写js的表达式需要使用 {},而定义的样式是以对象的形式存在,也是通过{},所以看起来style标签里面使用了两个大括号{}
return(<div style={{color: 'blue'}}>
   hello react
</div>)
这样的方式优点是代码不会冲突,定义的代码都作用于当前元素,而且如果需要动态的获取state的值来设置样式也可以做到。缺点也很明显,当如果样式非常多的时候,即使把样式整体提炼出来,作为一个变量赋值给style,但仍然还是和业务逻辑混杂在一起,并且无法编写伪类等一些语法。
第二种方式能够将css代码与业务逻辑代码分离开来,在jsx的标签中定义className属性,自定义css的样式文件,再通过import引入css/scss/less等样式文件,就是使用的css的原生编写方式,定义伪类以及其它的高级选择器编写方式都可以支持。
return(<div className="title">
   hello react
</div>)

// 定义在单独的样式文件
.title {
    color: 'blue'
}
这样可以让代码比较清晰明了,css样式和jsx文件分离开。
当需要使用多个className,或者通过状态来变更className时,可以通过+来进行字符串拼接,或者使用数组,再通过toString()转成字符串
const isActive = true
<h2 className="active foo bar">我是标题1</h2>
// active foo bar
<h2 className={"foo", (isActive ? "active" : "") }>我是标题2</h2>
// active
<h2 className={"foo" + (isActive ? " active" : "") }>我是标题3</h2>
// foo, active
<h2 className={["foo",(isActive ? "active" : "")]}>我是标题4</h2>
// foo, active
<h2 className={["foo",(isActive ? "active" : "")].join(" ")}>
我是标题5</h2>
// foo avtive
为了简便使用,可以直接使用 classnames 这个库来动态的使用类名,classnames默认暴露了一个函数,传入参数的参数可以为字符串、对象和数组,传入null/undefined/boolean值也不会显示在页面上
import classNames from 'classnames'
const isShow = false
const list = ['foo', 'bar']
<h2 className={classNames({"active": isActive}, "foo")}>
我是标题6</h2>
// active foo
<h2 className={classNames({"active": isActive, "bar": isShow })}>
我是标题7</h2>
// active
<h2 className={classNames({"active": isActive}, list)}>
我是标题8</h2>
// active foo bar
<h2 className={classNames(null, undefined, 0, 10, '0', true, false)}>
我是标题8</h2>
// 10 0
但react开发的页面都叫做单页面应用,整个项目只有一个页面,样式在a组件引用,b组件即使没有引用,定义了同名的类名,也会有样式,这样导致如果c组件和d组件都定义了className属性,分别引入了css样式定义字体颜色,但最终两者呈现出的字体颜色为后引入的css文件里的字体颜色,即同名的样式会被覆盖掉。
为了解决这一问题,我们就需要在跟标签处再定义一个className,来包裹当前组件的所有标签,这样css样式的层级就比较多,并且还可能因为选择器优先级的问题(在外层定义了id选择器),而产生样式冲突,同时它不支持获取state属性动态设置样式。
return(<div className="homeComponent">
<div className="title">hello react</div>
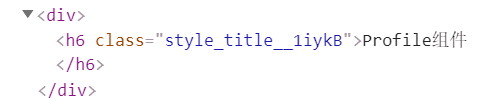
</div>)此时就产生了第三种编写方式,css的模块化,这样的方式可以区分各个组件的样式,不会相互覆盖,而且还能定义伪类,react脚手架当中内置了css modules的配置,我们可以直接将css的文件定义为 xxx.module.css,在xxx.module.css文件中,还是按照以前的css编写方式编写,不同点在于jsx页面中定义className,先引入该css文件,然后定义类名以对象的形式定义
import style from './index.module.css'
return(<div className={style.title}>
    hello react
</div>)
这样定义的样式是一个不会重复的字符
这样一种定义样式的方式能够比较有效的解决样式重叠的问题,麻烦之处就是每次编写样式的时候需要通过对象的语法来定义,并且不支持动态的设置样式。
那么就有了第四种方式,css in js,这是一种代码的理念,react中html和js没有分离,那么css也可以不分离,以js的方式来编写css,使css的编写更加的灵活,既可以像之前写css一样编写,又可以动态的获取属性。这种编写方式需要依赖其它库,这里使用常用的 styled-components来演示。
使用 styled-components之前需要对es6模板字符串的一种语法有了解,我们可以使用模板字符串来对字符串和属性进行拼接,在此之前的拼接可能都需要使用 +
const name = 'kiki'
const age = '18'
const user = `my name is ${name}, age is ${age}`
console.log(user) // my name is kiki, age is 18
但模板字符串还有一种用法,就是它可以像小括号一样调用函数,并且参数以一定的规则传递给函数
let name = 'kiki', age = 18
function foo(...args){
   console.log(args)
}
foo`hello`
foo`my name is ${name}, age is ${age} `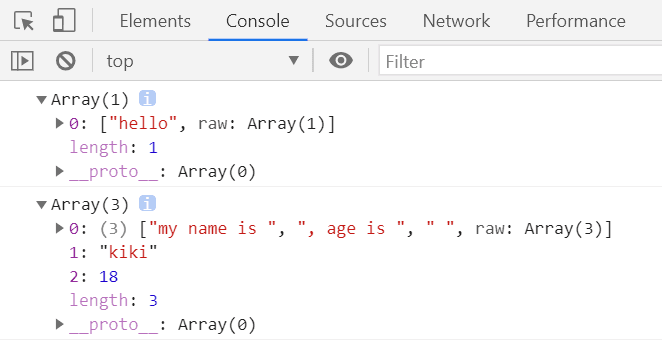
基于模板字符串的这种使用方式,我们来看看 styled-components 如何使用,先从styled-components的默认暴露中引入函数,创建一个div标签,并在模板字符串中定义样式,最后将创建的组件替换div标签,通过js定义的组件都可以抽取到一个单独的js文件当中,这里为了演示方便,就写在了一起。
import React, { PureComponent } from 'react'
import styled from 'styled-components'

const DivStyle = styled.div`
  background-color: gray;
  color: #fff;
  font-size: 20px;
`

export default class Profile extends PureComponent{
  render(){
    return(<div>
      <DivStyle>我是Profile组件的内容</DivStyle>
    </div>)
  }
}
这样看起来编写方式更为复杂了,但其实它还有很多好用的方式,除了使用样式,我们可能还对有些标签要做一些别的属性设置,以及我们需要通过当前页面维护的state属性来区分样式的展示,在定义样式的时候,value值以函数的形式从props中获取属性
import React, { PureComponent } from 'react'
import styled from 'styled-components'

const InputStyle = styled.input.attrs({
  type: 'text',
  placeholder: '请输入内容',
})`
  color: ${props => props.color}
`

export default class Deliver extends PureComponent{
  constructor(props){
    super(props)
    this.state = {
      color: 'purple'
    }
  }

  render(){
    return(<p>
      <InputStyle type="password" color={this.state.color}/>
    </p>)
  }
}
样式当中,如果有重复的定义样式方式,要么需要定义多个className,要么就得重复定义,styled-components提供了继承的方式使样式可以复用,通过styled-components中默认暴露的导出函数,直接传入已定义好样式的组件
import React, { PureComponent } from 'react'

import styled from 'styled-components'

const DivStyle = styled.div`
  background-color: gray;
  color: #fff;
  font-size: 14px;
`
const RecommondStyle = styled(DivStyle)`
  font-size: 20px;
`

export default class Profile extends PureComponent{
  render(){
    return(<div>
        <DivStyle>
          hello styled-components
        </DivStyle>
        <RecommondStyle>
          style属性的继承
        </RecommondStyle>
      </div>
    )
  }
}
另外,还可以给最外层的组件定义一个主题,这样它定义的样式子元素都可以从props中获取到
// 父组件
import { ThemeProvider } from 'styled-components'

export default class Home extends PureComponent{
  render(){
    return(<ThemeProvider theme={{color: 'brown'}}>
      <About/>
    </ThemeProvider>)
  }
}

// 子组件
import React, { PureComponent } from 'react'
import styled from 'styled-components'

const DivStyle = styled.div`
  color: ${props => props.theme.color};
`

export default class About extends PureComponent{
  render(){
    return(<DivStyle>
        style设置主题
      </DivStyle>
    )
  }
}
这样一种css的编写方式使得css的代码更像js,非常的灵活,也更具有复用性。
以上四种样式在react当中的定义方式是比较常用的,可以根据情况结合使用~
Recommend
About Joyk
Aggregate valuable and interesting links.
Joyk means Joy of geeK