
Android 5.x Theme 与 ToolBar 实战
source link: https://blog.csdn.net/lmj623565791/article/details/45303349
Go to the source link to view the article. You can view the picture content, updated content and better typesetting reading experience. If the link is broken, please click the button below to view the snapshot at that time.
转载请标明出处:
http://blog.csdn.net/lmj623565791/article/details/45303349;
本文出自:【张鸿洋的博客】
随着Material Design的逐渐的普及,业内也有很多具有分享精神的伙伴翻译了material design specification ,中文翻译地址:Material Design 中文版。So,我们也开始Android 5.x相关的blog,那么首先了解的当然是其主题的风格以及app bar。
当然,5.x普及可能还需要一段时间,所以我们还是尽可能的去使用兼容包支持低版本的设备。
ps:本博客使用:
- compileSdkVersion 22
- buildToolsVersion “22.0.1”
- compile ‘com.android.support:appcompat-v7:22.1.1’
- 忽然发现ActionBarActivity被弃用了,推荐使用AppCompatActivity,相关blog地址:Android Support Library 22.1
2、Material Design的Theme
md的主题有:
- @android:style/Theme.Material (dark version)
- @android:style/Theme.Material.Light (light version)
- @android:style/Theme.Material.Light.DarkActionBar
与之对应的Compat Theme:
- Theme.AppCompat
- Theme.AppCompat.Light
- Theme.AppCompat.Light.DarkActionBar
(1)个性化 Color Palette
我们可以根据我们的app的风格,去定制Color Palette(调色板),重点有以下几个属性:
<resources>
    <!-- Base application theme. -->
    <style name="AppBaseTheme" parent="Theme.AppCompat">

        <!-- customize the color palette -->
        <item name="colorPrimary">@color/material_blue_500</item>
        <item name="colorPrimaryDark">@color/material_blue_700</item>
        <item name="colorAccent">@color/material_green_A200</item>
    </style>
</resources>
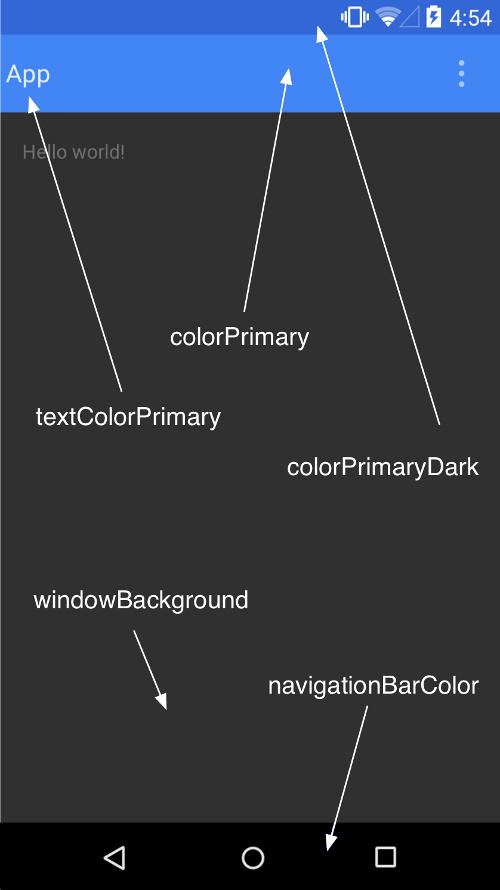
- colorPrimary 对应ActionBar的颜色。
- colorPrimaryDark对应状态栏的颜色
- colorAccent 对应EditText编辑时、RadioButton选中、CheckBox等选中时的颜色。
与之对应的图:
metarial design的theme允许我们去设置status bar的颜色,如果你项目的最小支持版本为5.0,那么你可以使用
android:Theme.Material,设置android:statusBarColor。当然了这种情况目前来说比较少,所以我们多数使用的是Theme.AppCompat,通过设置android:colorPrimaryDark.来设置status bar颜色。(ps:默认情况下,android:statusBarColor的值继承自android:colorPrimaryDark).
对于5.0以下的设备,目前colorPrimaryDark无法去个性化状态栏的颜色;底部的navagationBar可能也不一样,更别说设置颜色了。
下面写个简单的Demo去测试下。
(2)测试效果
values/styles.xml
<resources>
    <!-- Base application theme. -->

    <style name="AppTheme" parent="AppBaseTheme">


    </style>

    <style name="AppBaseTheme" parent="Theme.AppCompat.Light">

        <!-- customize the color palette -->
        <item name="colorPrimary">@color/material_blue_500</item>
        <item name="colorPrimaryDark">@color/material_blue_700</item>
        <item name="colorAccent">@color/material_green_A200</item>

    </style>


</resources>
values-v21/styles.xml
<resources>

    <style name="AppTheme" parent="AppBaseTheme">
        <item name="android:statusBarColor">@color/material_blue_700</item>
    </style>


</resources>
values/colors.xml
<?xml version="1.0" encoding="utf-8"?>
<resources>
    <color name="material_blue_500">#009688</color>
    <color name="material_blue_700">#00796B</color>
    <color name="material_green_A200">#FD87A9</color>
</resources>
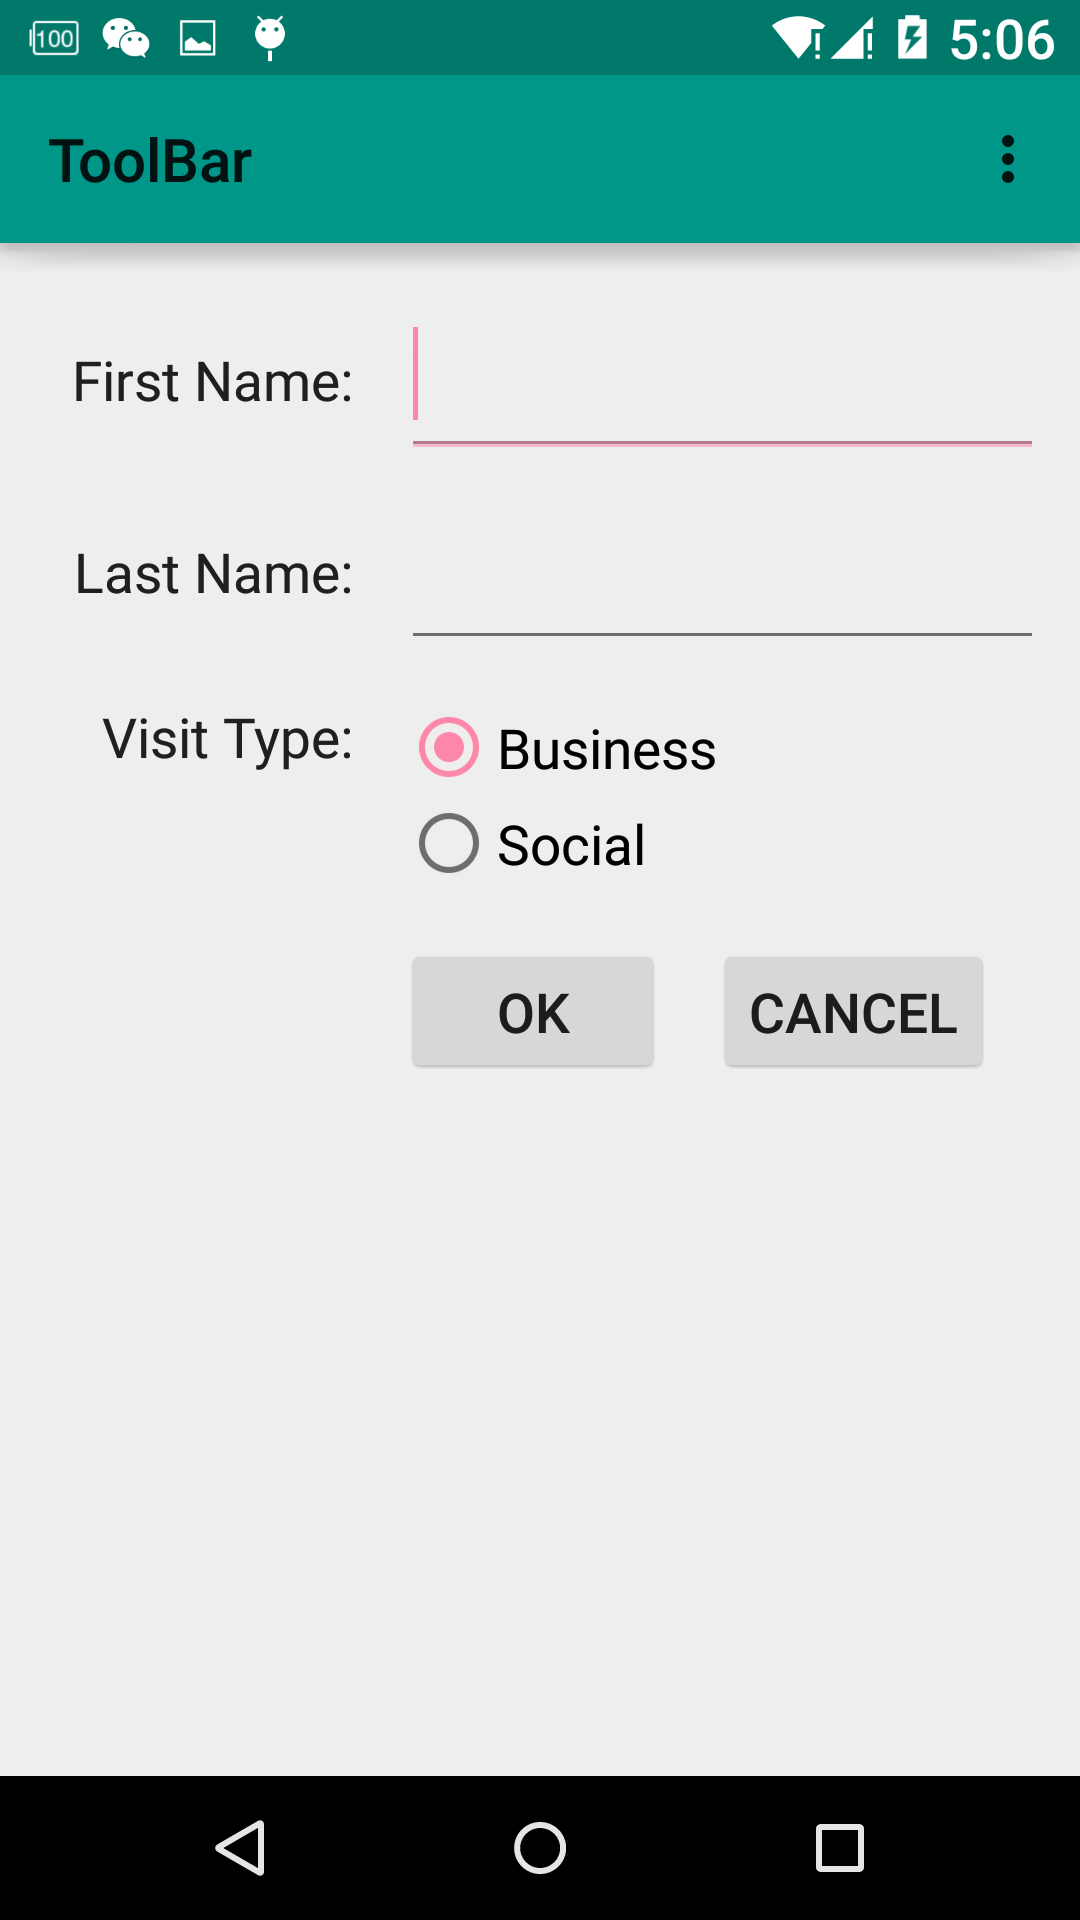
可以看到:colorAccent也就是图中的粉色,EditText正在输入时,RadioButton选中时的颜色。ps:5.0以下设备,状态栏颜色不会变化。
3、ToolBar的使用
众所周知,在使用ActionBar的时候,一堆的问题:这个文字能不能定制,位置能不能改变,图标的间距怎么控制神马的,由此暴露出了ActionBar设计的不灵活。为此官方提供了ToolBar,并且提供了supprot library用于向下兼容。Toolbar之所以灵活,是因为它其实就是一个ViewGroup,我们在使用的时候和普通的组件一样,在布局文件中声明。
(1)ToolBar的引入
既然准备用ToolBar,首先看看如何将其引入到app中。
1)隐藏原本的ActionBar
隐藏可以通过修改我们继承的主题为:Theme.AppCompat.Light.NoActionBar,当然也可以通过设置以下属性完成:
<item name="windowActionBar">false</item>
<item name="android:windowNoTitle">true</item>
我们这里选择前者:
    <style name="AppBaseTheme" parent="Theme.AppCompat.Light.NoActionBar">

        <!-- customize the color palette -->
        <item name="colorPrimary">@color/material_blue_500</item>
        <item name="colorPrimaryDark">@color/material_blue_700</item>
        <item name="colorAccent">@color/material_green_A200</item>

    </style>
2)在布局文件中声明
<LinearLayout xmlns:android="http://schemas.android.com/apk/res/android"
    android:layout_width="match_parent"
    android:orientation="vertical"
    android:layout_height="match_parent"
    xmlns:app="http://schemas.android.com/apk/res-auto">

    <android.support.v7.widget.Toolbar
        android:id="@+id/id_toolbar"
        android:layout_height="wrap_content"
        android:layout_width="match_parent" />

    <android.support.v7.widget.GridLayout
        android:layout_width="wrap_content"
        android:layout_height="wrap_content"
        android:layout_gravity="center_horizontal"

        app:useDefaultMargins="true"
        app:columnCount="3">


        <TextView
            android:text="First Name:"
            app:layout_gravity="right" />

        <EditText
            android:ems="10"
            app:layout_columnSpan="2" />

        <TextView
            android:text="Last Name:"

            app:layout_column="0"
            app:layout_gravity="right" />

        <EditText
            android:ems="10"
            app:layout_columnSpan="2" />


        <TextView
            android:text="Visit Type:"

            app:layout_column="0"
            app:layout_gravity="right" />

        <RadioGroup app:layout_columnSpan="2">

            <RadioButton
                android:layout_width="wrap_content"
                android:layout_height="wrap_content"
                android:text="Business" />


            <RadioButton
                android:layout_width="wrap_content"
                android:layout_height="wrap_content"
                android:text="Social" />

        </RadioGroup>

        <Button
            android:text="Ok"
            app:layout_column="1" />

        <Button
            android:text="Cancel"
            app:layout_column="2" />

    </android.support.v7.widget.GridLayout>

</LinearLayout>
ok,这里我们也贴出来上面图片的效果的xml,使用GridLayout实现的,有兴趣的可以研究下。可以看到我们在布局文件中定义了ToolBar。
3)代码中设定
public class MainActivity extends AppCompatActivity {

    @Override
    protected void onCreate(Bundle savedInstanceState) {
        super.onCreate(savedInstanceState);
        setContentView(R.layout.activity_main);

        Toolbar toolbar = (Toolbar) findViewById(R.id.id_toolbar);
        setSupportActionBar(toolbar);
    }
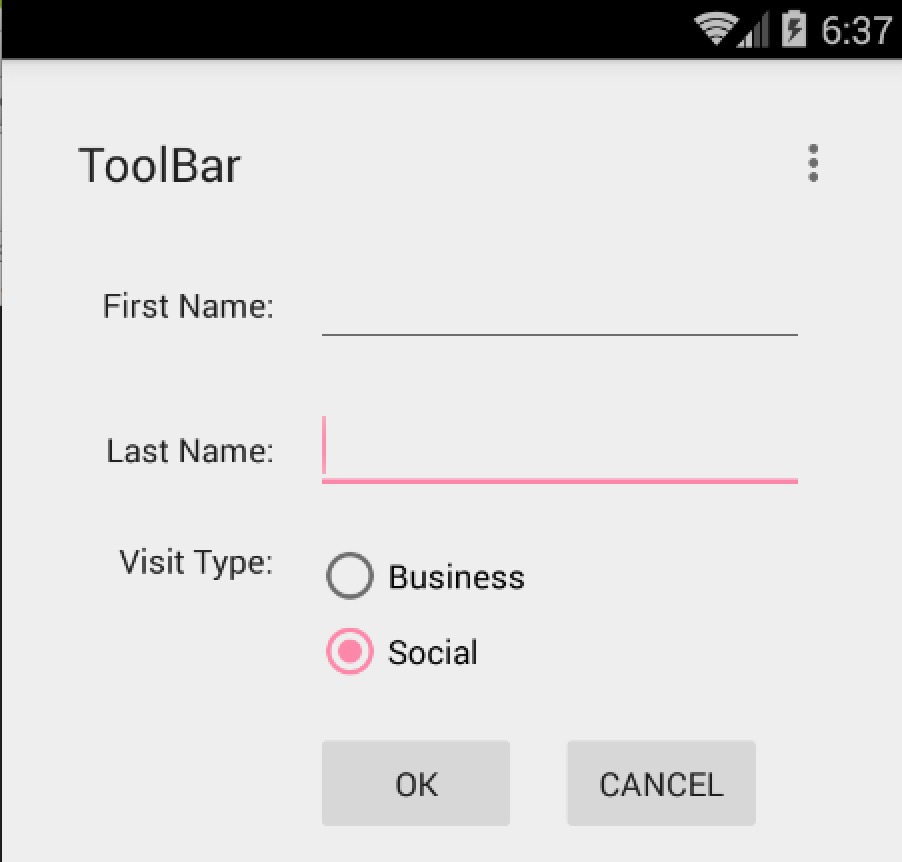
ok,基本就是先隐藏ActionBar,然后在布局文件中声明,最后代码中设定一下。现在看一下效果图:
可以看到我们的ToolBar显示出来了,默认的Title为ToolBar,但是这个样式实在是不敢恭维,下面看我们如何定制它。
(2)定制ToolBar
首先给它一个nice的背景色,还记得前面的colorPrimary么,用于控制ActionBar的背景色的。当然这里我们的ToolBar就是一个普通的ViewGroup在布局中,所以我们直接使用background就好,值可以为:?attr/colorPrimary使用主题中定义的值。
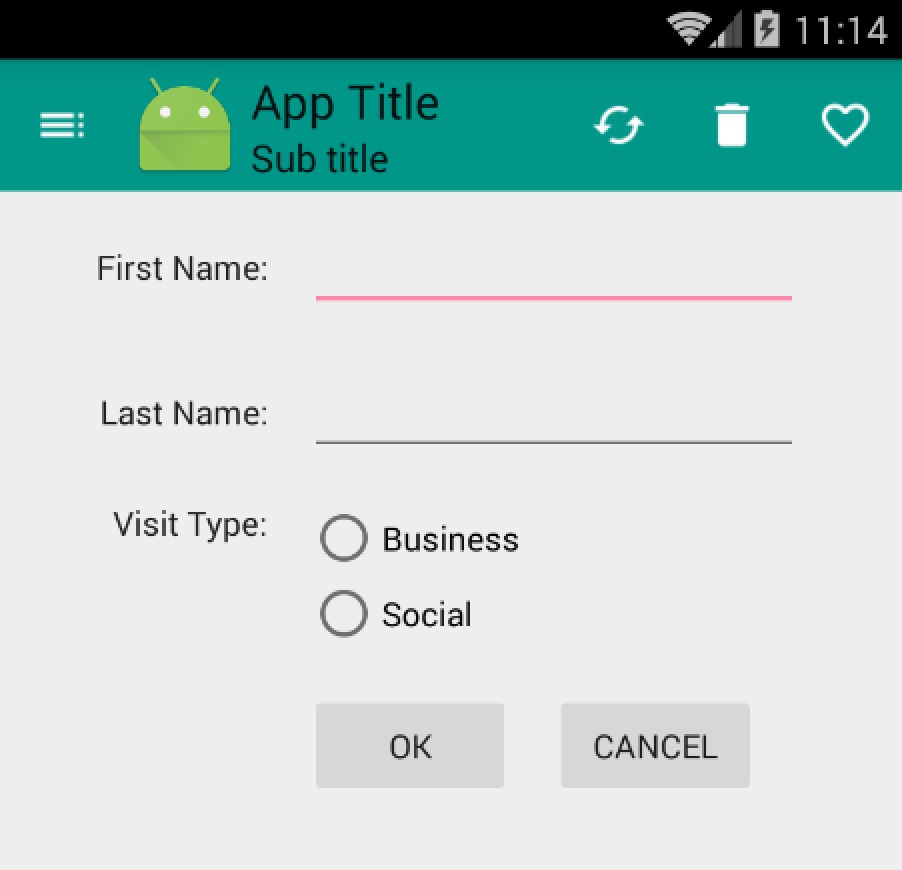
ToolBar中包含Nav Icon , Logo , Title , Sub Title , Menu Items 。
我们可以通过代码设置上述ToolBar中的控件:
@Override
    protected void onCreate(Bundle savedInstanceState) {
        super.onCreate(savedInstanceState);
        setContentView(R.layout.activity_main);

        Toolbar toolbar = (Toolbar) findViewById(R.id.id_toolbar);

        // App Logo
        toolbar.setLogo(R.mipmap.ic_launcher);
        // Title
        toolbar.setTitle("App Title");
        // Sub Title
        toolbar.setSubtitle("Sub title");

        setSupportActionBar(toolbar);
        //Navigation Icon
        toolbar.setNavigationIcon(R.drawable.ic_toc_white_24dp);
    }
可选方案当然如果你喜欢,也可以在布局文件中去设置部分属性:
 <android.support.v7.widget.Toolbar
        android:id="@+id/id_toolbar"
        app:title="App Title"
        app:subtitle="Sub Title"
        app:navigationIcon="@drawable/ic_toc_white_24dp"
        android:layout_height="wrap_content"
        android:minHeight="?attr/actionBarSize"
        android:layout_width="match_parent"
        android:background="?attr/colorPrimary"/>
至于Menu Item,依然支持在menu/menu_main.xml去声明,然后复写onCreateOptionsMenu和onOptionsItemSelected即可。
可选方案也可以通过toolbar.setOnMenuItemClickListener实现点击MenuItem的回调。
  toolbar.setOnMenuItemClickListener(new Toolbar.OnMenuItemClickListener() {
            @Override
            public boolean onMenuItemClick(MenuItem item) {
                return false;
            }
});关于字体的样式,可以在布局文件设置属性app:titleTextAppearance、app:subtitleTextAppearance或者代码setTitleTextAppearance、setSubTitleTextAppearance设置。
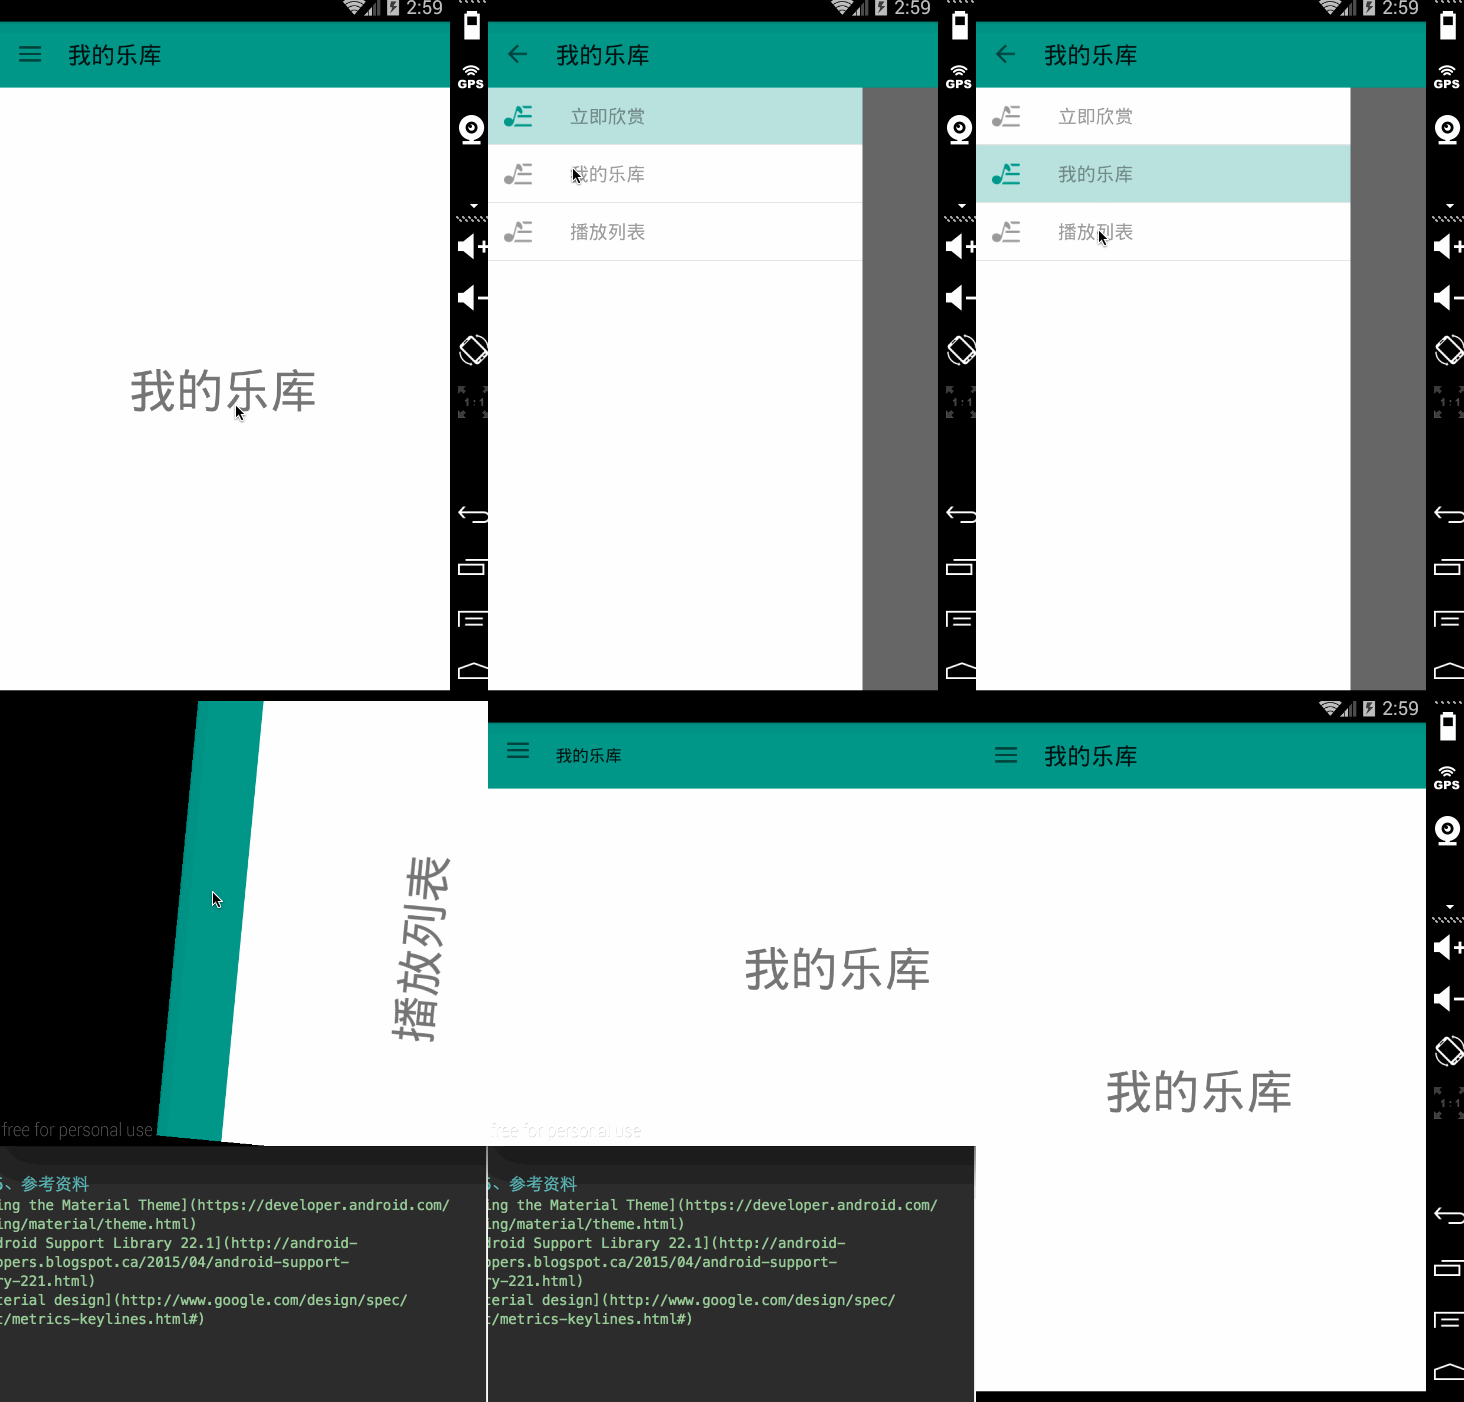
简单介绍了Toolbar以后呢,我们决定做点有意思的事,整合ToolBar,DrawerLayout,ActionBarDrawerToggle写个实用的例子,效果图如下:
ok,简单处理了下横纵屏幕的切换。接下来看代码实现。
整体实现还是比较容易的,首先需要引入DrawerLayout(如果你对DrawerLayout不了解,可以参考
Android DrawerLayout 高仿QQ5.2双向侧滑菜单),然后去初始化mActionBarDrawerToggle,mActionBarDrawerToggle实际上是个DrawerListener,设置mDrawerLayout.setDrawerListener(mActionBarDrawerToggle);就已经能够实现上面点击Nav Icon切换效果了。当然了细节还是挺多的。
我们的效果图,左侧菜单为Fragment,内容区域为Fragment,点击左侧菜单切换内容区域的Fragment即可。关于Fragment的知识,可以查看:Android Fragment 你应该知道的一切
- 布局文件
activity_main.xml
<LinearLayout xmlns:android="http://schemas.android.com/apk/res/android"
    android:layout_width="match_parent"
    android:orientation="vertical"
    android:layout_height="match_parent"
    android:background="#ffffffff"
    xmlns:app="http://schemas.android.com/apk/res-auto">

    <!--app:subtitle="Sub Title"-->
    <android.support.v7.widget.Toolbar
        android:id="@+id/id_toolbar"
        app:title="App Title"
        app:navigationIcon="@drawable/ic_toc_white_24dp"
        android:layout_height="wrap_content"
        android:minHeight="?attr/actionBarSize"
        android:layout_width="match_parent"
        android:background="?attr/colorPrimary" />

    <android.support.v4.widget.DrawerLayout
        android:id="@+id/id_drawerlayout"
        android:layout_width="match_parent"
        android:layout_height="match_parent">

        <FrameLayout
            android:id="@+id/id_content_container"
            android:layout_width="match_parent"
            android:layout_height="match_parent"></FrameLayout>

        <FrameLayout
            android:id="@+id/id_left_menu_container"
            android:layout_width="match_parent"
            android:layout_height="match_parent"
            android:layout_gravity="left"
            android:background="#ffffffff"></FrameLayout>


    </android.support.v4.widget.DrawerLayout>


</LinearLayout>
DrawerLayout中包含两个FrameLayout,分别放内容区域和左侧菜单的Fragment。
- LeftMenuFragment
package com.zhy.toolbar;

import android.os.Bundle;
import android.support.annotation.Nullable;
import android.support.v4.app.ListFragment;
import android.view.LayoutInflater;
import android.view.View;
import android.view.ViewGroup;
import android.widget.ListView;

/**
 * Created by zhy on 15/4/26.
 */
public class LeftMenuFragment extends ListFragment {

    private static final int SIZE_MENU_ITEM = 3;

    private MenuItem[] mItems = new MenuItem[SIZE_MENU_ITEM];

    private LeftMenuAdapter mAdapter;

    private LayoutInflater mInflater;

    @Override
    public void onCreate(@Nullable Bundle savedInstanceState) {
        super.onCreate(savedInstanceState);

        mInflater = LayoutInflater.from(getActivity());

        MenuItem menuItem = null;
        for (int i = 0; i < SIZE_MENU_ITEM; i++) {
            menuItem = new MenuItem(getResources().getStringArray(R.array.array_left_menu)[i], false, R.drawable.music_36px, R.drawable.music_36px_light);
            mItems[i] = menuItem;
        }
    }

    @Override
    public View onCreateView(LayoutInflater inflater, ViewGroup container, Bundle savedInstanceState) {
        return super.onCreateView(inflater, container, savedInstanceState);
    }

    @Override
    public void onViewCreated(View view, @Nullable Bundle savedInstanceState) {
        super.onViewCreated(view, savedInstanceState);

        setListAdapter(mAdapter = new LeftMenuAdapter(getActivity(), mItems));

    }

    @Override
    public void onListItemClick(ListView l, View v, int position, long id) {
        super.onListItemClick(l, v, position, id);

        if (mMenuItemSelectedListener != null) {
            mMenuItemSelectedListener.menuItemSelected(((MenuItem) getListAdapter().getItem(position)).text);
        }

        mAdapter.setSelected(position);

    }


    //选择回调的接口
    public interface OnMenuItemSelectedListener {
        void menuItemSelected(String title);
    }
    private OnMenuItemSelectedListener mMenuItemSelectedListener;

    public void setOnMenuItemSelectedListener(OnMenuItemSelectedListener menuItemSelectedListener) {
        this.mMenuItemSelectedListener = menuItemSelectedListener;
    }


}
继承自ListFragment,主要用于展示各个Item,提供了一个选择Item的回调,这个需要在Activity中去注册处理。
- LeftMenuAdapter
package com.zhy.toolbar;

import android.content.Context;
import android.graphics.Color;
import android.view.LayoutInflater;
import android.view.View;
import android.view.ViewGroup;
import android.widget.ArrayAdapter;
import android.widget.ImageView;
import android.widget.TextView;

/**
 * Created by zhy on 15/4/26.
 */
public class LeftMenuAdapter extends ArrayAdapter<MenuItem> {


    private LayoutInflater mInflater;

    private int mSelected;


    public LeftMenuAdapter(Context context, MenuItem[] objects) {
        super(context, -1, objects);

        mInflater = LayoutInflater.from(context);

    }

    @Override
    public View getView(int position, View convertView, ViewGroup parent) {


        if (convertView == null) {
            convertView = mInflater.inflate(R.layout.item_left_menu, parent, false);
        }

        ImageView iv = (ImageView) convertView.findViewById(R.id.id_item_icon);
        TextView title = (TextView) convertView.findViewById(R.id.id_item_title);
        title.setText(getItem(position).text);
        iv.setImageResource(getItem(position).icon);
        convertView.setBackgroundColor(Color.TRANSPARENT);

        if (position == mSelected) {
            iv.setImageResource(getItem(position).iconSelected);
            convertView.setBackgroundColor(getContext().getResources().getColor(R.color.state_menu_item_selected));
        }

        return convertView;
    }

    public void setSelected(int position) {
        this.mSelected = position;
        notifyDataSetChanged();
    }


}


package com.zhy.toolbar;

public class MenuItem {

    public MenuItem(String text, boolean isSelected, int icon, int iconSelected) {
        this.text = text;
        this.isSelected = isSelected;
        this.icon = icon;
        this.iconSelected = iconSelected;
    }

    boolean isSelected;
    String text;
    int icon;
    int iconSelected;
}
Adapter没撒说的~~提供了一个setSection方法用于设置选中Item的样式什么的。
接下来看ContentFragment,仅仅只是一个TextView而已,所以代码也比较easy。
package com.zhy.toolbar;

import android.os.Bundle;
import android.support.annotation.Nullable;
import android.support.v4.app.Fragment;
import android.text.TextUtils;
import android.view.Gravity;
import android.view.LayoutInflater;
import android.view.View;
import android.view.ViewGroup;
import android.widget.TextView;

/**
 * Created by zhy on 15/4/26.
 */
public class ContentFragment extends Fragment {

    public static final String KEY_TITLE = "key_title";
    private String mTitle;

    public static ContentFragment newInstance(String title) {
        ContentFragment fragment = new ContentFragment();
        Bundle bundle = new Bundle();
        bundle.putString(KEY_TITLE, title);
        fragment.setArguments(bundle);
        return fragment;
    }

    @Nullable
    @Override
    public View onCreateView(LayoutInflater inflater, @Nullable ViewGroup container,
                             @Nullable Bundle savedInstanceState) {

        TextView tv = new TextView(getActivity());
        String title = (String) getArguments().get(KEY_TITLE);
        if (!TextUtils.isEmpty(title))
        {
            tv.setGravity(Gravity.CENTER);
            tv.setTextSize(40);
            tv.setText(title);
        }

        return tv;
    }
}
提供newInstance接收一个title参数去实例化它。
最后就是我们的MainActivity了,负责管理各种Fragment。
- MainActivity
package com.zhy.toolbar;

import android.os.Bundle;
import android.support.v4.app.Fragment;
import android.support.v4.app.FragmentManager;
import android.support.v4.app.FragmentTransaction;
import android.support.v4.widget.DrawerLayout;
import android.support.v7.app.ActionBarDrawerToggle;
import android.support.v7.app.AppCompatActivity;
import android.support.v7.widget.Toolbar;
import android.text.TextUtils;
import android.view.Gravity;

import java.util.List;


public class MainActivity extends AppCompatActivity {

    private ActionBarDrawerToggle mActionBarDrawerToggle;

    private DrawerLayout mDrawerLayout;

    private Toolbar mToolbar;

    private LeftMenuFragment mLeftMenuFragment;
    private ContentFragment mCurrentFragment;

    private String mTitle;

    private static final String TAG = "com.zhy.toolbar";
    private static final String KEY_TITLLE = "key_title";

    @Override
    protected void onCreate(Bundle savedInstanceState) {
        super.onCreate(savedInstanceState);
        setContentView(R.layout.activity_main);

        initToolBar();
        initViews();

        //恢复title
        restoreTitle(savedInstanceState);

        FragmentManager fm = getSupportFragmentManager();
        //查找当前显示的Fragment
        mCurrentFragment = (ContentFragment) fm.findFragmentByTag(mTitle);

        if (mCurrentFragment == null) {
            mCurrentFragment = ContentFragment.newInstance(mTitle);
            fm.beginTransaction().add(R.id.id_content_container, mCurrentFragment, mTitle).commit();
        }

        mLeftMenuFragment = (LeftMenuFragment) fm.findFragmentById(R.id.id_left_menu_container);
        if (mLeftMenuFragment == null) {
            mLeftMenuFragment = new LeftMenuFragment();
            fm.beginTransaction().add(R.id.id_left_menu_container, mLeftMenuFragment).commit();
        }

        //隐藏别的Fragment,如果存在的话
        List<Fragment> fragments = fm.getFragments();
        if (fragments != null)

            for (Fragment fragment : fragments) {
                if (fragment == mCurrentFragment || fragment == mLeftMenuFragment) continue;
                fm.beginTransaction().hide(fragment).commit();
            }

        //设置MenuItem的选择回调
        mLeftMenuFragment.setOnMenuItemSelectedListener(new LeftMenuFragment.OnMenuItemSelectedListener() {
            @Override
            public void menuItemSelected(String title) {

                FragmentManager fm = getSupportFragmentManager();
                ContentFragment fragment = (ContentFragment) getSupportFragmentManager().findFragmentByTag(title);
                if (fragment == mCurrentFragment) {
                    mDrawerLayout.closeDrawer(Gravity.LEFT);
                    return;
                }

                FragmentTransaction transaction = fm.beginTransaction();
                transaction.hide(mCurrentFragment);

                if (fragment == null) {
                    fragment = ContentFragment.newInstance(title);
                    transaction.add(R.id.id_content_container, fragment, title);
                } else {
                    transaction.show(fragment);
                }
                transaction.commit();

                mCurrentFragment = fragment;
                mTitle = title;
                mToolbar.setTitle(mTitle);
                mDrawerLayout.closeDrawer(Gravity.LEFT);


            }
        });

    }

    private void restoreTitle(Bundle savedInstanceState) {
        if (savedInstanceState != null)
            mTitle = savedInstanceState.getString(KEY_TITLLE);

        if (TextUtils.isEmpty(mTitle)) {
            mTitle = getResources().getStringArray(
                    R.array.array_left_menu)[0];
        }

        mToolbar.setTitle(mTitle);
    }


    @Override
    protected void onSaveInstanceState(Bundle outState) {
        super.onSaveInstanceState(outState);
        outState.putString(KEY_TITLLE, mTitle);
    }

    private void initToolBar() {

        Toolbar toolbar = mToolbar = (Toolbar) findViewById(R.id.id_toolbar);
        // App Logo
        // toolbar.setLogo(R.mipmap.ic_launcher);
        // Title
        toolbar.setTitle(getResources().getStringArray(R.array.array_left_menu)[0]);
        // Sub Title
        // toolbar.setSubtitle("Sub title");

//        toolbar.setTitleTextAppearance();


        setSupportActionBar(toolbar);


        //Navigation Icon
        toolbar.setNavigationIcon(R.drawable.ic_toc_white_24dp);
        /*
        toolbar.setOnMenuItemClickListener(new Toolbar.OnMenuItemClickListener() {
            @Override
            public boolean onMenuItemClick(MenuItem item) {
                return false;
            }
        });*/

    }

    private void initViews() {

        mDrawerLayout = (DrawerLayout) findViewById(R.id.id_drawerlayout);

        mActionBarDrawerToggle = new ActionBarDrawerToggle(this,
                mDrawerLayout, mToolbar, R.string.open, R.string.close);
        mActionBarDrawerToggle.syncState();
        mDrawerLayout.setDrawerListener(mActionBarDrawerToggle);


    }
}
内容区域的切换是通过Fragment hide和show实现的,毕竟如果用replace,如果Fragment的view结构比较复杂,可能会有卡顿。当然了,注意每个Fragment占据的内存情况,如果内存不足,可能需要改变实现方式。
对于旋转屏幕或者应用长时间置于后台,Activity重建的问题,做了简单的处理。
对了,写布局的时候,可以尽可能的去考虑 Material design 的规范。
5、参考资料
源码下载
群号: 264950424
微信公众号:hongyangAndroid
(欢迎关注,第一时间推送博文信息)
Recommend
About Joyk
Aggregate valuable and interesting links.
Joyk means Joy of geeK
