

Hosting a static website | Cloud Storage | Google Cloud
source link: https://cloud.google.com/storage/docs/hosting-static-website
Go to the source link to view the article. You can view the picture content, updated content and better typesetting reading experience. If the link is broken, please click the button below to view the snapshot at that time.
Hosting a static website
This tutorial describes how to configure a Cloud Storage bucket to host a static website for a domain you own. Static web pages can contain client-side technologies such as HTML, CSS, and JavaScript. They cannot contain dynamic content such as server-side scripts like PHP.
Since Cloud Storage doesn't support custom domains with HTTPS on its own, this tutorial uses Cloud Storage with HTTP(S) Load Balancing to serve content from a custom domain over HTTPS. For more ways to serve content from a custom domain over HTTPS, see the related troubleshooting topic. You can also use Cloud Storage to serve custom domain content over HTTP, which doesn't require a load balancer.
For examples and tips on static web pages, including how to host static assets for a dynamic website, see the Static Website page.
Caution: This tutorial makes content available to the public internet. We recommend that you don't serve content that contains sensitive or private data from your Cloud Storage bucket.Objectives
This tutorial shows you how to:- Create a bucket.
- Upload and share your site's files.
- Set up a load balancer and SSL certificate.
- Connect your load balancer to your bucket.
- Point your domain to your load balancer using an
Arecord. - Test the website.
Costs
This tutorial uses the following billable components of Google Cloud:
- Cloud Storage
- Cloud Load Balancing
See the Monitoring your charges tip for details on what charges may be incurred when hosting a static website, and see the Pricing page for details on Cloud Storage costs.
Before you begin
- Sign in to your Google Cloud account. If you're new to Google Cloud, create an account to evaluate how our products perform in real-world scenarios. New customers also get $300 in free credits to run, test, and deploy workloads.
-
In the Google Cloud Console, on the project selector page, select or create a Google Cloud project.
Note: If you don't plan to keep the resources that you create in this procedure, create a project instead of selecting an existing project. After you finish these steps, you can delete the project, removing all resources associated with the project. -
Make sure that billing is enabled for your Cloud project. Learn how to confirm that billing is enabled for your project.
- Have a domain that you own or manage. If you don't have an existing domain,
there are many services through which you can register a new domain, such as
Google Domains.
This tutorial uses the domain
example.com. - Have a few website files you want to serve. This tutorial works best if you
have at least an index page (
index.html) and a 404 page (404.html). - Have the following Identity and Access Management roles: Storage Object Admin and Network Admin.
- (Optional) You can give your Cloud Storage bucket the same name
as your domain, which allows you to control the website configuration for
your bucket from the Cloud Console. To do so, you must
Verify that
you own or manage the domain that you will be using. Make sure you are
verifying the top-level domain, such as
example.com, and not a subdomain, such aswww.example.com.Note: If you own the domain you are associating to a bucket, you might have already performed this step in the past. If you purchased your domain through Google Domains, verification is automatic.
Creating a bucket
To create a bucket:
- Open the Cloud Storage browser in the Google Cloud Console.
Open the Cloud Storage browser - Click Create bucket to open the bucket creation form.
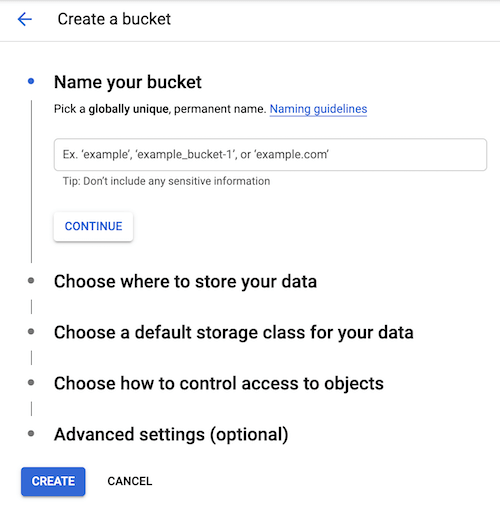
- Specify a Name, subject to the bucket name requirements.
- Select a Location type and Location where the bucket data will be permanently stored.
- Select a Default storage class for the bucket. The default
storage class is assigned by default to all
objects uploaded to the bucket.
Note: The Monthly cost estimate panel in the right pane estimates the bucket's monthly costs based on your selected storage class and location, as well as your expected data size and operations.
- Select an Access control model to determine how you control access to the bucket's objects.
- Optionally, you can add bucket labels, set a retention policy, and choose an encryption method.
See Troubleshooting for how to get detailed error information about failed operations in the Cloud Storage browser.
Uploading your site's files
Add the files you want your website to serve to the bucket:
- Open the Cloud Storage browser in the Google Cloud Console.
Open the Cloud Storage browser In the list of buckets, click on the name of the bucket that you created.
The Bucket details page opens, with the Objects tab selected.
Click the Upload files button.
In the file dialog, browse to the desired file and select it.
After the upload completes, you should see the file name along with file information displayed in the bucket.
See Troubleshooting for how to get detailed error information about failed operations in the Cloud Storage browser.
Note: If you are migrating an existing website, or copying a large number of files, usegsutil rsync to move your content. You can use the -R
option to recursively copy directory trees. For example, to synchronize a local
directory named local-dir with a bucket named my-static-assets, use:
gsutil rsync -R local-dir gs://my-static-assets
Sharing your files
To make all objects in your bucket readable to everyone on the public internet:
Caution: Before making your bucket publicly accessible, make sure that the files in your bucket do not contain sensitive or private information.- Open the Cloud Storage browser in the Google Cloud Console.
Open the Cloud Storage browser In the list of buckets, click on the name of the bucket that you want to make public.
Select the Permissions tab near the top of the page.
Click the Add members button.
The Add members dialog box appears.
In the New members field, enter
allUsers.In the Select a role drop down, select the Cloud Storage sub-menu, and click the Storage Object Viewer option.
Click Save.
Click Allow public access.
Once shared publicly, a link icon appears for each object in the public access column. You can click on this icon to get the URL for the object.
See Troubleshooting for how to get detailed error information about failed operations in the Cloud Storage browser.
Note:roles/storage.objectViewer includes permission to list the objects
in the bucket. If you don't want to grant listing publicly, use
roles/storage.legacyObjectReader.To make individual objects in your bucket publicly accessible, you need to switch your bucket's Access control mode to Fine-grained. Generally, making all files in your bucket publicly accessible is easier and faster.
Visitors receive a http 403 response code when requesting the URL for a
non-public or non-existent file. See the next section for information on how to
add an error page that uses a http 404 response code.
Recommended: Assigning specialty pages
You can assign an index page suffix, which is controlled by the MainPageSuffix
property, and a custom error page, which is controlled by the NotFoundPage
property. Assigning either is optional, but without an index page, nothing is
served when users access your top-level site, for example,
https://www.example.com. For more information about the MainPageSuffix and
NotFoundPage properties, see Specialty pages.
In the following sample, the MainPageSuffix is set to index.html and
NotFoundPage is set to 404.html:
- Open the Cloud Storage browser in the Google Cloud Console.
Open the Cloud Storage browser In the list of buckets, find the bucket you created.
Click the Bucket overflow menu (
 )
associated with the bucket and select Edit website configuration.
)
associated with the bucket and select Edit website configuration.In the website configuration dialog, specify the main page and error page.
Click Save.
See Troubleshooting for how to get detailed error information about failed operations in the Cloud Storage browser.
Setting up your load balancer and SSL certificate
Cloud Storage doesn't support custom domains with HTTPS on its own, so you also need to set up an SSL certificate attached to an HTTPS load balancer to serve your website through HTTPS. This section shows you how to add your bucket to a load balancer's backend and how to add a new Google-managed SSL certificate to the load balancer's front end.
- Go to the Load balancing page in the Google Cloud Console.
Go to the Load balancing page - Under HTTP(S) load balancing, click Start configuration.
- Select From Internet to my VMs and click Continue.
- Give your load balancer a Name, such as
example-lb.
Configuring the backend
- Click Backend configuration.
- In the Create or select backend services & backend buckets dropdown, go to the Backend buckets sub-menu, and click the Create a backend bucket option.
- Choose a Name for the backend bucket, such as
example-bucket. - Click Browse under Cloud Storage bucket.
- Select the
my-static-assetsbucket and click Select. - If you want to use Cloud CDN, select the checkbox for Enable Cloud CDN. Leave the Cache mode selection as Cache static content. Note that Cloud CDN may incur additional costs.
- Click Create.
Configuring host rules and path matchers
Host rules and path matchers are configuration components of an external HTTP(S) load balancer's URL map.
- Click Host and path rules.
- Leave Mode at the default Simple host and path rule for the backend
bucket
example-bucket, which you created earlier.
Configuring the frontend
This section shows you how to configure the HTTPS protocol and create an SSL certificate. You can also select an existing certificate or upload a self-managed SSL certificate.
- Click Frontend configuration.
Configure the values for the following fields:
- Protocol: HTTPS
- Network Service Tier: Premium
- IP version: IPv4. If you prefer IPv6, see IPv6 termination for additional information.
For the IP address field:
- In the dropdown, click Create IP address.
- In the Reserve a new static IP address pop-up, enter
example-ipfor the Name of the IP address. - Click Reserve.
For Port, select 443.
For the Certificate field, select Create a new certificate. The certificate creation form appears in a panel. Configure the following:
- Name:
example-ssl - Create mode: Create Google-managed certificate
- Domains:
www.example.com. If you want to serve your content through additional domains such as the root domainexample.com, press Enter to add them on additional lines. Each certificate has a limit of 100 domains.
- Name:
Click Create.
Click Done.
Reviewing the configuration
- Click Review and finalize.
- Review the Backend configuration, Host and path rules, and Frontend configuration.
- Click Create.
You may need to wait a few minutes for the load balancer to be created.
Connecting your domain to your load balancer
After the load balancer is created, click the name of your load balancer:
example-lb. Note the IP address associated with the load balancer: for
example, 30.90.80.100. To point your domain to your load balancer, create an
A record using your domain registration service. If you added multiple domains
to your SSL certificate, you must add an A record for each one, all pointing
to the load balancer's IP address. For example, to create A records for
www.example.com and example.com:
NAME                  TYPE     DATA
www                   A        30.90.80.100
@                     A        30.90.80.100
If you are using Google Domains, see the Google Domains Help page for more information.
Recommended: Monitoring the SSL certificate status
It might take up to 60-90 minutes for Google Cloud to provision the certificate and make the site available through the load balancer. To monitor the status of your certificate:
- Go to the Load balancing page in the Google Cloud Console.
Go to the Load balancing page - Click on the name of your load balancer:
example-lb. - Click on the name of the SSL certificate associated with the load balancer:
example-ssl. - The Status and Domain status rows show the certificate status. Both must be active in order for the certificate to be valid for your website.
See Troubleshooting SSL certificates for more information about certificate status.
Testing the website
Once the SSL certificate is active, verify that content is served from the
bucket by going to https://www.example.com/test.html, where test.html is an
object stored in the bucket that you're using as the backend. If you set the
MainPageSuffix property, https://www.example.com goes to index.html.
Cleaning up
After you've finished the Hosting a static website tutorial, you can clean up the resources that you created on Google Cloud so they won't take up quota and you won't be billed for them in the future. The following sections describe how to delete or turn off these resources.
Deleting the project
The easiest way to eliminate billing is to delete the project that you created for the tutorial.
To delete the project:
Caution: Deleting a project has the following effects:- Everything in the project is deleted. If you used an existing project for this tutorial, when you delete it, you also delete any other work you've done in the project.
-
Custom project IDs are lost.
When you created this project, you might have created a custom project ID that you want to use in
the future. To preserve the URLs that use the project ID, such as an
appspot.comURL, delete selected resources inside the project instead of deleting the whole project.
If you plan to explore multiple tutorials and quickstarts, reusing projects can help you avoid exceeding project quota limits.
In the Cloud Console, go to the Manage resources page.
In the project list, select the project that you want to delete, and then click Delete. In the dialog, type the project ID, and then click Shut down to delete the project.
Deleting the load balancer and bucket
If you don't want to delete the entire project, delete the load balancer and bucket that you created for the tutorial:
- Go to the Load balancing page in the Google Cloud Console.
Go to the Load balancing page - Select the checkbox next to
example-lb. - Click Delete.
- (Optional) Select the checkbox next to the resources you want to delete along
with the load balancer, such as the
my-static-assetsbucket or theexample-sslSSL certificate. - Click Delete load balancer or Delete load balancer and the selected resources.
Releasing a reserved IP address
To delete the reserved IP address you used for the tutorial:
In the Cloud Console, go to the External IP addresses page.
Select the checkboxes next to
example-ip.Click Release static address.
In the confirmation window, click Delete.
What's next
Try it for yourself
If you're new to Google Cloud, create an account to evaluate how Cloud Storage performs in real-world scenarios. New customers also get $300 in free credits to run, test, and deploy workloads.
Recommend
About Joyk
Aggregate valuable and interesting links.
Joyk means Joy of geeK