

How to add Ethernet to Raspberry Pi Pico
source link: https://www.raspberrypi.org/blog/how-to-add-ethernet-to-raspberry-pi-pico/
Go to the source link to view the article. You can view the picture content, updated content and better typesetting reading experience. If the link is broken, please click the button below to view the snapshot at that time.

How to add Ethernet to Raspberry Pi Pico
Raspberry Pi Pico has a lot of interesting and unique features, but it doesn’t have networking. Of course this was only ever going to be a temporary inconvenience, and sure enough, over Pi Day weekend we saw both USB Ethernet and Ethernet PHY support released for Pico and RP2040.
 Raspberry Pi Pico and RMII Ethernet PHY
The PHY support was put together by Sandeep Mistry, well known as the author of the noble and bleno Node.js libraries, as well as the Arduino LoRa library, amongst others. Built around the lwIP stack, it leverages the PIO, DMA, and dual-core capabilities of RP2040 to create an Ethernet MAC stack in software. The project currently supports RMII-based Ethernet PHY modules like the Microchip LAN8720.
Breakout boards for the LAN8720 can be found on AliExpress for around $1.50. If you want to pick one up next day on Amazon you should be prepared to pay somewhat more, especially if you want Amazon Prime delivery, although they can still be found fairly cheaply if you’re prepared to wait a while.
What this means is that you can now connect your $4 microcontroller to an Ethernet breakout costing less than $2 and connect it to the internet.
Building from source
If you already have the Raspberry Pi Pico toolchain set up and working, make sure your pico-sdk checkout is up to date, including submodules. If not, you should first set up the C/C++ SDK. Afterwards you need grab the the project from GitHub, along with the lwIP stack.
$ git clone [email protected]:sandeepmistry/pico-rmii-ethernet.git
$ cd pico-rmii-ethernet
$ git submodule update --init
Make sure you have your PICO_SDK_PATH set before before proceeding. For instance, if you’re building things on a Raspberry Pi and you’ve run the pico_setup.sh script, or followed the instructions in our Getting Started guide, you’d point the PICO_SDK_PATH to
$ export PICO_SDK_PATH = /home/pi/pico/pico-sdkthen after that you can go ahead and build both the library and the example application.
$ mkdir build
$ cd build
$ cmake ..
$ make
If everything goes well you should have a UF2 file in build/examples/httpd called pico_rmii_ethernet_httpd.uf2. You can now load this UF2 file onto your Pico in the normal way.
Go grab your Raspberry Pi Pico board and a micro USB cable. Plug the cable into your Raspberry Pi or laptop, then press and hold the BOOTSEL button on your Pico while you plug the other end of the micro USB cable into the board. Then release the button after the board is plugged in.
A disk volume called RPI-RP2 should pop up on your desktop. Double-click to open it, and then drag and drop the UF2 file into it. Your Pico is now running a webserver. Unfortunately it’s not going to be much use until we wire it up to our Ethernet breakout board.
Wiring things up on the breadboard
Unfortunately the most common (and cheapest) breakout for the LAN8720 isn’t breadboard-friendly, although you can find some boards that are, so you’ll probably need to grab a bunch of male-to-female jumper wires along with your breadboard.
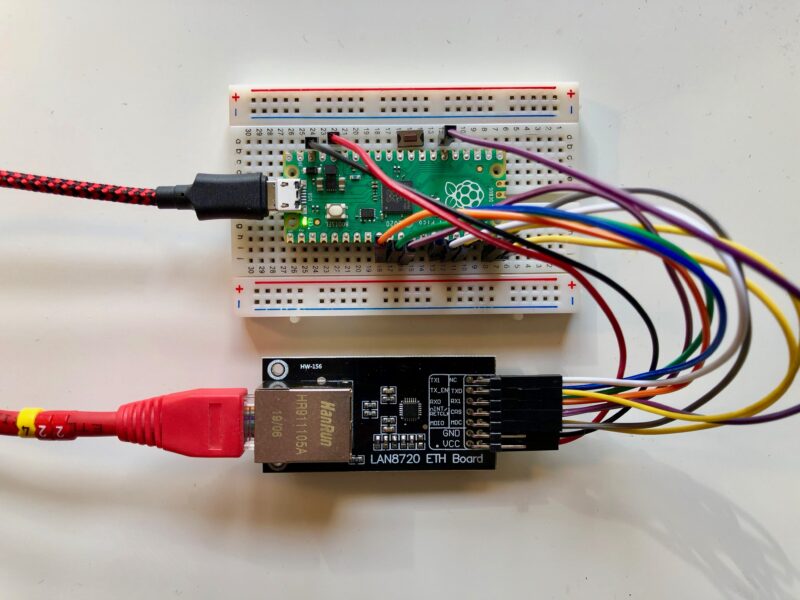 LAN8720 breakout wired to a Raspberry Pi Pico on a breadboard (with reset button)
Then wire up the breakout board to your Raspberry Pi Pico. Most of these boards seem to be well labelled, with the left-hand labels corresponding to the top row of breakout pins. The mapping between the pins on the RMII-based LAN8720 breakout board and your Pico should be as follows:
PicoRP20401LAN8720 BreakoutPin 9GP6RX0Pin 10GP7 RX1 (RX0 + 1 )Pin 11GP8 CRS (RX0 + 2)Pin 14GP10TX0Pin 15GP11 TX1 (TX0 + 1)Pin 16GP12 TX-EN (TX0 + 2)Pin 19GP14MDIOPin 20GP15MDCPin 26GP20nINT / RETCLK3V3 (OUT)—VCCPin 38GNDGNDMapping between physical pin number, RP2040 pin, and LAN8720 breakout
1 These pins are the library default and can be changed in software.
Once you’ve wired things up, plug your Pico into Ethernet and also via USB into your Raspberry Pi or laptop. As well as powering your Pico you’ll be able to see some debugging information via USB Serial. Open a Terminal window and start minicom.
$ minicom -D /dev/ttyACM0If you’re having problems, see Chapter 4 of our Getting Started guide for more information.
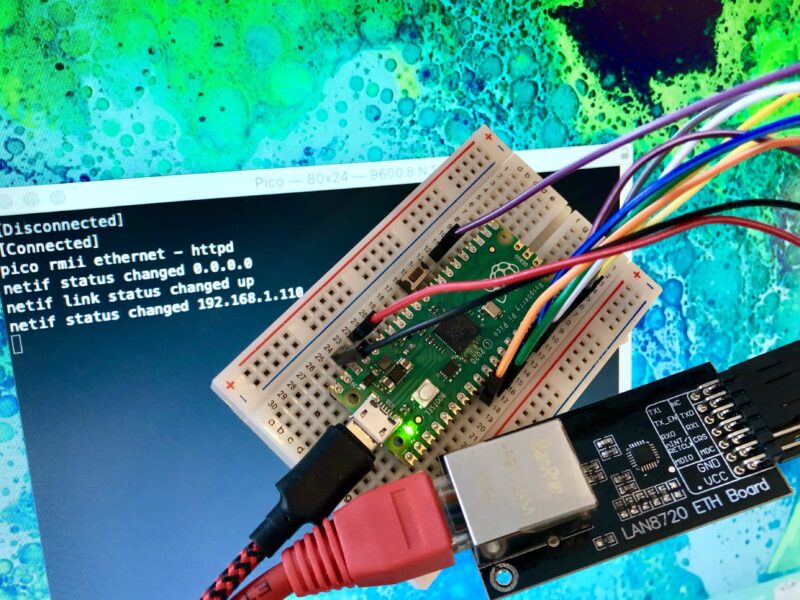
Hopefully, so long as your router is handing out IP addresses, you should see something like this in the minicom window, showing that your Pico has grabbed an IP address using DHCP:
pico rmii ethernet - httpd
netif status changed 0.0.0.0
netif link status changed up
netif status changed 192.168.1.110
If you open up a browser window and type the IP address that your router has assigned to your Pico into the address bar, if everything goes well you should see the default lwIP index page:
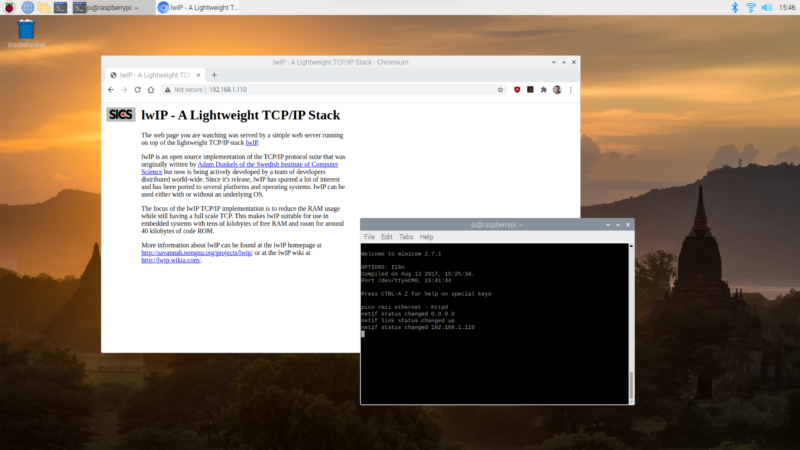
Congratulations. Your Pico is now a web server.
Changing the web pages
It turns out to be pretty easy to change the web pages served by Pico. You can find the “file system” with the default lwIP pages inside the HTTP application in the lwIP Git submodule.
$ cd pico-rmii-ethernet/lib/lwip/src/apps/http/fs
$ ls
404.html   img/        index.html
$
You should modify the index.html file in situ here with your favourite editor. Afterwards we’ll need to move the file system directory into place, and then we can repackage it up using the associated makefsdata script.
$ cd ..
$ mv fs makefsdata
$ cd makefsdata
$ perl makefsdata
Running this script will create an fsdata.c file in the current directory. You need to move this file up to the parent directory and then rebuild the UF2 file.
$ mv fsdata.c ..
$ cd ../../../../../..
$ rm -rf build
$ mkdir build
$ cd build
$ cmake ..
$ make
If everything goes well you should have a new UF2 file in build/examples/httpd called pico_rmii_ethernet_httpd.uf2 , and you can again load this UF2 file onto your Pico as before.
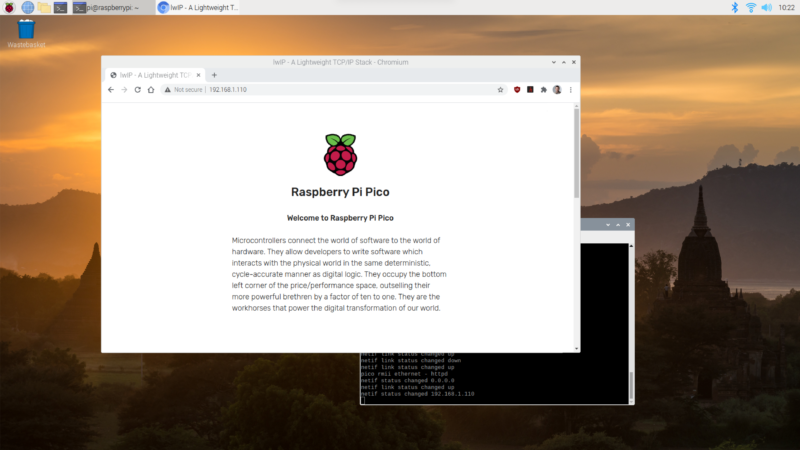
On restart, wait till your Pico grabs an IP address again and then, opening up a browser window again and typing the IP address assigned to your Pico into the address bar, you should now see an updated web page.
You can go back and edit the page served from your Pico, and build an entire site. Remember that you’ll need to rebuild the fsdata.c file each time before your rebuild your UF2.
Current limitations
There are a couple of limitations on the current implementation. The RP2040 is running underclocked to just 50MHz using the RMII modules’ reference clock, while the lwIP stack is compiled with NO_SYS so neither the Netcon API nor the Socket API is enabled. Finally, link speed is set to 10 Mbps as there is currently an issue with TX at 100 Mbps.
Where next?
While the example Sandeep put together used the lwIP web server, there are a number of other library application examples we can grab and twist to our own ends, including TFTP and MQTT example applications. Beyond that, lwIP is a TCP/IP stack. Anything you can do over TCP you can now do from your Pico.
Wrapping up
Support for developing for Pico can be found on the Raspberry Pi forums. There is also an (unofficial) Discord server where a lot of people active in the new community seem to be hanging out. Feedback on the documentation should be posted as an Issue to the pico-feedback repository on GitHub, or directly to the relevant repository it concerns.
All of the documentation, along with lots of other help and links, can be found on the Getting Started page. If you lose track of where that is in the future, you can always find it from your Pico: to access the page, just press and hold the BOOTSEL button on your Pico, plug it into your laptop or Raspberry Pi, then release the button. Go ahead and open the RPI-RP2 volume, and then click on the INDEX.HTM file.
That will always take you to the Getting Started page.
Recommend
-
7
Testing 2.5 Gbps Ethernet on the Raspberry Pi CM4 December 29, 2020
-
8
Meet Raspberry Silicon: Raspberry Pi Pico now on sale at $4 Today, we’re launching our first microcontroller-class product: Raspberry Pi Pico. Priced at just $4, it is built on RP2040, a brand-new chip developed right h...
-
10
Matrix 首页推荐 Matrix 是少数派的写作社区,我们主张分享真实的产品体验,有实用价值的经验与思考。我们会不定期挑选 Matrix 最优质的文章,展示来自用户的最真实的体验和观点。 文章代表作者个人观点,少数派仅对标题...
-
11
Raspberry Pi 推出 MCU 產品 PicoRaspberry Pi 推出了新的產品線 Raspberry Pi Pico,基於
-
6
树莓派发布4美元微控制器RaspBerry Pi Pico – 开源派 树莓派基金会官方发布首款微控制器级产品 Raspberry Pi Pico,售价4 美元。微控制器树莓派 Pi Pico 可以处理模拟输入和低延迟 I/O,还提供非常低功耗的待机模式。官网商城还有带预焊接接头的 R...
-
4
How to add LoRaWAN to Raspberry Pi Pico Arguably the winner of the standards war around wide area networking protocols for the Internet...
-
9
Getting faster 10 Gbps Ethernet on the Raspberry Pi July 7, 2021 If you read the title of this blog post an...
-
4
Add-ons supply CAN FD to Raspberry Pi Zero and Pico Jul 21, 2021 — by Eric Brown — views
-
8
Add 57,600 pixels to your Raspberry Pi Pico In the latest issue of HackSpace magazine, Ben Everard tests whether a bit of kit from Spotpear can turn...
-
71
pico-rmii-ethernet Enable 100Mbit/s Ethernet connectivity on your Raspberry Pi Pico with an RMII based Ethernet PHY module. Leverages the Raspberry Pi RP204...
About Joyk
Aggregate valuable and interesting links.
Joyk means Joy of geeK