

vRealize Automation Cloud Assembly's IaaS API - VMware Cloud Management
source link: https://blogs.vmware.com/management/2021/02/vra-cloud-assembly-iaas-api.html
Go to the source link to view the article. You can view the picture content, updated content and better typesetting reading experience. If the link is broken, please click the button below to view the snapshot at that time.
Hey, guys! Let’s talk about the best way for you to automate the use of the VMware product vRealize Automation Cloud Assembly – by utilizing the Cloud Assembly IaaS API.
In this blog, you’re going to learn about:
- What is the Cloud Assembly IaaS API and for what purposes you can use it
- How to authenticate with vRealize Automation Cloud Assembly as a Cloud Assembly IaaS API consumer
- IaaS API versions, how versioning works and how you should use it
The information here is valid for both vRealize Automation Cloud (SaaS solution) and vRealize Automation 8.x versions (on-prem solution).
Cloud Assembly IaaS API and its scope
So what is the Cloud Assembly IaaS API? It is one of the main ways to communicate with Cloud Assembly, a REST API which allows you to do all the configurations needed and then provision Infrastructure-as-a-Service components which you can later manage. And the best part is that it is cloud agnostic and you can use it across multiple clouds. You don’t need to know the specifics of the APIs of different cloud providers, the complexity is hidden thanks to the IaaS API and the entire product. Provisioning of resources happens in an iterative manner by making API calls whose response contains a special kind of body we call “Request Tracker” and is used to track the progress until the resource is ready. The IaaS API allows you to automate what you do with Cloud Assembly by entirely replacing UI interaction with API calls.
For what purposes can you use the IaaS API
What can you use the IaaS API for? Basically, It consists of 2 complementary parts – Provider part and Consumer part.
Provider part allows you to automate configuration and maintenance of cloud infrastructure and includes APIs for CRUD operations (CRUD stands for Create, Read, Update, Delete) with:
- Cloud Accounts
- Cloud Zones
- Image, Flavor, Network and Storage profiles
- Projects
- and so on
Consumer part is for provisioning of different resources including:
- Machines
- Networks
- Block Devices
- Load Balancers
- and so on
Overall, the idea is for the IaaS API to provide the same functionality as the UI and it is constantly being extended to include more and more features to enable full automation.
IaaS API documentation
So, you’re probably wondering where to find everything you can do with the IaaS API or you already know the answer. We have Swagger documentation available at https://www.mgmt.cloud.vmware.com/iaas/api/swagger/ui/:
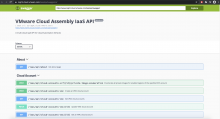
The base URL is the same as the one of vRealize Automation Cloud and of course, if you use our on-prem version, it would be the same as the one of your vRealize Automation instance. In this doc, you can easily find what endpoints the IaaS API has, what HTTP actions they support, what kind of body you should send and what kind of body to expect in response.
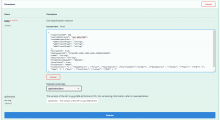
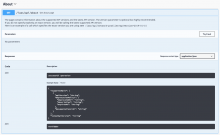
The Swagger doc is divided into sections to simplify searching for what you need in it. The sections have descriptive names like “Flavor Profiles” or “Images” or “Login” and so on. For example, on the screenshot above, you see the “About” and “Cloud Account” sections which are expanded. Each section contains a list of HTTP method and endpoint sets. When you click on each set, it is expanded and you can see a description of the operation, what kind of query parameters are supported, what status codes you can expect to receive and what each of them means. You can also see if the request requires a body and if it does, there is detailed information about what properties the body includes, which of them are required and an example body. For example, let’s have a look at the API for creating a block device:

We have clicked on the “Model” tab here where we see the entire BlockDeviceSpecification with all supported properties. The required properties are the ones marked with a red star, so in this case the request requires only capacityInGB, name and projectId. You can also click on the “Example Value” tab to see an example body which you can directly copy and use in your code. You can even click on the “Try it out” button on the top right (visible in the above screenshot) and edit the example body like this:
We also have an Api Programming Guide. It includes information about how to use all Cloud Assembly APIs including the IaaS API. Since there are differences in how to use the APIs in the SaaS version of the product and in the on-prem version, this guide also has different versions. Versions of the guide:
How to authenticate with vRealize Automation Cloud Assembly as a Cloud Assembly IaaS API user
In order to do anything with the IaaS API, you need to authenticate or you’ll get 401 on your requests. Cloud Assembly uses the Authorization header for that purpose. The header should include your access token.
OK. So how do you acquire an access token? This happens on 2 steps. First, you need to generate an API token, also called “refresh token”. Then, you use that token in the body of a IaaS API call to receive an access token. No worries! Detailed step-by-step guide follows now. Just follow the guide and you’ll successfully obtain an access token which will allow to execute your IaaS API requests.
Obtain an API token
In order to obtain an API token, you have to follow different steps depending on whether you’re using the SaaS or on-prem version of vRealize Automation. This is due to some architectural specifics of SaaS and on-prem. I have described how to do it for both versions below.
Generate an API token in vRealize Automation Cloud (SaaS)
To generate an API token if you’re using vRealize Automation Cloud, just follow these simple steps:
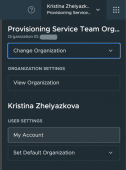
- Log in to Cloud Assembly and click on your username on the top right:
- Click on “My account” which will take you to a page about your profile:

- Click on the “API Tokens” tab.
- Click on “GENERATE TOKEN”
- Enter a token name, how long the token will be valid (token TTL) and define the organization and service roles to enforce granular access control to the requests made with this token:

- Click on “GENERATE” and a pop-up appears with the token:
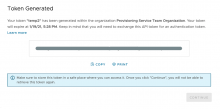
- Click on “COPY” and save the token somewhere safe so that you can access it later when needed.
- Click on “CONTINUE” and have in mind that after you do this, you will no longer be able to see the API token here so make sure you copied it and saved it first.
Obtain an API token in vRealize Automation (on-prem)
As I said, it’s different for on-prem. But again, it’s just a few simple steps:
- Execute a POST request to /csp/gateway/am/api/login?access_token with a body containing your username and password (the ones with which you authenticate with vRealize Automation) like this:
 Here, url-home is the base URL of your vRealize Automation appliance.
Note: the username should also contain your domain name - If your username and password are correct, you should receive HTTP status code 200 and a body containing a few tokens:
- What you need from the response is the value of the “refresh_token” property.
The access control is based on the organization roles and service roles of your user (the user whose username and password you specified in the body of your request).
You can also make use of one of the scripts created by the Terraform plugin for vRealize Automation team to obtain an API token. The Powershell and bash scripts along with examples are available here: https://github.com/vmware/terraform-provider-vra/blob/master/docs/getting_a_refresh_token.md. Just get the script suitable for your system and execute it as it is.
Great! We have an API token now. Let’s go ahead and use it to obtain an access token.
Use the API token to get an access token
The only thing left to do is to use the API token (refresh token) in the body of one IaaS API call:

If the refresh token is valid, the simple POST request to /iaas/api/login we made should return the access token:
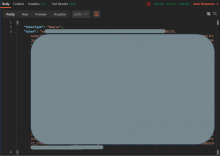
That’s it! The value of the “token” property is our access token. Just add “Authorization” header with value “Bearer <token>”, where <token> is the obtained value, to authenticate all of your IaaS API calls.
Have in mind that the access token becomes invalid after 25 minutes of inactivity and you should refresh it using the API token again.
IaaS API versioning
And the last thing in this blog is about versioning. Any API can have multiple versions and new versions may not be backward compatible with old ones.We highly recommend you to specify the exact IaaS API version that you tested your scripts on each and every IaaS API call. This will ensure your code works the same way in the future even if a newer version is released.
If you don’t specify an exact version, your code will always work against the latest released IaaS API version that may include backward incompatible changes.
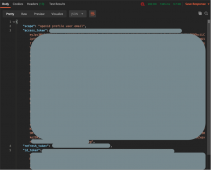
So how do you specify which IaaS API version you’re using? You just need to add the query parameter “apiVersion” with the value you want to your IaaS API call. This information is included for each set of HTTP method and IaaS API endpoint in the Swagger documentation we talked about earlier. For example, for GET /iaas/api/images:

In the time of writing, there is only one IaaS API version and it is 2019-01-15. However, a new version is currently under implementation and probably more versions will be released in the future. To give an example with the current version, if you want to get all images, your call should look like this:

You’re probably wondering where you can find which are the available versions. Here’s the IaaS API endpoint exactly for that:
As you probably noticed, this is also from the IaaS API Swagger documentation.
Here’s the response I got for this call in the time of writing this blog:
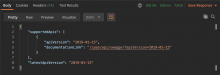
As you can see, this call will give you a list of all currently supported versions and which one of them is the latest version.
So what happens if you don’t specify a version when executing IaaS API requests? As I mentioned above, if you don’t pass the apiVersion query parameter, latest version will be used. This means that one and the same IaaS API call might return one thing today but another thing tomorrow, for example. Backward compatibility is ensured only for one and the same API version. If you don’t pass apiVersion, you’re risking your code to be broken at any time.
So I want to end this blog with a very important message: always specify which IaaS API version you’re using, on every single IaaS API call you make. This is strongly recommended. Go ahead and add the apiVersion query parameter to all appropriate places in your code.
Recommend
About Joyk
Aggregate valuable and interesting links.
Joyk means Joy of geeK