

快速部署基于BERT预训练模型的文本广告anti-spam服务
source link: https://zhuanlan.zhihu.com/p/67123497
Go to the source link to view the article. You can view the picture content, updated content and better typesetting reading experience. If the link is broken, please click the button below to view the snapshot at that time.
快速部署基于BERT预训练模型的文本广告anti-spam服务
识别用户发布内容中出现的垃圾广告是我们anti-spam工作中的重要一环,其中文本广告占了绝大多数。广告发布者通常会使用带有明确诱导性意图的语言进行内容描述。文本广告的机器识别本质是一类NLP文本分类任务,因此我们有很多诸如word2vec, LSTM, fastText等成熟的方法和工具可以使用。但是今天我们所采用的BERT模型,有别于传统的Word Embedding方法,采用了预训练双向语言模型(Pre-Traininig LM)加微调(Fine-Tuning)的方式构造,这使得它不仅具有极强的普适性,而且在训练样本有限时,依旧能够获得非常不错的识别能力。
BERT模型简述
BERT模型被广为人知是从2018年10月开始,它由Google发布的这篇paper中提出:BERT: Pre-training of Deep Bidirectional Transformers for Language Understanding,同年11月,Google开源了其模型代码的tensorflow实现以及预训练模型。其中也包含了使用中文简繁字预训练的12-layer, 768-hidden, 12-heads的基础模型。由于本文不会涉及到模型的详细解读,所以对模型原理和进化历史感兴趣的朋友推荐阅读一些知乎上已有的解读文章,例如张俊林博士的:从Word Embedding到Bert模型—自然语言处理中的预训练技术发展史,李如的:【NLP】Google BERT详解 等等。值得一提的是,BERT采用了Transformer Encoder作为其预训练的语言模型,相对于其他语言模型而言,它同时利用到了bidirectional context信息,相较RNN会能捕捉到更多的上下文依赖信息。
通过预训练,模型能够掌握大量的语言学知识并将其编码到网络结构中,这些先验知识,能够在下游任务的带标注的训练样本数量有限时,提供很好的特征补充,从而大幅提升在下游任务中的表现。在我们的应用场景中,广告内容识别是sequence-level的分类任务,根据作者的描述,可以直接取第一个[CLS] token的final hidden state,加一层权重后通过softmax预测label,如图(b):
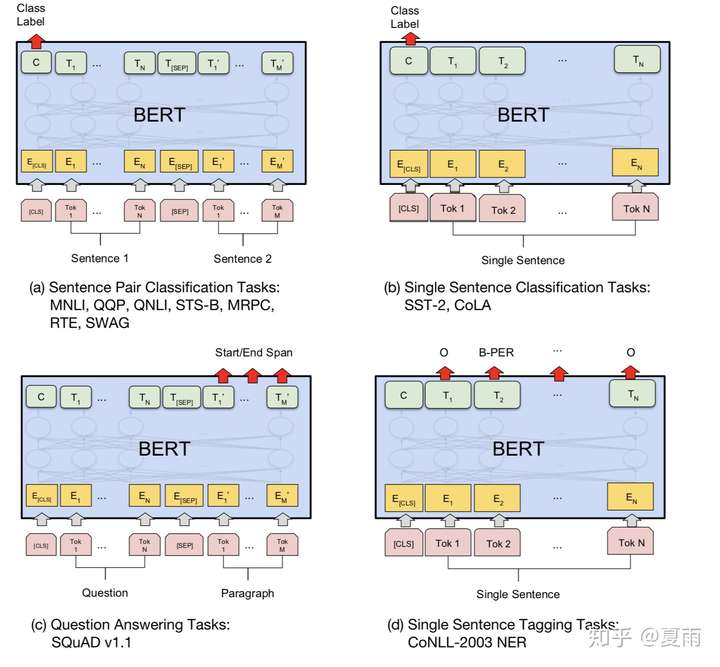 摘自「BERT: Pre-training of Deep Bidirectional Transformers for Language Understanding」
- 确保训练项目所使用的环境已安装tensorflow >= 1.11.0
- 从Github上下载BERT的源码: https://github.com/google-research/bert 及其预训练模型 BERT-Base, Chinese
- 准备训练样本(train.tsv)、开发样本(dev.tsv)和测试样本(test.tsv)。这里样本的存储格式可自行定义,根据实际情况,修改数据读入的方法即可。这里举个例子:
# train.tsv
# label: 1表示spam, 0表示pass
0	忘掉所有的烦恼做一个快乐的女孩
1	需要的来了解,长期测试,稳定推广。群 3xxxxxxx
...- 根据存储格式在`run_classifier.py`中增加自己的样本处理方法。对于文本分类任务,可以参考`ColaProcessor`,例如:
class SpamProcessor(ColaProcessor):
    def _create_examples(self, lines, set_type):
        """Creates examples for the training and dev sets."""
        examples = []
        for (i, line) in enumerate(lines):
            guid = "%s-%s" % (set_type, i)
            label = tokenization.convert_to_unicode(line[0])
            text_a = tokenization.convert_to_unicode(line[1])
            examples.append(InputExample(guid=guid, text_a=text_a, text_b=None, label=label))
        return examples
这里我们基于Google提供的预训练模型直接做Fine-Tuning。如果是做某个特定领域的文本分类任务,有很多专业词汇,并且有大量的领域语料样本积累的话,可以在这之前做domain-specific pre-training,具体细节可以参考BERT的官方文档。要运行Fine-Tuning很简单,只需运行`run_classifier.py`脚本,并指定对应的参数,例如:
# 参数说明:
# DATA_PATH 训练样本保存路径
# OUTPUT_PATH 训练模型时checkpoint的保存路径
# BERT_BASE 预训练模型的保存路径
python run_classifier.py \
  --task_name=spam \
  --do_train=true \
  --do_eval=true \
  --data_dir=${DATA_PATH} \
  --vocab_file=${BERT_BASE}/vocab.txt \
  --bert_config_file=${BERT_BASE}/bert_config.json \
  --init_checkpoint=${BERT_BASE}/bert_model.ckpt \
  --max_seq_length=128 \
  --train_batch_size=32 \
  --learning_rate=2e-5 \
  --num_train_epochs=3.0 \
  --output_dir=${OUTPUT_PATH}
这里的`data_dir`指向存放训练样本的路径,`output_dir`指向训练过程保存的checkpoint输出目录。`do_eval`则是在训练完成后使用开发集`dev.tsv`进行一次评估。
模型导出和生产环境部署
当模型训练完毕后,我们需要将它部署到生产环境中。这里我们需要使用TensorFlow Serving模块。它是tensorflow专门为生产环境设计实现的一个机器学习模型的部署方案,扩展性强、性能也不错。TensorFlow Serving支持多种安装和部署方式(包括docker),可以参照官方文档:https://www.tensorflow.org/tfx/serving/setup 同时它提供了REST API用于模型的调用。
Life of a Servable这里我们需要将自己训练的模型导出成模块支持的格式。所幸的是,tensorflow的Estimator类提供了通用的导出方法: export_savedmodel,我们所要做的是在`run_classifier.py`中,定义一个输入层转换函数,用在模型serving的时候接受输入变量,例如我们可以定义:
def input_receiver_fn():
  """An input receiver that expects a serialized tf.Example."""
  seq_length = int(FLAGS.max_seq_length)
  input_ids = tf.placeholder(dtype=tf.int32, shape=[None, seq_length], name='input_ids')
  input_mask = tf.placeholder(dtype=tf.int32, shape=[None, seq_length], name='input_mask')
  segment_ids = tf.placeholder(dtype=tf.int32, shape=[None, seq_length], name='segment_ids')
  features = {
      'input_ids': input_ids,
      'input_mask': input_mask,
      'segment_ids': segment_ids,
      'label_ids': tf.constant(0, tf.int32),  # serving label_ids is actually not used
  }
  receiver_tensors = {
      'input_ids': input_ids,
      'input_mask': input_mask,
      'segment_ids': segment_ids,
  }
  return tf.estimator.export.ServingInputReceiver(features=features, receiver_tensors=receiver_tensors)
然后添加一个`do_save`和`save_dir`的FLAG,用于模型的导出:
# ... add do_save
flags.DEFINE_bool("do_save", False, "Whether to export model.")
flags.DEFINE_string("save_dir", None, "The output directory where the model will be saved.")

# ... modify this line to add do_save check
if not FLAGS.do_train and not FLAGS.do_eval and not FLAGS.do_predict and not FLAGS.do_save:
    raise ValueError(
        "At least one of `do_train`, `do_eval`, `do_save` or `do_predict' must be True.")

# .... add below at the end of main()
if FLAGS.do_save:
    estimator._export_to_tpu = False  # this is important
    estimator.export_savedmodel(FLAGS.save_dir, input_receiver_fn, strip_default_attrs=True, as_text=True)
然后我们就可以将训练完毕时存储的checkpoint导出成可以被serving的模型文件
# 参数说明:
# EXPORT_MODEL_PATH 导出的模型存放的路径
# OUTPUT_PATH 训练模型时checkpoint的保存路径
# BERT_BASE 预训练模型的保存路径
python run_classifier.py \
  --task_name=spam \
  --do_save=true \
  --save_dir=${EXPORT_MODEL_PATH} \
  --vocab_file=${BERT_BASE}/vocab.txt \
  --bert_config_file=${BERT_BASE}/bert_config.json \
  --init_checkpoint=${OUTPUT_PATH} \
  --output_dir=${OUTPUT_PATH}
模型导出时,会建立一个以时间戳命名的文件夹(相当于serving时的version信息),其中包含了类似`saved_model.pbtxt`文件和`variables`目录。将该文件夹的内容全部复制到部署Tensorflow Serving的服务器上(或者是通过docker制作的镜像),然后启动serving服务:
# MODEL_PATH 模型存放路径
tensorflow_model_server --port=8500 --rest_api_port=8501 --model_name='spam' --model_base_path=${MODEL_PATH}
如果有多个模型同时部署,可以使用配置文件,更为方便,例如:
# models.conf
model_config_list {
  config {
    name: 'model1'
    base_path: ${MODEL1_PATH}
    model_platform: 'tensorflow'
  }
  config {
    name: 'model2'
    base_path: ${MODEL2_PATH}
    model_platform: 'tensorflow'
  }
}
启动的时候带上参数:
# MODEL_CONFIG_PATH 配置存放路径
tensorflow_model_server --port=8500 --rest_api_port=8501 --model_config_file=${MODEL_CONFIG_PATH}/models.conf
当server启动后,会提供REST API接口用于模型的预测,预测接口的地址:
http://${MODEL_SERVER_HOST}:8501/v1/models/${MODEL_NAME}:predict这里值得注意的是模型传入参数。本文中的例子在导出时定义了输入:`input_ids`, `input_mask` 和 `segment_ids`是类似这样的格式:
{
  "input_ids": [101,832,845,812,134, ...],
  "input_mask": [1, 1, 1, 1, 1, ...],
  "segment_ids": [0, 0, 0, 0, 0, ...]
}
它们可以通过BERT项目中自带的`tokenization.py`来将原本的文本内容转换成数字向量得到,具体本文就不再赘述。
本文简要地介绍了如何快速部署基于BERT模型的文本广告anti-spam服务。在实际的生产工作当中,还可以尝试更多的工程策略和技巧去提高识别模型的效能,例如对训练和待测文本进行预处理和正则化。又或者是利用BERT模型的上游任务Sentence Encoding / Embedding,来获得文本的嵌入向量,并结合用户发布内容的其他维度特征,构造更为复杂的深度神经网络。这样一方面可以享受到BERT预训练模型所保留下来的语义特征,同时又能结合更多的特征维度进行有效识别。对此有兴趣的同学可以了解下这个开源项目:https://github.com/hanxiao/bert-as-service
Recommend
About Joyk
Aggregate valuable and interesting links.
Joyk means Joy of geeK