

火币科普系列:兼容以太坊开发环境,开发者如何参与Heco开发?
source link: http://www.ciotimes.com/IT/199707.html
Go to the source link to view the article. You can view the picture content, updated content and better typesetting reading experience. If the link is broken, please click the button below to view the snapshot at that time.

火币科普系列:兼容以太坊开发环境,开发者如何参与Heco开发?
2021-02-10 13:52:45 来源:互联网
关键词: 火币

火币生态链火币生态链(Heco)是一个去中心化高效节能公链,也是火币开放平台推出的首个产品,在支撑高性能交易的基础上,实现智能合约的兼容。 Heco的原生数字资产为HT,采用HPoS共识机制。
Heco也是以太坊友好的开发平台,兼容以太坊开发环境和工具,有以太坊智能合约开发经验的开发者可以轻松上手。
为帮助开发者更好地使用Heco进行开发,本文将Heco的开发流程大致阐述。
首先要完成源码下载,通过git下载源码。
git clone https://github.com/HuobiGroup/huobi-eco-chain.git
在拿到源码后,需要把源代码转换成机器可以识别的二进制语言,组合成为一个系统可以执行的可执行文件,即完成编译过程。编译支持Go语言。区块链开发较为复杂,而Go语言具有更好的便捷性,对开发者更为友好。
cd /path/to/hecochain
make geth
如果希望进行跨平台编译,某些在Mac上编译Linux平台的二进制文件,可以使用make geth-linux相关命令操作。编译完成后,生成的二进制文件在build/bin目录下。
通过./build/bin/geth --help查看所有的option选项,根据情况自行设置相关配置参数。
程序启动替换接入mainnet,如需接入公共测试网,可添加option --testnet。
部署:引入系统管理配置
config.toml
[Eth]
SyncMode = "fast"
DiscoveryURLs = []
TrieCleanCacheRejournal= 300000000000
[Eth.Miner]
GasFloor = 8000000
GasCeil = 8000000
GasPrice = 0
Recommit = 3000000000
Noverify = false
[Eth.Ethash]
CacheDir = "ethash"
CachesInMem = 2
CachesOnDisk = 3
CachesLockMmap = false
DatasetDir = "/data/heco/data/.ethash"
DatasetsInMem = 1
DatasetsOnDisk = 2
DatasetsLockMmap = false
PowMode = 0
[Eth.TxPool]
Locals = []
NoLocals = false
Journal = "transactions.rlp"
Rejournal = 3600000000000
PriceLimit = 1
PriceBump = 10
AccountSlots = 16
GlobalSlots = 4096
AccountQueue = 64
GlobalQueue = 1024
Lifetime = 10800000000000
[Node]
DataDir = "/data/heco/data"
InsecureUnlockAllowed = true
NoUSB = true
IPCPath = "geth.ipc"
HTTPHost = "0.0.0.0"
HTTPPort = 8545
HTTPCors = ["*"]
HTTPVirtualHosts = ["*"]
HTTPModules = ['eth', 'net', 'web3']
WSHost = "0.0.0.0"
WSPort = 8546
WSModules = ['eth', 'net', 'web3']
GraphQLVirtualHosts = ["localhost"]
[Node.P2P]
MaxPeers = 50
NoDiscovery = false
ListenAddr = ":32668"
EnableMsgEvents = false
[Node.HTTPTimeouts]
ReadTimeout = 30000000000
WriteTimeout = 30000000000
IdleTimeout = 120000000000
在配置中使用快速同步,如果需要完全同步,请删除此行:
SyncMode = "fast"
启动bash
config.toml
#!/usr/bin/env bash
/data/heco/geth-linux-amd64 \
--config /data/heco/config.toml \
--logpath /data/heco/logs \
--verbosity 3 >> /data/heco/logs/systemd_chain_console.out 2>&1
如果需要将其用作存档节点,请添加:
--syncmode full \
--gcmode archive \
#!/usr/bin/env bash
/data/heco/geth-linux-amd64 \
--config /data/heco/config.toml \
--logpath /data/heco/logs \
--syncmode full \
--gcmode archive \
--verbosity 3 >> /data/heco/logs/systemd_chain_console.out 2>&1
[Unit]
Description=huobi smart chain service
[Service]
Type=simple
ExecStart=/bin/sh /data/heco/run.sh
Restart=on-failure
RestartSec=5s
LimitNOFILE=65536
[Install]
Heco与以太坊的生态系统兼容,支持所有以太坊的RPC API和DK
RPC方法列表
curl -s -H 'content-type:application/json' -d '{"jsonrpc":"2.0","method":"web3_clientVersion","params":[],"id":67}' http://localhost:8545
使用诸如web3j、web3js等以太坊SDK库进行开发。
获取链上信息
const Web3 = require('web3')
async function getChainId() {
const web3 = new Web3('https://http-mainnet.hecochain.com')
let chainId = await web3.eth.getChainId()
console.log(`chain id: ${chainId}`)
return chainId
const Web3Accounts = require('web3-eth-accounts')
let account = new Web3Accounts().create()
//do not do this on prd env
console.log(`account generated. address: ${account.address}, private key: ${account.privateKey}`)
const Web3 = require('web3')
async function transfer(fromAccount, to, value){
const web3 = new Web3('https://http-mainnet.hecochain.com')
let chainId = await web3.eth.getChainId()
let nonce = await web3.eth.getTransactionCount(fromAccount.address)
let gasPrice = await web3.eth.getGasPrice()
let unsigned = {
from: fromAccount.address,
value: web3.utils.numberToHex(web3.utils.toWei(value, 'ether')),
gasPrice,
nonce,
chainId,
unsigned.gas = await web3.eth.estimateGas(unsigned)
let signed = await fromAccount.signTransaction(unsigned)
return signed
Heco使用EVM执行合约。
Remix
Remix IDE是一个开源的web和桌面应用程序。它促进了一个快速的开发周期,并且有一组具有直观gui的丰富插件。Remix用于合约开发的整个过程,同时也是学习和教授合约开发的小天地。
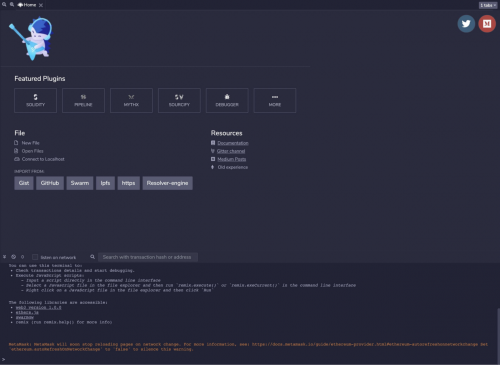
在文件资源管理器中创建新文件。在右侧编辑合约信息。
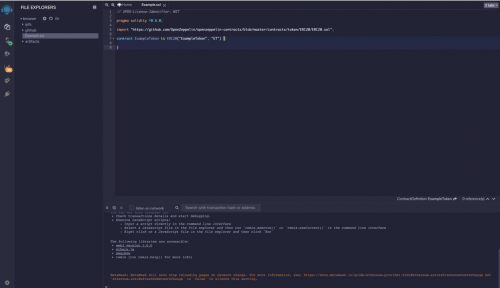
1.点击编译器按钮,切换界面
2.选择要编译的合约
3.设置编译标志
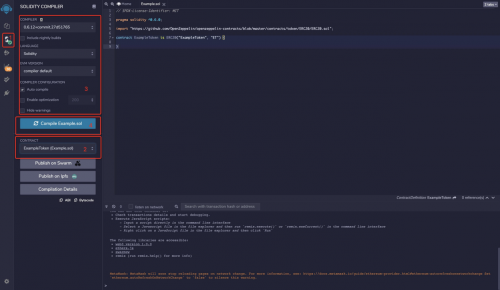
4.Clieck compile按钮
通过钱包(如MetaMask)将合约部署到区块链。
1.在MetaMask中设置网络信息:
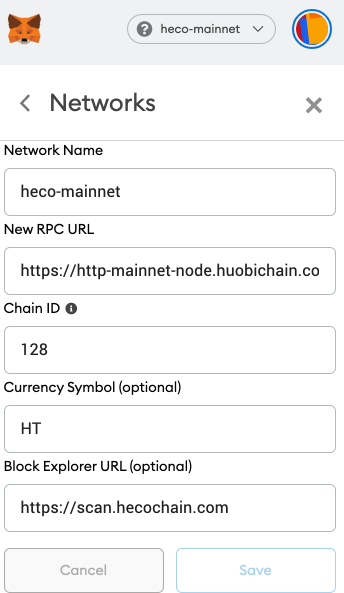
2.回到Remix。
•开关环境
•选择合约
•单击部署按钮

通过MetaMask即可将合约部署上链了
Truffle
使用truffle编译和部署契约。
安装节点。
安装truffle
npm install -g truffle
truffle version安装完成后运行。如果命令行显示如下消息,则说明安装成功。
Truffle v5.1.36 (core: 5.1.36)
Solidity v0.5.16 (solc-js)
Node v10.22.1
Web3.js v1.2.1
首先,为项目创建文件夹。
mkdir Example
cd Example
然后,通过truffle初始化项目
truffle init
初始化完成后,将在项目中生成以下文件结构。
|-- contracts //folder for contracts
|-- migrations //folder for deployment scripts
|-- test //folder for test scripts
|-- truffle-config.js //truffle config file
配置truffle信息
const HDWalletProvider = require('@truffle/hdwallet-provider');
const fs = require('fs');
const mnemonic = fs.readFileSync(".secret").toString().trim();
module.exports = {
networks: {
testnet: {
provider: () => new HDWalletProvider(mnemonic, 'https://http-testnet.hecochain.com'),
network_id: 256
mainnet: {
provider: () => new HDWalletProvider(mnemonic, 'https://http-mainnet.hecochain.com'),
network_id: 128
// Set default mocha options here, use special reporters etc.
mocha: {
// timeout: 100000
// Configure your compilers
compilers: {
solc: {
// version: "0.5.1", // Fetch exact version from solc-bin (default: truffle's version)
// docker: true, // Use "0.5.1" you've installed locally with docker (default: false)
// settings: { // See the solidity docs for advice about optimization and evmVersion
// optimizer: {
// enabled: false,
// runs: 200
// evmVersion: "byzantium"
C创建合同将自定义合同放入文件夹中,contracts并修改文件夹中的部署脚本migrations。
truffle migrate --network testnet
输出如下.
2_example_migration.js
======================
Deploying 'ExampleToken'
------------------------
> transaction hash: 0x91e50594a63bc6f4c299f3f445868571678be306b835bddce6dff5c7a5ddf9dc
> Blocks: 2 Seconds: 4
> contract address: 0x54D2049715FC8De1361D7350de90eb05F0f6CA84
> block number: 375304
> block timestamp: 1608016637
> account: 0x03D32B774295D740ffEe43b20fcC0a53acC576e6
> balance: 878.909609236165318643
> gas used: 1056044 (0x101d2c)
> gas price: 20 gwei
> value sent: 0 ETH
> total cost: 0.02112088 ETH
> Saving migration to chain.
> Saving artifacts
-------------------------------------
> Total cost: 0.02112088 ETH
Summary
=======
> Total deployments: 1
> Final cost: 0.02112088 ETH
最后,合约部署完成。
Graph Node
Graph Node是一种使用GraphQL在以太坊和IPFS上快速构建分布式应用程序(DAPP)的协议。
下一个操作仅作为简单的设置教程供参考。
设置图节点
为了方便起见,我们将官方docker compose用于节点,数据库和IPFS部署。
请注意,其中的ethereum字段的值将docker-compose.yml替换为HECO的节点连接信息。
graph-node:
image: graphprotocol/graph-node
ports:
- '8000:8000'
- '8001:8001'
- '8020:8020'
- '8030:8030'
- '8040:8040'
depends_on:
- ipfs
- postgres
environment:
postgres_host: postgres
postgres_user: graph-node
postgres_pass: let-me-in
postgres_db: graph-node
ipfs: 'ipfs:5001'
ethereum: 'mainnet:http://127.0.0.1:8545' #replaced with heco rpc info
RUST_LOG: info
注意:连接到graph-node的节点必须处于archive模式(启动节点时添加标志--syncmode full --gcmode存档),我们建议每个用户都构建自己的RPC节点。
每个用户根据自己的情况编写,以下内容可用作参考:
将编写的子图打包并构建到wasm文件中,然后部署到graph node。可以在上面的示例项目代码中找到特定的命令。
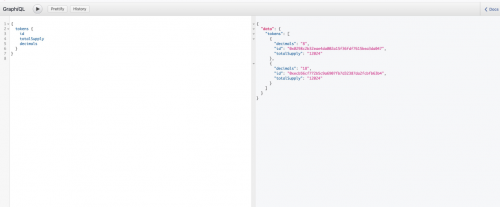
GraphQL的用法
一旦部署,就可以使用GraphQL请求数据
法国布雷斯特商学院硕士班招生
北达软EXIN网络空间与IT安全基础认证培训
北达软EXIN DevOps Professional认证培训
Recommend
-
5
火币DeFi实验室运营负责人高潮:HBTC为以太坊注入了最大共识的BTC资产 2021-01-07 17:45:00 1月7日16:00,路印CTO郭雄辉 & 火币DeFi实验室运营负责人高潮做客币世界直播间,就《首次披露:谈谈低费用即时的BTC转账功...
-
19
随着以太坊价格的暴涨,在上面开发dapp项目的成本越来越高,而eth2.0与芬分片技术还尚不成熟。对于独立开发者来说,有必要选择一个新的公链。我在这里重点检索了heco,并提出来一些对于独立开发者的建议。 随着以太坊价格的暴涨,...
-
13
Polkastarter上线多链IDO池,兼容以太坊和BSC 2021-04-14 21:21:00 官方...
-
13
04月08日 11:04Wanchain将于4月15日硬分叉升级,完全兼容以太坊EVM 和工具火星财经消息,Wanchain 官方宣布主网客户端 Gwan 将于北京时间 4 月 15 日早上 8 点进行木星版本(v2.2.0)硬分叉升级,届时...
-
15
以太坊EVM兼容区块链全表 发表于 2021-05-26 ...
-
23
最佳答案 2天前 链本身是没有任何的关系(连接),...
-
11
Acala推出完全兼容以太坊EVM的Acala EVM+
-
4
旧版本的以太坊网络客户端Geth中的一个bug已经导致运行这些版本的节点从主网络中分离出来。该bug影响较老版本的Geth客户端,特别是v1.10.7和更早版本。这些节点...
-
5
Cosmos 2022年展望:兼容以太坊,DeFi与NFT生态或迎来爆发链捕手2021-12-30热度: 13713Cosmos 生态系统中一些最具创新性的项目将于明年投入...
-
4
V2EX › 加密货币 19 年在火币 APP 买的以太坊,然后就放里面没关注过了,还有办法找回吗?
About Joyk
Aggregate valuable and interesting links.
Joyk means Joy of geeK