

Getting Started with Tuist
source link: https://sarunw.com/posts/getting-started-with-tuist/
Go to the source link to view the article. You can view the picture content, updated content and better typesetting reading experience. If the link is broken, please click the button below to view the snapshot at that time.
Getting Started with Tuist
What is Tuist
Tuist is a command-line tool that helps you generate, maintain and interact with Xcode projects. It's open-source and written in Swift.
The above meaning is coming from their Github repo, but what Tuist really is?
Source of truth
When working with an iOS project, the Xcode project (.xcodeproj) is our source of truth. It holds information about our source code and how they link together. We can easily create a new test target, a new framework, and link everything together via Xcode user interfaces.
Interact and manage our project via Xcode is easy, and nothing wrong with it. The problem comes when you start working as a team. Xcode project is very fragile. Even the slightest change like open Storyboard or move files around could cause a change in the Xcode project (.xcproject), which ends up in merge conflict.
This is where Tuist comes into play. Tuist helps us take back the control of our project. Instead of treating the Xcode project as a source of truth and hoping it will do the right thing, Tuist treats our filesystem and a Tuist's manifest file (which define dependencies) as a source of truth. Then it generates an Xcode project out of that.
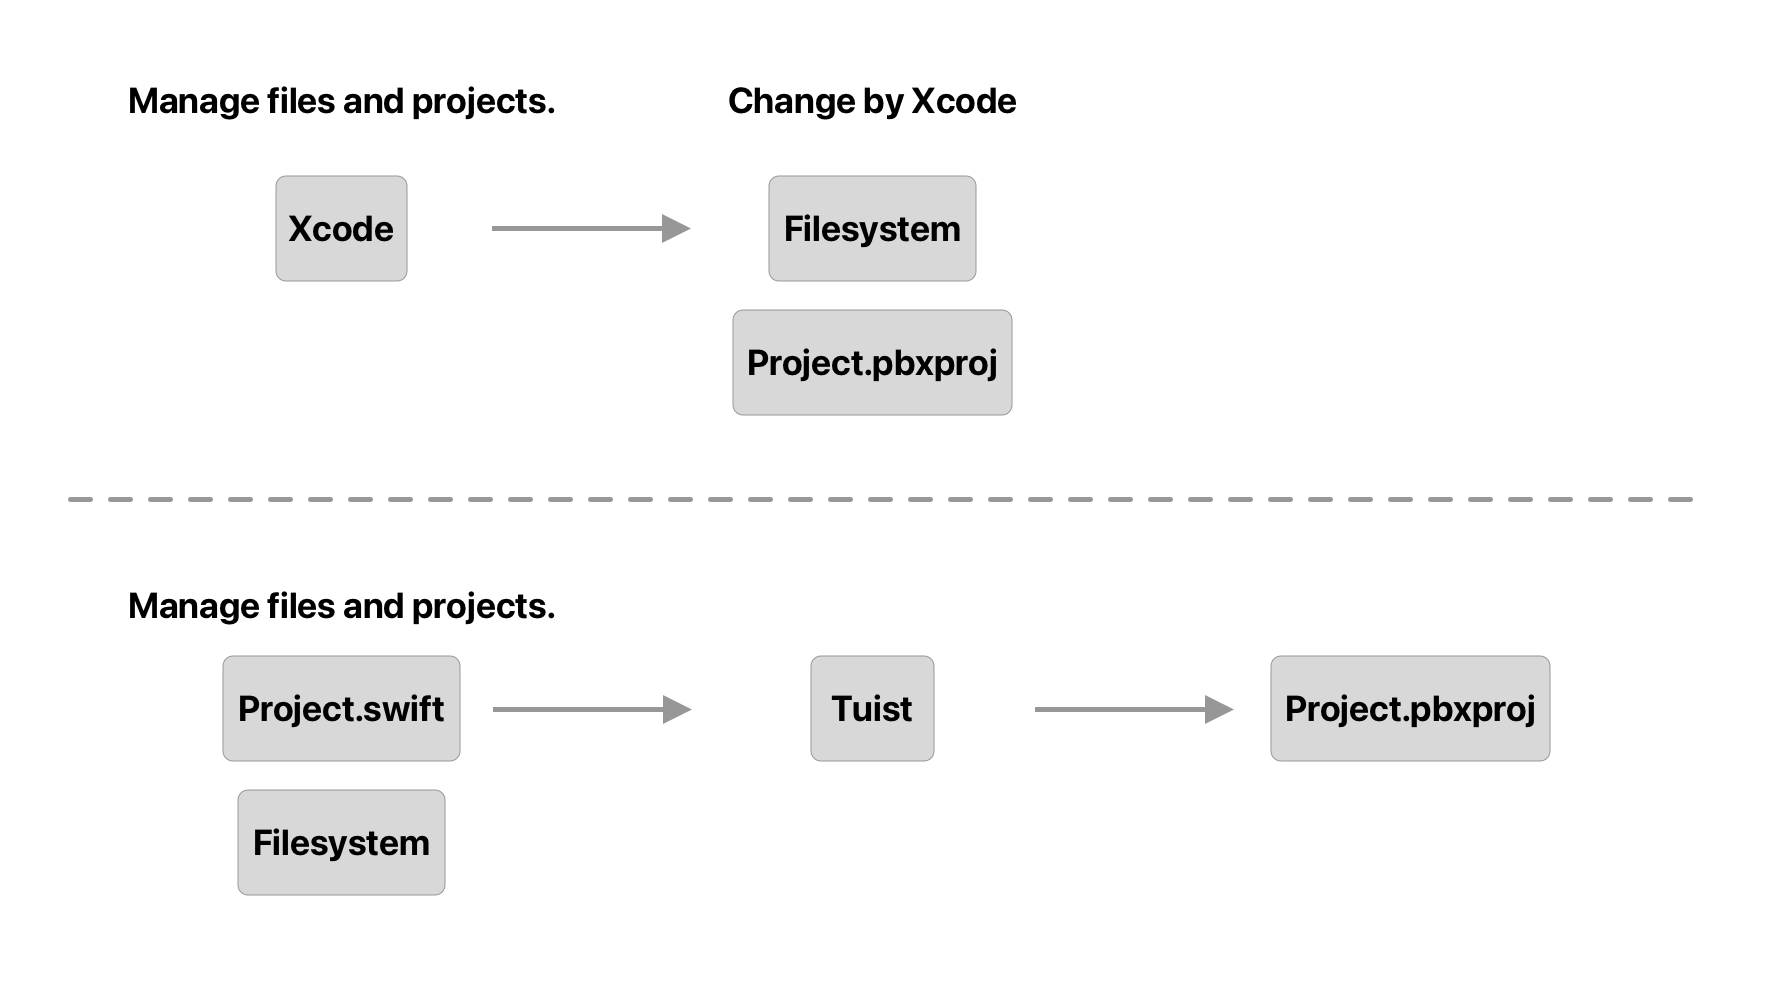 The different ways to think about the source of truth of the project.
You might wonder what the manifest file looks like and how hard it is to manage a project from this file. Let's see it for yourself.
Install
First, let's install the Tuist. Open Terminal and enter this command.
bash <(curl -Ls https://install.tuist.io)Then try running the tuist command, which will install Tuist for you if you do not already have one. After you have the tool set up, let's create your first project.
If you are not familiar with the Terminal, don't worry. Just launch the Terminal app and type those commands in. (Don't forget to hit return to execute the command).
Creating our first project
Let's create a new project folder to work with. I called it "MyApp".
mkdir MyApp
cd MyApp
mkdir (Make Directory) is a command to create a new folder. cd (Change Directory) is a command to change the directory.
Project.swift
Then create a Project.swift file. Project.swift file is a manifest file contains metadata for our project. This is the instruction for Tuist to understand how we want our project to be.
Create a new file named Project.swift, then running tuist edit, which will open up a temporary Xcode project with all the project manifests and the project helpers, so you will be able to edit manifest with the help of Xcode auto-correct.
tuist editThe snippet below is our project manifest:
import ProjectDescription // <1>

let project = Project(
    name: "MyApp",
    targets: [
        Target(
            name: "MyApp",
            platform: .iOS,
            product: .app,
            bundleId: "com.sarunw.myapp",
            infoPlist: .default,
            sources: [
                "Sources/**"
            ],
            resources: [
                "Resources/**"
            ]
        )
    ]
)
<1> ProjectDescription framework define all the Xcode project related models.
Press CTRL + C in your Terminal once you are done editing.
Since we are defining an Xcode project, most of the properties might be familiar to you. You can check out the project reference to see all the available properties in the ProjectDescription framework. The only two required fields are name and targets.
Tuist isn't magically creating source files and folders for us. We have to do it manually. We need to create files that our manifest file references to, Sources and Resources. As an example, I will create a SwiftUI project since it required fewer boilerplate files and setup. SwiftUI needs one file (main App) while UIKit needs two (AppDelegate and SceneDelegate).
When I said, "Tuist isn't magically creating source files and folders for us", I lied to you. Tuist can generate some helpers and even Info.plist for you, but I want to emphasize that you should be the one who creates your source of truth (Project structure and source files).
File structure: Folders and Source codes
Create two folders for hosting our files.
mkdir Sources
mkdir Resources
Then I create two Swift files, MainApp.swift and ContentView.swift, and put them under Sources. These two files' contents should be familiar to you because I copied them from the Xcode boilerplate when we create a new project from Xcode.
MainApp.swift
import SwiftUI

@main
struct MainApp: App {
    var body: some Scene {
        WindowGroup {
            ContentView()
        }
    }
}
ContentView
import SwiftUI

struct ContentView: View {
    var body: some View {
        Text("Hello, world!")
            .padding()
    }
}

struct ContentView_Previews: PreviewProvider {
    static var previews: some View {
        ContentView()
    }
}
Resources
I also put a custom font ObjectSans-Bold.otf in a Resources folder for demonstration.
I put a custom font here to show how Tuist can generate a helper function for us. In this case, the Fonts+MyApp.swift file.
That's all we need to do. We have our source of truth set up. Let's see how we can generate the Xcode project from these files.
Generating project
The manifest and the project files are the only things that Tuist needs. To generate Xcode project out of it, you run the following command:
tuist generateWe’ll get a MyApp.xcodeprojand and MyApp.xcworkspace files. If you open MyApp.xcworkspace and try to run the MyApp scheme, it should build the app and run it on the simulator 📱.
Every time you change Project.swift, you need to regenerate the project with tuist generate. Regenerate the project and manually open it can get annoying quickly. Luckily, Tuist has a command for that.
tuist generate -O
tuist generate --open
Both of these will generate the project and open it immediately.
I suggest you close your project before running tuist generate. It can become buggy if you run it while open the project.
Here is the current file struture:
Derived
  - InfoPlists
    - MyApp.plist
  - Sources
    - Bundle+MyApp.swift
    - Fonts+MyApp.swift
MyApp.xcodeproj
MyApp.xcworkspace
Resources
  - ObjectSans-Bold.otf
Sources
  - ContentView.swift
  - MainApp.swift
Project.swift
Tuist generates everything under the Derived folder. You shouldn't modify these files since they will be in your .gitignore and can override by tuist generate any time.
Run the app, and this is what you will see:
It looks like the generate Info.plist is missing some key. Let's add that.
Modify Info.plist
Xcode required a launch screen as an indicator of whether the app can support a large screen size or not. Ours generate Info.plist doesn't include any of this key. To fix this, we need to add a new dictionary key, UILaunchScreen.
Since we use a Tuist generated Info.plist, we shouldn't directly modify our Info.plist from the Xcode. What we should do is modify it from our source of truth, Project.swift.
Run tuist edit and modify our manifest to this:
import ProjectDescription

let infoPlist: [String: InfoPlist.Value] = [ // <1>
    "UILaunchScreen": [:]
]

let project = Project(
    name: "MyApp",
    targets: [
        Target(
            name: "MyApp",
            platform: .iOS,
            product: .app,
            bundleId: "com.sarunw.myapp",
            infoPlist: .extendingDefault(with: infoPlist), // <2>
            sources: [
                "Sources/**"
            ],
            resources: [
                "Resources/**"
            ]
        )
    ]
)
<1> We declare a new Info plist value.
<2> We change infoPlist from .default to .extendingDefault(with: infoPlist) which allow us to override value from the default info plist.
Run tuist generate again, and you should see the new key in the Info.plist.
Run the app, and everything should work.
Full control of our Info.plist
If you want to have full control of your info plist, you can also do that.
- Create or move your info plist file to somewhere outside the Derived folder. In my case, I move it to the root.
Resources
  - ObjectSans-Bold.otf
Sources
  - ContentView.swift
  - MainApp.swift
Project.swift
MyApp.plist- Run
tuist editand tell Tuist to use ourInfo.plistinstead of generating one. We do this by modifyinginfoPlistkey.
import ProjectDescription]

let project = Project(
    name: "MyApp",
    targets: [
        Target(
            name: "MyApp",
            platform: .iOS,
            product: .app,
            bundleId: "com.sarunw.myapp",
            infoPlist: "MyApp.plist", // <1>
            sources: [
                "Sources/**"
            ],
            resources: [
                "Resources/**"
            ]
        )
    ]
)
<1> We point infoPlist to our info plist.
- Run
tuist generate, and this is what we got. As you can see,InfoPlists/MyApp.plistis gone from the Derived folder. You are in charge of managing the info plist now.
Derived
  - Sources
    - Bundle+MyApp.swift
    - Fonts+MyApp.swift
MyApp.xcodeproj
MyApp.xcworkspace
Resources
  - ObjectSans-Bold.otf
Sources
  - ContentView.swift
  - MainApp.swift
Project.swift
MyApp.plist
Conclusion
This article focuses on a very basic approach where we create an iOS project from the ground up with Tuist. I want to show that it is not hard to start managing the Xcode project with Tuist.
The primary benefit of using Tuist to generate the Xcode project is no more merge conflict since we will put .xcodeproj in our .gitignore. I can't say much about other benefits at this point (Since I'm also new with this tool), but from what I know, it can make project separation among teams easier.
I'm still in the state of exploring this tool and see what does it capable of. My first impression is I'm kind of like it, and you can expect more posts from me about this tool.
Read more article about Xcode, Development, Tuist,
or see all available topic
Get new posts weekly
If you enjoy this article, you can subscribe to the weekly newsletter.
Every Friday, you’ll get a quick recap of all articles and tips posted on this site — entirely for free.
Feel free to follow me on Twitter and ask your questions related to this post. Thanks for reading and see you next time.
If you enjoy my writing, please check out my Patreon https://www.patreon.com/sarunw and become my supporter. Sharing the article is also greatly appreciated.
How to resize an UIImageView to fit a container view using auto layout
Learn how to fit image view to any container by changing Content Hugging Priority and Content Resistance Priority.
Recommend
About Joyk
Aggregate valuable and interesting links.
Joyk means Joy of geeK