

Build a chat app with React native
source link: https://kriss.io/build-a-chat-app-with-react-native
Go to the source link to view the article. You can view the picture content, updated content and better typesetting reading experience. If the link is broken, please click the button below to view the snapshot at that time.
Build a chat app with React native
Welcome to part one of our series on building a mobile chat app with React Native and PubNub. PubNub provides our realtime messaging chat APIs and backend, and React Native Gifted Chat provides a complete chat UI for our app.
In this case, we’ll use the PubNub React package, which is a wrapper for the PubNub JavaScript SDK (v4). It simplifies the PubNub integrations with React or React Native.
In the end, we’ll have a simple mobile group chat app that allows multiple users to message one another in real-time. From there, we’ll continue adding new chat features including message history, user online/offline status, and typing indicators.
Requirements
Before we begin, make sure you have the following:
-
Node.js installed, along with NPM or yarn.
-
A PubNub account; this is where you’ll get your unique publish/subscribe keys.
-
Two (or more) mobile devices to test the app.
Set Up
In this step, we’ll create a React Native project using the following command:
react-native init pubnubchatwithreactnativeOpen the project folder named pubnubchatwithreactnative with VSCode or your favorite code editor. Next, open an integrated terminal and run the Android and iOS simulator by using the following code snippets:
react-native run-ios
# OR
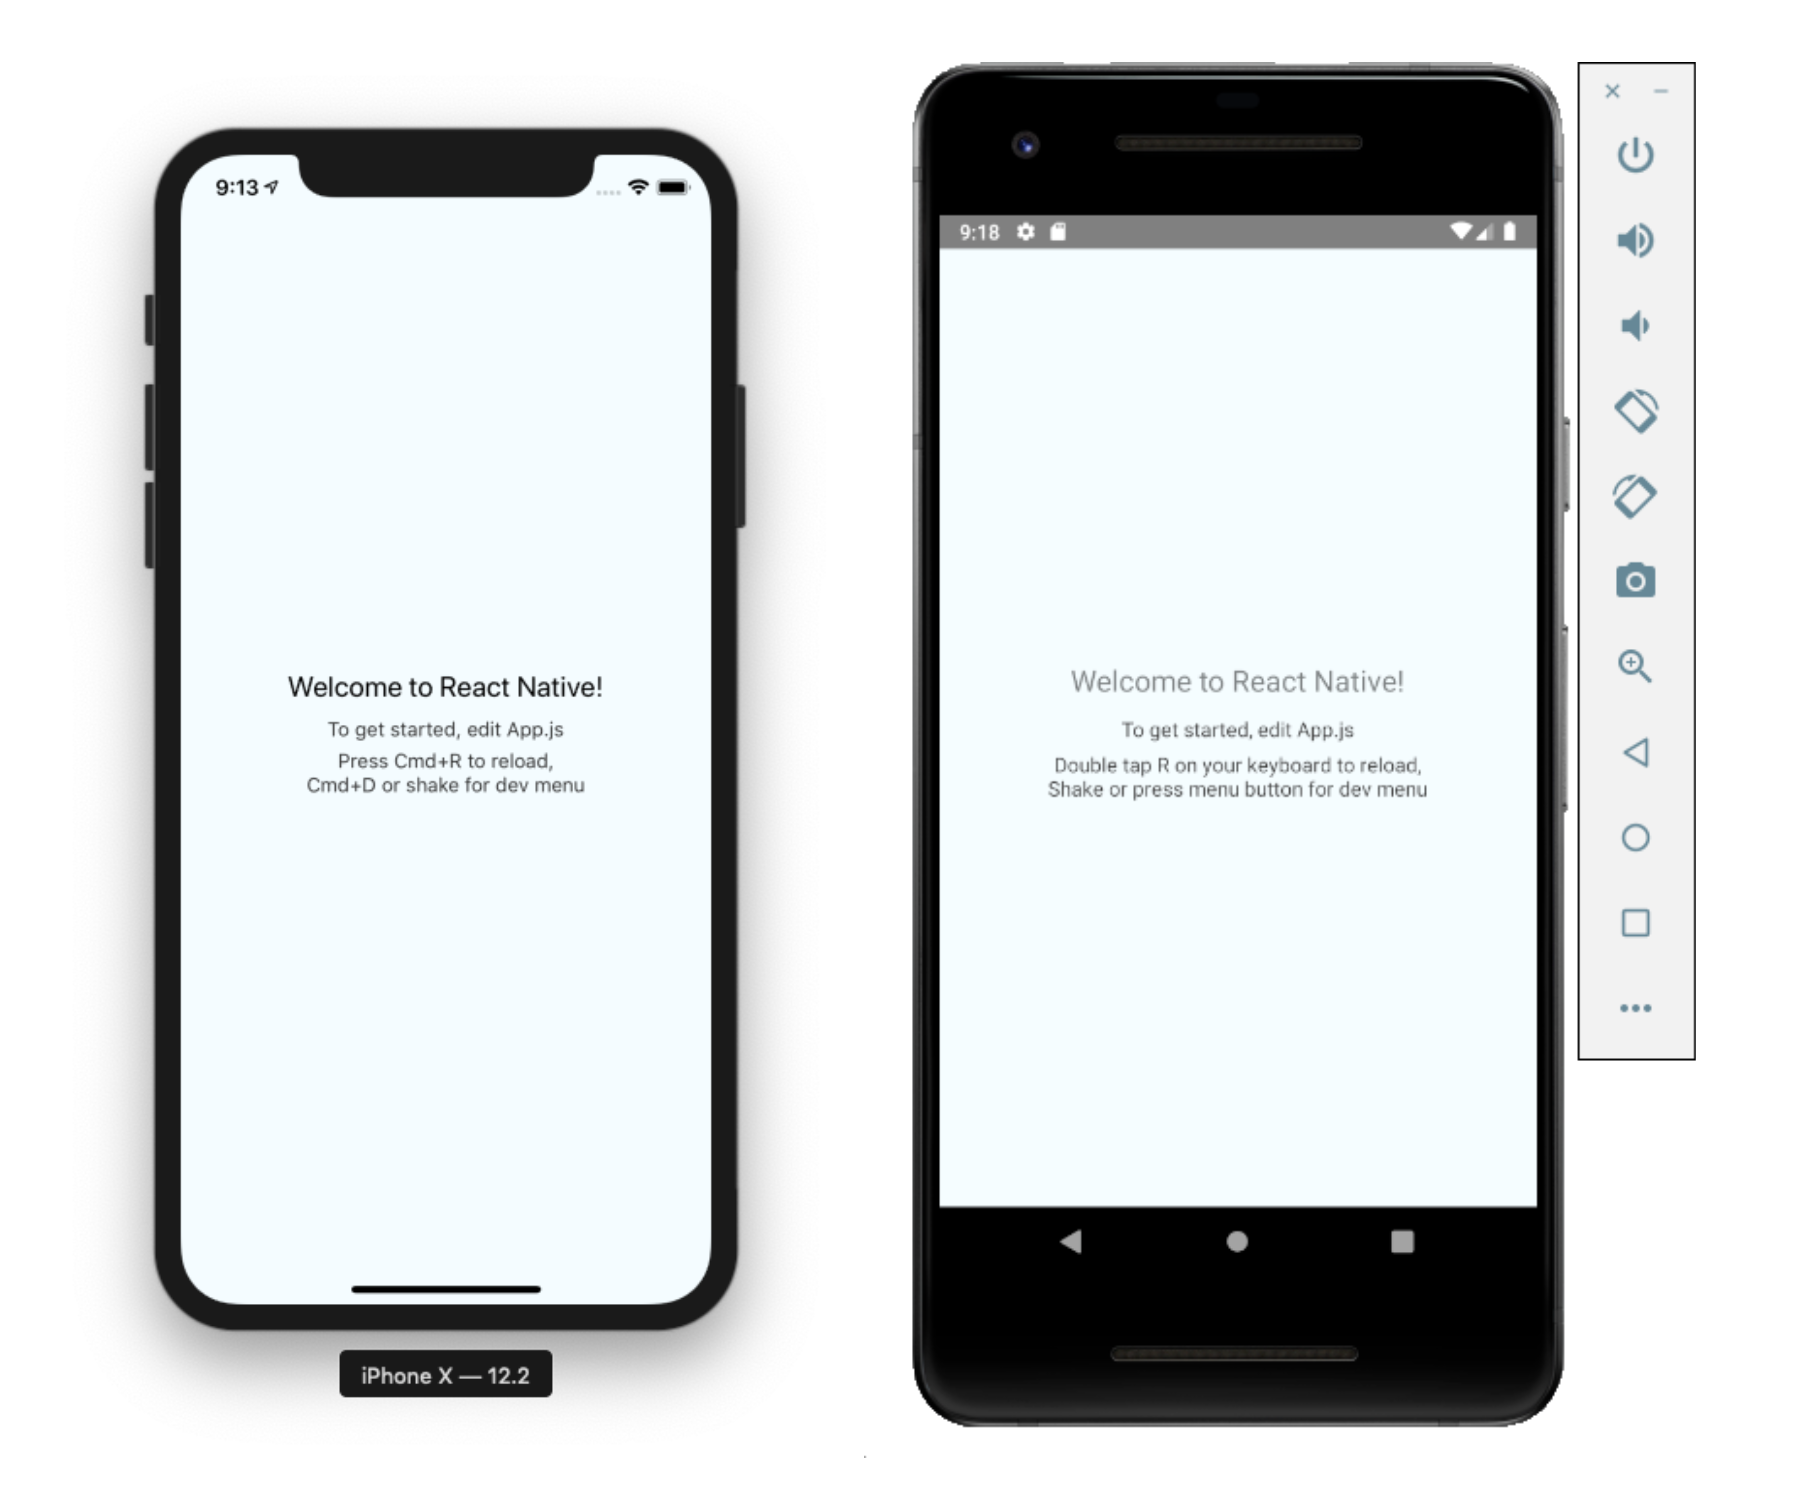
react-native run-androidNote: It will take a considerable amount of time for the first build of the React project. After the build, you will see the following on your Android and iOS simulators.
UI: Installing the Gifted Chat UI Package
In this step, we are going to install the Gifted Chat package, providing us with a complete chat UI. You can install react-native-gifted-chat with using following commands:
npm install react-native-gifted-chat --save

# OR

yarn add react-native-gifted-chat
Grab the example code from the GitHub readme file and paste it into the App.js file.
Next, import the GiftedChat component/module from the react-native-gifted-chat package as shown in the code snippet below:
import { GiftedChat } from 'react-native-gifted-chat'Replace the code in the default class with the following piece of code:
    export default class App extends Component {
      state = { messages: [], };

      componentWillMount() {
        this.setState({
          messages: [
            { _id: 1, text: "Hello developer", createdAt: new Date(),    user: {
           _id: 2,
           name: "React Native",
           avatar: "https://placeimg.com/140/140/any", }, }, ],
          });
      }

      onSend(messages = []) {
        this.setState(previousState => ({
          messages: GiftedChat.append(previousState.messages, messages),
        })
        );
      }

    render() {
        return (
          <GiftedChat messages={this.state.messages} onSend={messages => this.onSend(messages)} user={{ _id: 1, }} />
        );
    }
As seen in the code snippet above, the onSend() function is used for collecting messages and concatenating with the previous message. You’ll see it in the chat UI. The imported component GiftedChat is used to cover the whole chat interface.
You need to save the code and refresh the simulators. You will see an example of message.
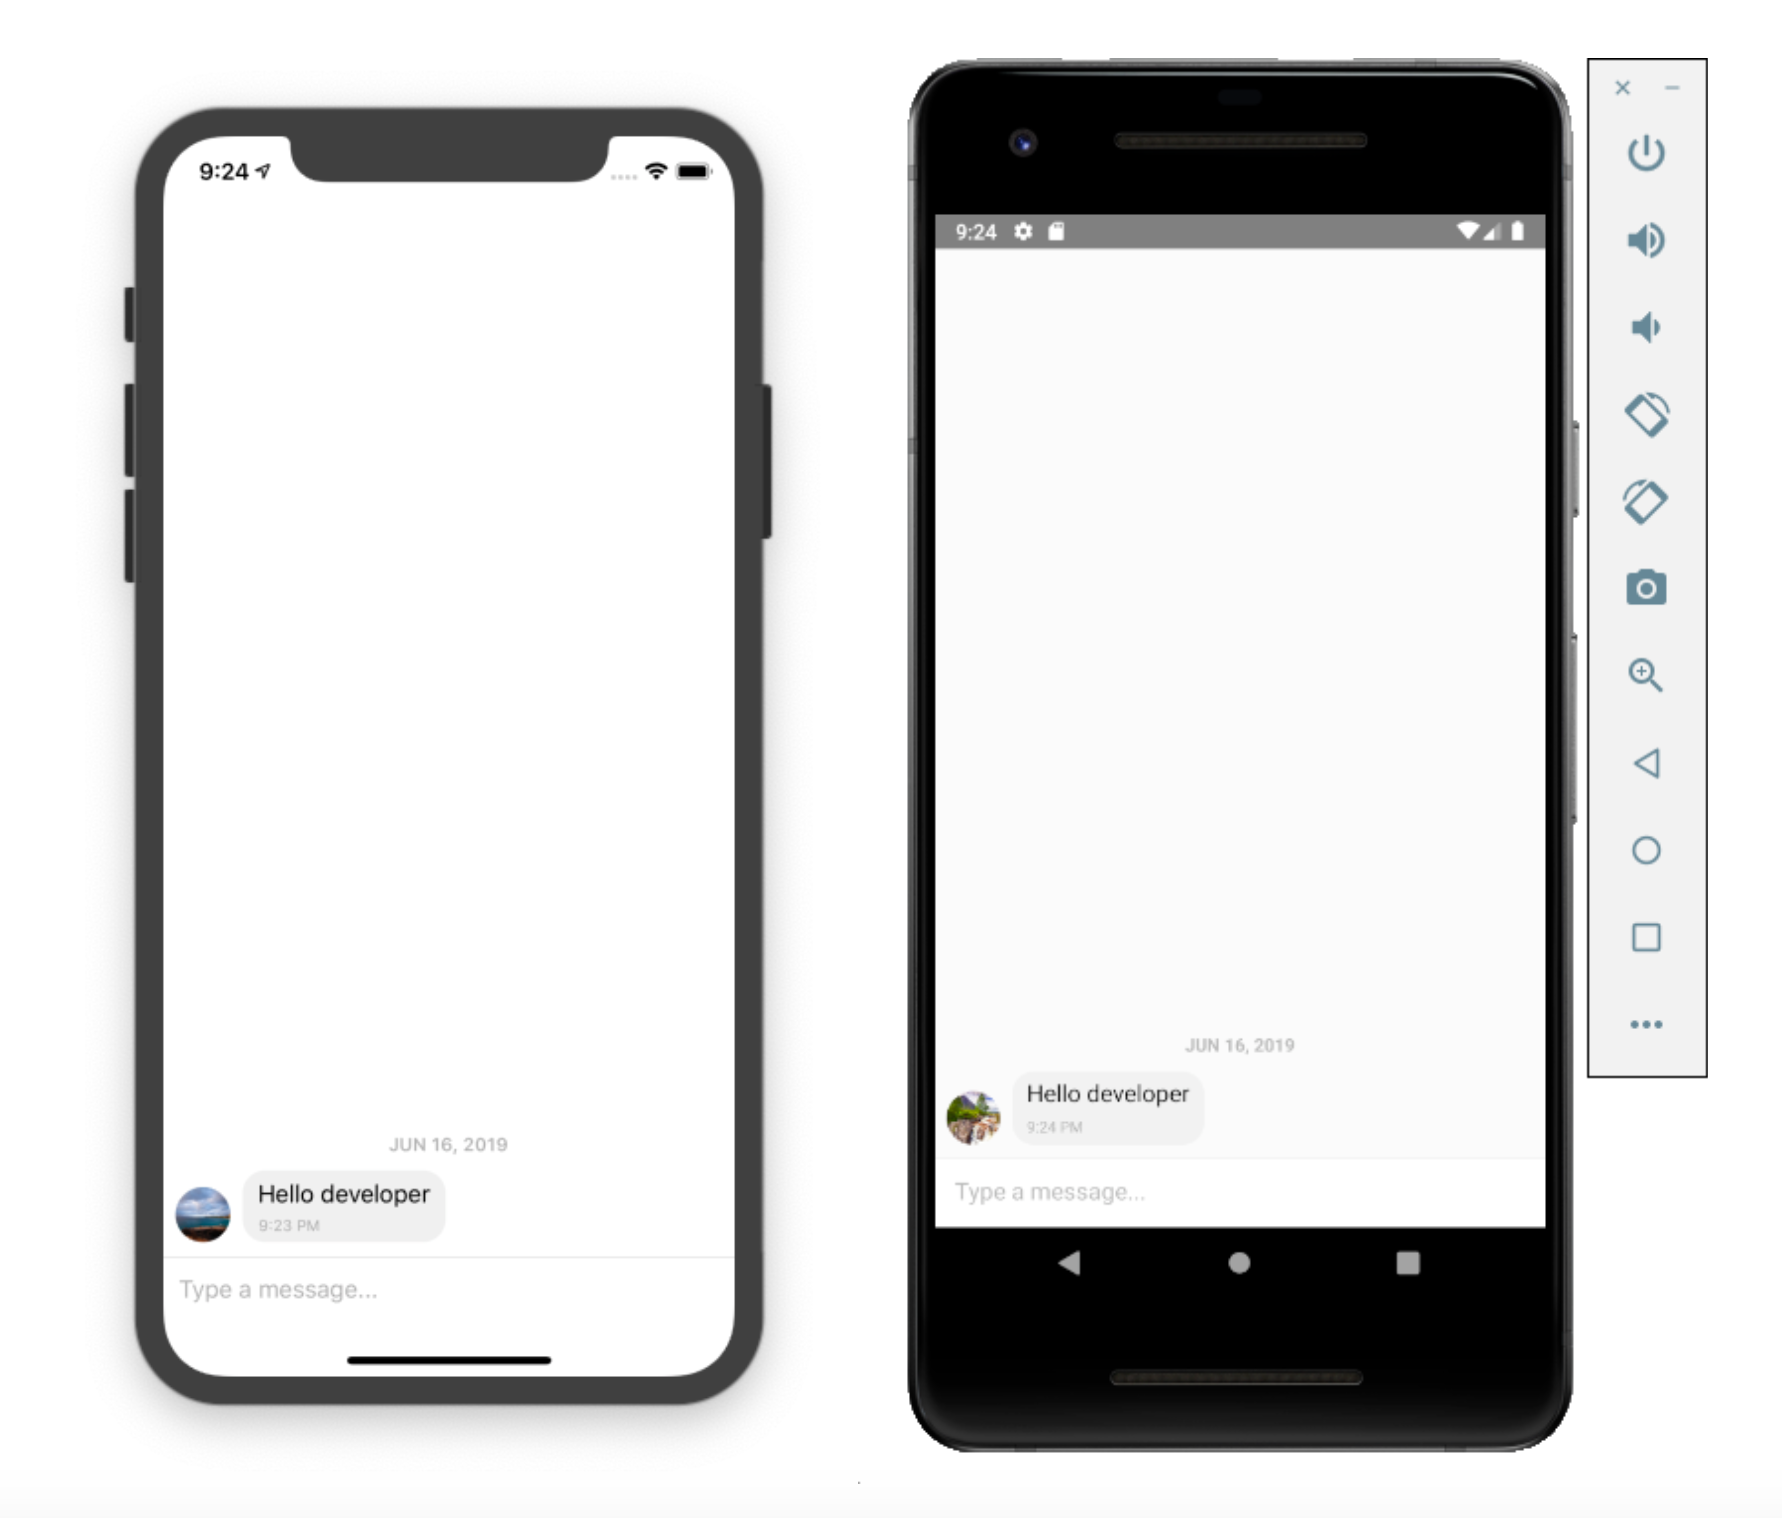
Keep in mind that you will not be able to send messages because PubNub is not yet implemented.
Messaging and Backend: Implementing PubNub
Now that we’ve got our UI ready to go, it’s time to make our chat app interactive — allowing users to communicate in real-time. That’s where PubNub comes in.
In this step, we’ll install the PubNub SDK. You can install the package using the following commands.
Using NPM:
npm install pubnub-react --saveUsing Yarn:
yarn add pubnub-reactOnce the installation is done, you need to import the PubNubReact module from the pubnub-react package as shown in the code:
import PubNubReact from 'pubnub-react';Next, you can copy the example code from README file of the PubNub React GitHub, and paste it into the App.js file of your project:
constructor(props) {
super(props); this.pubnub = new PubNubReact({ publishKey: 'YOUR PUBLISH KEY', subscribeKey: 'YOUR SUBSCRIBE KEY' });
this.pubnub.init(this);
}
componentWillMount() {
this.pubnub.subscribe({ channels: ['channel1'], withPresence: true });
this.pubnub.getMessage('channel1', (msg) => { console.log(msg); });
this.pubnub.getStatus((st) => { console.log(st);
this.pubnub.publish({ message: 'hello world from react', channel: 'channel1' }); });
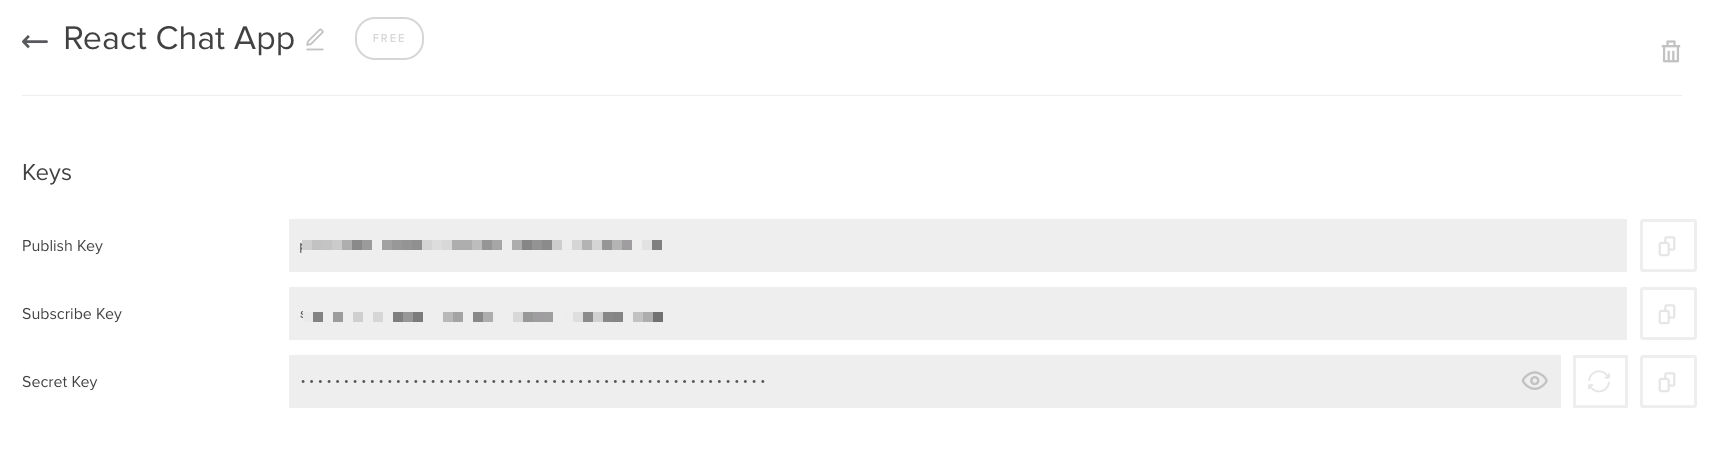
}componentWillUnmount() { this.pubnub.unsubscribe({ channels: ['channel1'] }); }Next, add your unique pub/sub keys you got when you signed up for PubNub. They’re available in your PubNub Admin Dashboard.
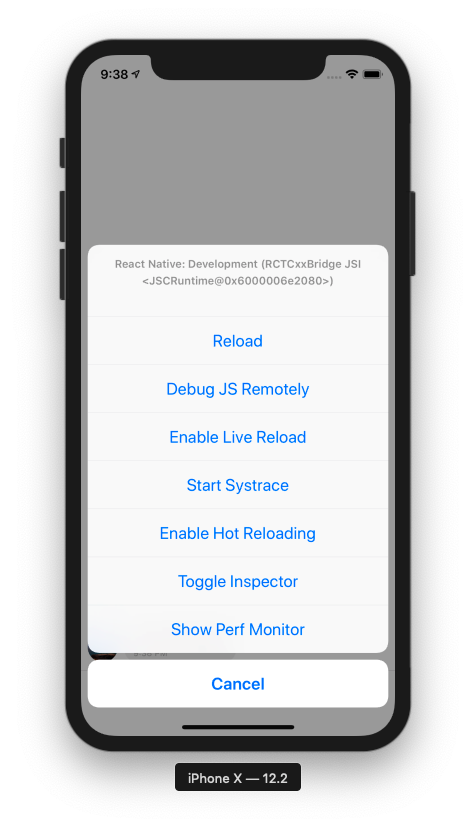
Save and re-run the simulator. To view the JavaScript console output, we need to use Debug JS remotely.
You will now be able to see PubNub data in the browser console.
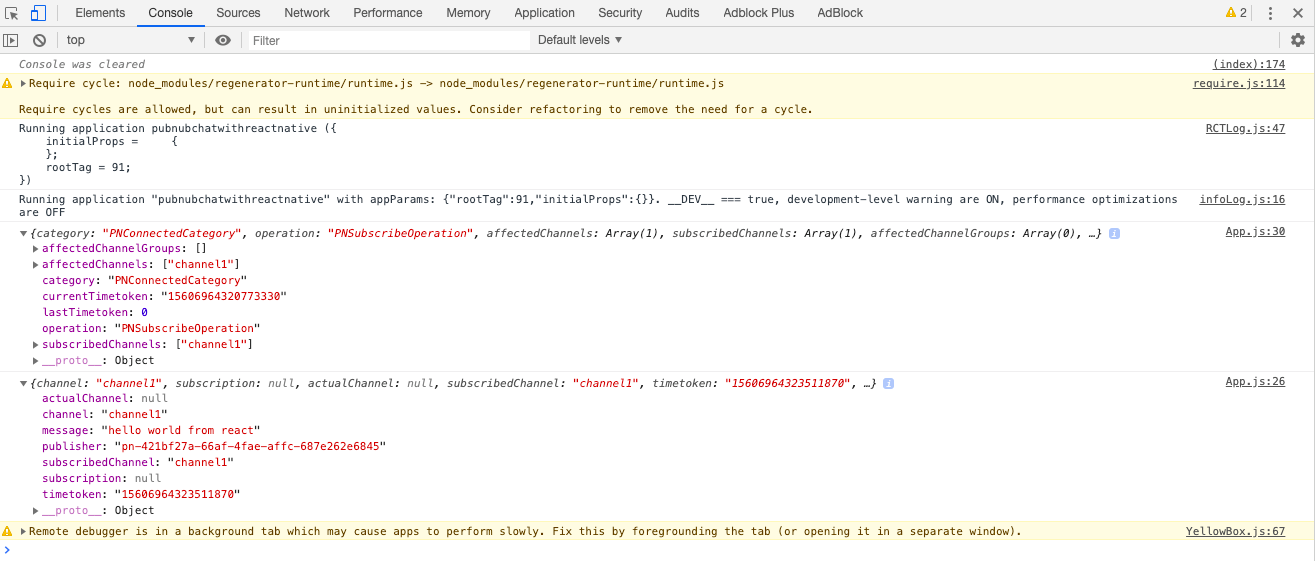
With that, the PubNub implementation is complete.
Next, we need to configure the chat channel using PubNub as set it up along with Gifted Chat. Follow these simple steps:
-
Initialize PubNub (done)
-
Subscribe to channel name “channel1” with the SDK subscribe method.
-
Send a message to “channel1” with the publish method.
-
Get a message from a channel with getMessagemethod.
Putting It All Together
In this step, we bring the entire configuration together. We pass a message from Gifted Chat to the PubNub publish() method. You can use the example code from the code snippet below.
    onSend(messages = []) {
      this.pubnub.publish({ message: messages, channel: "Channel1", });
    }
When the callback function onSend() is called, we will send a message to Channel1.
To get a message from the channel in realtime, we use the following callback to append previous state messages. Here is the code:
    this.pubnub.getMessage("ReactChat", m => {
      this.setState(previousState => ({ messages:  GiftedChat.append(previousState.messages, m["message"]), }));
    });
All done! Let’s try it out by reloading the simulators. Now you should see the following in your UI.
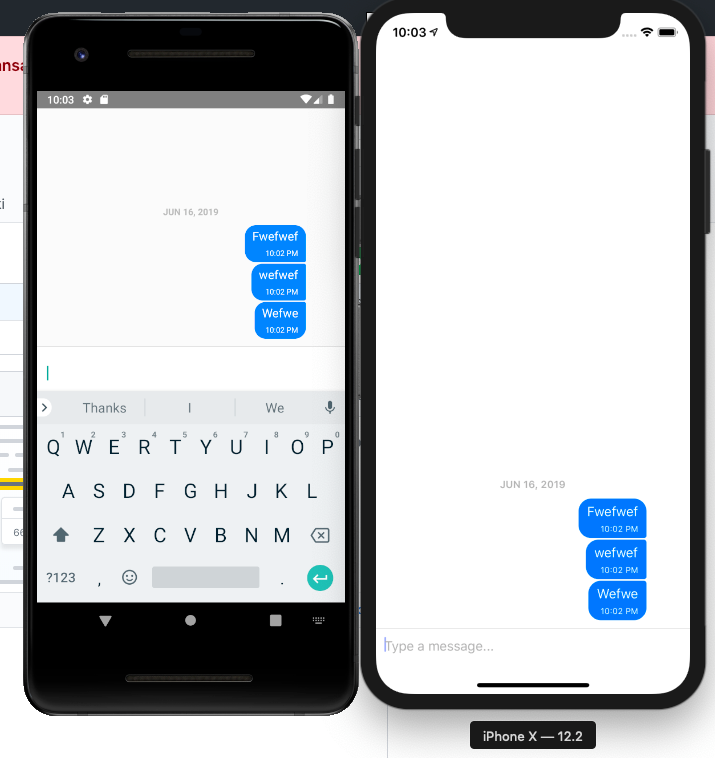
You will see chat messages appear in the UI, but all the messages appear on the same side. We need to graphically separate messages sent from messages received, to make it appear that two people are chatting.
<GiftedChat messages={this.state.messages} onSend={messages => this.onSend(messages)} user={{ _id: 0, }} />This is because we haven’t set a new id when we open a new session. We need to hard code the user **ID.
Create a function in App.js for generating a random user ID, as shown in the code snippet below.
randomid = () => { return Math.floor(Math.random() * 100); };Set the variable and add it to the constructor function in App.js.
this.id = this.randomid();Lastly, add the state and function to the GiftedChat HTML, as shown in the code below.
<GiftedChat messages={this.state.messages} onSend={messages => this.onSend(messages)} user={{ _id: this.id, }} />Now, reload the simulator and observe the result. You will see the chat messages appear on the other side.

At last! We have completed the setup of a chat app using React Native along with Gifted Chat and PubNub.
Wrapping Up
In this tutorial, we learned how to create a simple chat app with React Native using Gifted Chat and PubNub. You’ve now got a basic mobile chat application allowing users to send and receive messages in real-time.
Next step is to start adding additional chat features — message history, typing indicators, user presence, etc. Keep an eye out for subsequent posts on that!
All the code for this tutorial is available in my GitHub repo.
Recommend
About Joyk
Aggregate valuable and interesting links.
Joyk means Joy of geeK