

How to Use CustomActionData to Access Windows Installer Properties in Deferred C...
source link: https://www.advancedinstaller.com/access-installer-properties-using-custom-action-data.html
Go to the source link to view the article. You can view the picture content, updated content and better typesetting reading experience. If the link is broken, please click the button below to view the snapshot at that time.

How to Use CustomActionData to Access Windows Installer Properties in Deferred CustomActions
Written by Horatiu Vladasel · January 20th, 2021
In my experience, CustomActions can be difficult to add and set up, especially in MSI, often requiring reviewing lengthy documentation or dealing with unexpected failures or bugs. If you started your career prior to the App-V and MSIX era, you have probably come across various applications installers that required reverse engineering work.
That means that you know first-hand how painful it could be to add multiple custom action scripts to your packages just to make them install and uninstall smoothly -- or to customize them to meet organization requirements.
In this article, we will go through Deferred CustomActions and will show you how to approach and deal with one of its downsides: accessing Windows Installer properties.
 We have a previous article, Don't Do It: Use Immediate CustomAction For Changing The System State, where we compared the Immediate and the Deferred CustomActions, presented their limitations, and explained when to use one or the other.
Why do you need CustomActionData to Access Windows Installer Properties?
As an Application Packager, I hardly ever use Immediate CustomActions. This is due to the fact that I often need to make core changes to install and configure an application meant to modify the system (like adding, deleting or updating a file or a registry key). Only from time to time, I need to create a CustomAction to gather information for the installation and when I do, the information gathered is usually parsed to a Deferred CustomAction.
However, accessing Windows Installer properties within a Deferred CustomAction doesn't work the same as with Immediate CustomActions (using Session.Property). Hence, why you will need to use CustomActionData instead.
When using Deferred CustomActions, you should note that the script generated for them is executed outside the installation session. This is the reason why the information about the original session handle and property data is not available to a Deferred CustomAction.
Further on, we will go through how to access these installer properties from Deferred CustomActions by using CustomActionData. But first, let's review a scenario of how Deferred CustomActions behave.
When can Deferred CustomActions go wrong?
Let’s suppose your application installs a configuration file with a server path that is different from one department to the other. Your application reads the content of the configuration file and displays it on the screen (see image below).
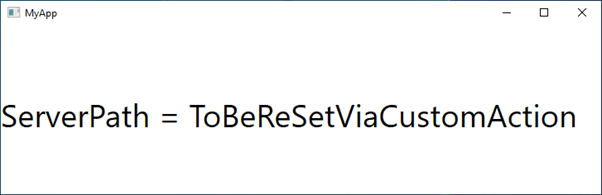
Ideally, you would have the server path parameterized within the package. This is helpful in case the server path changes in the future, as you will not need to rework the whole package -- just change the parameterized value from the Property table or within the install command line.

Then, you should parse its value through the installation command line of your package.
msiexec /i <path to MyApp.msi> SERVERPATH=NewServerPath
You need a CustomAction to retrieve the value of the public property which contains the server path to be able to update the content of the configuration file with the corresponding value.
If you use VBScript, you can use the Property of the Session object ( Session.Property) to retrieve the value of the public property. Your CustomAction script should look like the one below:
Const ForReading = 1
Const ForWriting = 2

Set wshShell = CreateObject( "WScript.Shell" )
strFilePath = wshShell.ExpandEnvironmentStrings("%ProgramFiles(x86)%") & Session.Property("Manufacturer") & "\" & Session.Property("ProductName") & "\config.xml"
msgbox strFilePath
wshShell = Nothing
strNewServerPathValue = Session.Property("SERVERPATH")
msgbox strNewServerPathValue

Set objFSO = CreateObject("Scripting.FileSystemObject")
Set objFile = objFSO.OpenTextFile(strFilePath, ForReading)

Dim strReadLineContent
strFileContent = ""
Do Until objFile.AtEndOfStream
            	strReadLineContent = objFile.ReadLine
            	If InStr(strReadLineContent,"ServerPath") <> 0 Then
                            	strReadLineContent = Replace(strReadLineContent, "ToBeReSetViaCustomAction", strNewServerPathValue)
            	End If
strFileContent = strFileContent & strReadLineContent & vbCrLf
Loop

objFile.Close

Set objFile = objFSO.OpenTextFile(strFilePath, ForWriting)
objFile.WriteLine strFileContent
objFile.Close
 You must take into consideration sequencing restrictions when scheduling your CustomAction in the Custom Actions sequence. In our scenario, because the target file is not already installed on the device, the Deferred CustomAction must be sequenced after the “InstallFiles'' standard action.
What happens and what to do when the Deferred CustomAction fails?
If you add this script into your MSI package as a Deferred CustomAction and then run the MSI installer of your package, it's a possible outcome for it to either fail or pass.
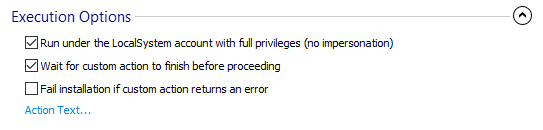
This result depends on how you set your CustomAction (e.g. if you set it to “Fail installation if custom action returns an error” or not) and the logic within the script itself.
Regardless of the outcome, the CustomAction will not work as expected and it will not update the configuration file - as you can see in our example below.

If you set your Deferred CustomAction to ignore exit code and continue, the installation of your package will carry on even if your CustomAction failed.
For more details, you can go to the Microsoft Docs - Custom Action Return Processing Options.
When trying to identify the problem, looking into the MSI log will not be that helpful. There, you can see some information but only if you set your CustomAction "not to ignore the exit code" (see example below).
MSI (s) (78:9C) [11:06:50:754]: Created Custom Action Server with PID 5632 (0x1600).
MSI (s) (78:B4) [11:06:50:770]: Running as a service.
MSI (s) (78:B4) [11:06:50:770]: Hello, I'm your 32bit Elevated Non-remapped custom action server.
MSI (s) (78:54) [11:06:54:926]: Product: MyApp -- Error 1720. There is a problem with this Windows Installer package. A script required for this install to complete could not be run. Contact your support personnel or package vendor.  Custom action SetServerPath script error -2146828197, Microsoft VBScript runtime error: Object variable not set: 'wshShell' Line 7, Column 1,
Error 1720. There is a problem with this Windows Installer package. A script required for this install to complete could not be run. Contact your support personnel or package vendor.  Custom action SetServerPath script error -2146828197, Microsoft VBScript runtime error: Object variable not set: 'wshShell' Line 7, Column 1,
MSI (s) (78:3C) [11:06:54:942]: Note: 1: 2265 2:  3: -2147287035
MSI (s) (78:3C) [11:06:54:942]: User policy value 'DisableRollback' is 0
MSI (s) (78:3C) [11:06:54:942]: Machine policy value 'DisableRollback' is 0
Action ended 11:06:54: InstallExecute. Return value 3.
To debug it, let’s amend the CustomAction script and add a message box which will display the retrieved value for the server path.
So, when you run the MSI installer of your package again, it will display a NULL value. That means the property that stores the server path is set to an empty string once the acquisition phase is completed (before the execution phase).
Now that we know what went wrong there, let’s solve it.
Accessing the CustomActionData property
The CustomActionData property is one of the few properties available to custom actions during the execution phase.
Please be aware that the CustomActionData property is only available to Deferred CustomActions -- Immediate CustomActions do not allow access to this property.
So, in order to sort out the issue, you have to follow these steps:
1. Amend the Deferred CustomAction script and use Session.Property (“CustomActionData”).
        Const ForReading = 1
Const ForWriting = 2

strCustomActionData = Session.Property("CustomActionData")
CustomActionDataArray = split (strCustomActionData, "|")

strFilePath = CustomActionDataArray(0) & "config.xml"
strNewServerPathValue = CustomActionDataArray(1)

Set objFSO = CreateObject("Scripting.FileSystemObject")
Set objFile = objFSO.OpenTextFile(strFilePath, ForReading)

Dim strReadLineContent
strFileContent = ""
Do Until objFile.AtEndOfStream
            	strReadLineContent = objFile.ReadLine
            	If InStr(strReadLineContent,"ServerPath") <> 0 Then
                            	strReadLineContent = Replace(strReadLineContent, "ToBeReSetViaCustomAction", strNewServerPathValue)
            	End If
strFileContent = strFileContent & strReadLineContent & vbCrLf
Loop

objFile.Close

Set objFile = objFSO.OpenTextFile(strFilePath, ForWriting)
objFile.WriteLine strFileContent
objFile.Close
2. Create another CustomAction (the easiest way is by using a property assignment custom action) that sets the property of interest to a property with the same name as the Deferred CustomAction.

During the installation sequence, the installer will write the value of the property/properties (e.g. APPDIR, SERVERPARTH) into the execution script as the value of the property CustomActionData.
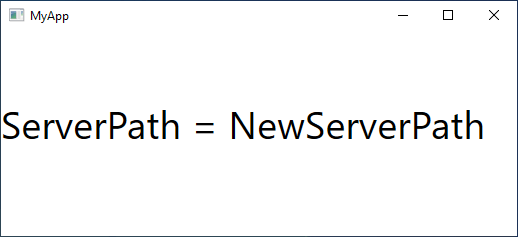
If you run your MSI installer for your package and set the value of SERVERPATH property to NewServerPath, then you will see that the configuration file has been updated with the new value and the new value is displayed on the screen when the application is launched, as in the example below:
msiexec /i <path to MyApp.msi> SERVERPATH=NewServerPath
Automatically Create the Custom Action with Advanced Installer
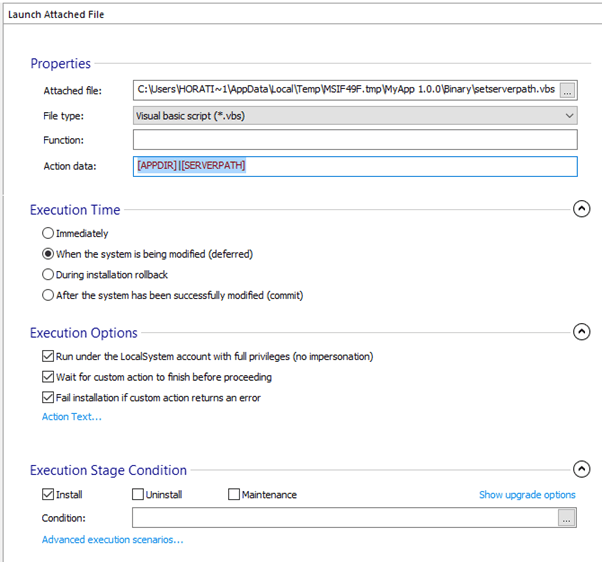
If you use Advanced Installer to build and create your MSI package, there is no need for you to manually create the “Set Property” CustomAction (second step in the example above).
Advanced Installer can do that automatically. All you need to do is to specify the value of the CustomActionData property within the “Action Data” field.
Try it first hand with Advanced Installer 30-day full featured FREE trial.
For step-by-step instructions on how to set up the Deferred CustomAction to be able to access Windows Installer properties, go to How to access installer properties from deferred custom actions article.
If you go and have a look at the CustomAction table within your MSI, you will notice that behind the scenes, AI_DATA_SETTER CustomAction has been automatically added.

Conclusion
CustomActionData is an elegant way of accessing installer properties when using a Deferred CustomAction.
In order to make the whole process seamless, Advanced Installer provides a GUI-based experience, which is practical both for junior packagers and for the most experienced IT Pros.
I hope you found this information useful and that it sheds some light on when and how to use CustomActionData property.
Recommend
About Joyk
Aggregate valuable and interesting links.
Joyk means Joy of geeK