

Building an app with Google Sheets
source link: https://docs.retool.com/docs/google-sheets?utm_campaign=changelog-news
Go to the source link to view the article. You can view the picture content, updated content and better typesetting reading experience. If the link is broken, please click the button below to view the snapshot at that time.

Building an app with Google Sheets
Query data from Google Sheets in Retool.
Retool makes it easy for you to build apps with Google Sheets data, including connecting Google Sheets with other APIs. Retool supports reading and writing data from Google Sheets, and with our query JSON via SQL, you can easily combine Google Sheets with other data sources.
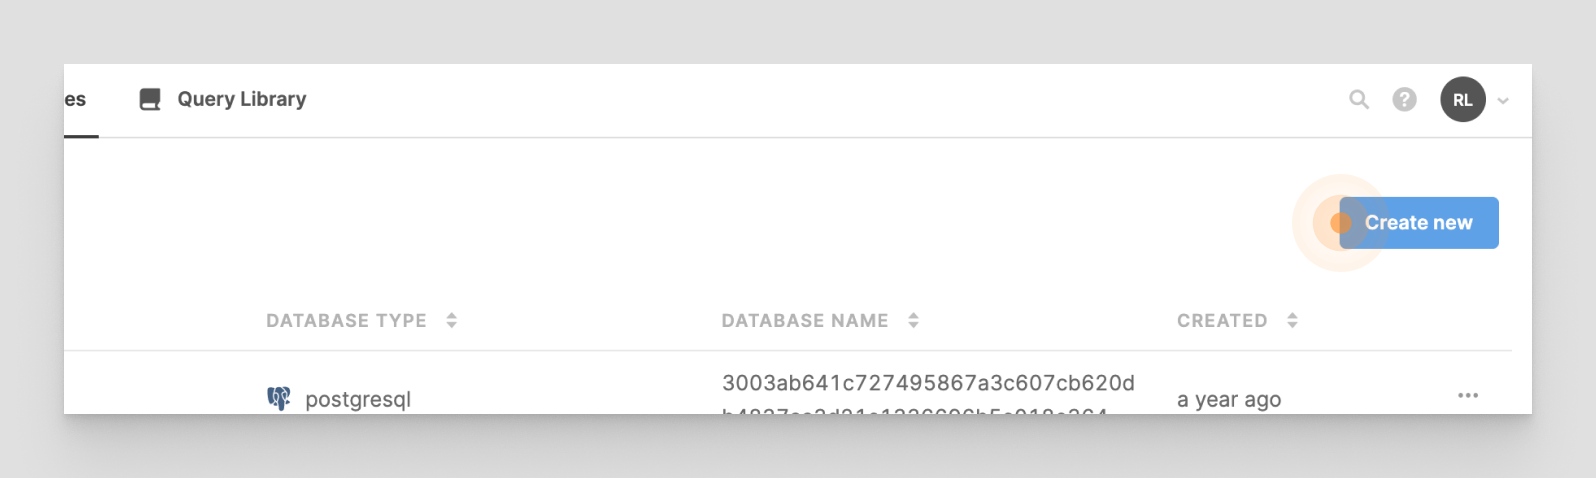
- Log into your Retool dashboard and in the top menu bar click Resources.

- Click on Create new.
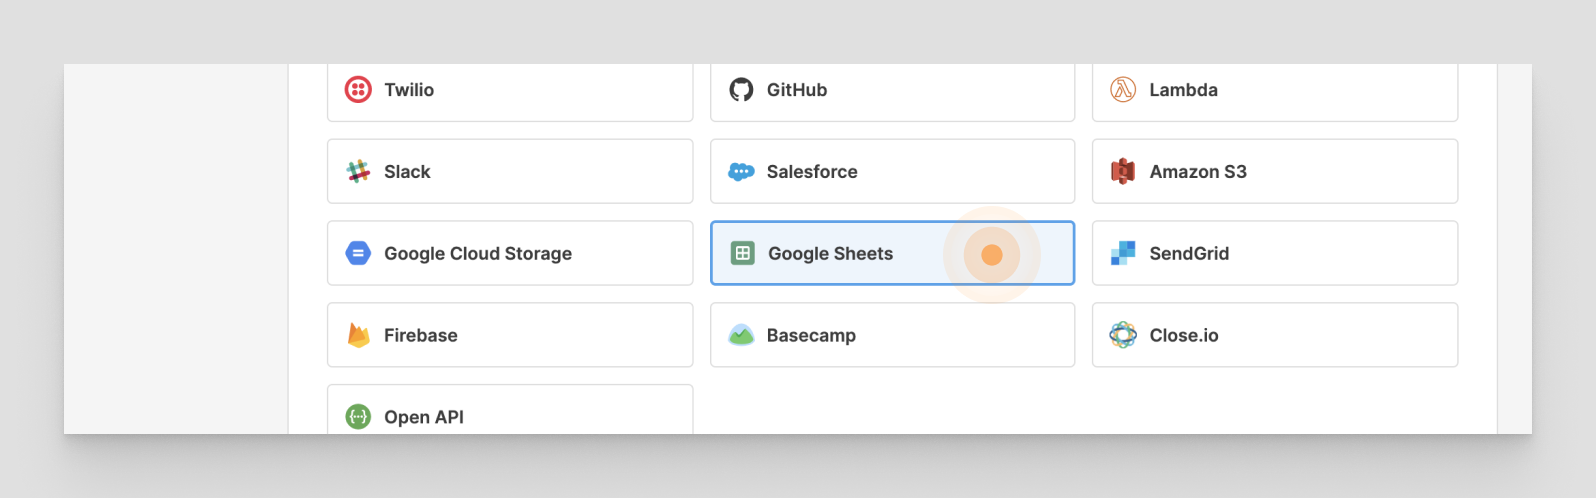
- Select Google Sheets from the list of resource types.
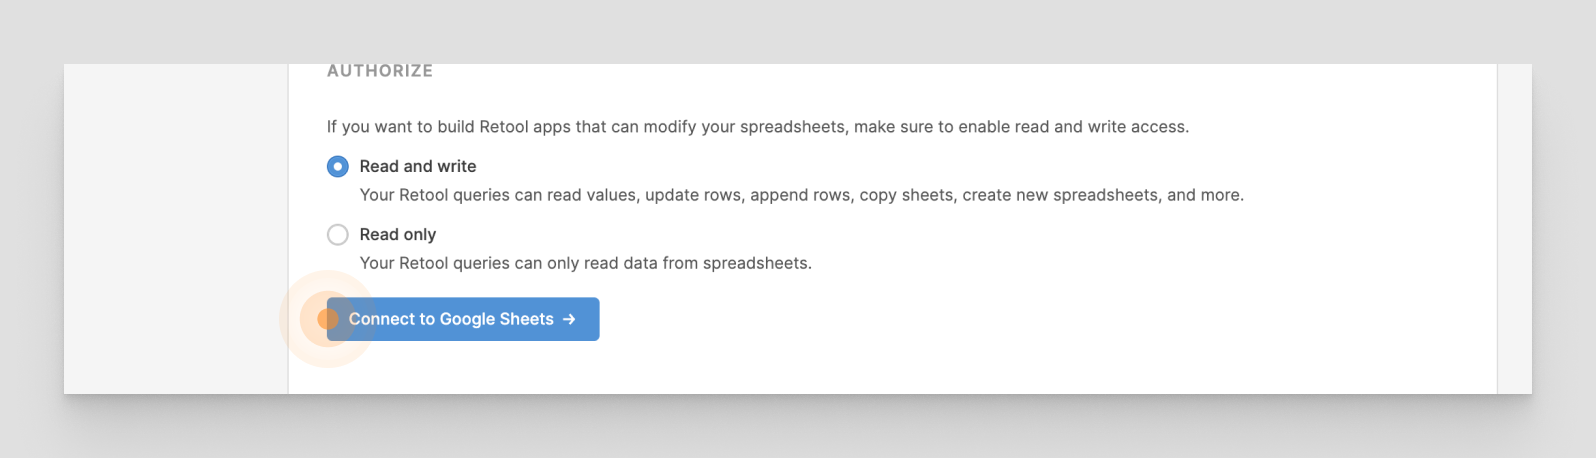
- Enter a name for your resource that you’ll use when querying it in the editor (e.g. “David’s Google Sheets”). Next, you’ll need to decide whether you want to grant Read and write or Read only access to Retool. We recommend Read and write: in addition to reading values out of your sheets, your apps will also be able to update rows, append rows, copy sheets, create new spreadsheets, and more.
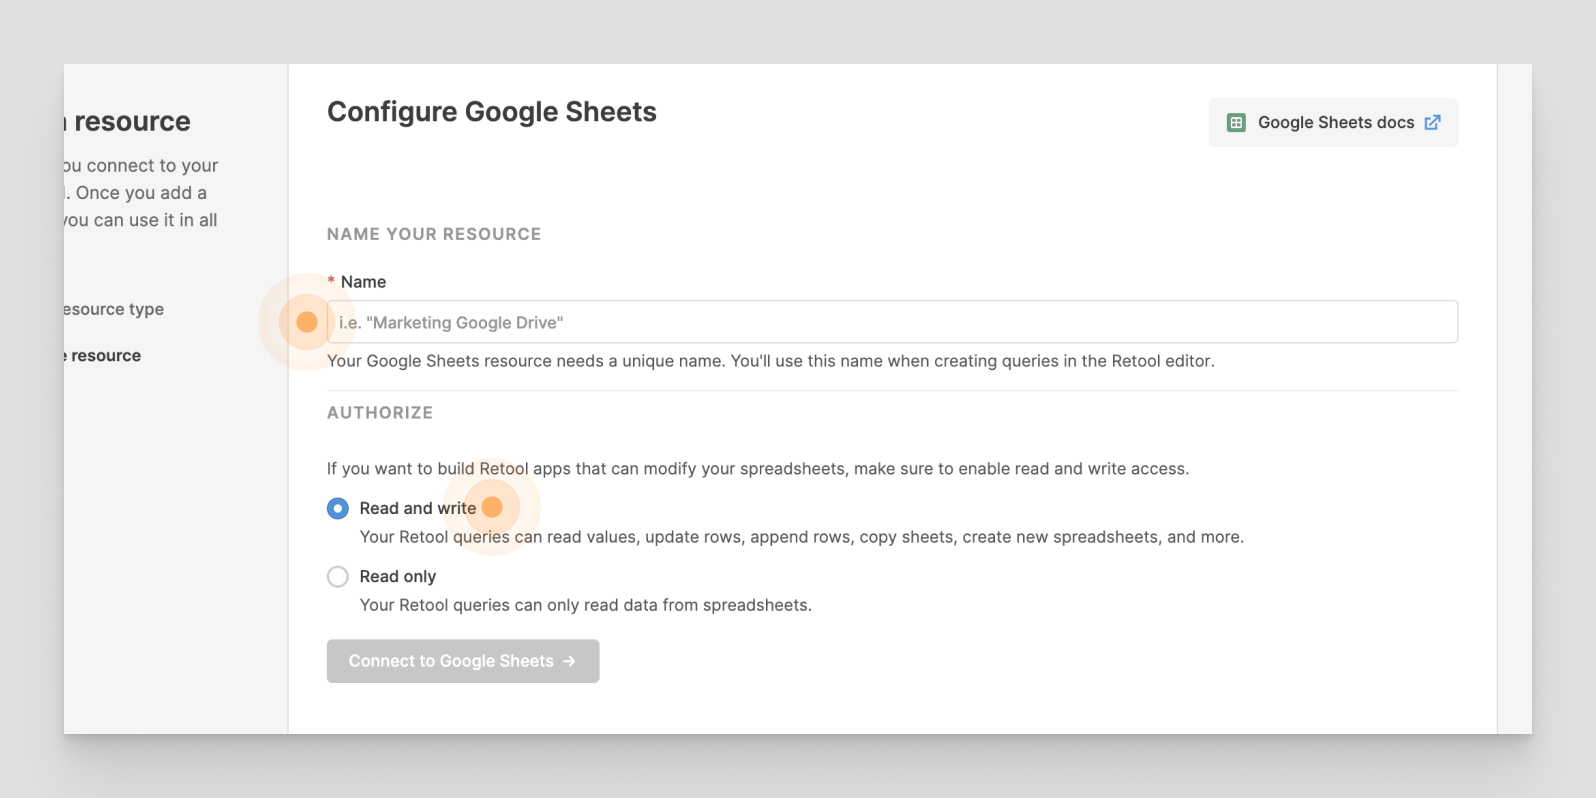
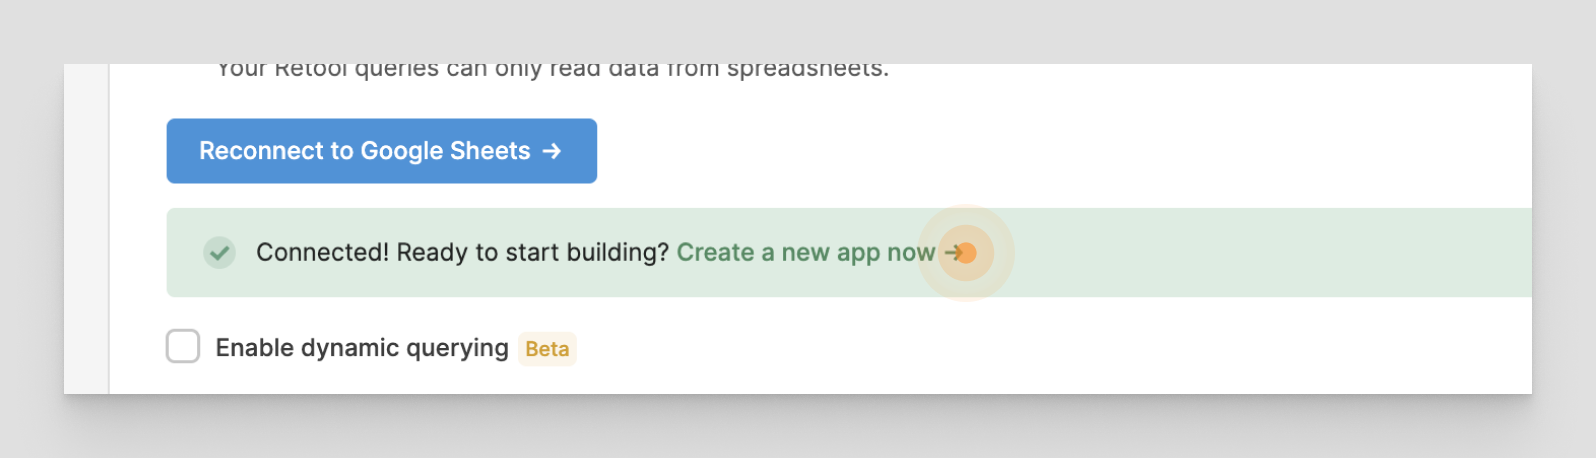
- Click Connect to Google Sheets to begin Google’s authorization flow.
- After completing the authorization flow, you should see a message indicating a successful connection. Click the Create a new app now link in that message to create a blank Retool app and start building with Google sheets!
To set up your Google Sheets using the on-premise setup process, see Google Sheets integration instructions.
Let’s say you’d like to build a Retool app to send invites to users who’ve signed up to be beta testers of your new product. Their contact information is stored in a Google Sheets spreadsheet in the Google Drive that you setup as your new resource. To kick off building your app, let’s first make sure your spreadsheet is properly formatted.
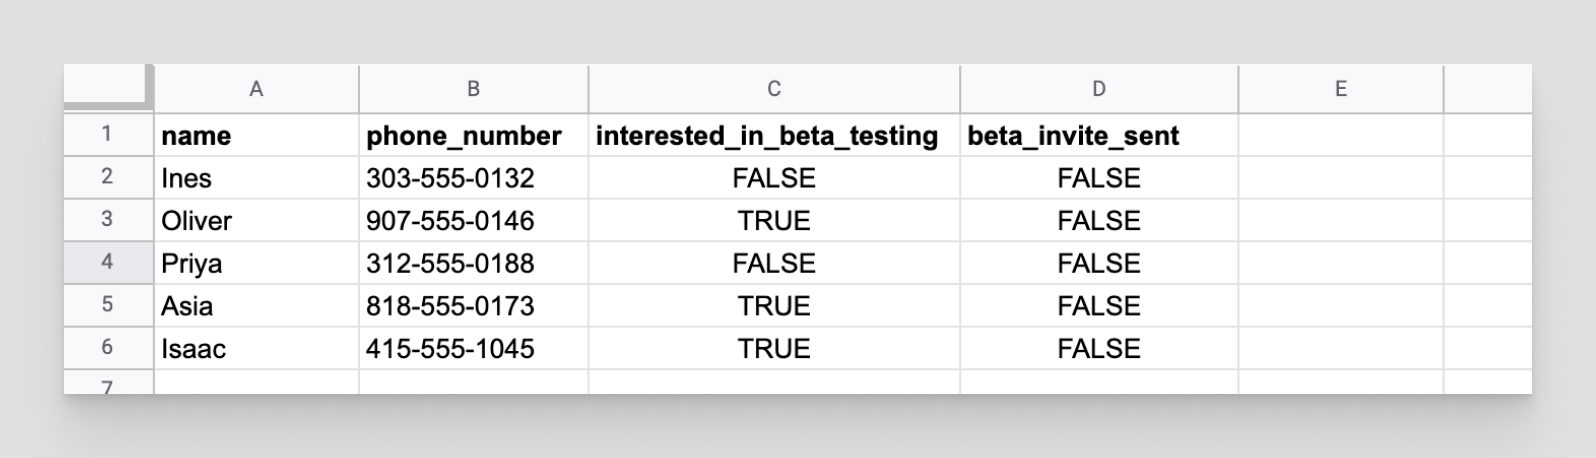
In Retool, you can specify which sheet in a Google spreadsheet from which you’d like to query data. The first row in that sheet must have column names that map to the data listed in the rows below. Here’s what a well-formatted sheet looks like:

Just like the example above, the sheet you query in Retool should have no additional data besides:
- Your first row of column names
- Your rows of data
There should also be no empty columns between your column names. To easily reference your column names in Retool, we also recommend the following naming conventions:
- Use alphanumeric characters
- Use lowercase letters
- Use underscores to separate words, instead of spaces
If you have a sheet that does have some additional data in it (e.g. some summary statistics off to the right) you can instead use our A1 notation option. It requires a bit more work to setup, so for this tutorial we instead recommend creating a new sheet that references your desired data, and formatting that new sheet as above.
Retool also queries a maximum of 26 columns, , by default. If you have more than 26 columns in your data, you’ll need to use A1 notation. (For example, if you have 28 columns, your A1 notation would be .)
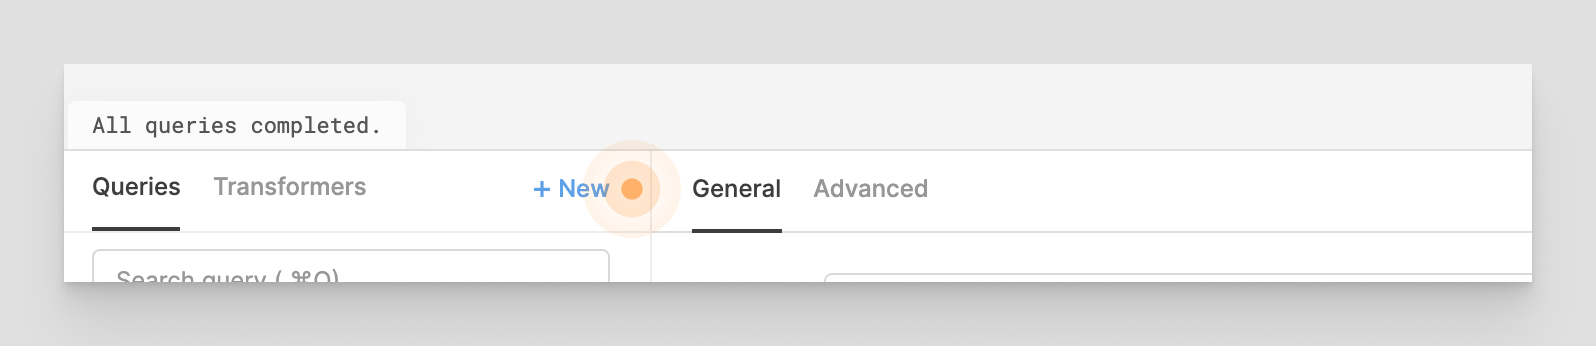
In your app, create a new query that you’ll use to read in data from your sheet.
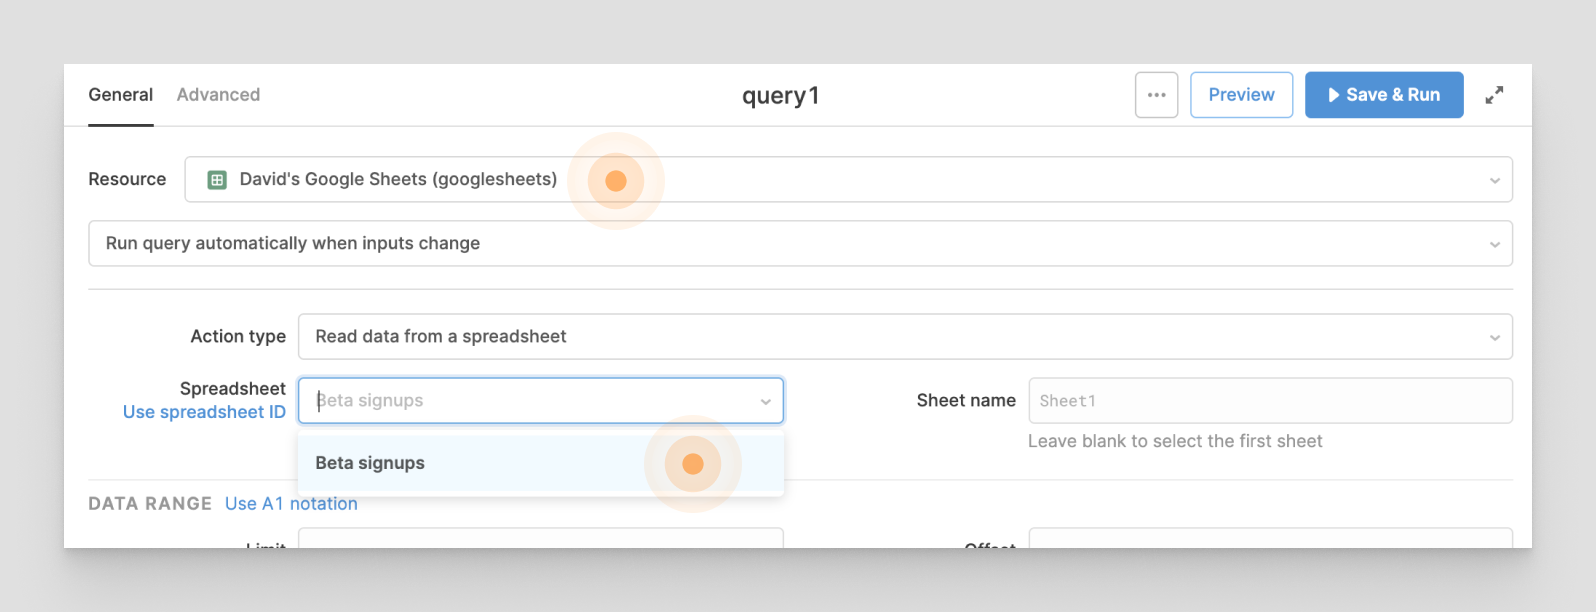
Select your Google Sheets resource from the Resource dropdown, for this example that’s “David’s Google Sheets”. Then select your desired spreadsheet, here that’s “Beta signups”. (If this is left blank, Retool will use the first sheet in the spreadsheet.)
📘
Choosing a spreadsheet by ID
In addition to selecting a spreadsheet name from the dropdown menu, you can also enter the spreadsheet ID as specified in its URL. For example, if the Google sheet URL is
https://docs.google.com/spreadsheets/d/1L2h7HMrHjcpU_-vpT8pGVKNlfBaxh8FUEN-UHXt--mU/edit#gid=0, the ID would be
1L2h7HMrHjcpU_-vpT8pGVKNlfBaxh8FUEN-UHXt--mU.
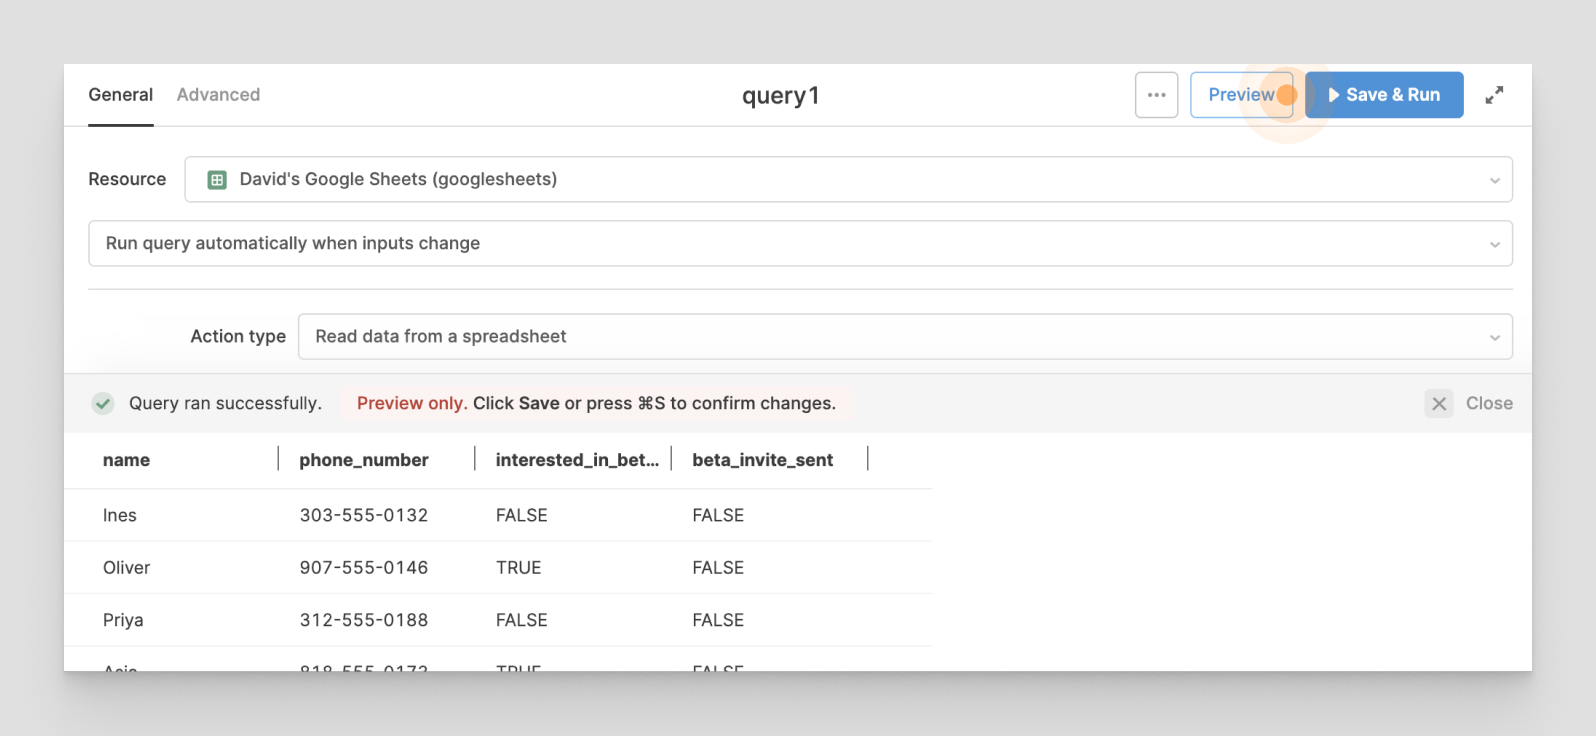
Click Preview to see your data in Retool!
To save, click Save & Run. Next, drag a Table component onto your canvas:
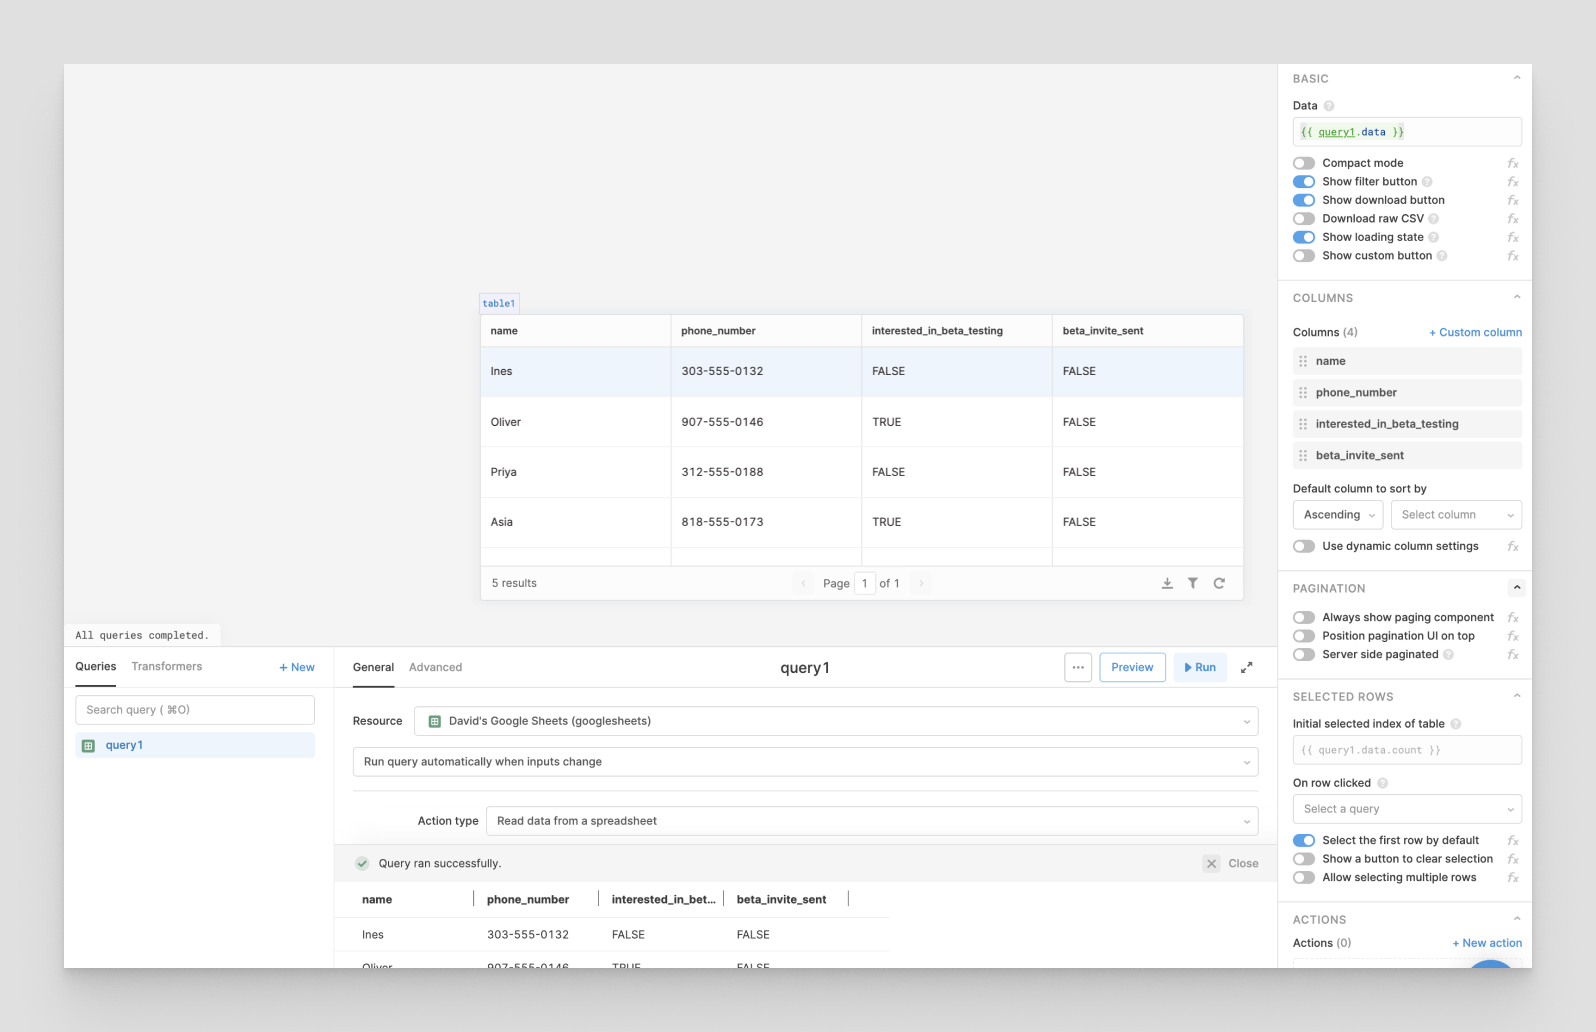
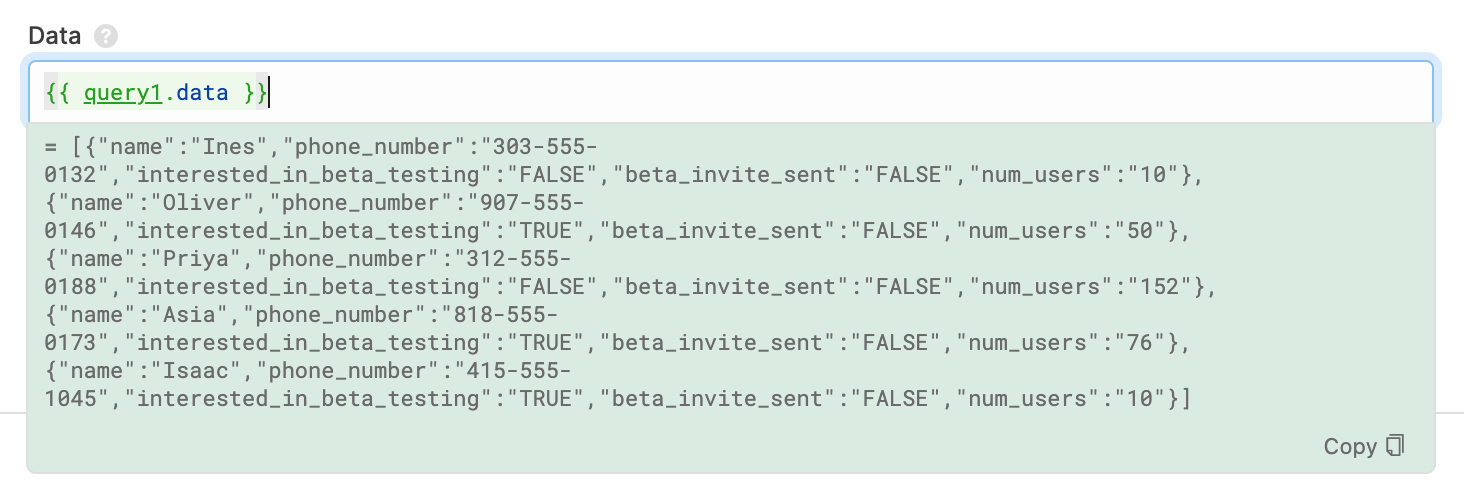
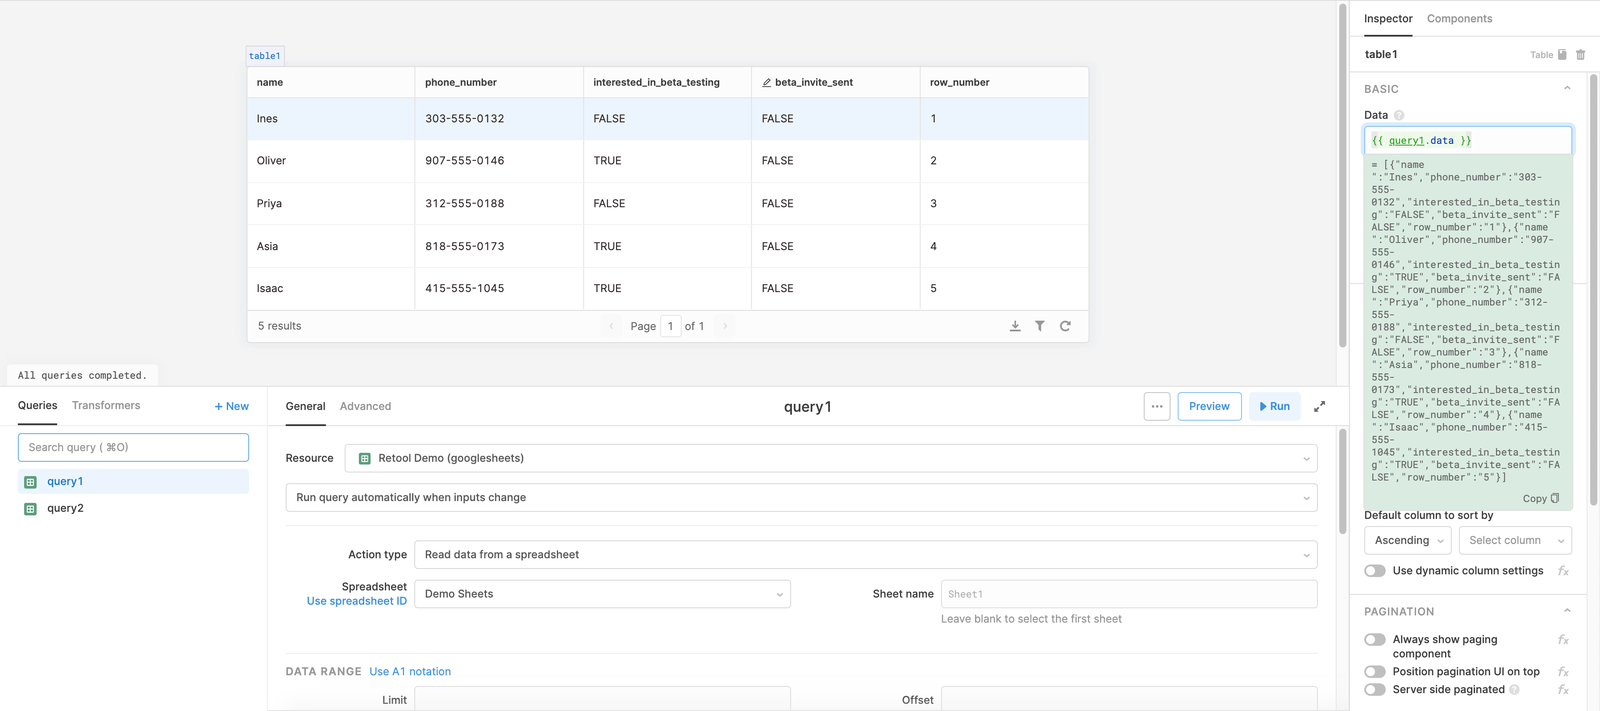
By default, Retool’s Table component automatically populates with the
.dataquery1{{query1.data}}{
"name":"Ines",
"phone_number":"303-555-0132",
"interested_in_beta_testing":"FALSE",
"beta_invite_sent":"FALSE",
}
Retool provides a few different options for a read query with Google Sheets.
Limit: sets an integer limit on the rows returned from your sheet, excluding your column names row.
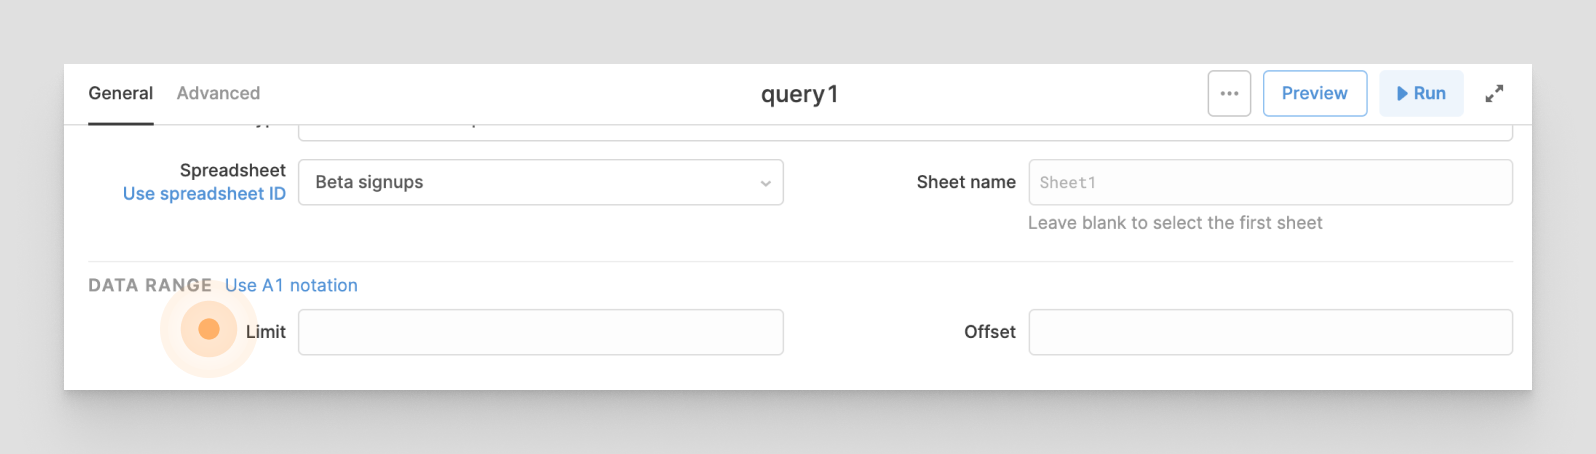
In the example sheet:
A read query with a limit of 2 would return the rows for Ines and Oliver, excluding the rows for Priya, Asia, and Isaac. The following JSON would be returned:
[
{
  "name":"Ines",
  "phone_number":"303-555-0132",
  "interested_in_beta_testing":"FALSE",
  "beta_invite_sent":"FALSE",
},
{
"name":"Oliver",
"phone_number":"907-555-0146",
"interested_in_beta_testing":"TRUE",
"beta_invite_sent":"FALSE",
}
]
Offset: sets an integer offset on the rows returned from your sheet, excluding your column names row.
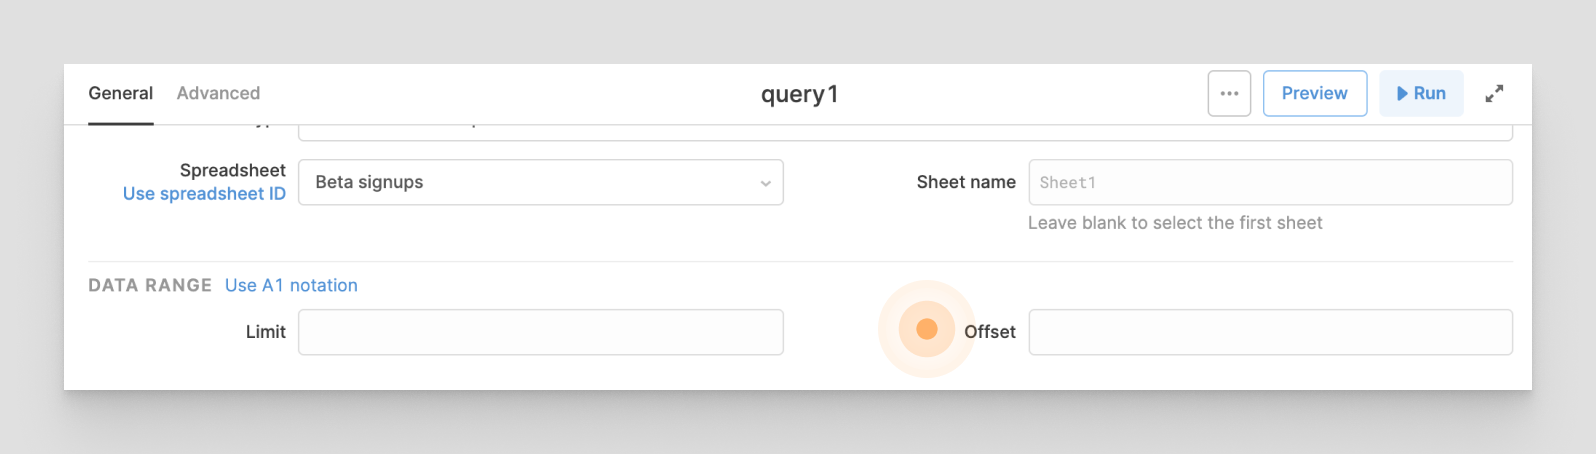
Again, in the example sheet:

A read query with an offset of 1 would return the rows for Oliver, Priya, Asia, and Isaac and exclude the row for Ines. The following JSON would be returned:
[
  {
    "name":"Oliver",
    "phone_number":"907-555-0146",
    "interested_in_beta_testing":"TRUE",
    "beta_invite_sent":"FALSE",
  },
  {
    "name":"Priya",
    "phone_number":"312-555-0188",
    "interested_in_beta_testing":"FALSE",
    "beta_invite_sent":"FALSE",
  },
  {
    "name":"Asia",
    "phone_number":"818-555-0173",
    "interested_in_beta_testing":"TRUE",
    "beta_invite_sent":"FALSE",
  },
  {
    "name":"Isaac",
    "phone_number":"415-555-1045",
    "interested_in_beta_testing":"TRUE",
    "beta_invite_sent":"FALSE",
  },
]
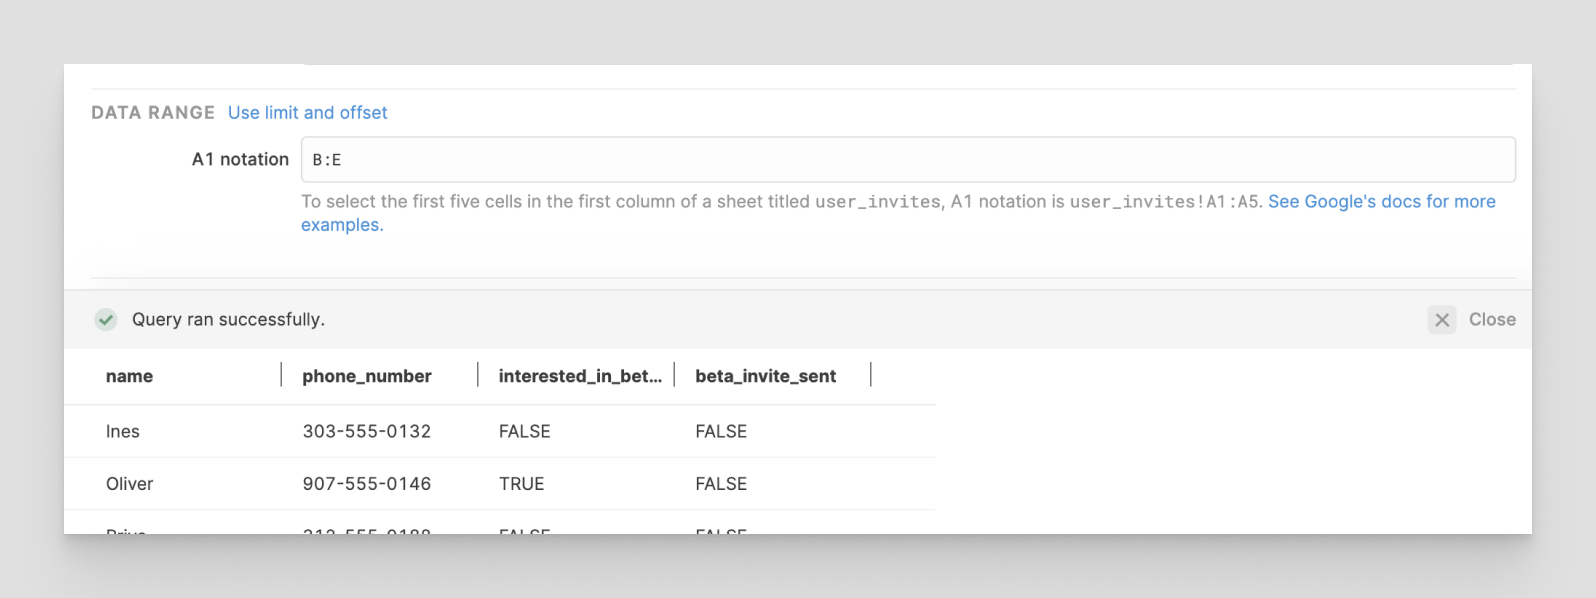
If you need to select a specific section of a sheet, you can use A1 Notation in Retool. In this example spreadsheet, the row data starts at column B and there are some summary statistics off to the right:
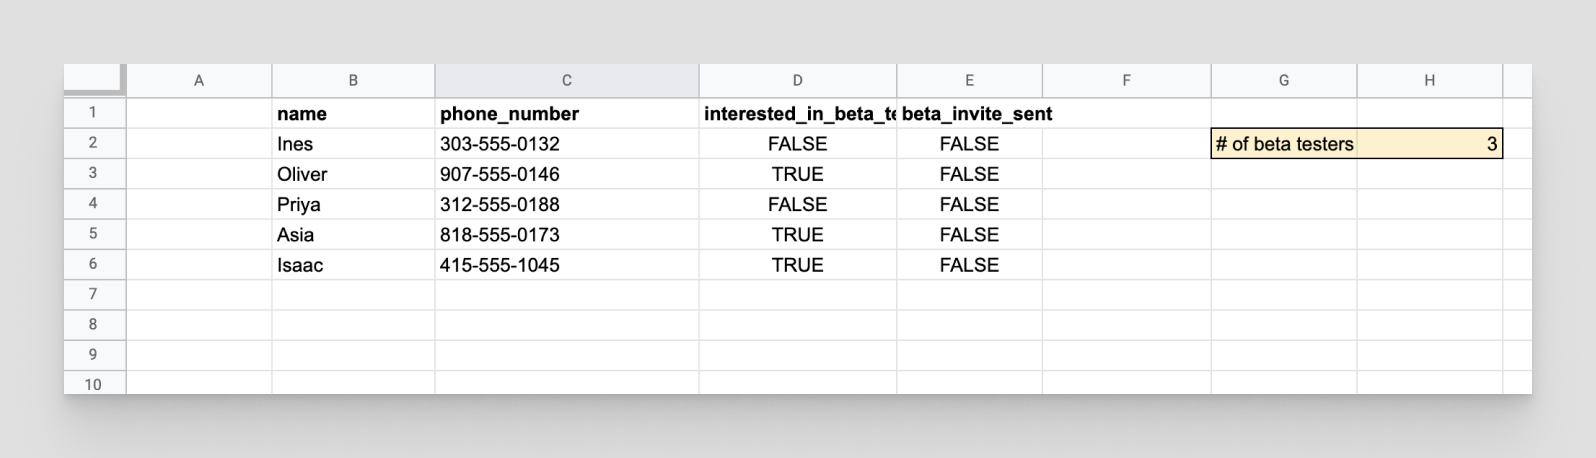
To select the data from this sheet, you can write A1 notation to get the exact above cells with
B1:E6use A1 notation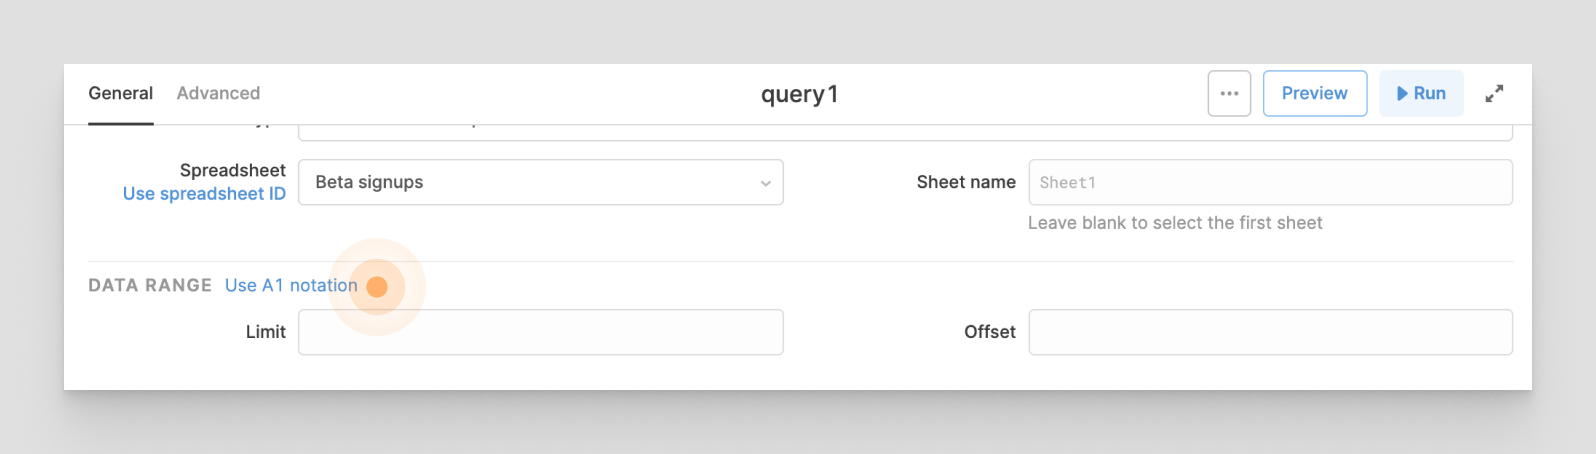
Add your A1 notation, here , and your data will returned as an array of JSON objects:
Let’s say you want to enable the users of your app to add a new beta tester to the table — and have that propagate to the data source, your spreadsheet.
You can start by creating a new query, call it
append_rowtable1append_row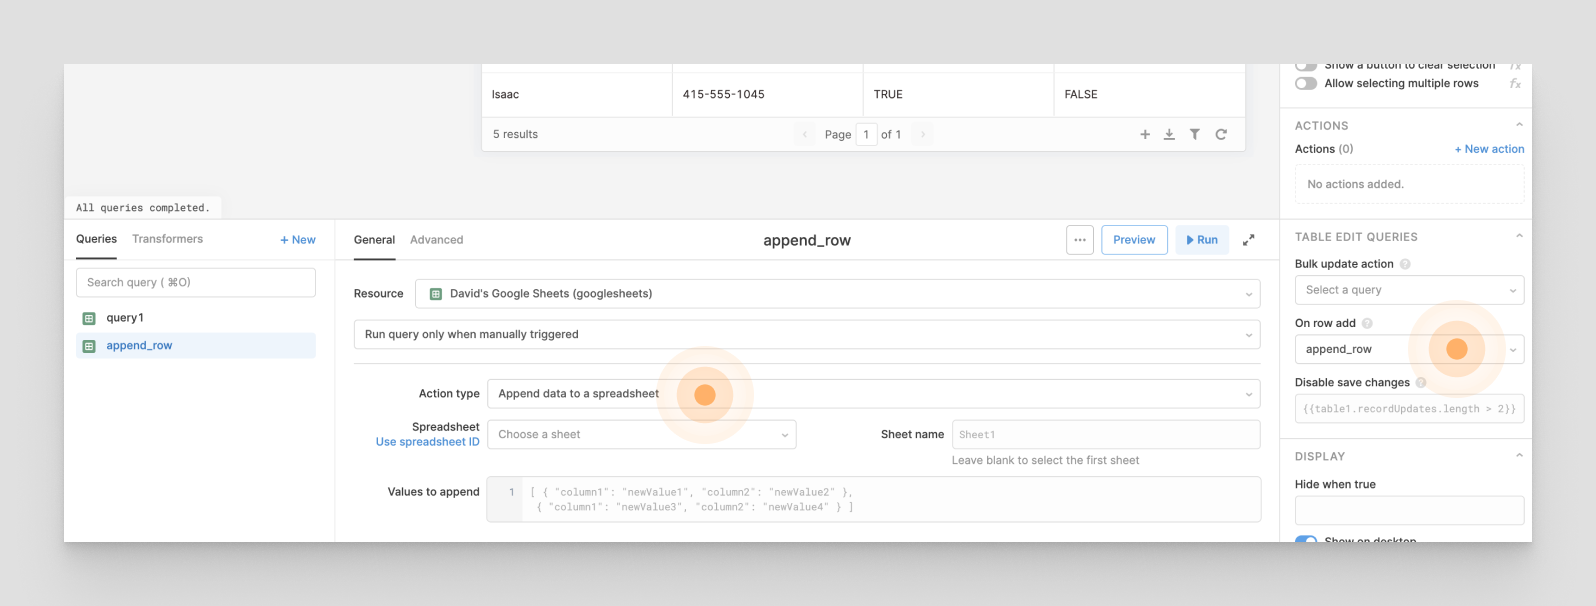
Notice right now, there is nothing in the Values to append field. First you'll setup your
table1append_rowFirst, click on
table1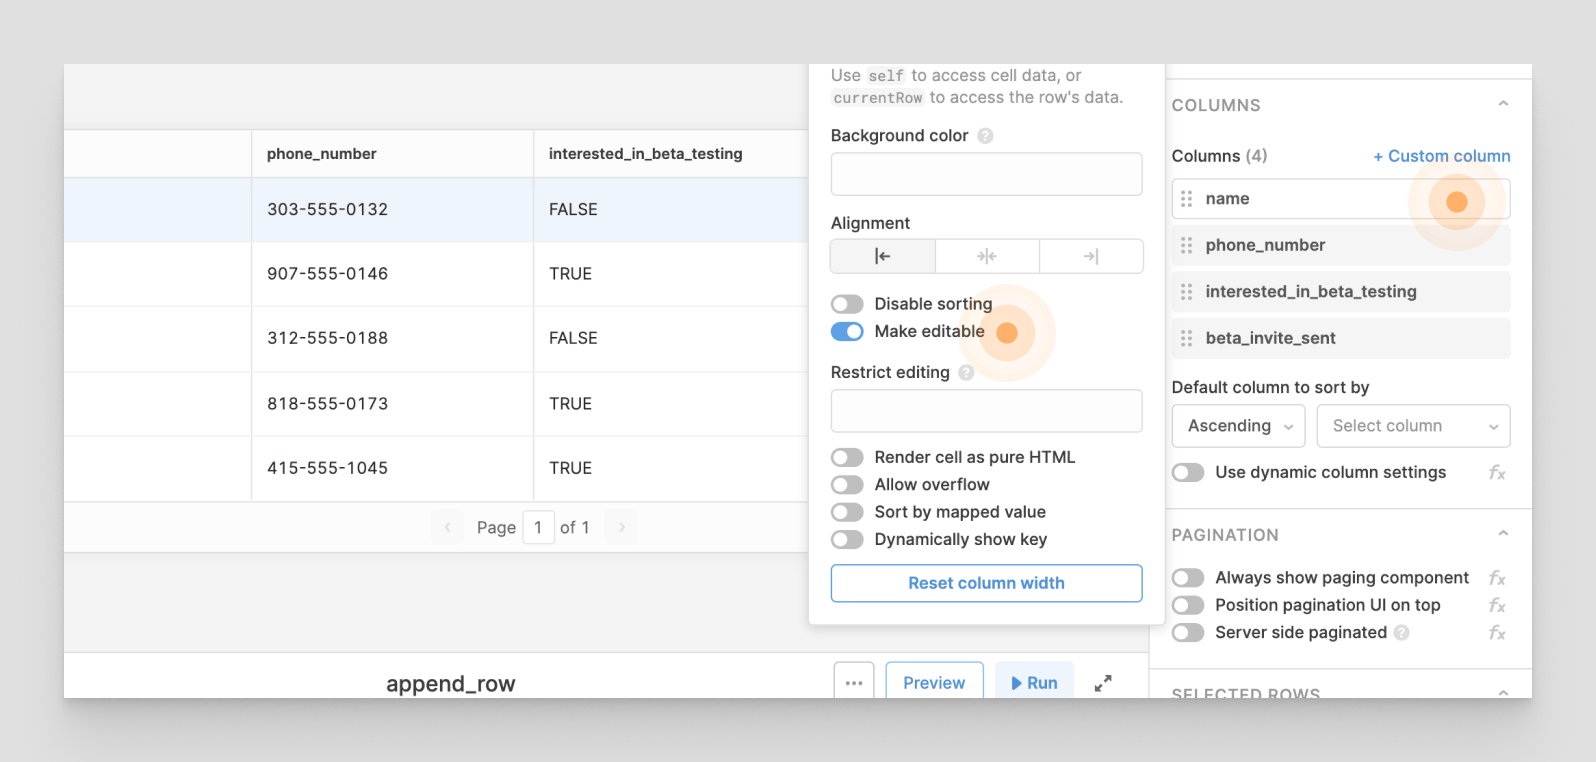
Users of your app will add a new row by clicking on the + button on
table1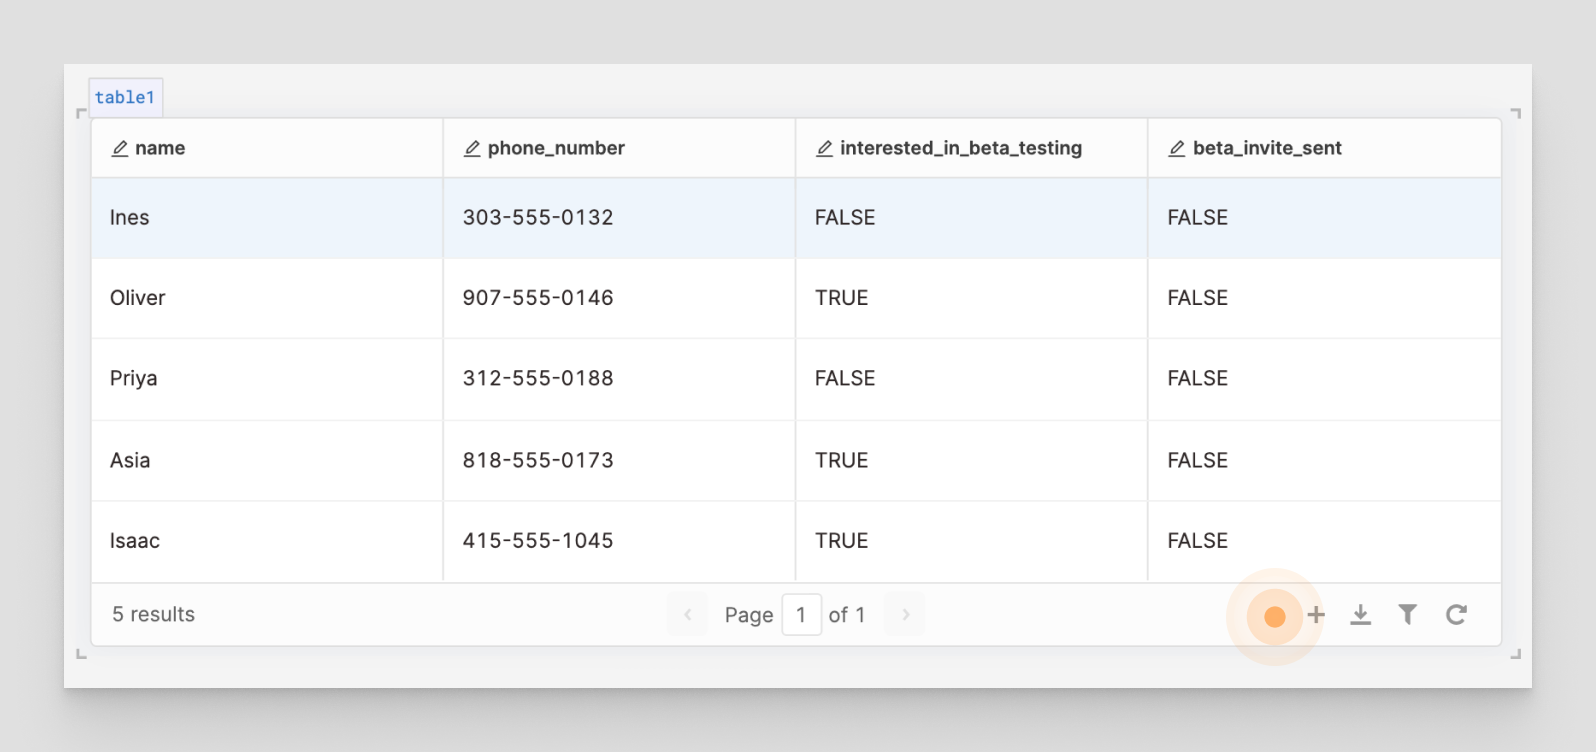
Let’s test it out, and see how Retool stores this newly added row. You can add a new beta tester to your app, in this case, Hui-lan, by filling out her information:
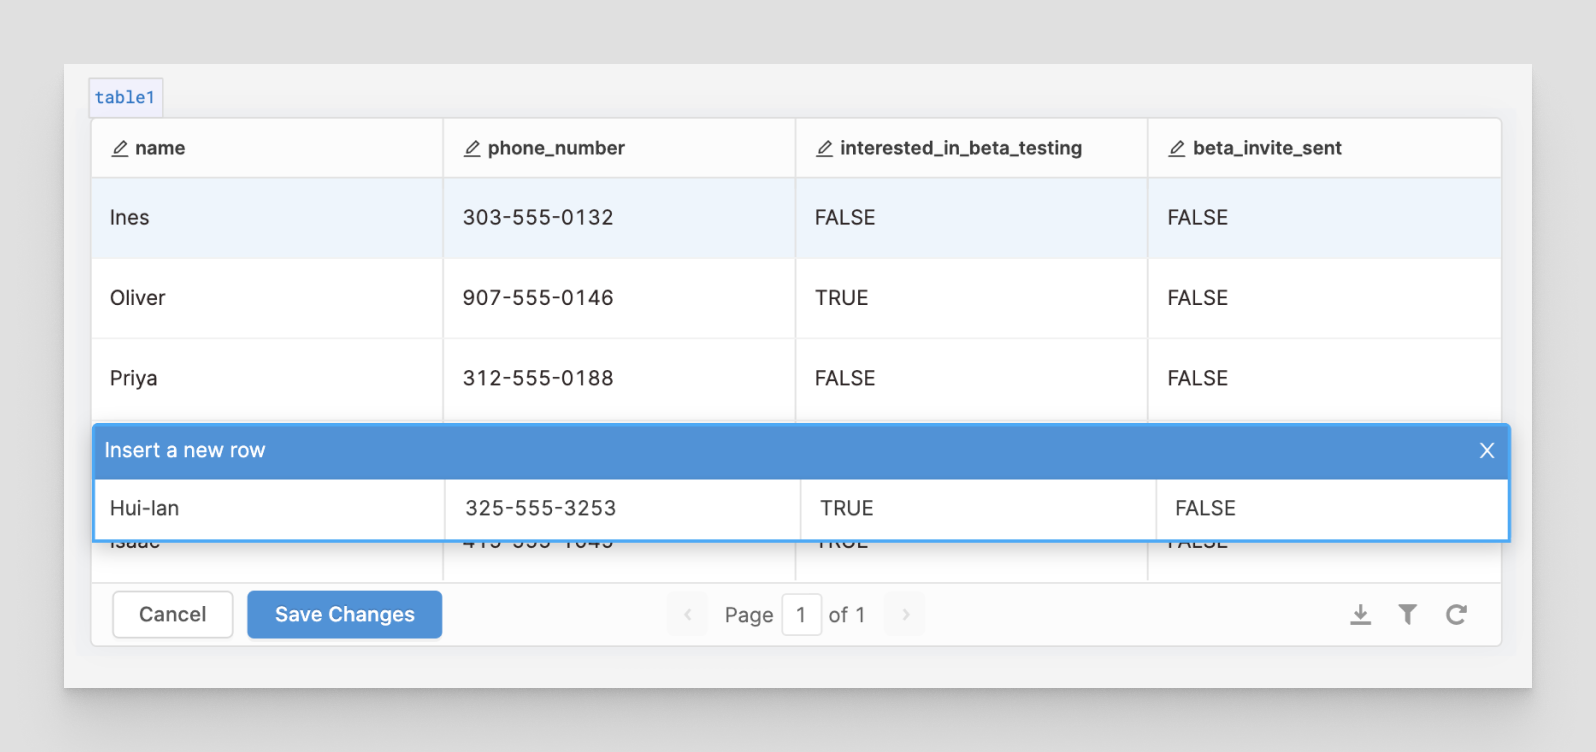
When you do that, your
table1newRow
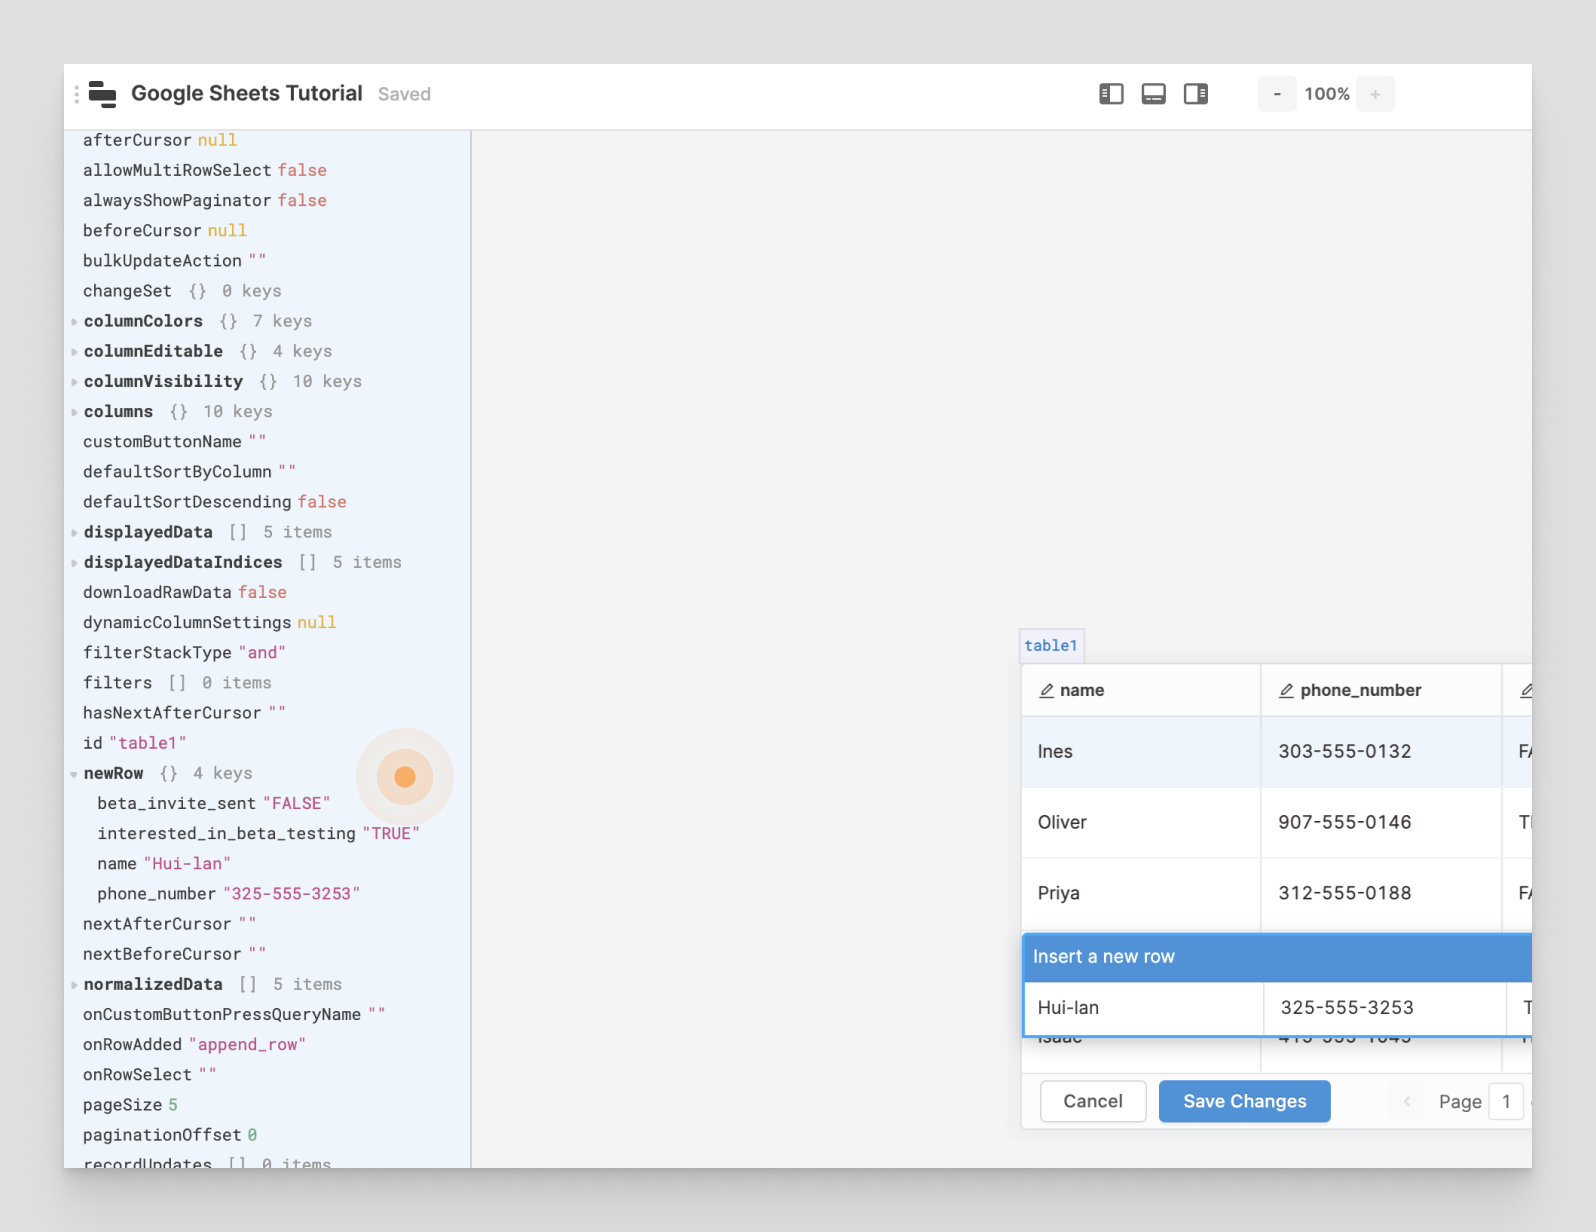
Now, as a final step, you'll need to hook up your
append_rowtable1[ {{ table1.newRow }} ]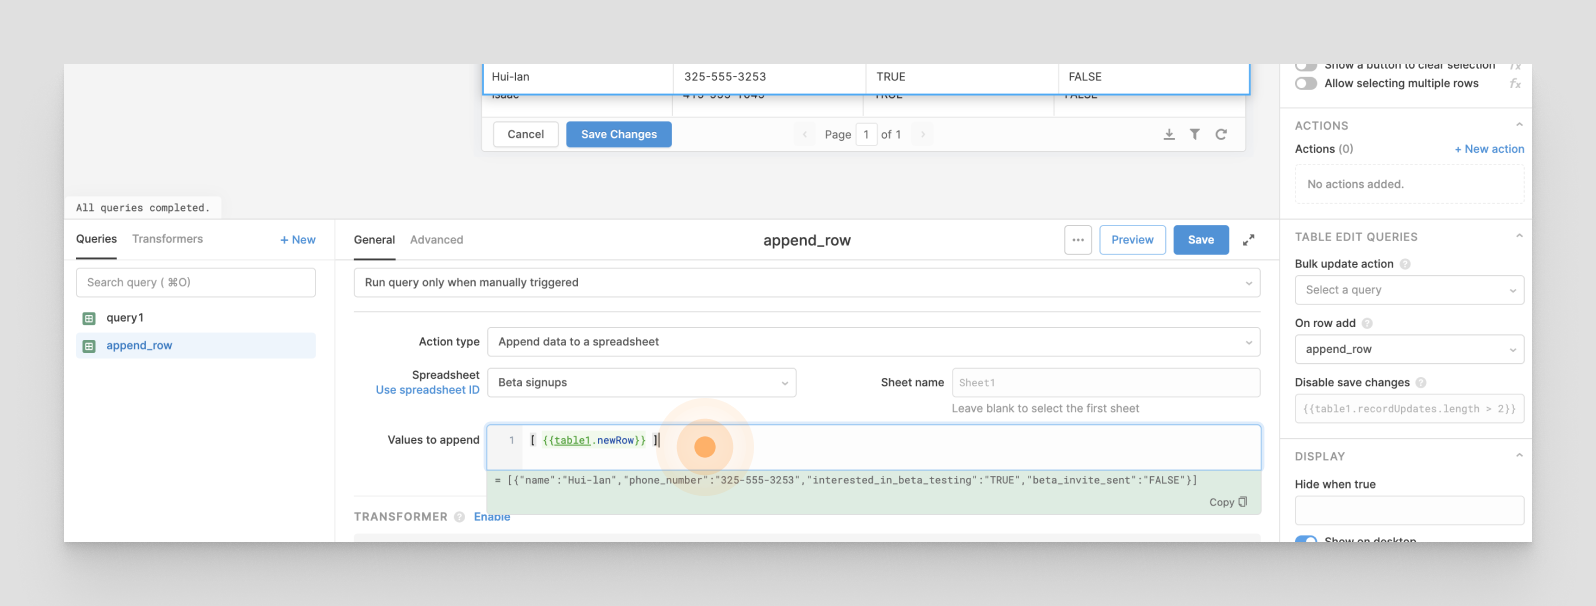
Any array of row JSON objects will work, for example, this array of literal objects:
[
  {
    "name":"Thara",
    "phone_number":"212-555-4435",
    "interested_in_beta_testing":"TRUE",
    "beta_invite_sent":"FALSE",
  },
  {
    "name":"Vanessa",
    "phone_number":"503-555-9742",
    "interested_in_beta_testing":"FALSE",
    "beta_invite_sent":"FALSE",
  }
]
The only requirement is that the keys of your JSON objects match the first row of your spreadsheet, your column names.
The new row will be added at the end of your row data, which is detected by Google automatically. Lastly, whenever you write an append query, you likely will want to trigger your read query as the on success trigger, so that your table data is reloaded to reflect the new row you just appended.
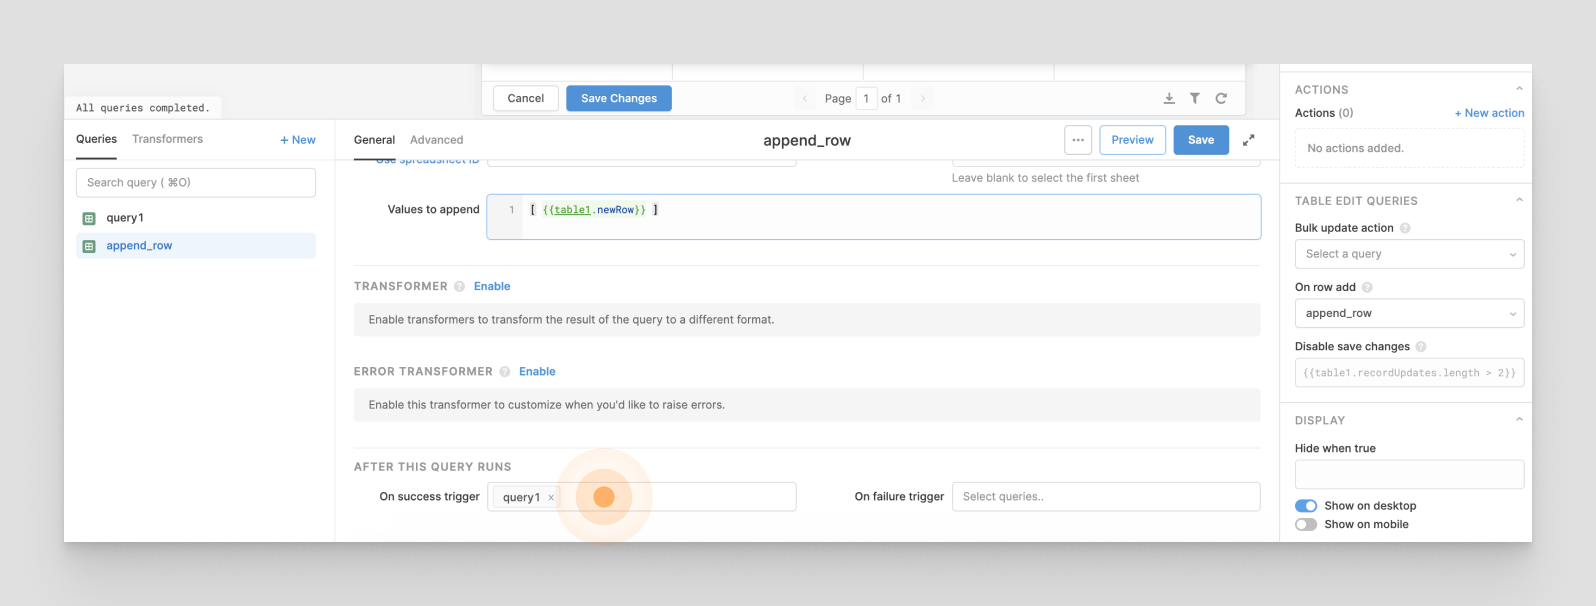
Now you can press the Save changes button on your table. This should trigger the
append_row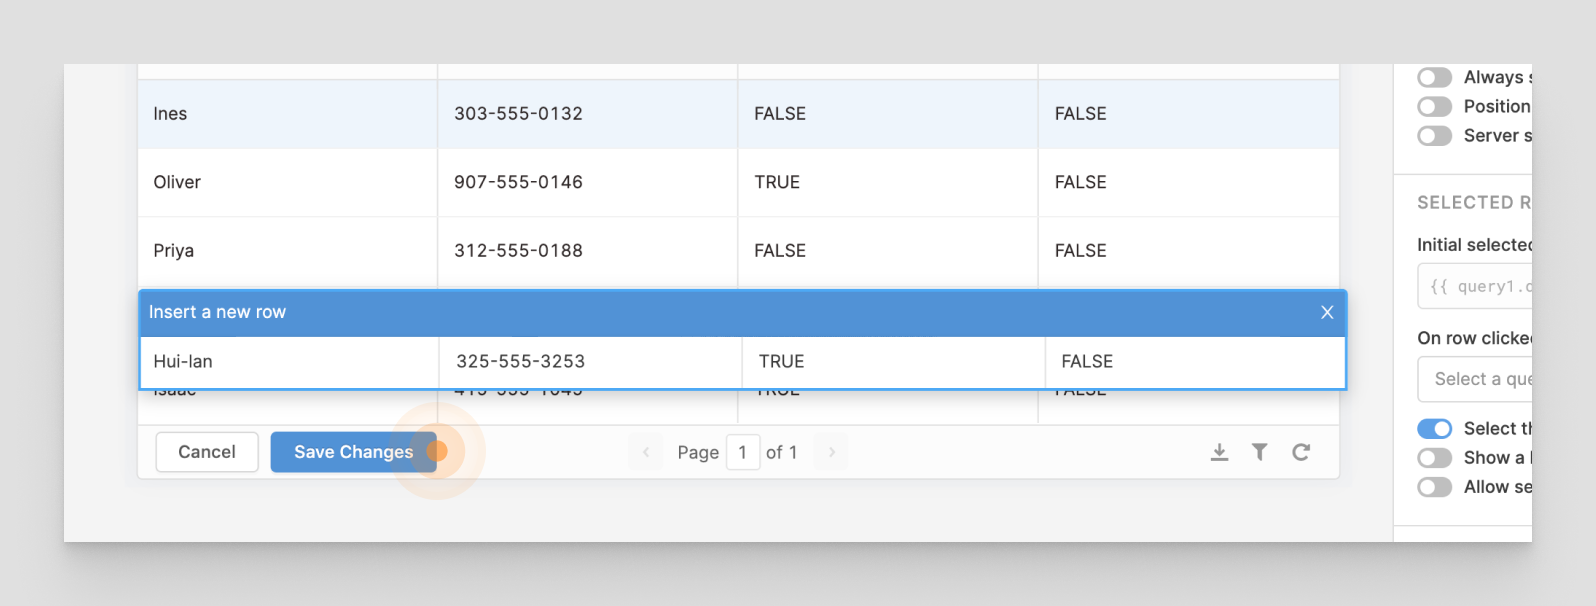
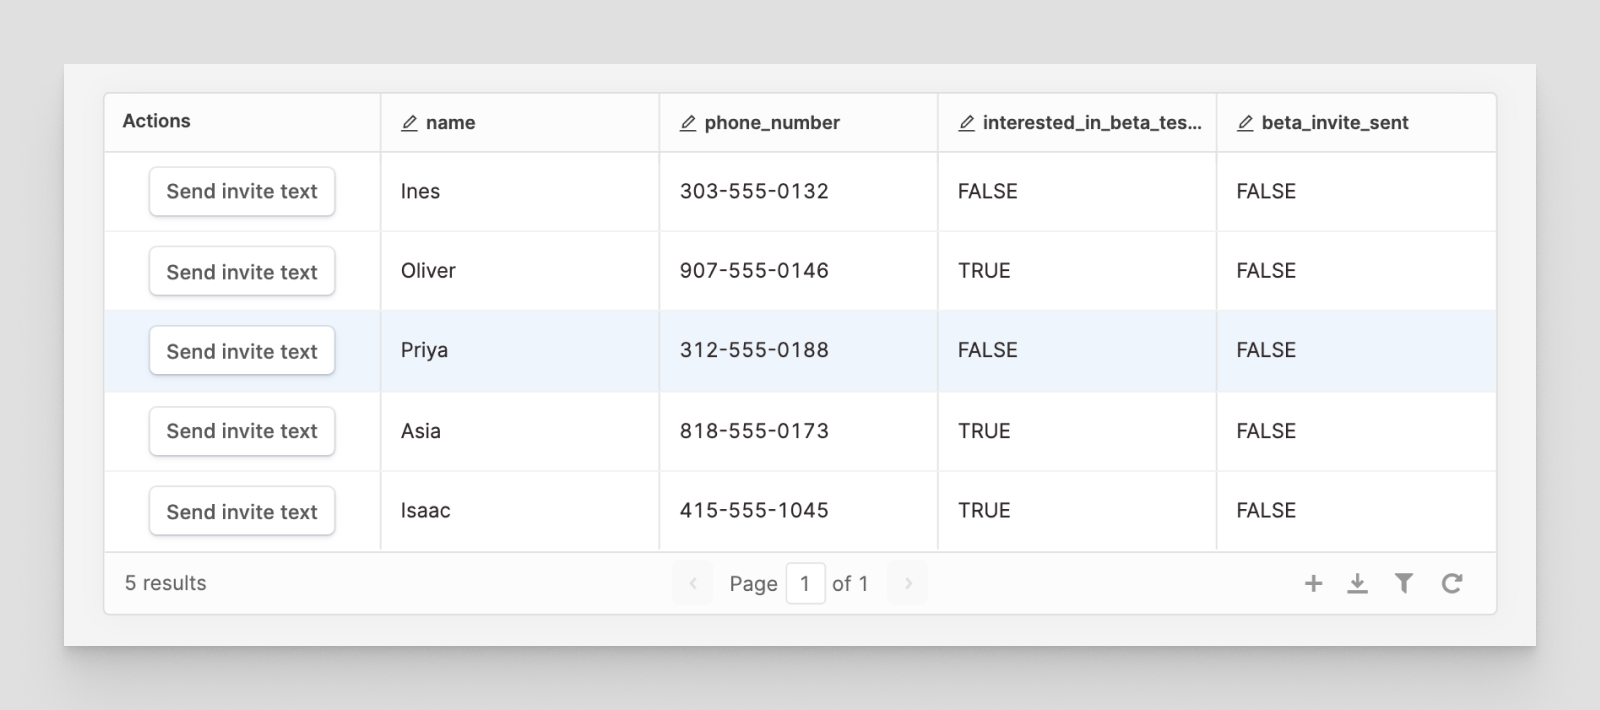
Next, you can wire up a “Send invite text” button. You'll need to add an Action button column to the table. Click on the
table1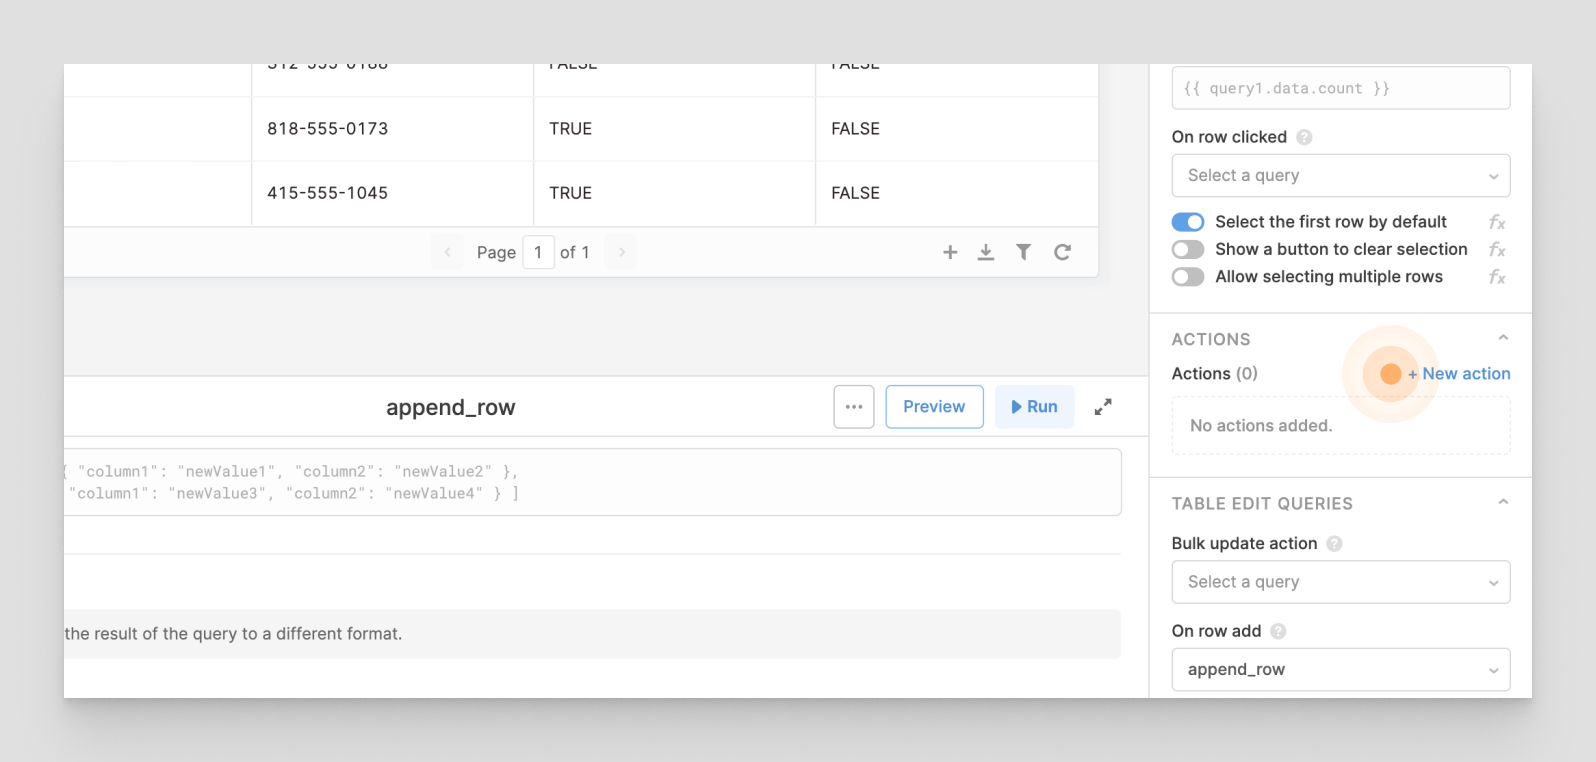
A new column called "Actions" will appear in your table, with each row featuring a button. You can rename the button by clicking on Action 1 in the list and then changing Action button text to "Send invite text".
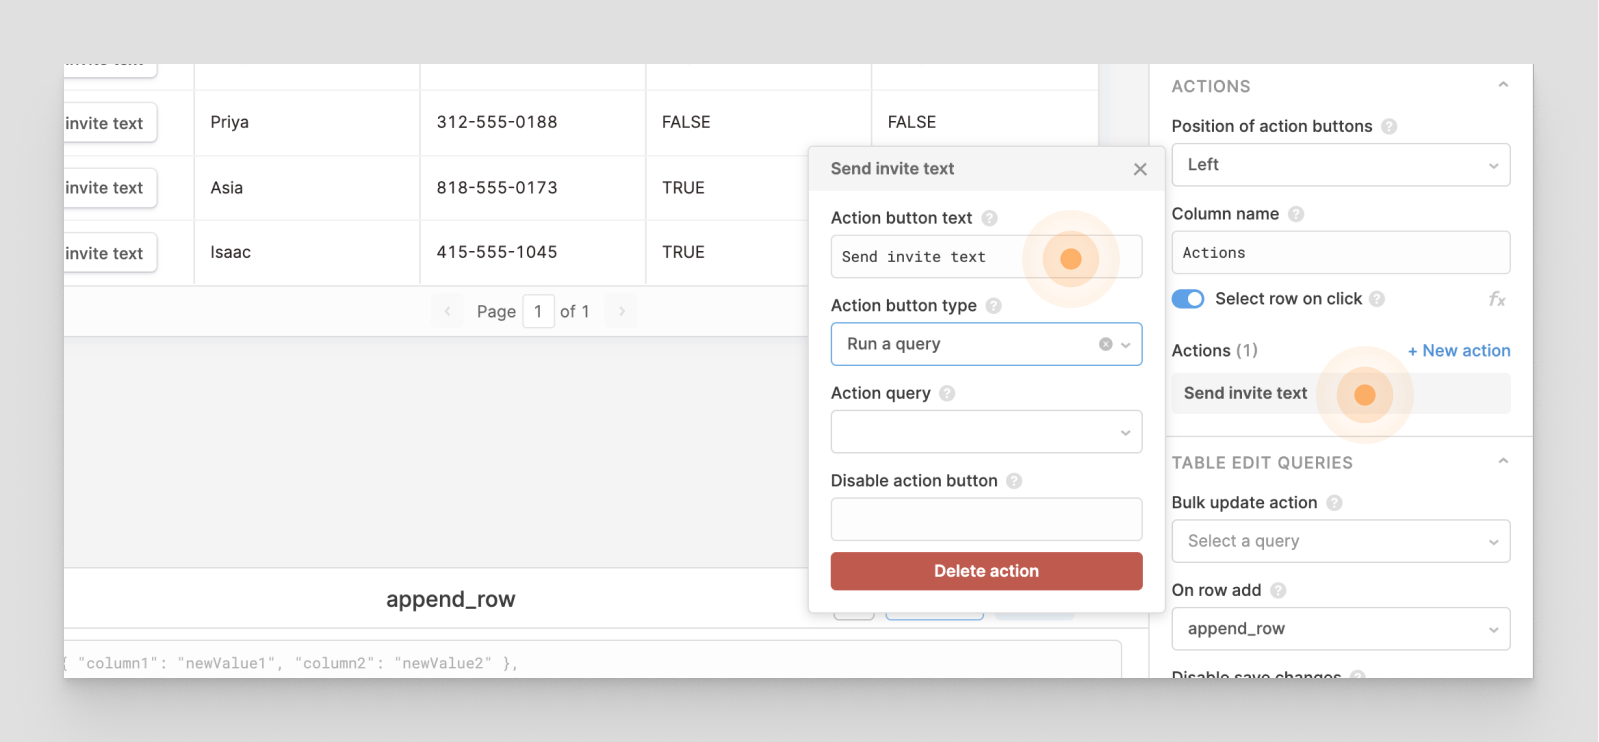
You'd probably want to use something like the Twilio API to send the text message when this button is pushed. This example, though, will just focus on updating the spreadsheet as if you’ve sent the text message successfully.
Next, you'll want to add a new column,
invite_text_sent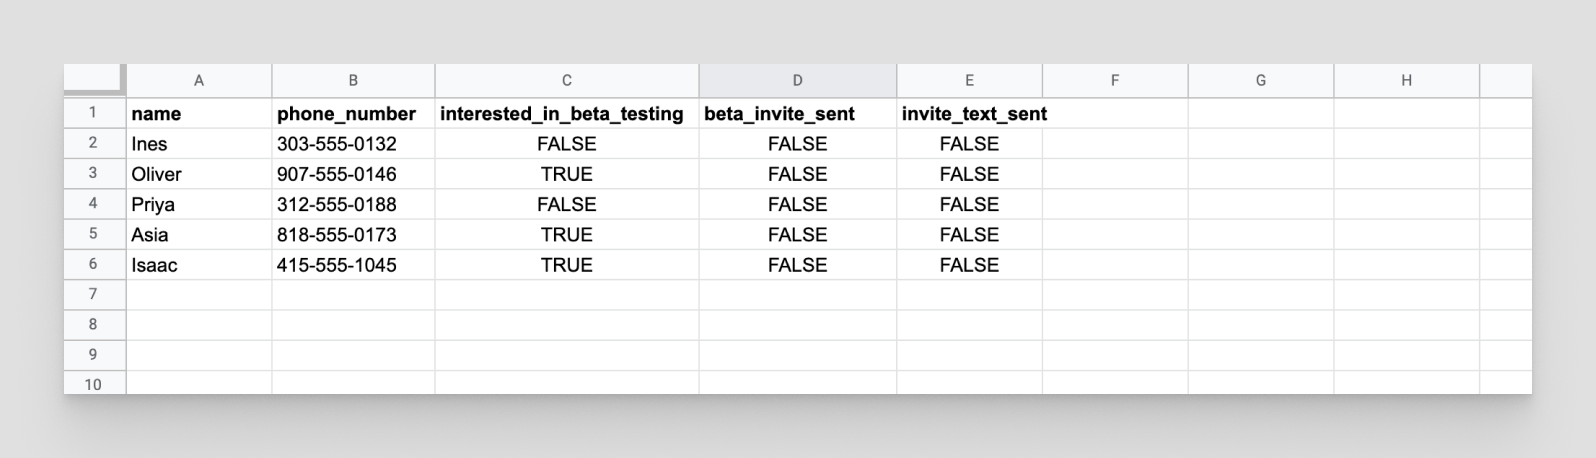
Create another new query,
update_invite_sent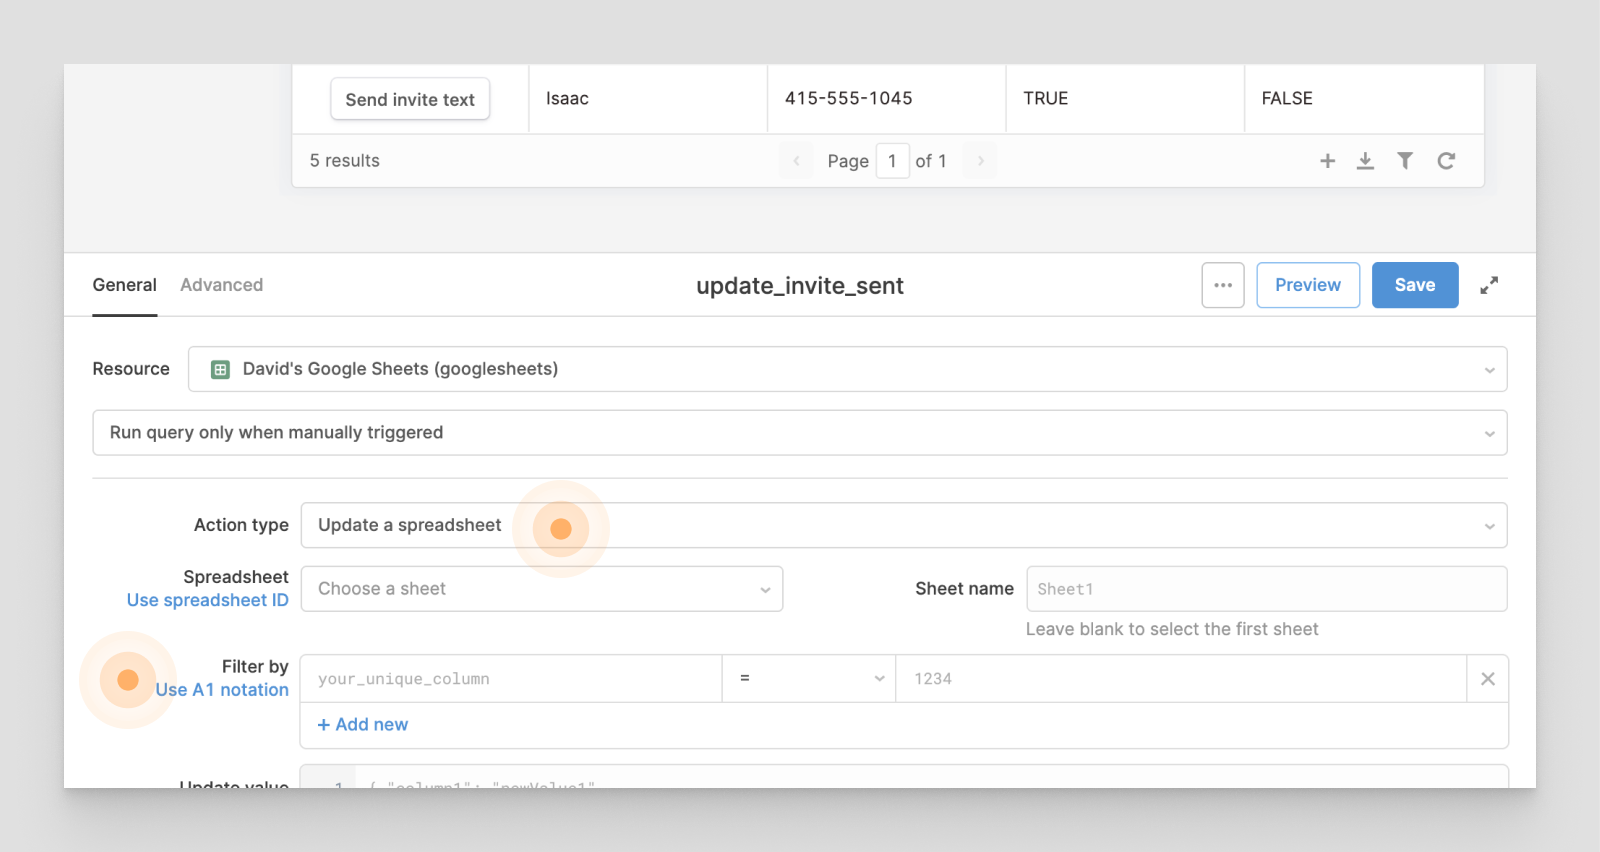
A good candidate for your unique column would be a primary key like id, but in this case you can use the
phone_numberphone_number{{ table1.selectedRow.data.phone_number }}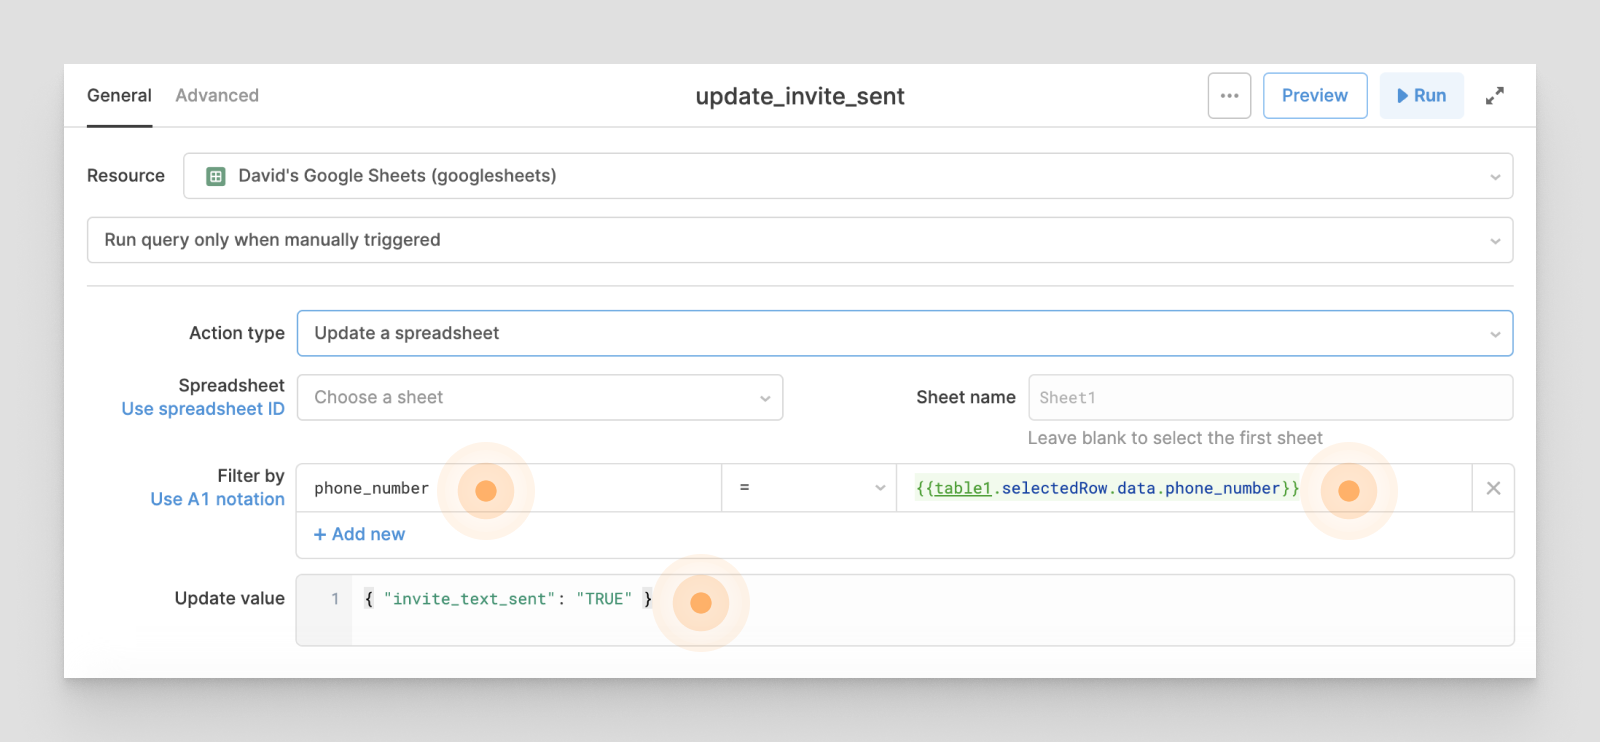
You'll next need to hook up the new
update_invitation_sentupdate_invitation_sent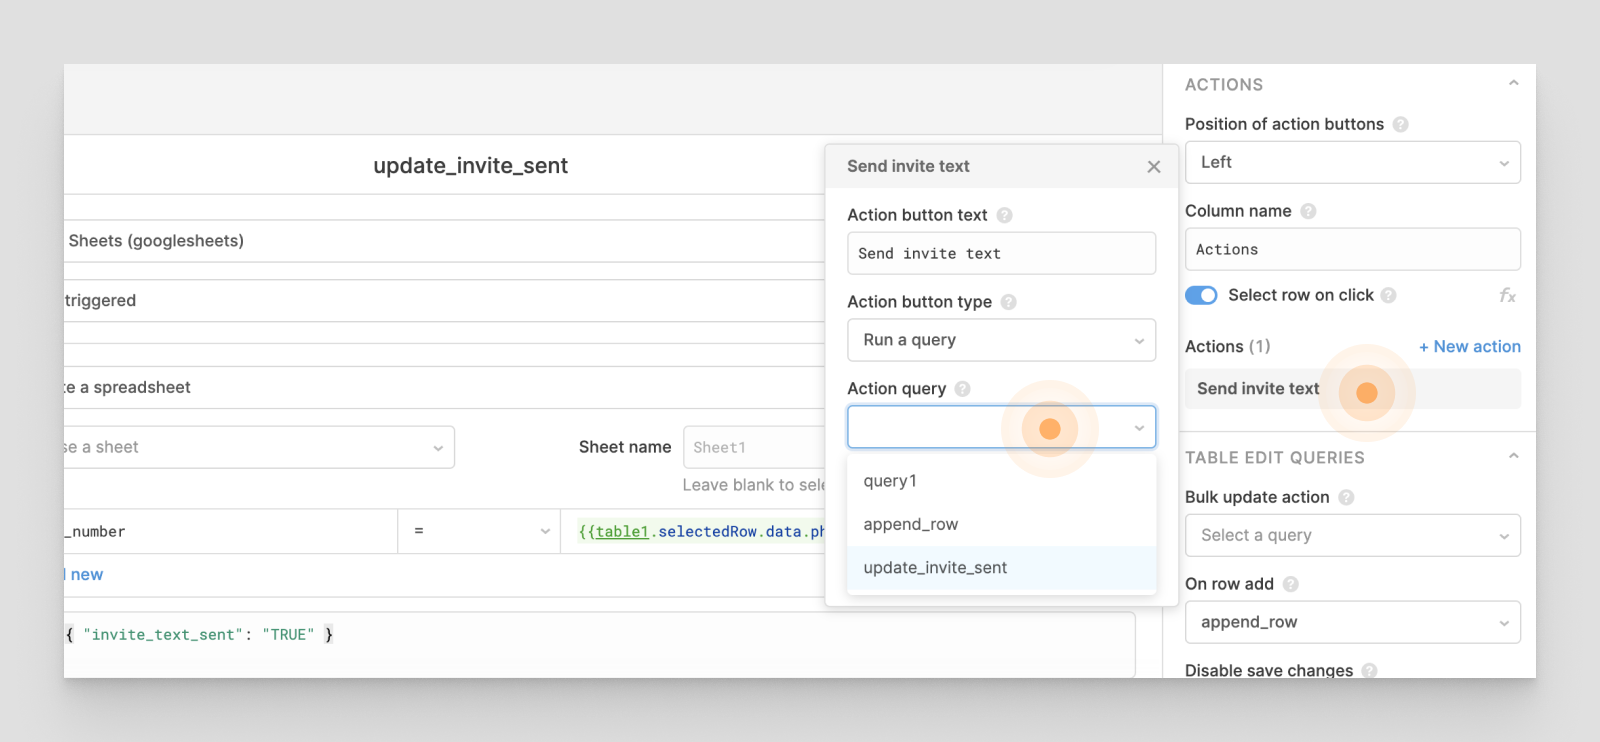
As a final step, once again set your read query as the on success trigger for this update query, so that the table data always matches what is in the Google sheet:
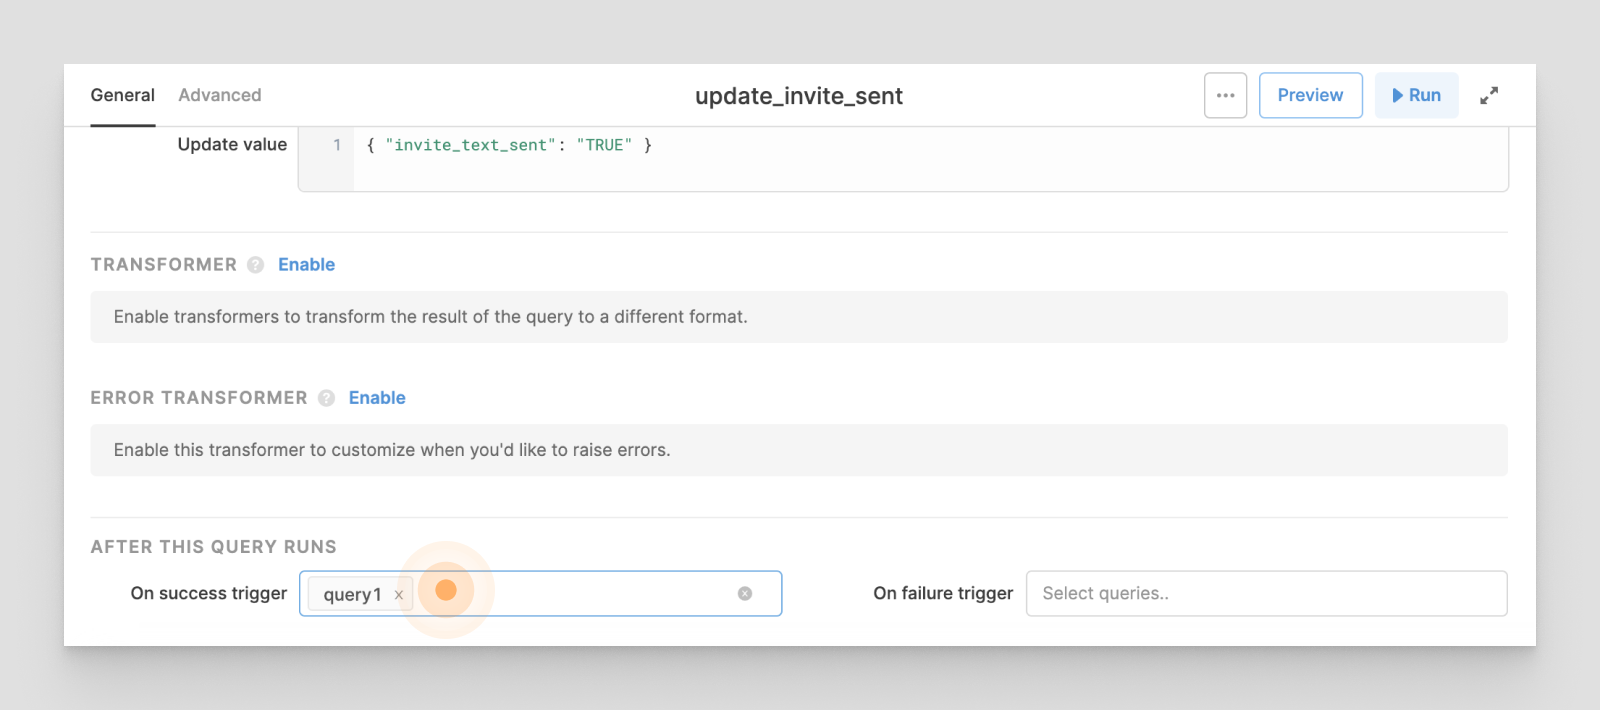
That's it! Now, when you click the “Send Invite Text” button, you’ll see the “invite_text_column” update from
FALSEBy default, Retool fetches data from Google Sheets as formatted strings. For example, if your spreadsheet cell has a value of formatted in USD, a query in Retool from Google Sheets will return
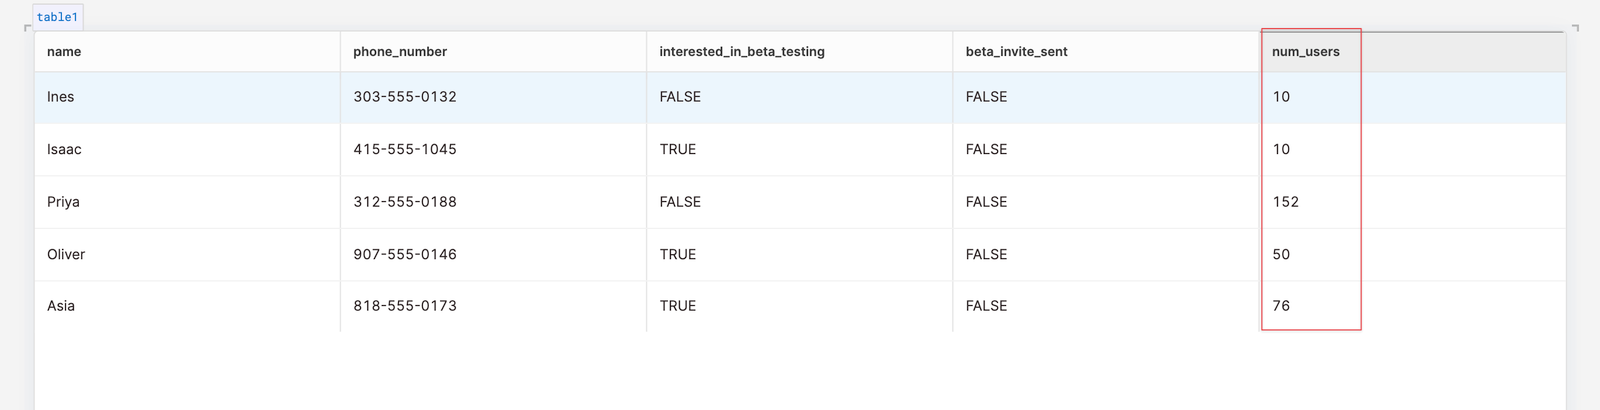
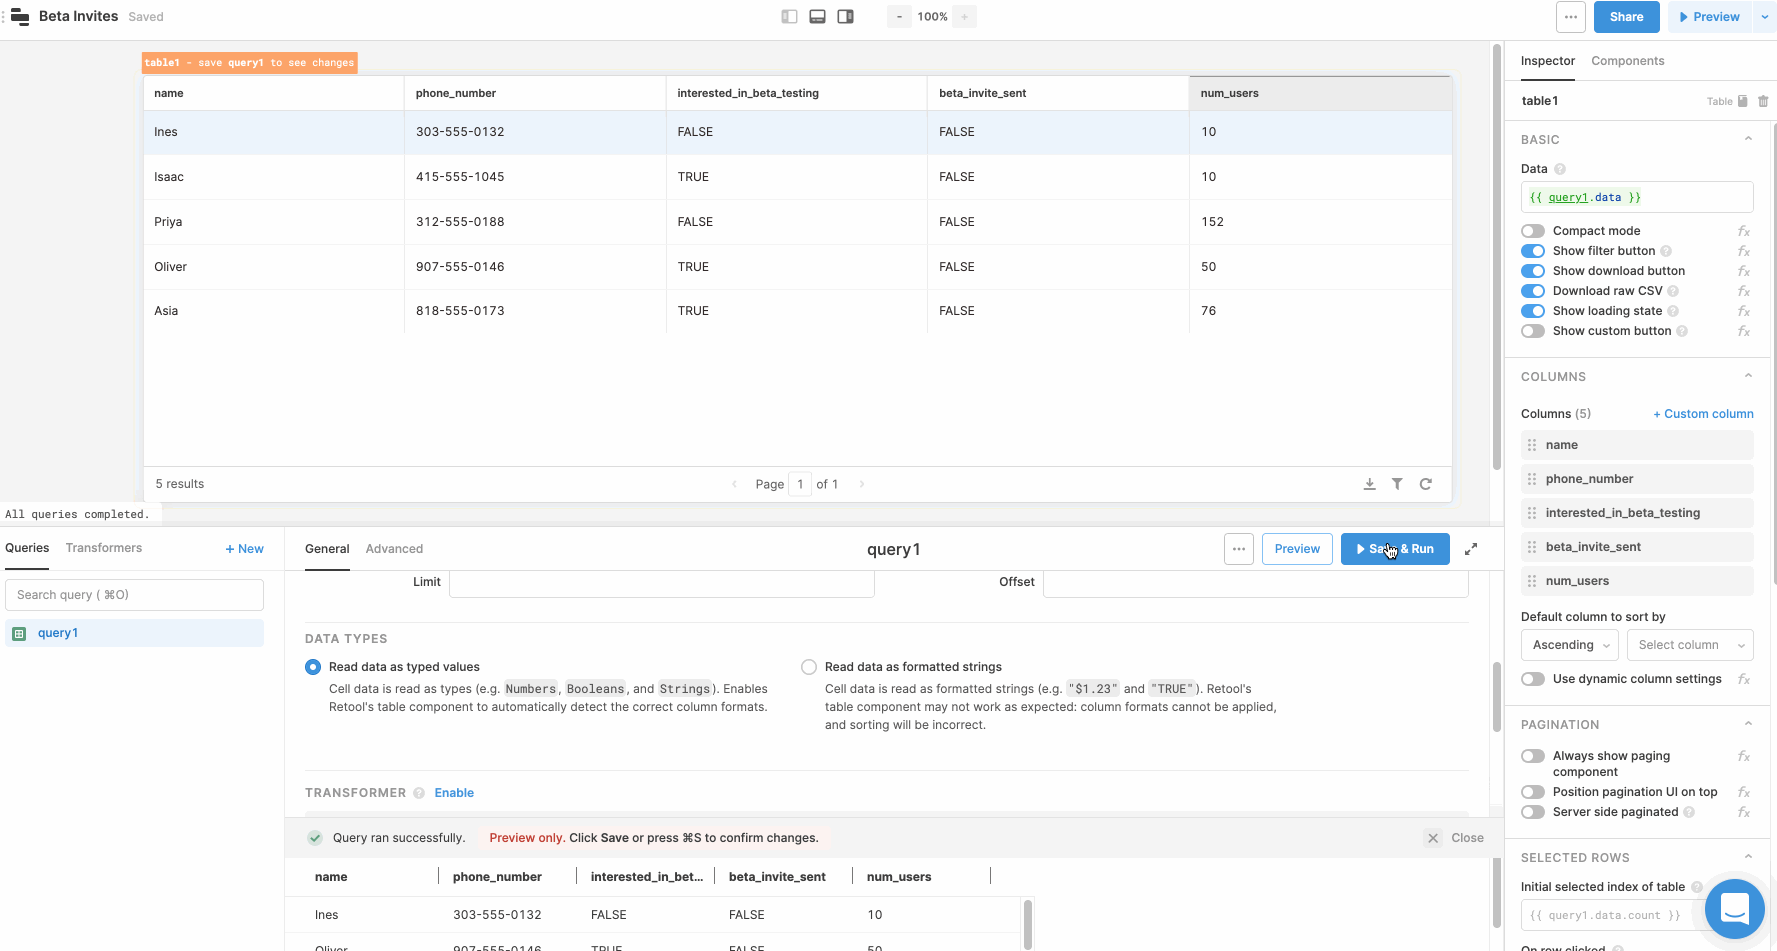
"$1.23"Let’s take a look at our Beta Invites example spreadsheet (we’ve added one more column,
num_users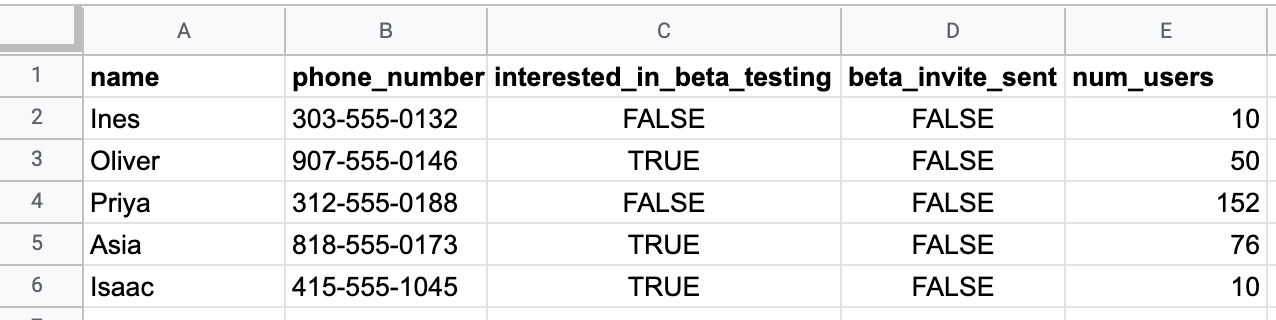
When you inspect the returned results of a query by hovering over it, you can see the formatted strings:
Notice "10" vs. 10
Formatted strings work well when you are:
- Displaying data in a table exactly as it appears in Google Sheets, and you don’t need to use any sorting or formatting features of Retool’s table
- Using column formats supported by Google Sheets that are not yet supported by Retool. Drop us a note at [email protected] with any requests for more formatting types!
Formatted strings do not work well when you try to apply Retool’s column formats to them. For example, a formatted boolean from Google Sheets is
"TRUE""FALSE"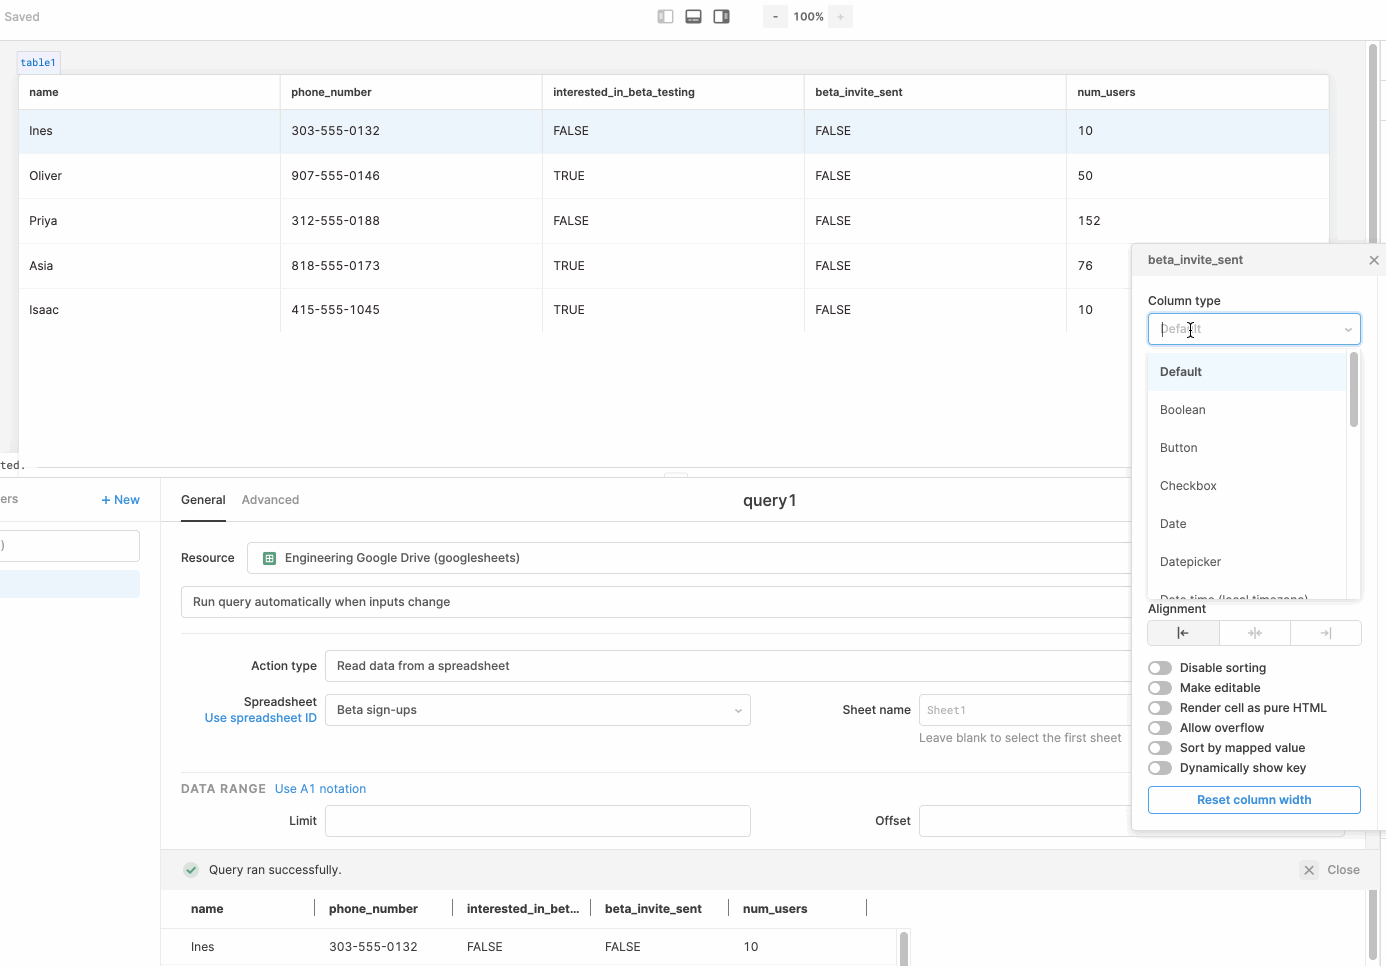
Additionally, any column sorting will be string based, which is likely not what you want when sorting columns that are numbers in your spreadsheet, but formatted strings when pulled into Retool:
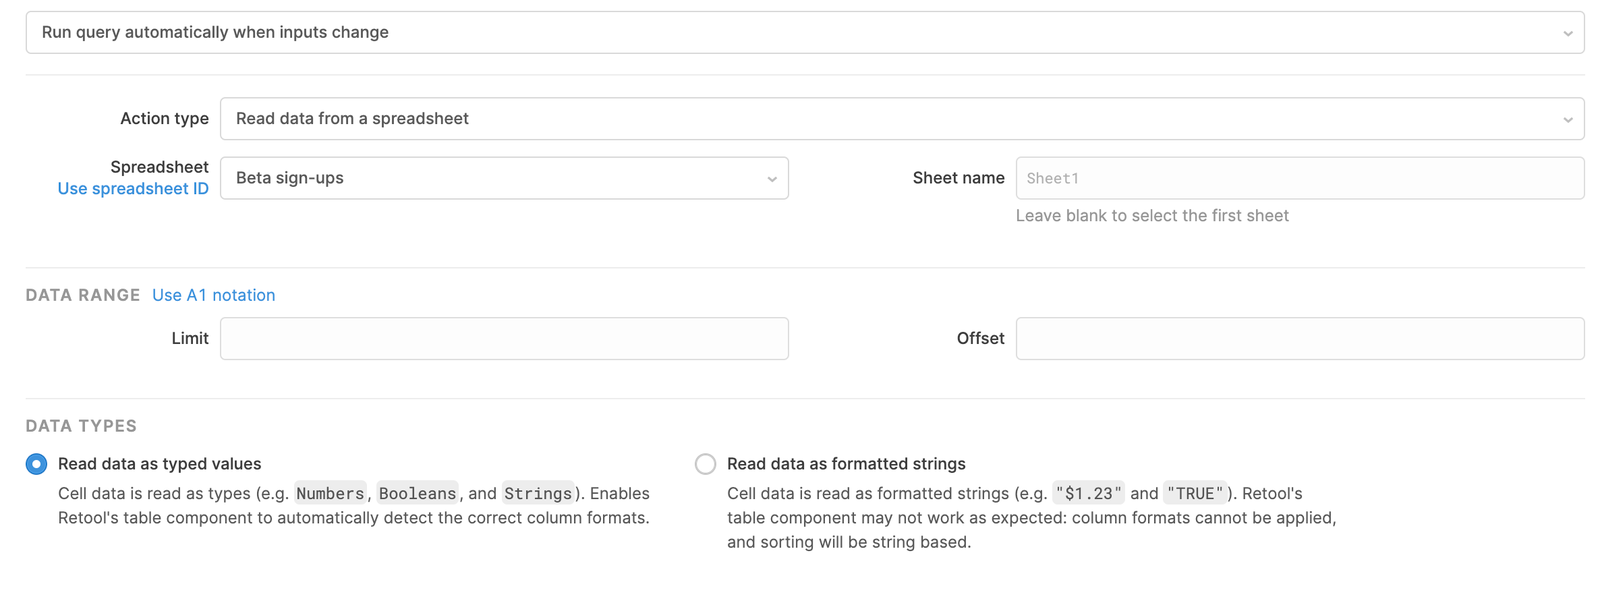
As you can see, a lot of Retool’s table features don’t work as well out of the box with formatted strings so we recently built the ability to read in unformatted typed values from Google Sheets.
Now, if your Google spreadsheet has multiple data types, like booleans and numbers, you can instead choose to read in those typed values by selecting “Read data as typed values” in the Data Types section of your read query in the Query Editor. We default you to the original behavior, formatted strings:
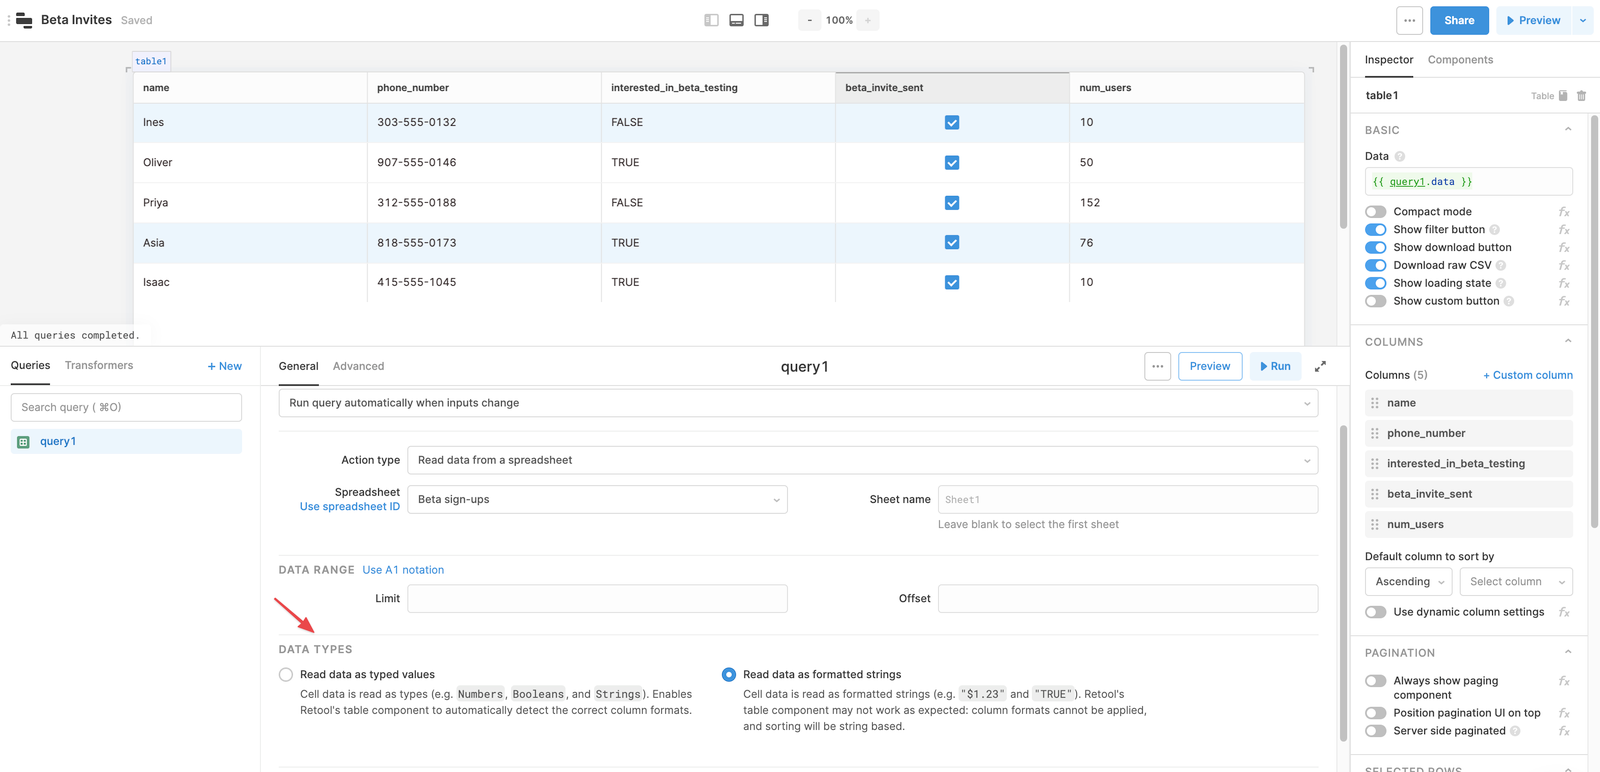
But you can now switch to read in unformatted typed values:
Here’s an example of changing a query over to unformatted typed values. You’ll notice that Retool automatically detects the column format and allows other formats to be applied correctly. Also, sorting now works as you’d expect:
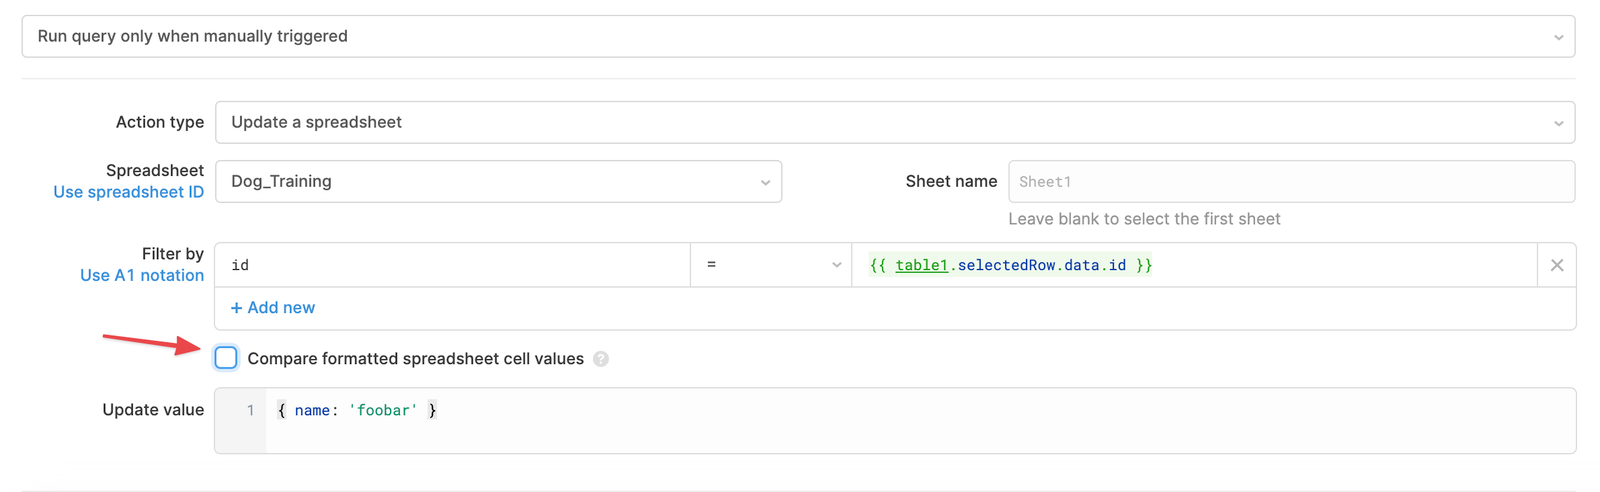
Earlier in our tutorial we walked through how to update data in your spreadsheet from changes in your Retool table. If the value in your “Filter by” is populated from a table, e.g.
{{table1.selectedRow.data.id}}Again, by default we will check “Compare formatted spreadsheet cell values,” but uncheck it like in the screenshot below to compare via unformatted typed values:
Previously, bulk updating a spreadsheet from a table required a lot of custom JS in Retool, so we built an action for it!
First, make sure that your data set in your Google Sheet has a primary key column — any column that has a unique value per row is a good candidate (e.g. a unique ID).
In our example spreadsheet, we could use
phone_number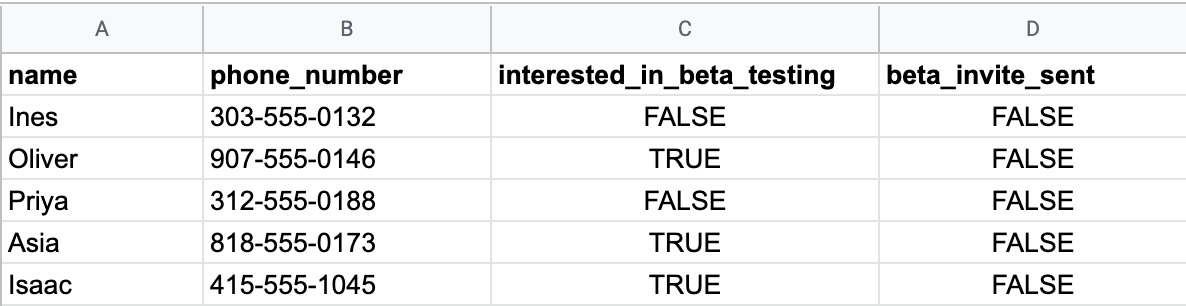
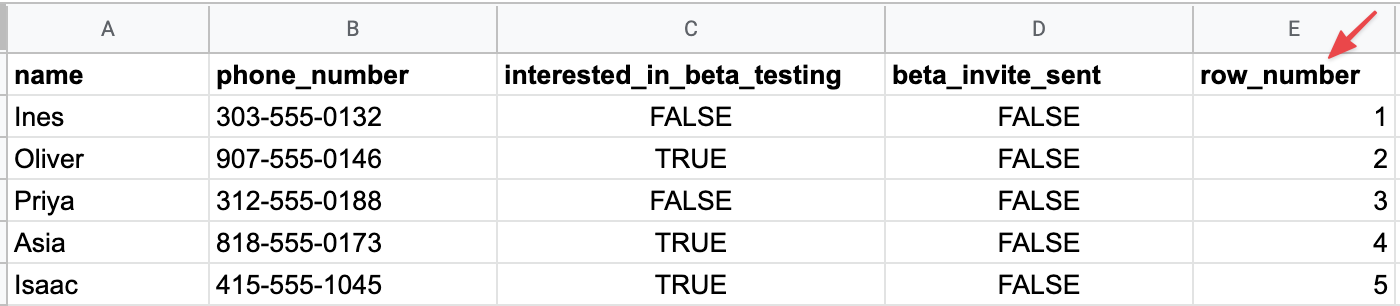
If your data set does not have a primary key, you can add a simple row number to identify your row:
Now, let’s say you've set up a query to read your data from your Google Sheet into a table:
Make sure that you make any columns you want to change editable (you can learn more about Retool's Table component in Working With Tables:
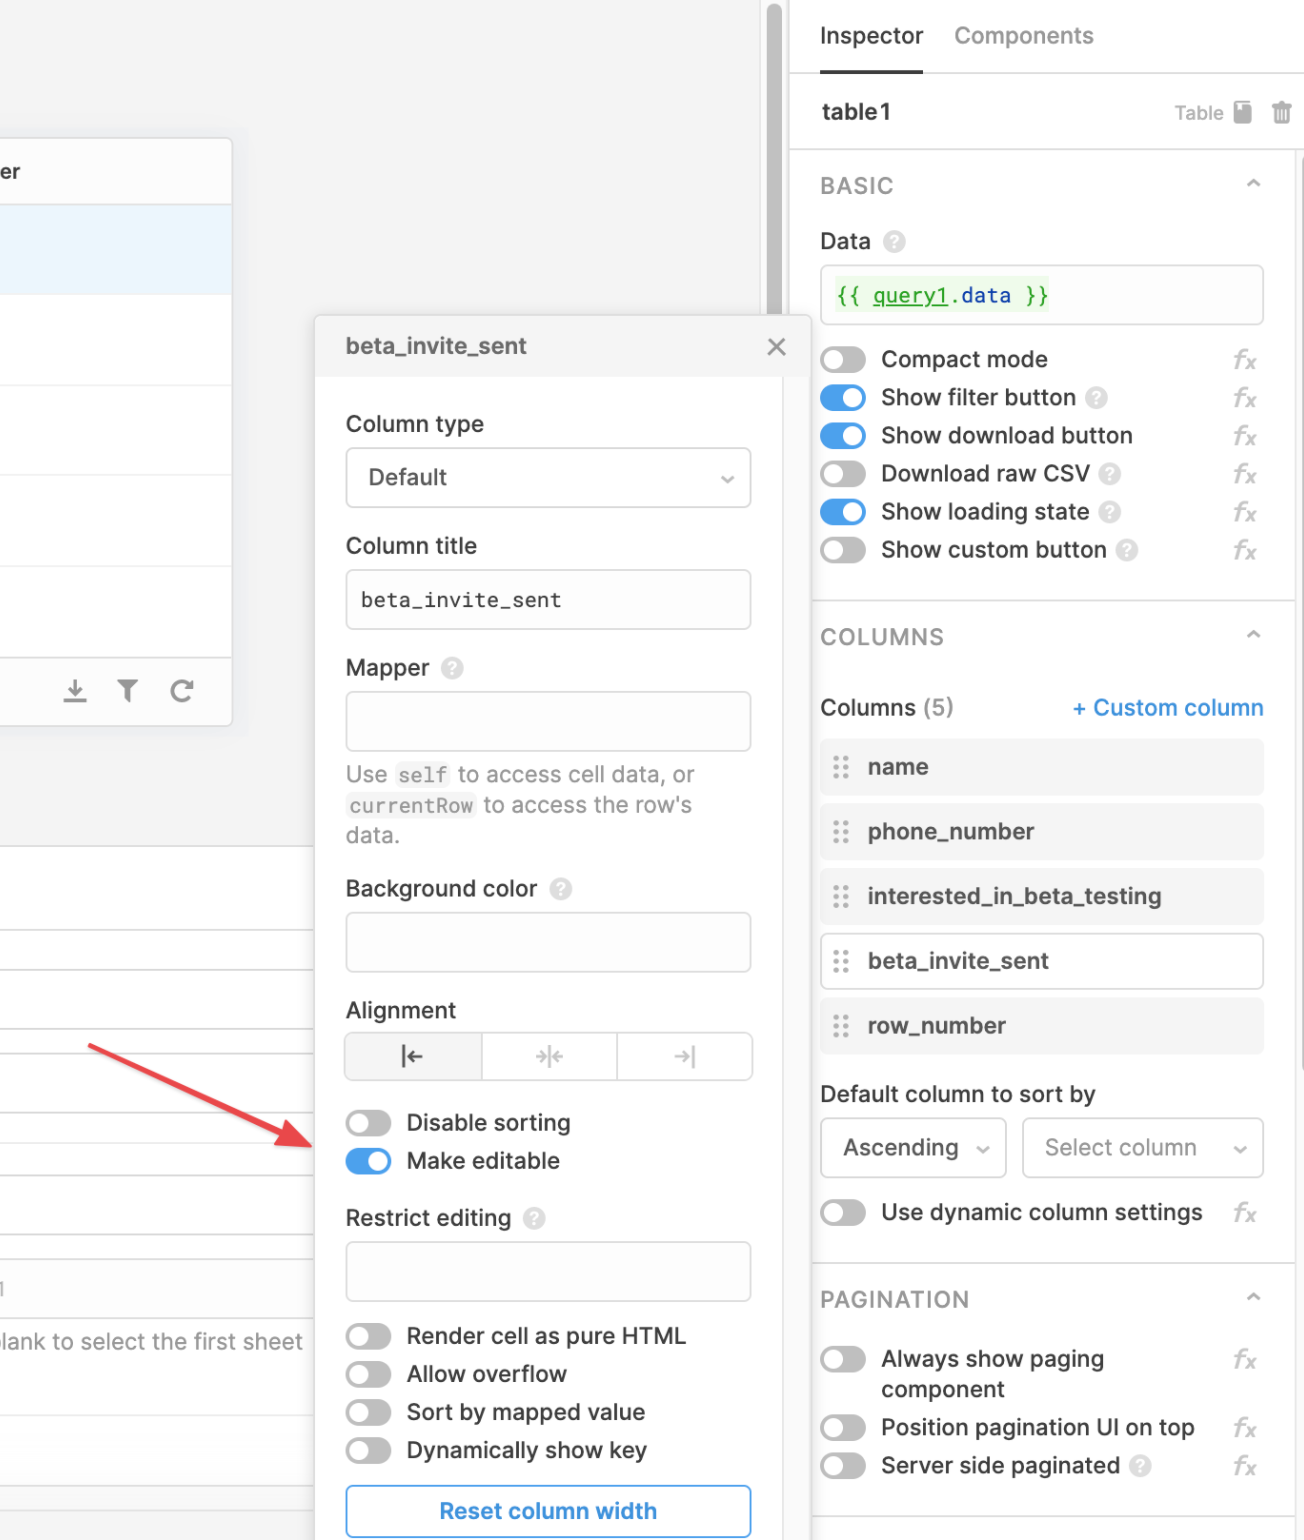
Now, you need to create your bulk update query and set it up so that it is triggered when you edit your table.
- Select Bulk update a spreadsheet by primary key from the actions list
- Add your primary key (e.g. )
phone_number - Add as the Array of rows to update so that you're capturing the edits you make to the table
{{ your_table_name.recordUpdates }} - Select that query as the Bulk update action for the table in the Bulk update action section of the right-hand panel
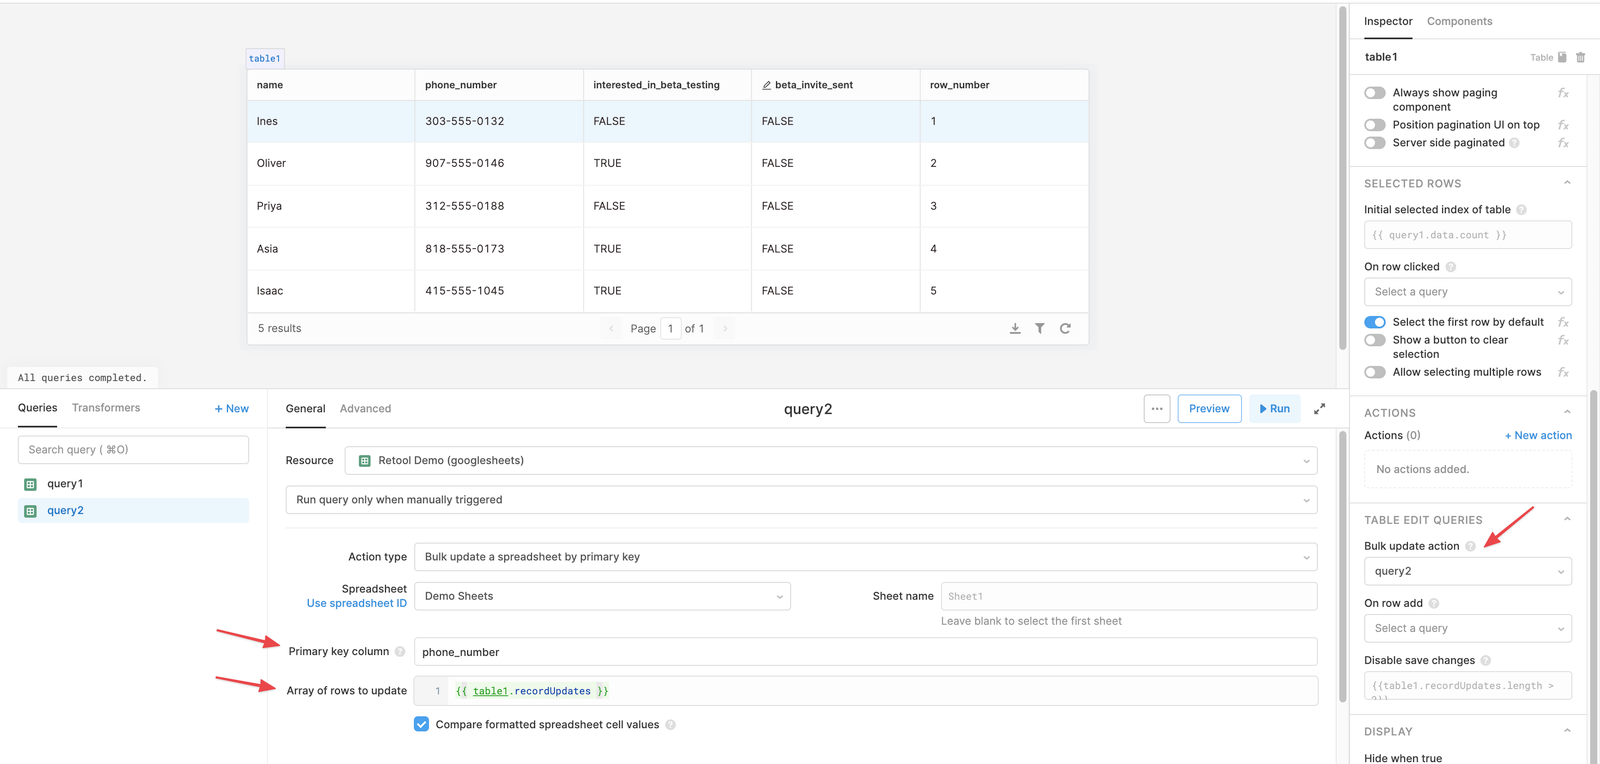
Lastly, remember to re-run your read query to populate your table with the updated values:
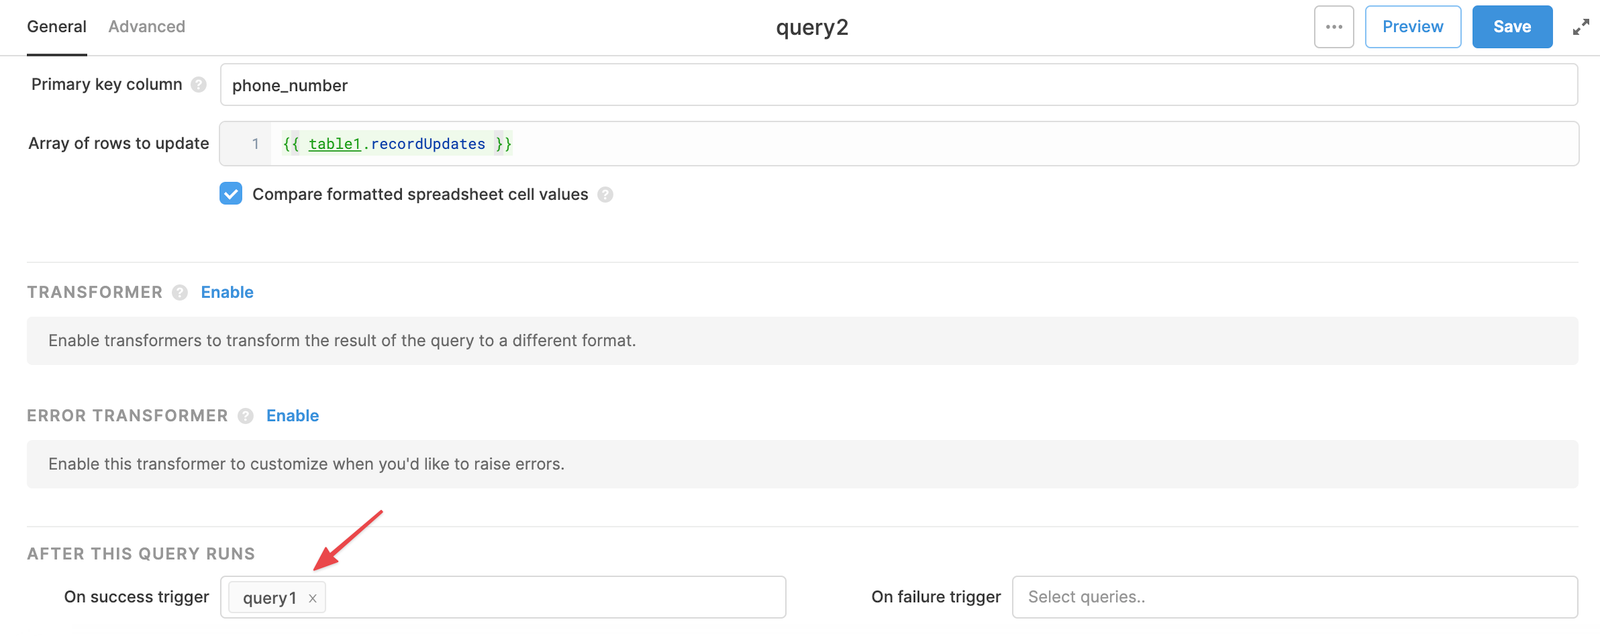
Now, you can edit multiple rows at once, click Save Changes and see those updates in your Google Spreadsheet!
If the action to bulk update a spreadsheet by primary key described above does not work for you, drop us a note at [email protected]. You can also still use the following set of instructions to loop through each change to a row in the table, and trigger a single row update query for each change.
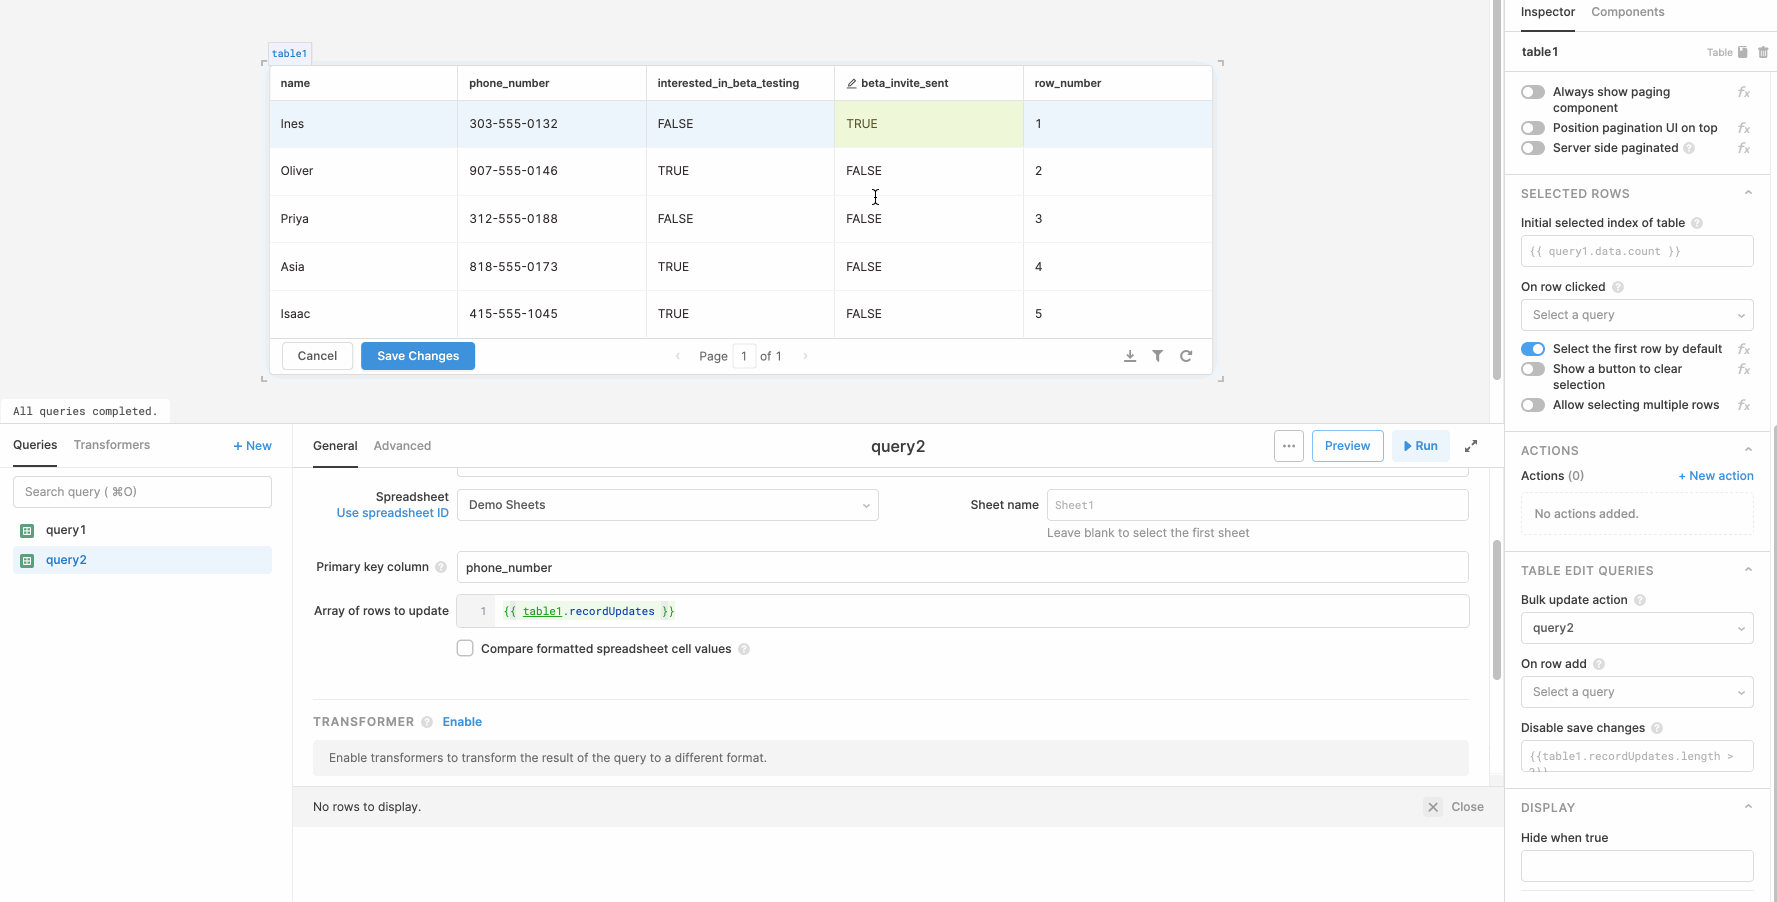
Here’s the table as it exists right now, after previously making all of the columns editable:
When you edit any cell, Retool adds the updated row to the
table1.recordUpdatesrecordUpdatesinterested_in_beta_testing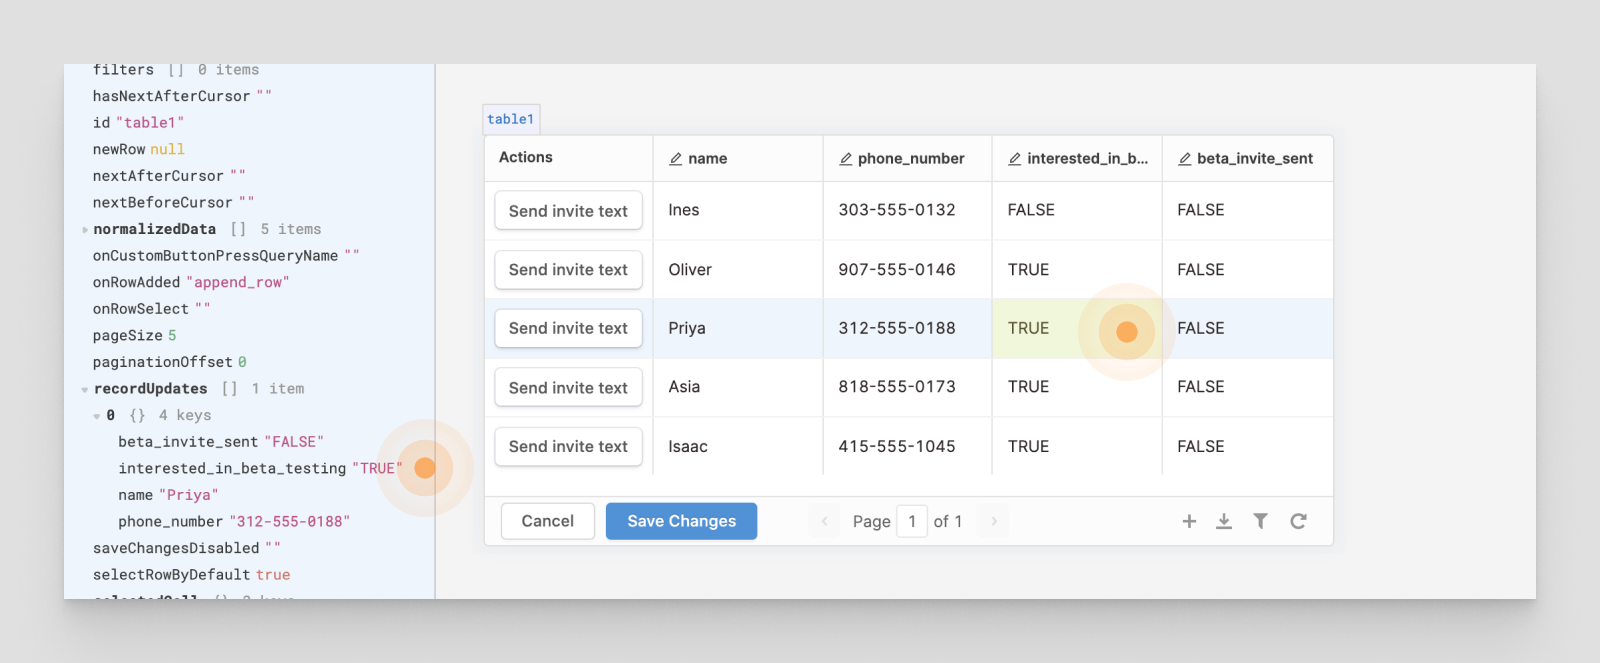
Now you can write a row update query that will map to a single entry in
recordUpdatesphone_number{{ table1.recordUpdates[i] }}The variable will evaluate as 0 by default, making this a single update to the row filtered by
table1.recordUpdates[0].phone_numbertable1.recordUpdates[0]Next, create a new Run JS Code query to trigger the
update_rowrecordUpdatesbulk_updateHere you'll define for each instance in the additionalScope object option on the
.trigger()query1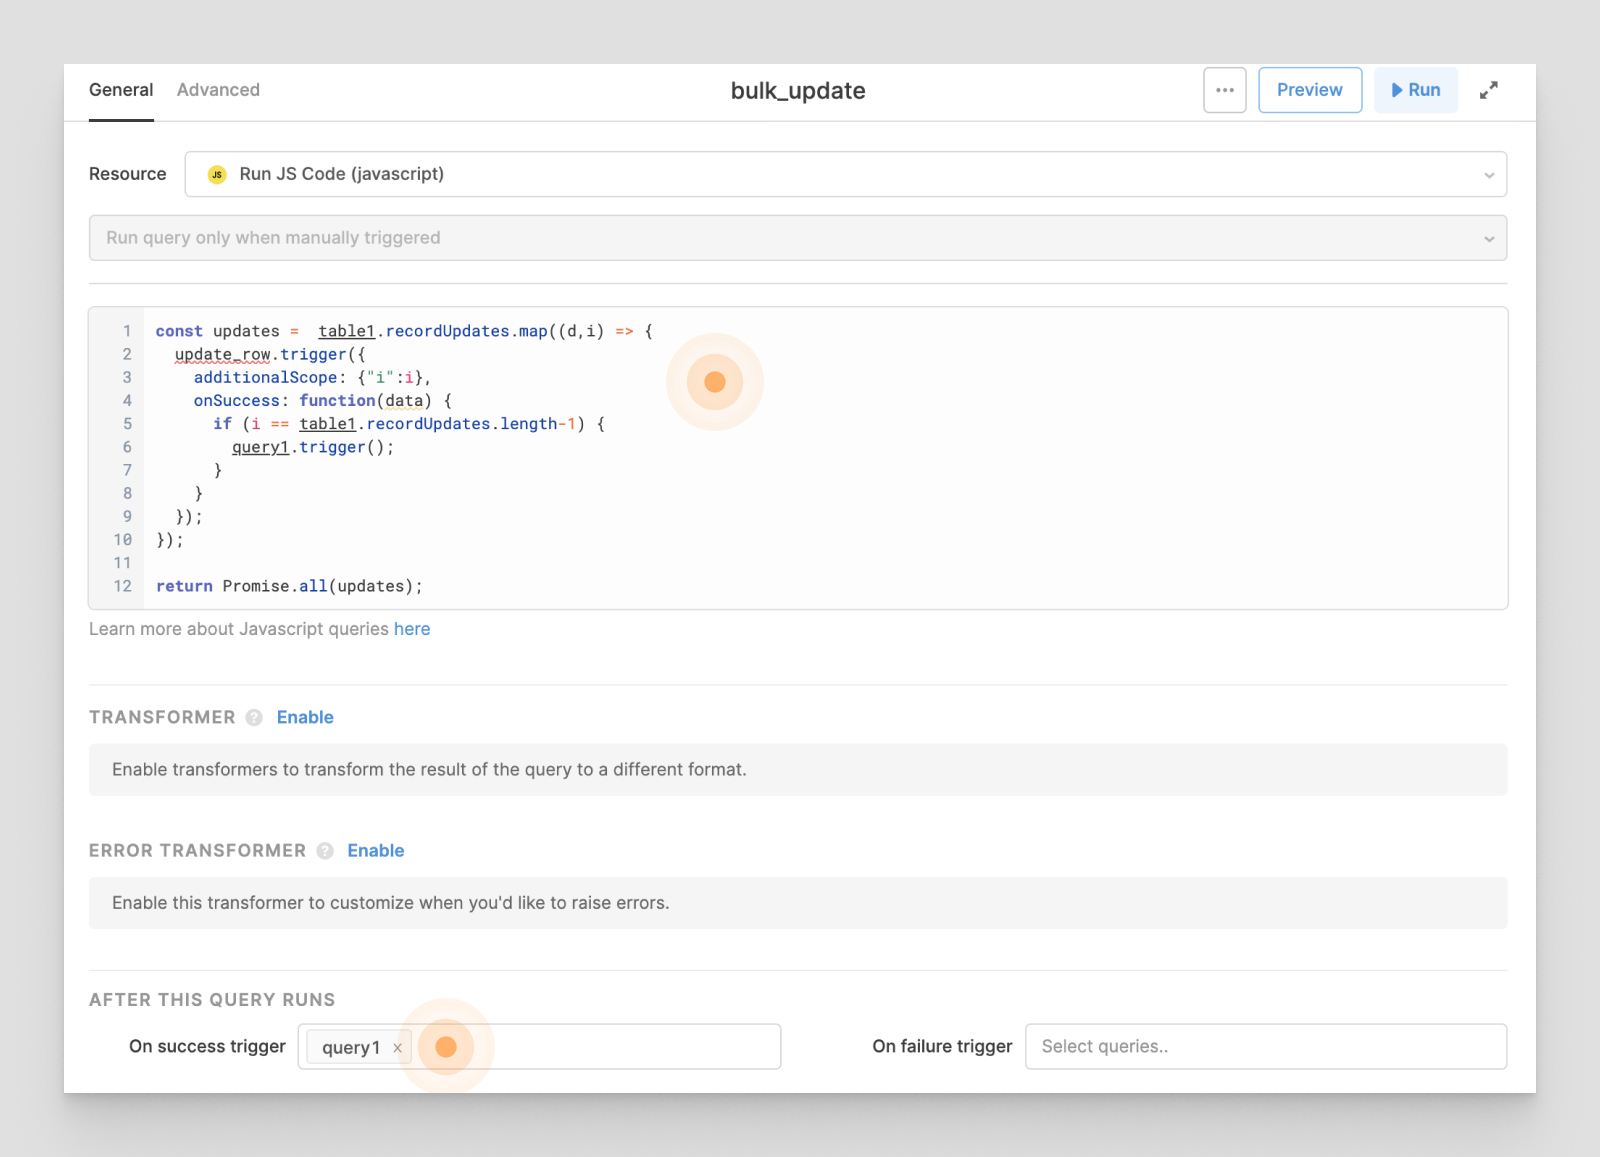
Here’s the code above:
const updates =  table1.recordUpdates.map((d,i) => {
  update_row.trigger({
    additionalScope: {"i":i},
    onSuccess: function(data) {
      if (i == table1.recordUpdates.length-1) {
        query1.trigger();
      }
    }
  });
});

return Promise.all(updates);
Last step! Set the table to use this JS Query as its "Bulk update action" setting in the inspector under the "Table Edit Queries" section of the table settings. That will cause the table to trigger the
bulk_updates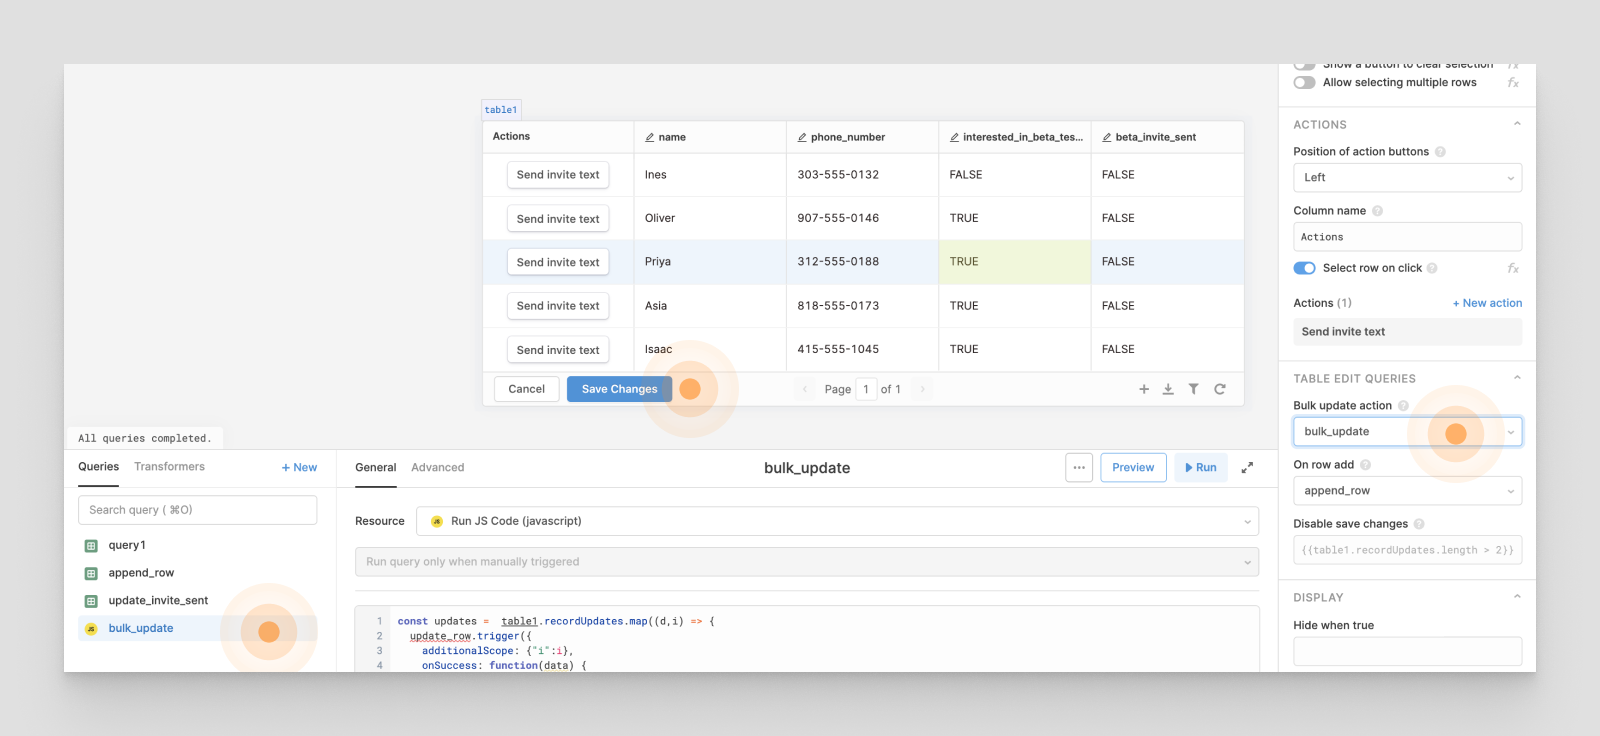
Recommend
-
136
A simple command line utility that sends your stdin to sheets. Available on pip by pip install tosheets (python3+ only) NOTE: On first use, tosheets will open a browser window to authorize OAut...
-
66
Data-driven web applications are invaluable for all sorts of people and businesses. But updating or changing data in a relational or NoSQL database is not something most non-programmers can do. Wouldn’t it be nice if we c...
-
75
Data visualizations have gotten a lot more popular over the last 5-10 years with the rise of software like D3 , Tableau , and infographics. Maps just...
-
74
Even as I grow wary Google’s monopoly power and the amount of data they have about literally EVERYTHING I do, I can’t deny my love for Google Sheets. Google sheets are one of the easiest ways to work with csvs and table...
-
37
(This article was first published on Stories by Matt.0 on Medium , and...
-
55
Sheety - 可将你的 Google Sheets 内容通过 API 接入到你的产品中,可实时内容更新 - NEXT
-
14
Raymond Camden
-
8
The Ultimate Google Ads Pacing Dashboard (Free Data Studio Template)Learn how to create a Google Ads Pacing dashboard with essential information all in one place and get a free template, too!
-
5
-
4
Google brings mouse support to Google Sheets app for Android...
About Joyk
Aggregate valuable and interesting links.
Joyk means Joy of geeK