
Writing Custom Lint Rules for Your Picky Developers
source link: https://flexport.engineering/writing-custom-lint-rules-for-your-picky-developers-67732afa1803
Go to the source link to view the article. You can view the picture content, updated content and better typesetting reading experience. If the link is broken, please click the button below to view the snapshot at that time.
Writing Custom Lint Rules for Your Picky Developers
Engineers at Flexport are opinionated about the code we write. Instead of arguing about these opinions over and over again, we recently created a custom ESLint plugin to enforce these custom rules. It has been a bit over two months since we’ve had our custom ESLint plugin infrastructure in place. In that time a handful of engineers have created about 10 custom rules.
This article is meant as a practical guide to get a custom ESLint plugin off the ground in your organization, but could also be used to help write a rule for an existing open-source plugin.
Why would you want to use custom ESLint rules?
There are a couple of reasons:
- You want to enforce a specific rule in your codebase, and this rule is not going to be relevant outside of your company (in other codebases).
- Your engineering team has a strong preference about how to set something up, but others might choose a different option. For example, we recently created a rule enforcing the use of
React.Flow types over the more experimentalReact$types.
In either of these cases, the key is this: You’re creating a rule that everyone really, really has to follow (if they want their code to get checked in).
If the rule you’re creating is more broadly applicable, you may not need to create a custom plugin at all. First, make sure that the rule you’re envisioning is not included in one of the many existing open-source plugins. If it is not included, should it be? If you feel that the rule should be part of the default React plugin or even core ESLint, you can open an issue or pull request instead of creating a custom plugin.
Step 1: Initializing the plugin
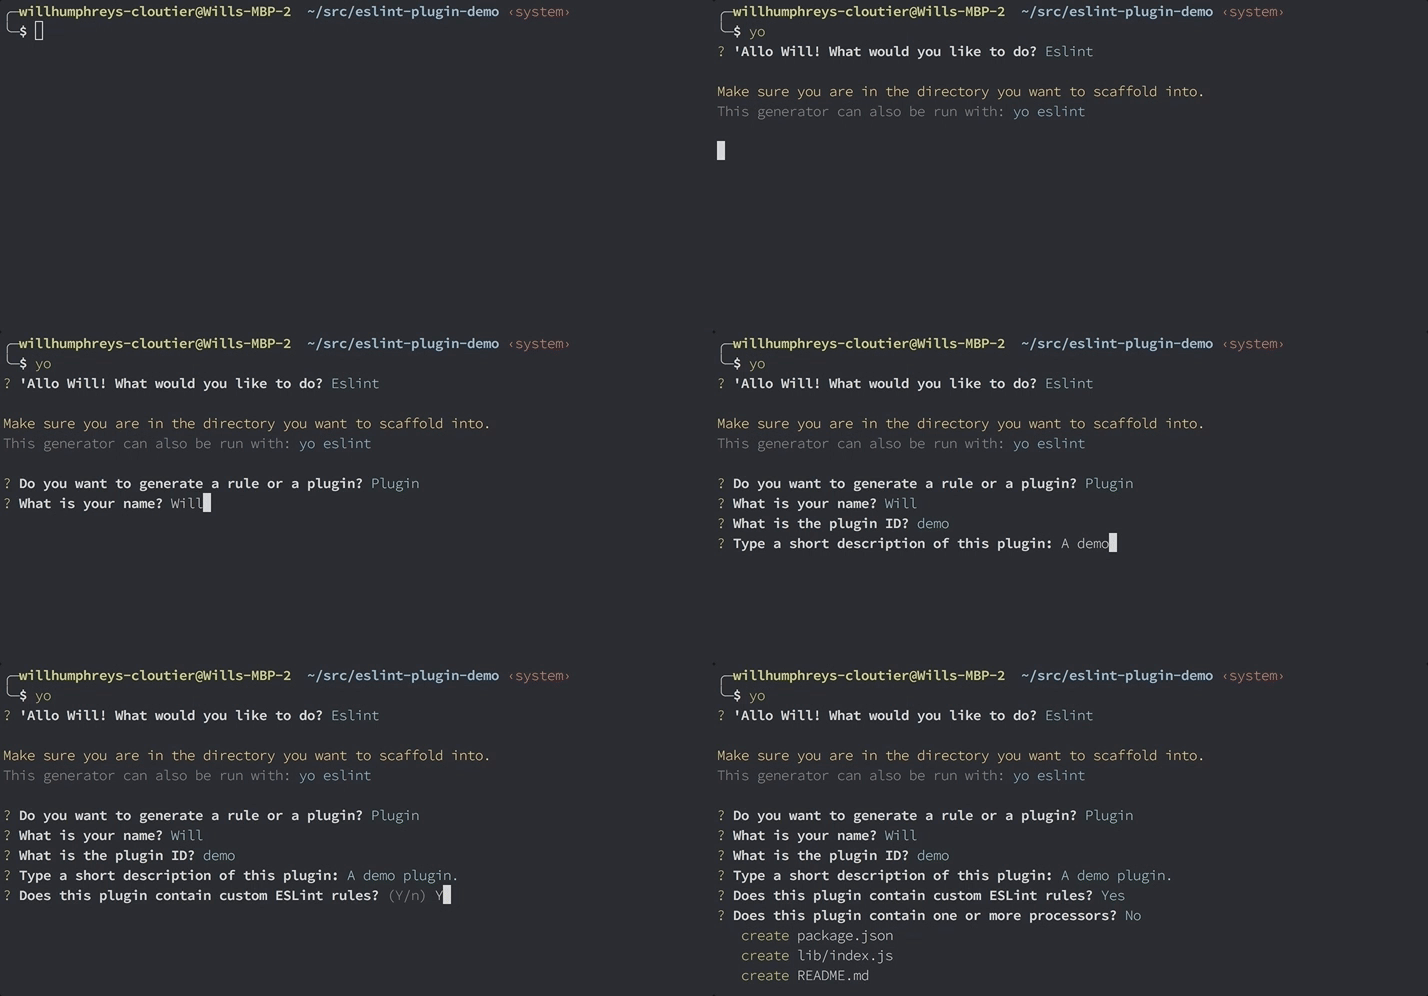
We’ll be using Yeoman to generate much of the boilerplate that goes into creating an ESLint plugin and rule. Start by installing it and the generator:
npm install -g yo generator-eslint
Next, cd to a folder where your plugin will live. Invoke yo and pretend you’re playing an old-school text-based RPG:

Finally, just npm install and you have yourself a plugin!
Step 2: Creating your first rule
As a (somewhat silly) demo, we’ll be creating a rule that enforces that <button>s have at least a btn class because default button styling really has not kept up over the years. This is a great example of a rule that should go in a custom plugin, as every organization will have different styling rules.
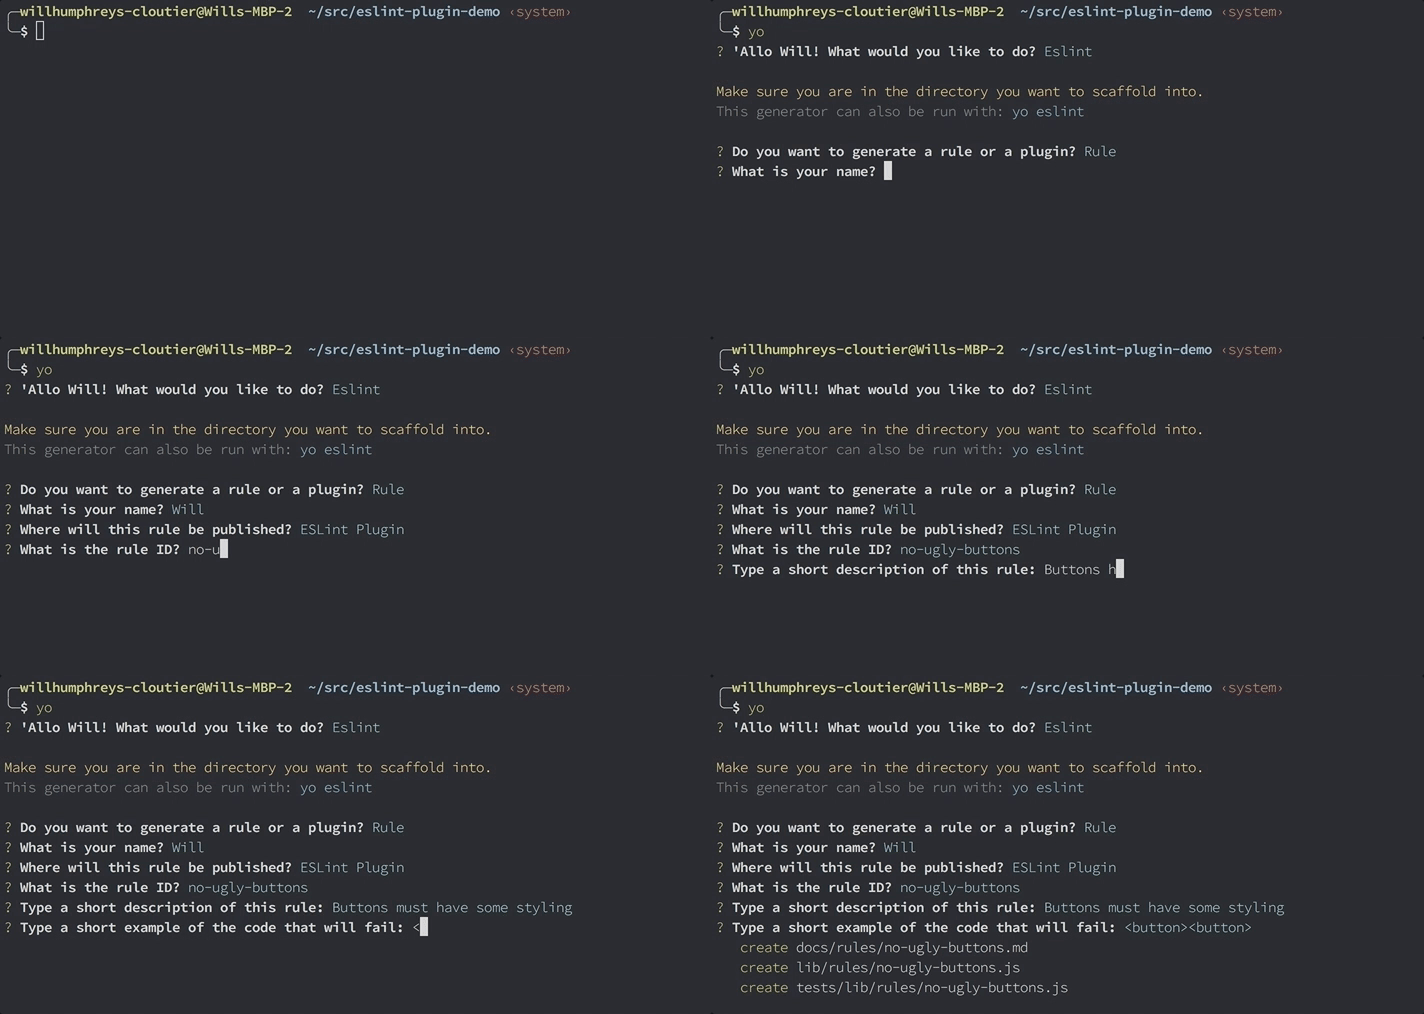
We’re going to play the text-based RPG again. This time, to create a rule:

The yeoman rule generator will give us a few new files:
docs/rules/<rule-name>.mdThis is a Markdown file that documents your rule. You should definitely fill this out before submitting your plugin/rule to help.lib/rules/<rule-name>.jsThis is where we’ll write the logic to implement the rule.tests/lib/rules/<rule-name>.jsThis is a scaffold of a test suite with an example of a test of some invalid code.
Let’s start by adding an example of a valid case. In our case, we end up with something like this:
If you run the tests now, you should see them correctly fail as we have not yet written the rule. Notice that we need to specify that we will be using JSX via RuleTester.setDefaultConfig. This will allow our rule to be tested with a parser that knows about JSX.
ESLint rules “listen” on specific identifiers based on a generated AST. When the rule identifies that the code represented by the AST is in violation of the rule that is being enforced, it simply must call context.report to report a violation. There is a great site to help us explore the AST that would describe our failing rule: astexplorer.net. It even has a super-handy ESLint mode:

I recommend you play with AST Explorer and try to write a simple rule like the one above before diving into something more complex.
Once you have something working in AST Explorer and you’re happy with it, paste the rule back into your plugin in the generated rule file. You may now want to add a few more test cases. Make sure your tests pass!

Congratulations, you’ve now written an ESLint rule! The next sections will focus on getting it running against your code.
Step 3: Running your new rule against an existing codebase
There are a number of ways that you could get your plugin installed into an existing ESLint configuration:
- store it in your repository and add
"eslint-plugin-<plugin_name>": "file:/path/to/plugin"to yourpackage.json - store it in your repository and have each developer use
npm link - publish it to an npm registry and simply add the plugin name to your
package.json
At Flexport we’ve chosen option 1, but any one of these options will work. Note that if you choose option 1 or 3, you’ll need to increment the package version when adding new rules.
To run the rule on a large codebase you’ll likely want to create a base version of your eslintrc.* that does not enable any rules. It should only have the configuration that is necessary for ESLint to understand your codebase such as globals and parserOptions. In the example below it is called .eslintrc.base.yaml.
Then you can run your new rule in isolation, for example:
eslint \
  --rule 'demo/no-ugly-buttons: error' \
  --config .eslintrc.base.yaml \
  --no-eslintrc \
  --plugin demo \
  .
Step 4: Deploying your new rule
If you are using ESLint as part of your continuous integration pipeline, you may not be able to simply enable your new rule as it would break the build. In that case, you must either:
- manually fix all violations of the rule
- deploy the rule as a warning, clear them out over time, and eventually promote it to a error
- write a fixer and run your rule with
--fixto have ESLint automatically fix all violations
Unfortunately, the ESLint autofix infrastructure is not as mature as the rule infrastructure. Look out for Part 2, where we will dive into the best practices for implementing ESLint fix functions.
Recommend
About Joyk
Aggregate valuable and interesting links.
Joyk means Joy of geeK