

基于 ServiceComb 和 SpringCloud Zuul 快速构建微服务系统
source link: http://servicecomb.apache.org/cn/docs/servicecomb-springcloud-zuul-demo/
Go to the source link to view the article. You can view the picture content, updated content and better typesetting reading experience. If the link is broken, please click the button below to view the snapshot at that time.

基于 ServiceComb 和 SpringCloud Zuul 快速构建微服务系统
2 分钟 阅读
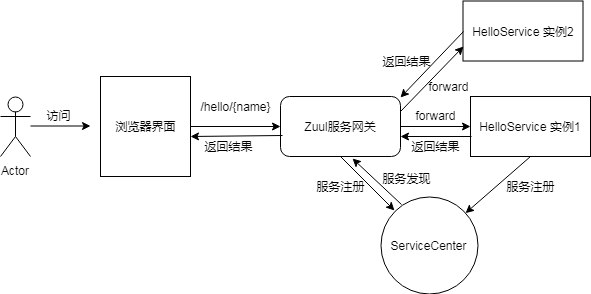
基于ServiceComb和Zuul实现微服务网关,如此一来用户只需要专注实现其业务需求。
本文将以一个简单的Hello服务演示网关的使用。Hello微服务提供一个hello/{name}接口,只要传递路径参数name就可以返回打招呼内容。接口返回结果通过网关将在浏览器界面显示
ServiceComb 作为后端微服务核心框架
ServiceCenter 作为服务发现与注册中心
SpringCloud Zuul 组件做服务网关
以下环境为Windows 64位系统
ServiceCenter安装
下载地址:http://mirrors.hust.edu.cn/apache/servicecomb/servicecomb-service-center/1.1.0/apache-servicecomb-service-center-1.1.0-windows-amd64.tar.gz
下载后解压如下
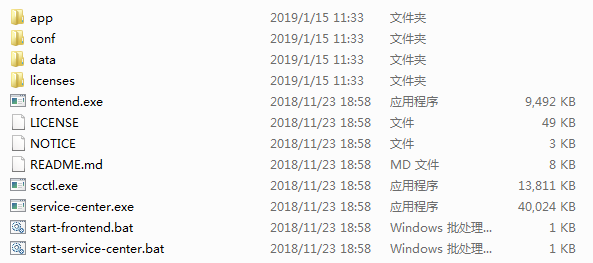
在该目录下双击service-center.exe即可启动,命令窗口中出现如下信息基本代表ServiceCenter启动成功,从这个信息也可以得知ServiceCenter监听的是30100端口,等下配置文件要用到。

问题点: 有可能会有如下信息,这个一般是端口被占用,很可能你打开了两个ServiceCenter,都关闭后再打开就可以了。

一. 后端微服务 HelloService
1. 添加依赖
新建maven项目HelloService,pom文件如下
<?xml version="1.0" encoding="UTF-8"?>
<project xmlns="http://maven.apache.org/POM/4.0.0"
         xmlns:xsi="http://www.w3.org/2001/XMLSchema-instance"
         xsi:schemaLocation="http://maven.apache.org/POM/4.0.0 http://maven.apache.org/xsd/maven-4.0.0.xsd">
    <modelVersion>4.0.0</modelVersion>

    <groupId>com.servicecomb.example</groupId>
    <artifactId>HelloService</artifactId>
    <version>1.0-SNAPSHOT</version>

    <dependencies>
        <dependency>
            <groupId>org.springframework.boot</groupId>
            <artifactId>spring-boot-starter</artifactId>
            <version>1.5.12.RELEASE</version>
        </dependency>

        <dependency>
            <groupId>org.apache.servicecomb</groupId>
            <artifactId>spring-boot-starter-provider</artifactId>
            <version>1.1.0</version>
        </dependency>

        <dependency>
            <groupId>org.hibernate</groupId>
            <artifactId>hibernate-validator</artifactId>
            <version>5.3.6.Final</version>
        </dependency>

    </dependencies>

    <dependencyManagement>
        <dependencies>
            <dependency>
                <groupId>org.apache.servicecomb</groupId>
                <artifactId>java-chassis-dependencies</artifactId>
                <version>1.1.0</version>
                <type>pom</type>
                <scope>import</scope>
            </dependency>
        </dependencies>
    </dependencyManagement>

    <build>
        <plugins>
            <plugin>
                <groupId>org.springframework.boot</groupId>
                <artifactId>spring-boot-maven-plugin</artifactId>
            </plugin>
        </plugins>
    </build>

</project>
新建ServiceComb配置文件src/main/resources/microservice.yaml,内容如下
APPLICATION_ID: helloworld   # 应用名,注意与网关服务器的应用名保持一致
service_description:
  name: helloservice   # 微服务名
  version: 0.0.1       # 微服务版本号
servicecomb:
  service:
    registry:
      address: http://127.0.0.1:30100   # 服务注册中心(重要)
  rest:
    address: 0.0.0.0:7777    # 微服务启动端口
3. 项目入口
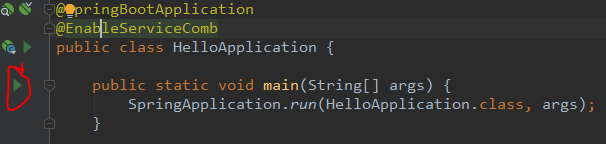
新建启动类HelloApplication.java,内容如下
package com.servicecomb.example;

import org.apache.servicecomb.springboot.starter.provider.EnableServiceComb;
import org.springframework.boot.SpringApplication;
import org.springframework.boot.autoconfigure.SpringBootApplication;


@SpringBootApplication
//这个注解使Spring能够自动配置ServiceComb模块
@EnableServiceComb
public class HelloApplication {
    public static void main(String[] args) {
        SpringApplication.run(HelloApplication.class, args);
    }
}
新建Controller类HelloController.java (这里我习惯SpringMvc的叫法,重点看注解)
package com.servicecomb.example;

import org.apache.servicecomb.provider.rest.common.RestSchema;
import org.springframework.web.bind.annotation.GetMapping;
import org.springframework.web.bind.annotation.PathVariable;
import org.springframework.web.bind.annotation.RequestMapping;

//restful服务契约
@RestSchema(schemaId = "helloController")
@RequestMapping(path = "/")
public class HelloController {

    @GetMapping(path = "/hello/{name}")
    public String hello(@PathVariable("name") String name) {
        return "Hello, " + name;
    }

}
到此,一个微服务就写完了,如下在IDEA里面直接启动应用
二. 编写Zuul网关服务
1. 添加依赖
新建maven项目 zuulserver,pom文件如下
<?xml version="1.0" encoding="UTF-8"?>
<project xmlns="http://maven.apache.org/POM/4.0.0"
         xmlns:xsi="http://www.w3.org/2001/XMLSchema-instance"
         xsi:schemaLocation="http://maven.apache.org/POM/4.0.0 http://maven.apache.org/xsd/maven-4.0.0.xsd">
    <modelVersion>4.0.0</modelVersion>

    <groupId>com.servicecomb.example</groupId>
    <artifactId>zuulserver</artifactId>
    <version>1.0-SNAPSHOT</version>

    <dependencies>
        <dependency>
            <groupId>org.springframework.boot</groupId>
            <artifactId>spring-boot-starter</artifactId>
            <version>1.5.12.RELEASE</version>
        </dependency>

        <!-- ServiceComb框架,提供基础能力 -->
        <dependency>
            <groupId>org.apache.servicecomb</groupId>
            <artifactId>spring-boot-starter-servicecomb</artifactId>
            <version>1.1.0</version>
        </dependency>

        <!-- ServiceComb与SpringCloud Zuul的集成框架 -->
        <dependency>
            <groupId>org.apache.servicecomb</groupId>
            <artifactId>spring-boot-starter-discovery</artifactId>
            <version>1.1.0</version>
        </dependency>

        <!-- SpringCloud Zuul框架 -->
        <dependency>
            <groupId>org.apache.servicecomb</groupId>
            <artifactId>spring-cloud-zuul</artifactId>
            <version>1.1.0</version>
        </dependency>

    </dependencies>

    <!-- 导入ServiceComb所需依赖 -->
    <dependencyManagement>
        <dependencies>
            <dependency>
                <groupId>org.apache.servicecomb</groupId>
                <artifactId>java-chassis-dependencies</artifactId>
                <version>1.1.0</version>
                <type>pom</type>
                <scope>import</scope>
            </dependency>
        </dependencies>
    </dependencyManagement>

    <build>
        <plugins>
            <plugin>
                <groupId>org.springframework.boot</groupId>
                <artifactId>spring-boot-maven-plugin</artifactId>
            </plugin>
        </plugins>
    </build>

</project>
2. 配置文件
新建springboot配置文件src/main/resources/application.yaml,内容如下
zuul:
  routes:         # 定义路由转发规则。凡是匹配/helloservice/**的路由都会转发到helloservice服务
    helloservice: /helloservice/**
server:
  port: 8080     #SpringBoot框架的配置,服务启动端口
新建ServiceComb配置文件src/main/resources/microservice.yaml,内容如下
APPLICATION_ID: helloworld   # 应用ID
service_description:
  name: gateway     #  微服务名
  version: 0.0.1    #  微服务版本
servicecomb:
  service:
    registry:
      address: http://127.0.0.1:30100   # 服务注册中心地址 (重要)
3.项目入口
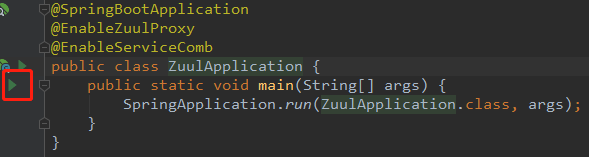
新建启动类 ZuulApplication.java
package com.servicecomb.example;

import org.apache.servicecomb.springboot.starter.provider.EnableServiceComb;
import org.springframework.boot.SpringApplication;
import org.springframework.boot.autoconfigure.SpringBootApplication;
import org.springframework.cloud.netflix.zuul.EnableZuulProxy;

@SpringBootApplication
@EnableZuulProxy
@EnableServiceComb
public class ZuulApplication {
    public static void main(String[] args) {
        SpringApplication.run(ZuulApplication.class, args);
    }
}
新建静态文件 src/main/resources/static/index.html,内容如下 (static目录是按springboot项目规范,属于应用静态文件根目录)
<!DOCTYPE HTML>
<html>
<head>
    <meta charset="utf-8">
    <link rel="stylesheet" href="https://cdn.bootcss.com/bootstrap/4.0.0/css/bootstrap.min.css" integrity="sha384-Gn5384xqQ1aoWXA+058RXPxPg6fy4IWvTNh0E263XmFcJlSAwiGgFAW/dAiS6JXm" crossorigin="anonymous">
    <script src="https://code.jquery.com/jquery-3.2.1.min.js" crossorigin="anonymous"></script>

</head>
<body>

<div style="width:300px; margin:0 auto ; margin-top: 50px;">

<div class="input-group mb-3">
    <input id="username" type="text" class="form-control" placeholder="Username" aria-label="Username" aria-describedby="basic-addon1">
    <div class="input-group-prepend">
        <button style="" type="button" class="btn btn-primary" onclick="testCall()">打招呼</button>
    </div>
</div>
<div >
    <div style="height: 200px;" class="form-control"  id="resultDiv" >
    </div>
</div>

</div>

</body>
<script>
    function testCall() {

        var username = $("#username").val();

        if(!username){
            return
        }

        $.ajax({
            url: "/helloservice/hello/"+username,
            success: function (data) {
                var resultDiv = document.getElementById("resultDiv");
                console.log(data)
                resultDiv.innerText = data;
            },
            error: function (data) {
                var resultDiv = document.getElementById("resultDiv");
                console.log(data)
                resultDiv.innerText = JSON.stringify(data);
            }
        })
    }
</script>
</html>
到此,网关服务器写完,如下在IDEA里面直接启动应用
三. 演示效果
浏览器访问http://localhost:8080/ ,如下图。 在输入框中输入姓名,就可以在下面看到打招呼的信息
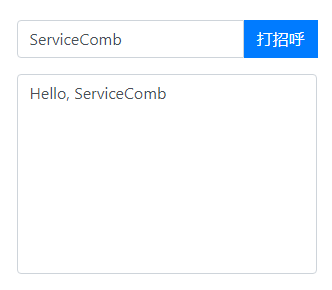
从以上的示例可以看出,通过 ServiceComb 结合SpringCloud Zuul 实现服务网关功能只需一些简单的配置。后续可以在网关服务上实现统一的鉴权,日志记录,和自定义过滤器等。
Recommend
-
154
引言:前面一个系列文章介绍了认证鉴权与API权限控制在微服务架构中的设计与实现 ,好多同学询问有没有完整的demo项目,笔者回答肯定有的。由于之前系列文章侧重讲解了权限前置,所以近期补上完整的后置项目,但是这最好有一个完整的微服务调用。本文主要讲下API网...
-
98
使用ServiceComb Go-chassis构建微服务
-
76
网关在微服务里的角色 在微服务架构体系里,网关是非常重要的一个环节,它主要实现了一些功能的统一处理,包括了: 统一授权 统一异常处理 路由导向 跨域处理...
-
394
What is Zuul? 官方介绍: Zuul is the front door for all requests from devices and web sites to the backend of the Netflix streaming application.As an edge service application, Zuul is built to en...
-
63
README.md 简介 SpringBlade 2.0 是如梦技术团队作品,是一个基于 Spring Boot 2 & Spring Cloud Finchley & Mybatis 等核心技术,用于快速构建中大...
-
50
-
32
在微服务架构模式中后端服务的实例数一般是动态的,于客户端而言很难发现动态改变的服务实例的访问地址信息,服务网关能对用户提供统一的入口。 ServiceComb Java-Chassis 内置了网关服务EdgeService,开发者可以非常简单的搭建...
-
13
随着业务的扩展,微服务会不对增加,相应的其对外开放的 API 接口也势必增多,这不利于前端的调用以及不同场景下数据的返回,因此,我们通常都需要设计一个 API 网关作为一个统一的 API 入口,来组合一个或多个内部 API。 二、简单介绍 2.1 AP...
-
10
至此,已实现基于Eureka的服务发现,基于Ribbon的负载均衡,Feign也为我们提供了很不错的远程调用能力,使用Hystrix后,高并发场景下应用也不会被别人拖死——咱们的微服务架构已经日趋完善! 然而,迄今为止,只讨论了微服务之间的调用,尚没讨论如何应对...
-
11
Spring Cloud之Finchley版学习(十八)-Zuul深入 作者: wencst 分类: JAVA,微服...
About Joyk
Aggregate valuable and interesting links.
Joyk means Joy of geeK