

Understanding Version Control with Git (Cisco DevNet)
source link: https://rowelldionicio.com/understanding-version-control-with-git-cisco-devnet/
Go to the source link to view the article. You can view the picture content, updated content and better typesetting reading experience. If the link is broken, please click the button below to view the snapshot at that time.
Understanding Version Control with Git (Cisco DevNet)
May 25, 2020 By Rowell Leave a Comment
Introduction to Version Control
Creating, saving, and tracking code can be very tedious if you’re constantly renaming them with different version numbers. As I dived into DevNet, I learned that this all could be handled more efficiently through Git and version control.
Git is an open source distributed version control system for tracking changes in source code.
After learning about Github, I’ve managed to play around with Git and learned that Git is used with applications such as Atom and Visual Studio Code.
With Git installed on my computer, I was able to set my Github credentials globally so I could begin updating my own Github repositories.
In this blog post, I’m going to review commonly used Git tasks for the purpose of the DevNet Associate exam.
Git Clone
git clone https://github.com/rowelldionicio/git-demo.gitWhen you want to collaborate on a new project you add the Git repository on your computer. You can download the tarball from Github or import the project using git clone.
Git is useful for the collaboration of a project to track the changes and added features.
By cloning a project, a new directory is created to hold a clone of the project you want to work on. I now have a localized version of the repository on my laptop. The main repository is centrally located on Github, for this example.
git clone https://github.com/rowell-test/git-test.git
Cloning into 'git-test'...
remote: Enumerating objects: 4, done.
remote: Counting objects: 100% (4/4), done.
remote: Compressing objects: 100% (3/3), done.
remote: Total 4 (delta 0), reused 0 (delta 0), pack-reused 0
Unpacking objects: 100% (4/4), done.
git add & git remove
Now that we created a repository, we want to add a new file. Let’s say we want to include a new Python script. I’ll create a new helloworld.py file which includes a simple print statement.
Let’s assume this is a new feature I’ve created for this project. I now want to share this with my collaborators. The file I just created is not tracked at all.
To include this document in the repository to be tracked we need to stage it.
This is done with the git add command.
git add helloworld.pyTo remove a file from staging you would do the opposite:
git remove helloworld.pyWe can look at the current status and see what changes have been made:
git status
On branch master
Your branch is up to date with 'origin/master'.

Changes to be committed:
  (use "git reset HEAD <file>..." to unstage)

    new file:   helloworld.py
git commit
The staging area is where we want to get ready to send our changes to the git repository.
To place our changes into this staging area we use the following command:
git commitWe could add a bit of context such as a comment to the commit statement:
git commit -m "Hope this works."
[master f5848bd] Hope this works.
 1 file changed, 1 insertion(+)
 create mode 100644 helloworld.py
git push & git pull
The changes made reside in your local repository. In order to apply these changes to the central repository, you must Push the changes to that location.
One thing to note is that you need privileges to push to a repository. In this example, I gave myself access to my test repository account.

The push is done by issuing the push command, git push:
git push
Enumerating objects: 4, done.
Counting objects: 100% (4/4), done.
Delta compression using up to 4 threads
Compressing objects: 100% (2/2), done.
Writing objects: 100% (3/3), 367 bytes | 367.00 KiB/s, done.
Total 3 (delta 0), reused 0 (delta 0)
To https://github.com/rowell-test/git-test.git
   b72dc81..f5848bd  master -> master
Performing a git pull allows you to download the latest version from the remote repository.
It may be that other collaborators have updated the source code so you would need to update your local copy.
In the following screenshot, the Github repository has two lines of code in the example file.
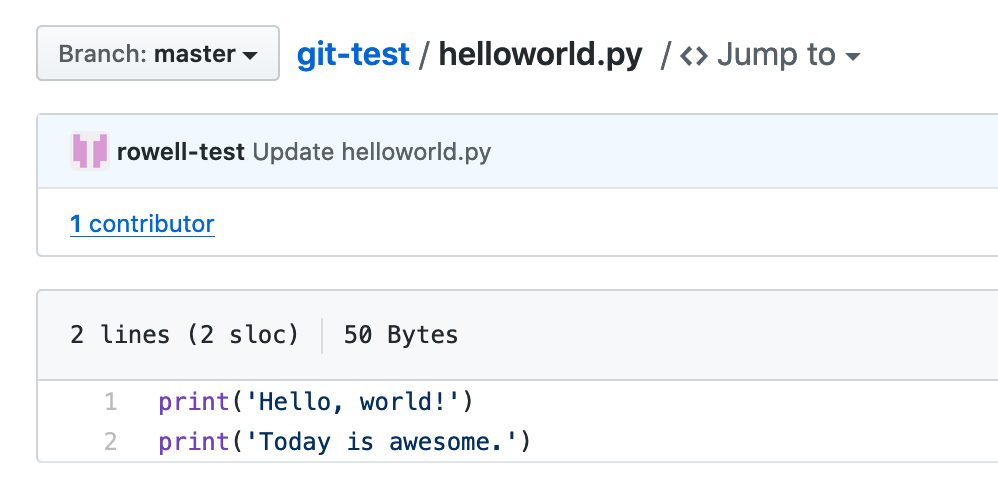
But my local file only has one line:
cat helloworld.py
print('Hello, world!')
So we will issue a git pull to grab the latest version.
git pull
remote: Enumerating objects: 5, done.
remote: Counting objects: 100% (5/5), done.
remote: Compressing objects: 100% (3/3), done.
remote: Total 3 (delta 1), reused 0 (delta 0), pack-reused 0
Unpacking objects: 100% (3/3), done.
From https://github.com/rowell-test/git-test
   f5848bd..b8e8f31  master     -> origin/master
Updating f5848bd..b8e8f31
Fast-forward
 helloworld.py | 1 +
 1 file changed, 1 insertion(+)
Now I take a look at what the file contains, which should match with the Github repository.
cat helloworld.py
print('Hello, world!')
print('Today is awesome.')
git branch
A branch is used to create a different version of the files in the repository. One example could be working on a new feature without affecting the master branch. The changes can be tracked on this specific branch.
We can see what branches exist with the git branch command:
git branch -a
* master
  remotes/origin/HEAD -> origin/master
  remotes/origin/master
To create a new branch we need to issue the same command with the name of our new branch:
git branch <name-of-branch>For example, I’m going to create a branch called function and list out the branches:
git branch function
git branch -a
  function
* master
  remotes/origin/HEAD -> origin/master
  remotes/origin/master
To move into that branch we use the checkout command:
git checkout function
Switched to branch 'function'
We can see that we are now in the function branch as indicated with the asterisk:
git branch -a
* function
  master
  remotes/origin/HEAD -> origin/master
  remotes/origin/master
git merge
Now that I’ve made changes to a branch, I want to merge this new feature with the master branch.
To do that, move back to the master branch by using git checkout:
git checkout master
Switched to branch 'master'
Your branch is up to date with 'origin/master'.
The master branch will not contain any of the changes from the created branch. To update the master branch, we merge the branch we were working on into the master branch.
git merge function
Updating b8e8f31..90eacd8
Fast-forward
 helloworld.py | 7 +++++--
 1 file changed, 5 insertions(+), 2 deletions(-)
git diff
What if you wanted to see what the changes were before doing commits and pushes? The git diff command helps visualize those changes.
I just added a single line to helloworld.py. Prior to committing my changes I ran a git diff:
git diff helloworld.py
diff – git a/helloworld.py b/helloworld.py
index 55ef248..805c40c 100644
- – a/helloworld.py
+++ b/helloworld.py
@@ -1,5 +1,6 @@
 def hello():
        print('Hello.')
        print('Is it me you're looking for?')
+       print('No way.')

 hello()
You can see where I’ve added a line of code indicated with the plus icon. The changes are compared to what is currently in the file prior to a git commit.
Recommend
About Joyk
Aggregate valuable and interesting links.
Joyk means Joy of geeK