

How to Integrate Face Stickers Into Your Apps With HUAWEI ML Kit
source link: https://dzone.com/articles/how-to-integrate-face-stickers-into-your-apps-with
Go to the source link to view the article. You can view the picture content, updated content and better typesetting reading experience. If the link is broken, please click the button below to view the snapshot at that time.
How to Integrate Face Stickers Into Your Apps With HUAWEI ML Kit
in this tutorial, we learn how to use a machine learning kit to create virtual stickers that stay on an object in motion in your camera.
Join the DZone community and get the full member experience.
Join For FreeIntroduction
Nowadays, you’ll see cute and funny face stickers everywhere. They’re not only used in camera apps, but also in social media and entertainment apps. In this post, I'm going to show you how to create a 2D sticker using HUAWEI ML Kit. We’ll share the development process for 3D stickers soon, so keep an eye out!
Scenarios
Apps that are used to take and edit photos, such as cameras and social media apps (TikTok, Weibo, and WeChat, etc.), often offer a range of stickers which can be used to customize images. With these stickers, users can create content which is more engaging and shareable.
Preparations
Add the Huawei Maven Repository to the Project-Level build.gradle File
Open the build.gradle file in the root directory of your Android Studio project.
Add the Maven repository address.
buildscript {
{
maven {url 'http://developer.huawei.com/repo/'}
}
}
allprojects {
repositories {
maven { url 'http://developer.huawei.com/repo/'}
}
}
Add SDK Dependencies to the App-Level build.gradle File
xxxxxxxxxx
// Face detection SDK.
implementation 'com.huawei.hms:ml-computer-vision-face:2.0.1.300'
// Face detection model.
implementation 'com.huawei.hms:ml-computer-vision-face-shape-point-model:2.0.1.300'
Apply for Camera, Network Access, and Storage Permissions in the AndroidManifest.xml File
<!--Camera permission-->
<uses-feature android:name="android.hardware.camera" ></uses>
<uses-permission android:name="android.permission.CAMERA" ></uses>
<!--Write permission-->
<uses-permission android:name="android.permission.WRITE_EXTERNAL_STORAGE" ></uses>
<!--Read permission-->
<uses-permission android:name="android.permission.READ_EXTERNAL_STORAGE" ></uses>
Code Development
Set the Face Analyzer
xxxxxxxxxx
MLFaceAnalyzerSetting detectorOptions;
detectorOptions = new MLFaceAnalyzerSetting.Factory()
.setFeatureType(MLFaceAnalyzerSetting.TYPE_UNSUPPORT_FEATURES)
.setShapeType(MLFaceAnalyzerSetting.TYPE_SHAPES)
.allowTracing(MLFaceAnalyzerSetting.MODE_TRACING_FAST)
.create();
detector = MLAnalyzerFactory.getInstance().getFaceAnalyzer(detectorOptions);
Obtain Face Contour Points and Pass Them to the FacePointEngine
Use the camera callback to obtain camera frame data, then call the face analyzer to obtain face contour points, and pass the points to the FacePointEngine. This will allow the sticker filter to use them later.
xxxxxxxxxx
@Override
public void onPreviewFrame(final byte[] imgData, final Camera camera) {
int width = mPreviewWidth;
int height = mPreviewHeight;
long startTime = System.currentTimeMillis();
// Set the shooting directions of the front and rear cameras to be the same.
if (isFrontCamera()){
mOrientation = 0;
}else {
mOrientation = 2;
}
MLFrame.Property property =
new MLFrame.Property.Creator()
.setFormatType(ImageFormat.NV21)
.setWidth(width)
.setHeight(height)
.setQuadrant(mOrientation)
.create();
ByteBuffer data = ByteBuffer.wrap(imgData);
// Call the face analyzer API.
SparseArray<MLFace> faces =
detector.analyseFrame(MLFrame.fromByteBuffer(data,property));
// Determine whether face information is obtained.
if(faces.size()>0){
MLFace mLFace = faces.get(0);
EGLFace EGLFace = FacePointEngine.getInstance().getOneFace(0);
EGLFace.pitch = mLFace.getRotationAngleX();
EGLFace.yaw = mLFace.getRotationAngleY();
EGLFace.roll = mLFace.getRotationAngleZ() - 90;
if (isFrontCamera())
EGLFace.roll = -EGLFace.roll;
if (EGLFace.vertexPoints == null) {
EGLFace.vertexPoints = new PointF[131];
}
int index = 0;
// Obtain the coordinates of a user's face contour points and convert them to the floating point numbers in normalized coordinate system of OpenGL.
for (MLFaceShape contour : mLFace.getFaceShapeList()) {
if (contour == null) {
continue;
}
List<MLPosition> points = contour.getPoints();
for (int i = 0; i < points.size(); i++) {
MLPosition point = points.get(i);
float x = ( point.getY() / height) * 2 - 1;
float y = ( point.getX() / width ) * 2 - 1;
if (isFrontCamera())
x = -x;
PointF Point = new PointF(x,y);
EGLFace.vertexPoints[index] = Point;
index++;
}
}
// Insert a face object.
FacePointEngine.getInstance().putOneFace(0, EGLFace);
// Set the number of faces.
FacePointEngine.getInstance().setFaceSize(faces!= null ? faces.size() : 0);
}else{
FacePointEngine.getInstance().clearAll();
}
long endTime = System.currentTimeMillis();
Log.d("TAG","Face detect time: " + String.valueOf(endTime - startTime));
}
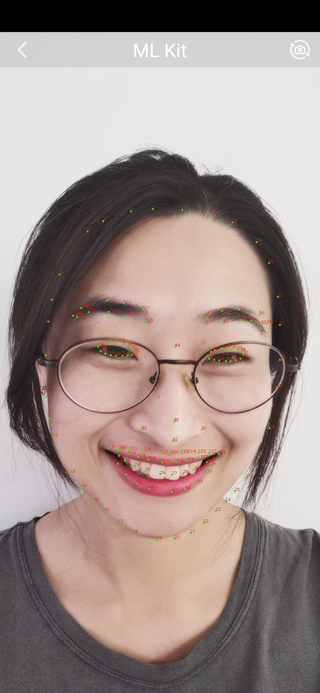
You can see the face contour points which the ML Kit API returns in the image below.
Sticker JSON Data Definition
xxxxxxxxxx
public class FaceStickerJson {
public int[] centerIndexList; // Center coordinate index list. If the list contains multiple indexes, these indexes are used to calculate the central point.
public float offsetX; // X-axis offset relative to the center coordinate of the sticker, in pixels.
public float offsetY; // Y-axis offset relative to the center coordinate of the sticker, in pixels.
public float baseScale; // Base scale factor of the sticker.
public int startIndex; // Face start index, which is used for computing the face width.
public int endIndex; // Face end index, which is used for computing the face width.
public int width; // Sticker width.
public int height; // Sticker height.
public int frames; // Number of sticker frames.
public int action; // Action. 0 indicates default display. This is used for processing the sticker action.
public String stickerName; // Sticker name, which is used for marking the folder or PNG file path.
public int duration; // Sticker frame displays interval.
public boolean stickerLooping; // Indicates whether to perform rendering in loops for the sticker.
public int maxCount; // Maximum number of rendering times.
...
}
Make a Cat Sticker
Create a JSON file of the cat sticker, and find the center point between the eyebrows (84) and the point on the tip of the nose (85) through the face index. Paste the cat's ears and nose, and then place the JSON file and the image in the assets directory.
xxxxxxxxxx
{
"stickerList": [{
"type": "sticker",
"centerIndexList": [84],
"offsetX": 0.0,
"offsetY": 0.0,
"baseScale": 1.3024,
"startIndex": 11,
"endIndex": 28,
"width": 495,
"height": 120,
"frames": 2,
"action": 0,
"stickerName": "nose",
"duration": 100,
"stickerLooping": 1,
"maxcount": 5
}, {
"type": "sticker",
"centerIndexList": [83],
"offsetX": 0.0,
"offsetY": -1.1834,
"baseScale": 1.3453,
"startIndex": 11,
"endIndex": 28,
"width": 454,
"height": 150,
"frames": 2,
"action": 0,
"stickerName": "ear",
"duration": 100,
"stickerLooping": 1,
"maxcount": 5
}]
}
Render the Sticker to a Texture
We use the GLSurfaceView to render the sticker to a texture, which is easier than using the TextureView. Instantiate the sticker filter using onSurfaceChanged, pass the sticker path, and start the camera.
xxxxxxxxxx
@Override
public void onSurfaceCreated(GL10 gl, EGLConfig config) {
GLES30.glClearColor(0.0f, 0.0f, 0.0f, 1.0f);
mTextures = new int[1];
mTextures[0] = OpenGLUtils.createOESTexture();
mSurfaceTexture = new SurfaceTexture(mTextures[0]);
mSurfaceTexture.setOnFrameAvailableListener(this);
// Pass the samplerExternalOES into the texture.
cameraFilter = new CameraFilter(this.context);
// Set the face sticker path in the assets directory.
String folderPath ="cat";
stickerFilter = new FaceStickerFilter(this.context,folderPath);
// Create a screen filter object.
screenFilter = new BaseFilter(this.context);
facePointsFilter = new FacePointsFilter(this.context);
mEGLCamera.openCamera();
}
Initialize the Sticker Filter in onSurfaceChanged
xxxxxxxxxx
@Override
public void onSurfaceChanged(GL10 gl, int width, int height) {
Log.d(TAG, "onSurfaceChanged. width: " + width + ", height: " + height);
int previewWidth = mEGLCamera.getPreviewWidth();
int previewHeight = mEGLCamera.getPreviewHeight();
if (width > height) {
setAspectRatio(previewWidth, previewHeight);
} else {
setAspectRatio(previewHeight, previewWidth);
}
// Set the image size, create a FrameBuffer, and set the display size.
cameraFilter.onInputSizeChanged(previewWidth, previewHeight);
cameraFilter.initFrameBuffer(previewWidth, previewHeight);
cameraFilter.onDisplaySizeChanged(width, height);
stickerFilter.onInputSizeChanged(previewHeight, previewWidth);
stickerFilter.initFrameBuffer(previewHeight, previewWidth);
stickerFilter.onDisplaySizeChanged(width, height);
screenFilter.onInputSizeChanged(previewWidth, previewHeight);
screenFilter.initFrameBuffer(previewWidth, previewHeight);
screenFilter.onDisplaySizeChanged(width, height);
facePointsFilter.onInputSizeChanged(previewHeight, previewWidth);
facePointsFilter.onDisplaySizeChanged(width, height);
mEGLCamera.startPreview(mSurfaceTexture);
}
Draw the Sticker on the Screen Using onDrawFrame
xxxxxxxxxx
@Override
public void onDrawFrame(GL10 gl) {
int textureId;
// Clear the screen and depth buffer.
GLES30.glClear(GLES30.GL_COLOR_BUFFER_BIT | GLES30.GL_DEPTH_BUFFER_BIT);
// Update a texture image.
mSurfaceTexture.updateTexImage();
// Obtain the SurfaceTexture transform matrix.
mSurfaceTexture.getTransformMatrix(mMatrix);
// Set the camera display transform matrix.
cameraFilter.setTextureTransformMatrix(mMatrix);
// Draw the camera texture.
textureId = cameraFilter.drawFrameBuffer(mTextures[0],mVertexBuffer,mTextureBuffer);
// Draw the sticker texture.
textureId = stickerFilter.drawFrameBuffer(textureId,mVertexBuffer,mTextureBuffer);
// Draw on the screen.
screenFilter.drawFrame(textureId , mDisplayVertexBuffer, mDisplayTextureBuffer);
if(drawFacePoints){
facePointsFilter.drawFrame(textureId, mDisplayVertexBuffer, mDisplayTextureBuffer);
}
}
And that's it, your face sticker is good to go.
Let's see it in action!

Learn More
For more information, please visit HUAWEI Developers.
For detailed instructions, please visit Development Guide.
You can join the HMS Core developer discussion on Reddit.
You can download the demo and sample code from GitHub.
To solve integration problems, please go to Stack Overflow.
Opinions expressed by DZone contributors are their own.
Recommend
About Joyk
Aggregate valuable and interesting links.
Joyk means Joy of geeK