

RocketMQ源码分析之服务发现
source link: https://zhuanlan.zhihu.com/p/57703136
Go to the source link to view the article. You can view the picture content, updated content and better typesetting reading experience. If the link is broken, please click the button below to view the snapshot at that time.
RocketMQ源码分析之服务发现
一:前言
何为服务发现?简单点说,就是通过一个名字,能够找到服务的通信地址。举个例子,我们平时打开浏览器进行上网,输入网址,浏览器向DNS服务器发起请求进行DNS解析,DNS服务器返回网址对应的服务器IP,浏览器根据服务器IP进行连接,这就是简单的服务发现。
二:RocketMQ中的服务发现
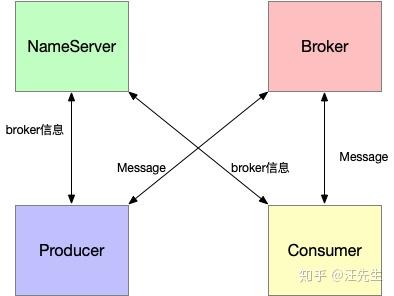
讨论RocketMQ的服务发现之前,首先需要明确几个角色。
NameSrv: 注册中心
Broker: 消息服务器
Producer: 消息生产者
Consumer: 消息消费者
RocketMQ没有像Kafka一样采用Zookeeper作为服务的注册中心,而是自研了NameSrv,NameSrv不像Zookeepr一样有Master / Slave的概念,每个NameSrv都是无关联的节点。
当消息服务器Broker启动后,会将自己的地址和名字等信息,注册到所有的NameSrv中。
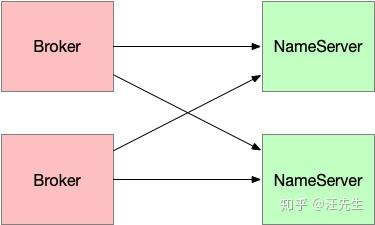 Broker注册
当Producer和Consumer启动后,会主动连接NameServer,获取可用的Broker列表,并选取Broker进行连接,进行消息的发送与拉取。
三:源码分析
3.1 服务注册
BrokerStartup 负责了Broker的启动,其中的主方法main()即为整个消息服务器的入口函数。
    public static void main(String[] args) {
        start(createBrokerController(args));
    }
这里主要分为两步:
1:创建BrokerController,用来管理Broker节点。
2:启动BrokerController。
BrokerController的创建过程主要是分析配置信息,如 NameSrv集群的地址表、Broker的角色信息(Master / Slave)等,并进行初始化。
final BrokerController controller = new BrokerController(
                brokerConfig,
                nettyServerConfig,
                nettyClientConfig,
                messageStoreConfig);
服务注册主要在第二步,即 BrokerController的start()方法中,这个方法顾名思义,就是用来进行启动各种服务的。
    public void start() throws Exception {
        if (this.messageStore != null) {
            this.messageStore.start();
        }

        ......

        this.registerBrokerAll(true, false, true);

        this.scheduledExecutorService.scheduleAtFixedRate(new Runnable() {

            @Override
            public void run() {
                try {
                    BrokerController.this.registerBrokerAll(true, false, brokerConfig.isForceRegister());
                } catch (Throwable e) {
                    log.error("registerBrokerAll Exception", e);
                }
            }
        }, 1000 * 10, Math.max(10000, Math.min(brokerConfig.getRegisterNameServerPeriod(), 60000)), TimeUnit.MILLISECONDS);

        ......
    }
这里我们重点要说的是服务注册,所以上面省略了很多代码,重点关注注册流程就可以了。
start()方法中调用了registerBrokerAll(),该方法就是用来进行向所有的NameSrv注册Broker自身信息的。
细心的读者可能会发现,这里在调用了registerBrokerAll()后,又开启了一个定时任务,周期性的重复调用registerBrokerAll(),这其实就是Broker在定期向NameSrv发送心跳包,NameSrv会每隔一段时间扫一遍broker列表,剔除长时间没发送心跳包的Broker。
registerBrokerAll()会调用到doRegisterBrokerAll(),这里可以看见Broker向NameSrv注册了哪些信息,如Broker节点地址、Name、id、topic等信息。
private void doRegisterBrokerAll(boolean checkOrderConfig, boolean oneway,
        TopicConfigSerializeWrapper topicConfigWrapper) {
        List<RegisterBrokerResult> registerBrokerResultList = this.brokerOuterAPI.registerBrokerAll(
            this.brokerConfig.getBrokerClusterName(),
            this.getBrokerAddr(),
            this.brokerConfig.getBrokerName(),
            this.brokerConfig.getBrokerId(),
            this.getHAServerAddr(),
            topicConfigWrapper,
            this.filterServerManager.buildNewFilterServerList(),
            oneway,
            this.brokerConfig.getRegisterBrokerTimeoutMills(),
            this.brokerConfig.isCompressedRegister());

       ......
    }
this.brokerOuterAPI.registerBrokerAll()内部,就是封装请求头,然后遍历NameSrv列表,向每个NameSrv发起注册请求。
    public List<RegisterBrokerResult> registerBrokerAll(
        final String clusterName,
        final String brokerAddr,
        final String brokerName,
        final long brokerId,
        final String haServerAddr,
        final TopicConfigSerializeWrapper topicConfigWrapper,
        final List<String> filterServerList,
        final boolean oneway,
        final int timeoutMills,
        final boolean compressed) {

        final List<RegisterBrokerResult> registerBrokerResultList = Lists.newArrayList();
        List<String> nameServerAddressList = this.remotingClient.getNameServerAddressList();
        if (nameServerAddressList != null && nameServerAddressList.size() > 0) {

            final RegisterBrokerRequestHeader requestHeader = new RegisterBrokerRequestHeader();
            requestHeader.setBrokerAddr(brokerAddr);
            requestHeader.setBrokerId(brokerId);
            requestHeader.setBrokerName(brokerName);
            requestHeader.setClusterName(clusterName);
            requestHeader.setHaServerAddr(haServerAddr);
            requestHeader.setCompressed(compressed);

            RegisterBrokerBody requestBody = new RegisterBrokerBody();
            requestBody.setTopicConfigSerializeWrapper(topicConfigWrapper);
            requestBody.setFilterServerList(filterServerList);
            final byte[] body = requestBody.encode(compressed);
            final int bodyCrc32 = UtilAll.crc32(body);
            requestHeader.setBodyCrc32(bodyCrc32);
            final CountDownLatch countDownLatch = new CountDownLatch(nameServerAddressList.size());
            for (final String namesrvAddr : nameServerAddressList) {
                brokerOuterExecutor.execute(new Runnable() {
                    @Override
                    public void run() {
                        try {
                            RegisterBrokerResult result = registerBroker(namesrvAddr,oneway, timeoutMills,requestHeader,body);
                            if (result != null) {
                                registerBrokerResultList.add(result);
                            }

                            log.info("register broker to name server {} OK", namesrvAddr);
                        } catch (Exception e) {
                            log.warn("registerBroker Exception, {}", namesrvAddr, e);
                        } finally {
                            countDownLatch.countDown();
                        }
                    }
                });
            }

            try {
                countDownLatch.await(timeoutMills, TimeUnit.MILLISECONDS);
            } catch (InterruptedException e) {
            }
        }

        return registerBrokerResultList;
    }
下面这句便是发起真正的网络请求:
RegisterBrokerResult result = registerBroker(namesrvAddr,oneway, timeoutMills,requestHeader,body);顺便看下实现:
   private RegisterBrokerResult registerBroker(
        final String namesrvAddr,
        final boolean oneway,
        final int timeoutMills,
        final RegisterBrokerRequestHeader requestHeader,
        final byte[] body
    ) throws RemotingCommandException, MQBrokerException, RemotingConnectException, RemotingSendRequestException, RemotingTimeoutException,
        InterruptedException {
        RemotingCommand request = RemotingCommand.createRequestCommand(RequestCode.REGISTER_BROKER, requestHeader);
        request.setBody(body);

        if (oneway) {
            try {
                this.remotingClient.invokeOneway(namesrvAddr, request, timeoutMills);
            } catch (RemotingTooMuchRequestException e) {
                // Ignore
            }
            return null;
        }

        RemotingCommand response = this.remotingClient.invokeSync(namesrvAddr, request, timeoutMills);
        assert response != null;
        switch (response.getCode()) {
            case ResponseCode.SUCCESS: {
                RegisterBrokerResponseHeader responseHeader =
                    (RegisterBrokerResponseHeader) response.decodeCommandCustomHeader(RegisterBrokerResponseHeader.class);
                RegisterBrokerResult result = new RegisterBrokerResult();
                result.setMasterAddr(responseHeader.getMasterAddr());
                result.setHaServerAddr(responseHeader.getHaServerAddr());
                if (response.getBody() != null) {
                    result.setKvTable(KVTable.decode(response.getBody(), KVTable.class));
                }
                return result;
            }
            default:
                break;
        }

        throw new MQBrokerException(response.getCode(), response.getRemark());
    }
RocketMQ 的网络请求是基于Netty库的,RocketMQ 基于 Netty 封装了 NettyRemotingClient,上面的代码就是调用了 NettyRemotingClient,向NameSrv连接地址发起网络请求。
当 NameSrv收到来自Broker的注册请求后,会触发 RouteInfoManager 的 registerBroker(),将Broker信息存放起来:
    public RegisterBrokerResult registerBroker(
        final String clusterName,
        final String brokerAddr,
        final String brokerName,
        final long brokerId,
        final String haServerAddr,
        final TopicConfigSerializeWrapper topicConfigWrapper,
        final List<String> filterServerList,
        final Channel channel) {
        RegisterBrokerResult result = new RegisterBrokerResult();
        try {
            try {
                this.lock.writeLock().lockInterruptibly();

                Set<String> brokerNames = this.clusterAddrTable.get(clusterName);
                if (null == brokerNames) {
                    brokerNames = new HashSet<String>();
                    this.clusterAddrTable.put(clusterName, brokerNames);
                }
                brokerNames.add(brokerName);

                boolean registerFirst = false;

                BrokerData brokerData = this.brokerAddrTable.get(brokerName);
                if (null == brokerData) {
                    registerFirst = true;
                    brokerData = new BrokerData(clusterName, brokerName, new HashMap<Long, String>());
                    this.brokerAddrTable.put(brokerName, brokerData);
                }
                String oldAddr = brokerData.getBrokerAddrs().put(brokerId, brokerAddr);
                registerFirst = registerFirst || (null == oldAddr);

                if (null != topicConfigWrapper
                    && MixAll.MASTER_ID == brokerId) {
                    if (this.isBrokerTopicConfigChanged(brokerAddr, topicConfigWrapper.getDataVersion())
                        || registerFirst) {
                        ConcurrentMap<String, TopicConfig> tcTable =
                            topicConfigWrapper.getTopicConfigTable();
                        if (tcTable != null) {
                            for (Map.Entry<String, TopicConfig> entry : tcTable.entrySet()) {
                                this.createAndUpdateQueueData(brokerName, entry.getValue());
                            }
                        }
                    }
                }

                BrokerLiveInfo prevBrokerLiveInfo = this.brokerLiveTable.put(brokerAddr,
                    new BrokerLiveInfo(
                        System.currentTimeMillis(),
                        topicConfigWrapper.getDataVersion(),
                        channel,
                        haServerAddr));
                if (null == prevBrokerLiveInfo) {
                    log.info("new broker registered, {} HAServer: {}", brokerAddr, haServerAddr);
                }

                if (filterServerList != null) {
                    if (filterServerList.isEmpty()) {
                        this.filterServerTable.remove(brokerAddr);
                    } else {
                        this.filterServerTable.put(brokerAddr, filterServerList);
                    }
                }

                if (MixAll.MASTER_ID != brokerId) {
                    String masterAddr = brokerData.getBrokerAddrs().get(MixAll.MASTER_ID);
                    if (masterAddr != null) {
                        BrokerLiveInfo brokerLiveInfo = this.brokerLiveTable.get(masterAddr);
                        if (brokerLiveInfo != null) {
                            result.setHaServerAddr(brokerLiveInfo.getHaServerAddr());
                            result.setMasterAddr(masterAddr);
                        }
                    }
                }
            } finally {
                this.lock.writeLock().unlock();
            }
        } catch (Exception e) {
            log.error("registerBroker Exception", e);
        }

        return result;
    }
需要注意的是,上面这段代码用了读写锁,当写入Broker信息的时候进行了写锁,保证了Broker信息并发写时的正确性。
3.2 服务发现
启动一个生产者很简单,代码如下:
 DefaultMQProducer producer = new DefaultMQProducer("Producer");
 producer.setNamesrvAddr("127.0.0.1:9876");
 producer.start();
上面先告知Producer NameSrv 的地址,紧接着调用了start()启动生产者。
Producer 的start()中会创建 MQClientInstance ,并调用其start()方法:
this.mQClientFactory = MQClientManager.getInstance().getAndCreateMQClientInstance(this.defaultMQProducer,
                        rpcHook);
mQClientFactory.start();
MQClientInstance start()后会调用startScheduledTask(),启动一些定时任务:
    private void startScheduledTask() {
        ......

        this.scheduledExecutorService.scheduleAtFixedRate(new Runnable() {

            @Override
            public void run() {
                try {
                    MQClientInstance.this.updateTopicRouteInfoFromNameServer();
                } catch (Exception e) {
                    log.error("ScheduledTask updateTopicRouteInfoFromNameServer exception", e);
                }
            }
        }, 10, this.clientConfig.getPollNameServerInteval(), TimeUnit.MILLISECONDS);

       ......
    }
上面的代码启动了一个定时任务,周期性的从NameSrv拉取路由信息。
我们直接看看updateTopicRouteInfoFromNameServer()吧。
    public void updateTopicRouteInfoFromNameServer() {
        Set<String> topicList = new HashSet<String>();
        ......
        // Producer
        {
            Iterator<Entry<String, MQProducerInner>> it = this.producerTable.entrySet().iterator();
            while (it.hasNext()) {
                Entry<String, MQProducerInner> entry = it.next();
                MQProducerInner impl = entry.getValue();
                if (impl != null) {
                    Set<String> lst = impl.getPublishTopicList();
                    topicList.addAll(lst);
                }
            }
        }

        for (String topic : topicList) {
            this.updateTopicRouteInfoFromNameServer(topic);
        }
    }
上面先从生产者中收集所要发送的主题:Topic,然后遍历Topic列表,调用updateTopicRouteInfoFromNameServer(topic)获取每个Topic的路由信息。下面来看看updateTopicRouteInfoFromNameServer(topic):
    public boolean updateTopicRouteInfoFromNameServer(final String topic, boolean isDefault,
                                                      DefaultMQProducer defaultMQProducer) {
        try {
            if (this.lockNamesrv.tryLock(LockTimeoutMillis, TimeUnit.MILLISECONDS)) {
                try {
                    TopicRouteData topicRouteData;
                    if (isDefault && defaultMQProducer != null) {
                        topicRouteData =
                                this.mQClientAPIImpl.getDefaultTopicRouteInfoFromNameServer(
                                        defaultMQProducer.getCreateTopicKey(), 1000 * 3);
                        if (topicRouteData != null) {
                            for (QueueData data : topicRouteData.getQueueDatas()) {
                                int queueNums =
                                        Math.min(defaultMQProducer.getDefaultTopicQueueNums(),
                                                data.getReadQueueNums());
                                data.setReadQueueNums(queueNums);
                                data.setWriteQueueNums(queueNums);
                            }
                        }
                    } else {
                        topicRouteData =
                                this.mQClientAPIImpl.getTopicRouteInfoFromNameServer(topic, 1000 * 3);
                    }
                    if (topicRouteData != null) {
                        TopicRouteData old = this.topicRouteTable.get(topic);
                        boolean changed = topicRouteDataIsChange(old, topicRouteData);
                        if (!changed) {
                            changed = this.isNeedUpdateTopicRouteInfo(topic);
                        } else {
                            log.info("the topic[{}] route info changed, odl[{}] ,new[{}]", topic, old,
                                    topicRouteData);
                        }

                        if (changed) {
                            TopicRouteData cloneTopicRouteData = topicRouteData.cloneTopicRouteData();

                            for (BrokerData bd : topicRouteData.getBrokerDatas()) {
                                this.brokerAddrTable.put(bd.getBrokerName(), bd.getBrokerAddrs());
                            }

                            // Update Pub info
                            {
                                TopicPublishInfo publishInfo =
                                        topicRouteData2TopicPublishInfo(topic, topicRouteData);
                                publishInfo.setHaveTopicRouterInfo(true);
                                Iterator<Entry<String, MQProducerInner>> it =
                                        this.producerTable.entrySet().iterator();
                                while (it.hasNext()) {
                                    Entry<String, MQProducerInner> entry = it.next();
                                    MQProducerInner impl = entry.getValue();
                                    if (impl != null) {
                                        impl.updateTopicPublishInfo(topic, publishInfo);
                                    }
                                }
                            }

                            //Update sub info
                            {
                                Set<MessageQueue> subscribeInfo =
                                        topicRouteData2TopicSubscribeInfo(topic, topicRouteData);
                                Iterator<Entry<String, MQConsumerInner>> it =
                                        this.consumerTable.entrySet().iterator();
                                while (it.hasNext()) {
                                    Entry<String, MQConsumerInner> entry = it.next();
                                    MQConsumerInner impl = entry.getValue();
                                    if (impl != null) {
                                        impl.updateTopicSubscribeInfo(topic, subscribeInfo);
                                    }
                                }
                            }
                            log.info("topicRouteTable.put TopicRouteData[{}]", cloneTopicRouteData);
                            this.topicRouteTable.put(topic, cloneTopicRouteData);
                            return true;
                        }
                    } else {
                        log.warn(
                                "updateTopicRouteInfoFromNameServer, getTopicRouteInfoFromNameServer return null, Topic: {}",
                                topic);
                    }
                } catch (Exception e) {
                    if (!topic.startsWith(MixAll.RETRY_GROUP_TOPIC_PREFIX)
                            && !topic.equals(MixAll.DEFAULT_TOPIC)) {
                        log.warn("updateTopicRouteInfoFromNameServer Exception", e);
                    }
                } finally {
                    this.lockNamesrv.unlock();
                }
            } else {
                log.warn("updateTopicRouteInfoFromNameServer tryLock timeout {}ms", LockTimeoutMillis);
            }
        } catch (InterruptedException e) {
            log.warn("updateTopicRouteInfoFromNameServer Exception", e);
        }

        return false;
    }
这个方法主要就是向NameSrv发起请求,获取Topic对应的Broker路由信息,反序列化成TopicRouteData,并添加到topicRouteTable中。
TopicRouteData 结构如下:
public class TopicRouteData extends RemotingSerializable {
    private String orderTopicConf;
    private List<QueueData> queueDatas;
    private List<BrokerData> brokerDatas;
    private HashMap<String/* brokerAddr */, List<String>/* Filter Server */> filterServerTable;
}
可见 TopicRouteData 中保存了处理对应Topic的Broker列表和Queue列表。updateTopicRouteInfoFromNameServer()中拿到TopicRouteData后,还会遍历其中的Broker列表brokerDatas,保存到brokerAddrTable中。
到这里,生产者就已经成功从NameSrv获取到了Broker信息。
当生产者发送消息的时候,便会从brokerAddrTable中找到Broker地址,进行网络连接。
四:总结
RocketMQ的服务发现,就是通过NameSrv这个注册中心来实现的,所有的Broker信息及Topic路由信息都会注册到NameSrv中,而生产者和消费者只需要通过心跳,不断的从NameSrv更新路由信息即可。
对 RocketMQ 感兴趣的同学,如果觉得分析的还不错,别忘记点个关注 。后面的文章,我将和大家一起,继续剖析 RocketMQ 源码。
欢迎大家点个赞,关注下!
文章链接:
听说喜欢点关注的同学都长得帅
Recommend
About Joyk
Aggregate valuable and interesting links.
Joyk means Joy of geeK