

人脸识别系统的原理与实现:PNET训练数据预处理2
source link: https://blog.csdn.net/tyler_download/article/details/111644605
Go to the source link to view the article. You can view the picture content, updated content and better typesetting reading experience. If the link is broken, please click the button below to view the snapshot at that time.

人脸识别系统的原理与实现:PNET训练数据预处理2
上一节我们详细说明了如何为PNET生成用于训练的人脸图片,本节我们需要将上一节分割出的人脸图片存储成文件,相关代码如下:
import numpy as np
import cv2
from google.colab.patches import cv2_imshow
import os

#准备存储不同训练图片的路径
pos_save_dir = "/content/drive/MyDrive/my_mtcnn/12/positive"
part_save_dir  = "/content/drive/MyDrive/my_mtcnn/12/part"
neg_save_dir = "/content/drive/MyDrive/my_mtcnn/12/neg"
if not os.path.exists(pos_save_dir):
    os.mkdir(pos_save_dir)
if not os.path.exists(part_save_dir):
    os.mkdir(part_save_dir)
if not os.path.exists(neg_save_dir):
    os.mkdir(neg_save_dir)
接下来我们调用上一节描述的图片切割函数,将不同类别的训练图片存入相应路径:
from tqdm import tqdm
annotation_file_path = "/content/drive/MyDrive/WIDER_TRAIN_DATA/WIDER_train/wider_face_train.txt"
trainning_img_dir = "/content/drive/MyDrive/WIDER_TRAIN_DATA/WIDER_train/images/"
def  save_neg_trainning_data():
    with open(annotation_file_path, 'r') as f:
      annotations = f.readlines()  #读取文件中所有照片的路径及人脸区域信息
    num = len(annotations)
    print("total images:{}".format(num))
    n_idx = 0
    neg_annotation_path = os.path.join(neg_save_dir, "neg_12.txt")
    neg_annotation_file = open(neg_annotation_path, "w")
    for annotation in tqdm(annotations):
        img_path, face_boxes = get_img_boxes(annotation)
        img_path = os.path.join(trainning_img_dir, img_path)
        img = cv2.imread(os.path.join(trainning_img_dir, img_path))
        neg_boxes = create_neg_parts(img, face_boxes)

        for neg_box in neg_boxes:
          #注意选择的区域坐标首先是宽,然后是高,但对图片进行裁剪时首先是高然后是宽
          cropped_img = img[neg_box[1]:neg_box[3], neg_box[0]:neg_box[2],:]
          resized_img = cv2.resize(cropped_img, (12, 12), interpolation=cv2.INTER_LINEAR) #将图片缩小为12,12
          neg_trainning_file = os.path.join(neg_save_dir, "%s.jpg"%n_idx)
          cv2.imwrite(neg_trainning_file, resized_img)
          neg_annotation_file.write(neg_trainning_file + "0\n")
          n_idx += 1
        neg_overlapped_boxes = create_neg_overlapped_parts(img, face_boxes)
        for neg_overlapped_box in neg_overlapped_boxes:
            cropped_img = img[neg_overlapped_box[1]:neg_overlapped_box[3], neg_overlapped_box[0]:neg_overlapped_box[2],:]
            resized_img = cv2.resize(cropped_img, (12, 12), interpolation=cv2.INTER_LINEAR) #将图片缩小为12,12
            neg_trainning_file = os.path.join(neg_save_dir, "%s.jpg"%n_idx)
            cv2.imwrite(neg_trainning_file, resized_img)
            neg_annotation_file.write(neg_trainning_file + "0\n")
            n_idx += 1

save_neg_trainning_data()

from tqdm import tqdm
annotation_file_path = "/content/drive/MyDrive/WIDER_TRAIN_DATA/WIDER_train/wider_face_train.txt"
trainning_img_dir = "/content/drive/MyDrive/WIDER_TRAIN_DATA/WIDER_train/images/"
def  save_part_pos_trainning_data():
    with open(annotation_file_path, 'r') as f:
        annotations = f.readlines()  #读取文件中所有照片的路径及人脸区域信息
    num = len(annotations)
    part_annotation_path = os.path.join(part_save_dir, "part_12.txt")
    part_annotation_file = open(part_annotation_path, "w")
    pos_annotation_path = os.path.join(pos_save_dir, "pos_12.txt")
    pos_annotation_file = open(pos_annotation_path, "w")
    pos_idx = 0
    part_idx = 0
    for annotation in tqdm(annotations):
        img_path, face_boxes = get_img_boxes(annotation)
        img_path = os.path.join(trainning_img_dir, img_path)
        img = cv2.imread(os.path.join(trainning_img_dir, img_path))
        pos_boxes, pos_offset, part_boxes, part_offset = create_pos_part_box(img, face_boxes)
        for i in range(len(pos_boxes)):
            box = pos_boxes[i]
            offset_info = pos_offset[i]
            cropped_img = img[box[1]:box[3], box[0]:box[2], :]
            resized_img = cv2.resize(cropped_img, (12, 12), interpolation = cv2.INTER_LINEAR)
            pos_trainning_file = os.path.join(pos_save_dir, "%s.jpg"%pos_idx)
            cv2.imwrite(pos_trainning_file, resized_img)
            pos_annotation_file.write(pos_trainning_file + ' 1 %.2f %.2f %.2f %.2f\n'%(offset_info[0], offset_info[1], offset_info[2], offset_info[3]))
            pos_idx+=1
        for i in range(len(part_boxes)):
            box = part_boxes[i]
            cropped_img = img[box[1]:box[3], box[0]:box[2], :]
            resized_img = cv2.resize(cropped_img, (12, 12), interpolation = cv2.INTER_LINEAR)
            part_trainning_file = os.path.join(part_save_dir, "%s.jpg"%part_idx)
            cv2.imwrite(part_trainning_file, resized_img)
            part_annotation_file.write(part_trainning_file + ' -1 %.2f %.2f %.2f %.2f\n'%(offset_info[0], offset_info[1], offset_info[2], offset_info[3]))
            part_idx += 1

save_part_pos_trainning_data()
这部分代码执行时非常缓慢,总计需要两个小时左右,读者在运行时需要耐心等待。由于PNET在训练时除了要判断人脸范围外,还需要预测五个人脸关键点坐标,这些关键点对应两只眼睛,两边嘴角和中间鼻子,因此我们还需要相应的数据,这些训练数据来自于数据集:!Deep Convolutional Network Cascade for Facial Point Detection,数据中含有大量人脸图片,同时包含一个说明文档,文档中每一行描述一张图片的信息,其中包括图片对应路径,图片中人脸的范围以及五个关键点的坐标,相应数据集和对应说明文档下载路径为:链接: https://pan.baidu.com/s/1qc48io4RfXXL2hXuaeqMCg 密码: kkkf,我们看说明文档中的一条记录:
lfw_5590\Aaron_Eckhart_0001.jpg 84 161 92 169 106.250000 107.750000 146.750000 112.250000 125.250000 142.750000 105.250000 157.750000 139.750000 161.750000
其中第一部分“lfw_5590\Aaron_Eckhart_0001.jpg”对应所描述的图片路径,第二部分“84 161 92 169”对应人脸区域,注意该区域与我们前面数据所描述的区域不一样,其中(84, 92)对应左上角,(161, 169)对应右下角,最后10个数据对应5个关键点的坐标,将数据集解压后可以使用下面代码绘制出人脸区域和对应关键点:
#在调用后面人脸翻转和旋转代码时一定要先执行这里的代码一次
line = "lfw_5590\Aaron_Eckhart_0001.jpg 84 161 92 169 106.250000 107.750000 146.750000 112.250000 125.250000 142.750000 105.250000 157.750000 139.750000 161.750000"
components = line.split(' ')
img_path = os.path.join("/content/drive/MyDrive/WIDER_TRAIN_DATA/", components[0])
img_path = img_path.replace("\\", '/')
box = (components[1], components[2], components[3], components[4])
box = list(map(int, box))
#box = np.array(box, dtype=np.float32).reshape(-1, 4) #人脸框
landmark = np.zeros((5, 2)) #五个关键点,两个眼睛,两个嘴角,一个鼻子
for index in range(5):
  rv = (float(components[5+2*index]), float(components[5+2*index + 1]))
  landmark[index] = rv
img = cv2.imread(img_path)
top_left = (box[0], box[2])
bottom_right = (box[1], box[3])  #该数据集人脸框的坐标与原先数据集不一样
img = cv2.rectangle(img, top_left, bottom_right, (255,0,0), 1)
for point in landmark:
  img = cv2.circle(img, (int(point[0]), int(point[1])), radius = 1, color=(0, 0, 255), thickness = 1)
cv2_imshow(img)
上面代码执行后所得结果如下: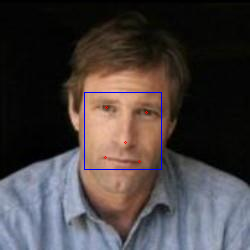
可以看到5个红点对应的就是5个关键点。这里还有一点需要强调,由于关键点坐标是相对于当前图片大小而言,但是为了训练PNET,我们需要将图片缩放为(12,12),由此关键点坐标将失效,解决办法是使用关键点坐标的相对值,也就是将关键点坐标转换为相对于人脸区域左上角坐标的偏移半分比,这样一来即使图片经过缩放,我们也可以通过百分比重新计算关键点坐标,相关转换代码如下:
class BBox:
    def  __init__(self, box):#box是人脸区域
        self.left = box[0]
        self.top = box[1]
        self.right = box[2]
        self.bottom = box[3]

        self.x = box[0]
        self.y = box[1]
        self.w = box[2] - box[0]
        self.h = box[3] - box[1]
    def  project(self, point):
      #point对应人脸区域内的一点,要将它的绝对坐标转换为相对于左上角的偏移比率
      x = (point[0] - self.x) / self.w
      y = (point[1] - self.y) / self.y
      return np.asarray([x,y])
    def  reproject(slef, point):
      #将相对偏移比率改为绝对坐标值
      x = self.x + self.w * point[0]
      y = self.y + self.h * point[1]
      return np.assarray([x,y])
    def  reprojectLandmark(self, landmark):
      #将特征点对应的偏移比率转为绝对坐标值
      p = np.zeros((len(landmark), 2))
      for i in range(len(landmark)):
          p[i] = self.reproject(landmark[i])
      return p
    def  projectLandmark(self, landmark):
      #将特征点对应的坐标值改为相对偏移比率
      p = np.zeros((len(landmark), 2))
      for i in range(len(landmark)):
          p[i] = self.project(landmark[i])
      return p
这里我们需要掌握两个人脸图像变换函数,分别是翻转和旋转,其实现如下:
def  flip(face , landmark): #将人脸图像翻转
    face_flipped_by_x = cv2.flip(face,1)
    #翻转后关键点的坐标也需要做相应变换
    landmark_ = np.asarray([(1-x, y) for (x,y) in landmark])
    landmark_[[0, 1]] = landmark_[[1, 0]]
    landmark_[[3, 4]] = landmark_[[4,3]]
    return (face_flipped_by_x, landmark_)

def  rotate(img, box, landmark, alpha):#对人脸图像旋转给定角度
    center = ((box.left + box.right) / 2, (box.top + box.bottom) / 2)
    rot_mat = cv2.getRotationMatrix2D(center, alpha, 1)
    img_rotated_by_alpha = cv2.warpAffine(img, rot_mat, (img.shape[1], img.shape[0]))
    #人脸旋转后对关键点也要做相应旋转
    landmark_ = np.asarray([(rot_mat[0][0] * x + rot_mat[0][1] * y + rot_mat[0][2],
                             rot_mat[1][0] * x + rot_mat[1][1] * y + rot_mat[1][2]) for (x,y) in landmark])
    face = img_rotated_by_alpha[box.top : box.bottom + 1, box.left:box.right+1]
    return (face, landmark_)
我们调用这两个函数看看它们所产生的效果,首先看看翻转效果,在执行下面代码前,记得一定要先执行一次上面绘制人脸的那一段代码一次:
#运行该段代码前需要执行前面绘制人脸和关键点的代码
face_flipped, landmark_flip = flip(img, landmark)
for point in landmark_flip:
  img = cv2.circle(face_flipped, (int(point[0]), int(point[1])), radius = 1, color=(0, 0, 255), thickness = 1)
cv2_imshow(img)
上面代码运行后结果如下所示: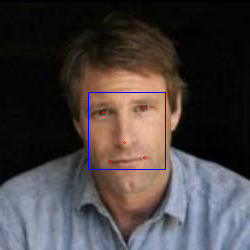
注意对比前面绘制的图像可以发现图中人脸变得向左边倾斜,而在翻转前人脸是向右边倾斜,接下来我们看看旋转效果:
#执行这段代码前记得运行前面绘制人脸图像的代码
bbox = (box[0], box[2], box[1], box[3])
b_box = BBox(bbox)
face_rotated, landmark_rotated = rotate(img, b_box, landmark, 50)
for point in landmark_rotated:
  img = cv2.circle(face_rotated, (int(point[0]), int(point[1])), radius = 1, color=(0, 0, 255), thickness = 1)
cv2_imshow(img)
代码运行后效果如下:
为什么需要做这些操作呢,这些手段叫数据增强,其目的是增加图片的多种形态,由此能训练网络更好的识别人脸。
现在我们将前面读取人脸区域和关键点坐标的代码封装到一个函数里:
def  getDataFromTxt(txt, data_path, with_landmark = True):
    with open(txt, 'r') as f:
      lines = f.readlines() #读取lwf数据集对应描述文件中的每一行
    result = []
    for line in lines:
        line = line.strip()
        components = line.split(' ')
        img_path = os.path.join(data_path, components[0]).replace("\\", '/')
        box = (componets[1], componets[2], componets[3], componets[4]) #人脸区域
        box = [float(_) for _ in box]
        box = list(map(int, box))
        if not with_landmark:
            result.append((img_path, BBox(box)))
            continue
        landmark = np.zeros((5, 2))
        for index in range(5):
            rv = (float(componets[5+ 2*index]), float(componets[5 + 2*index+1]))
            landmark[index] = rv
        result.append((img_path, BBox(box), landmark))
    return landmark
由于当前介绍的代码已经足够多,为了便于读者消化,我们暂时先停止,后面我们还需要在基于现在这些代码的基础上对数据集的图片进行加工处理。
Recommend
About Joyk
Aggregate valuable and interesting links.
Joyk means Joy of geeK