

Android 快速发布开源项目到jcenter
source link: https://blog.csdn.net/lmj623565791/article/details/51148825
Go to the source link to view the article. You can view the picture content, updated content and better typesetting reading experience. If the link is broken, please click the button below to view the snapshot at that time.
Android 快速发布开源项目到jcenter
转载请标明出处(请勿转载删除底部微博、微信等信息):
http://blog.csdn.net/lmj623565791/article/details/51148825;
本文出自:【张鸿洋的博客】
大家在很多时候都希望让自己的开源项目可以更方便的让用户去使用,那么对于Android平台,一个很好的方式就是上传到jcenter,然后使用时通过添加compile引用即可。
对于上传到jcenter,也不算技术类的文章,而且已经有很多较好的文章可以参考,写之前我也大致百度了一下。
目前很多文章都是以gradle-bintray-plugin这个插件做上传,多数文章的介绍都是针对普通的开源项目的(即不包含编译时注解相关)。那么对于用到编译时注解,因为涉及到多个module,上传可能会比较麻烦。
本文准备采用bintray-release这个插件,个人感觉比gradle-bintray-plugin要方便很多。
对于使用gradle-bintray-plugin的,我百度了下,可以参考这篇http://www.cnblogs.com/qianxudetianxia/p/4322331.html
So,本文的主要内容是:
- 使用
bintray-release发布一般项目到jcenter - 使用
bintray-release发布编译时注解项目到jcenter
一、普通项目上传到jcenter
ok,首先你应该有一个待上传的项目。
那么我们这里模拟一个简单的项目。
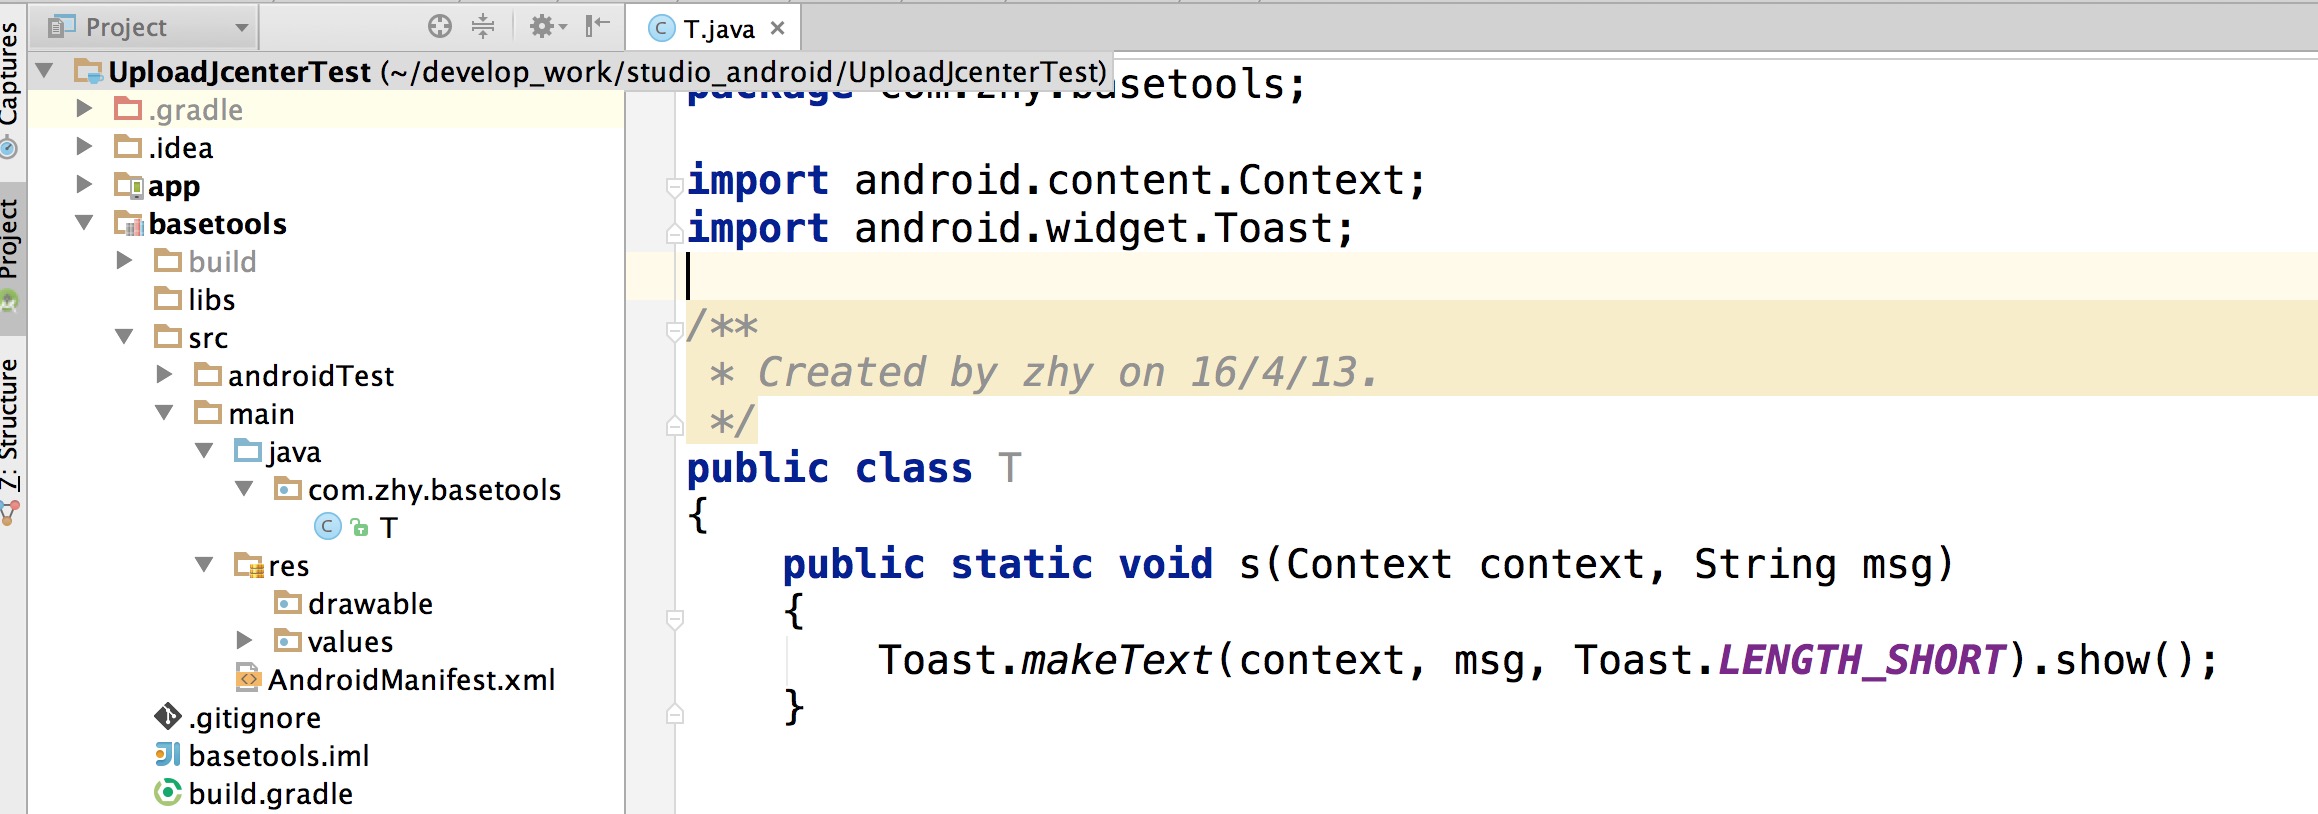
可以看到我们的basetools是个Android library,主要用来存放一些工具,我们现在要将其上传到jcenter。
那么,对于你,应该已经有了这样一个Android library,处于待上传的状态。
(1)注册bintray.com账号
为什么要注册这个账号呢,因为jcenter()属于bintray旗下的一个仓库。
我们的上传流程其实就是,从你的Androd Studio,到你的bintray 仓库,最后同步到jcenter仓库。
- 进入https://bintray.com/,注册账号。
- 注册完成后,需要邮箱激活;也可以选择第三方登录。
注册完成后,登录,这两步属于非职业玩家都能搞定的。
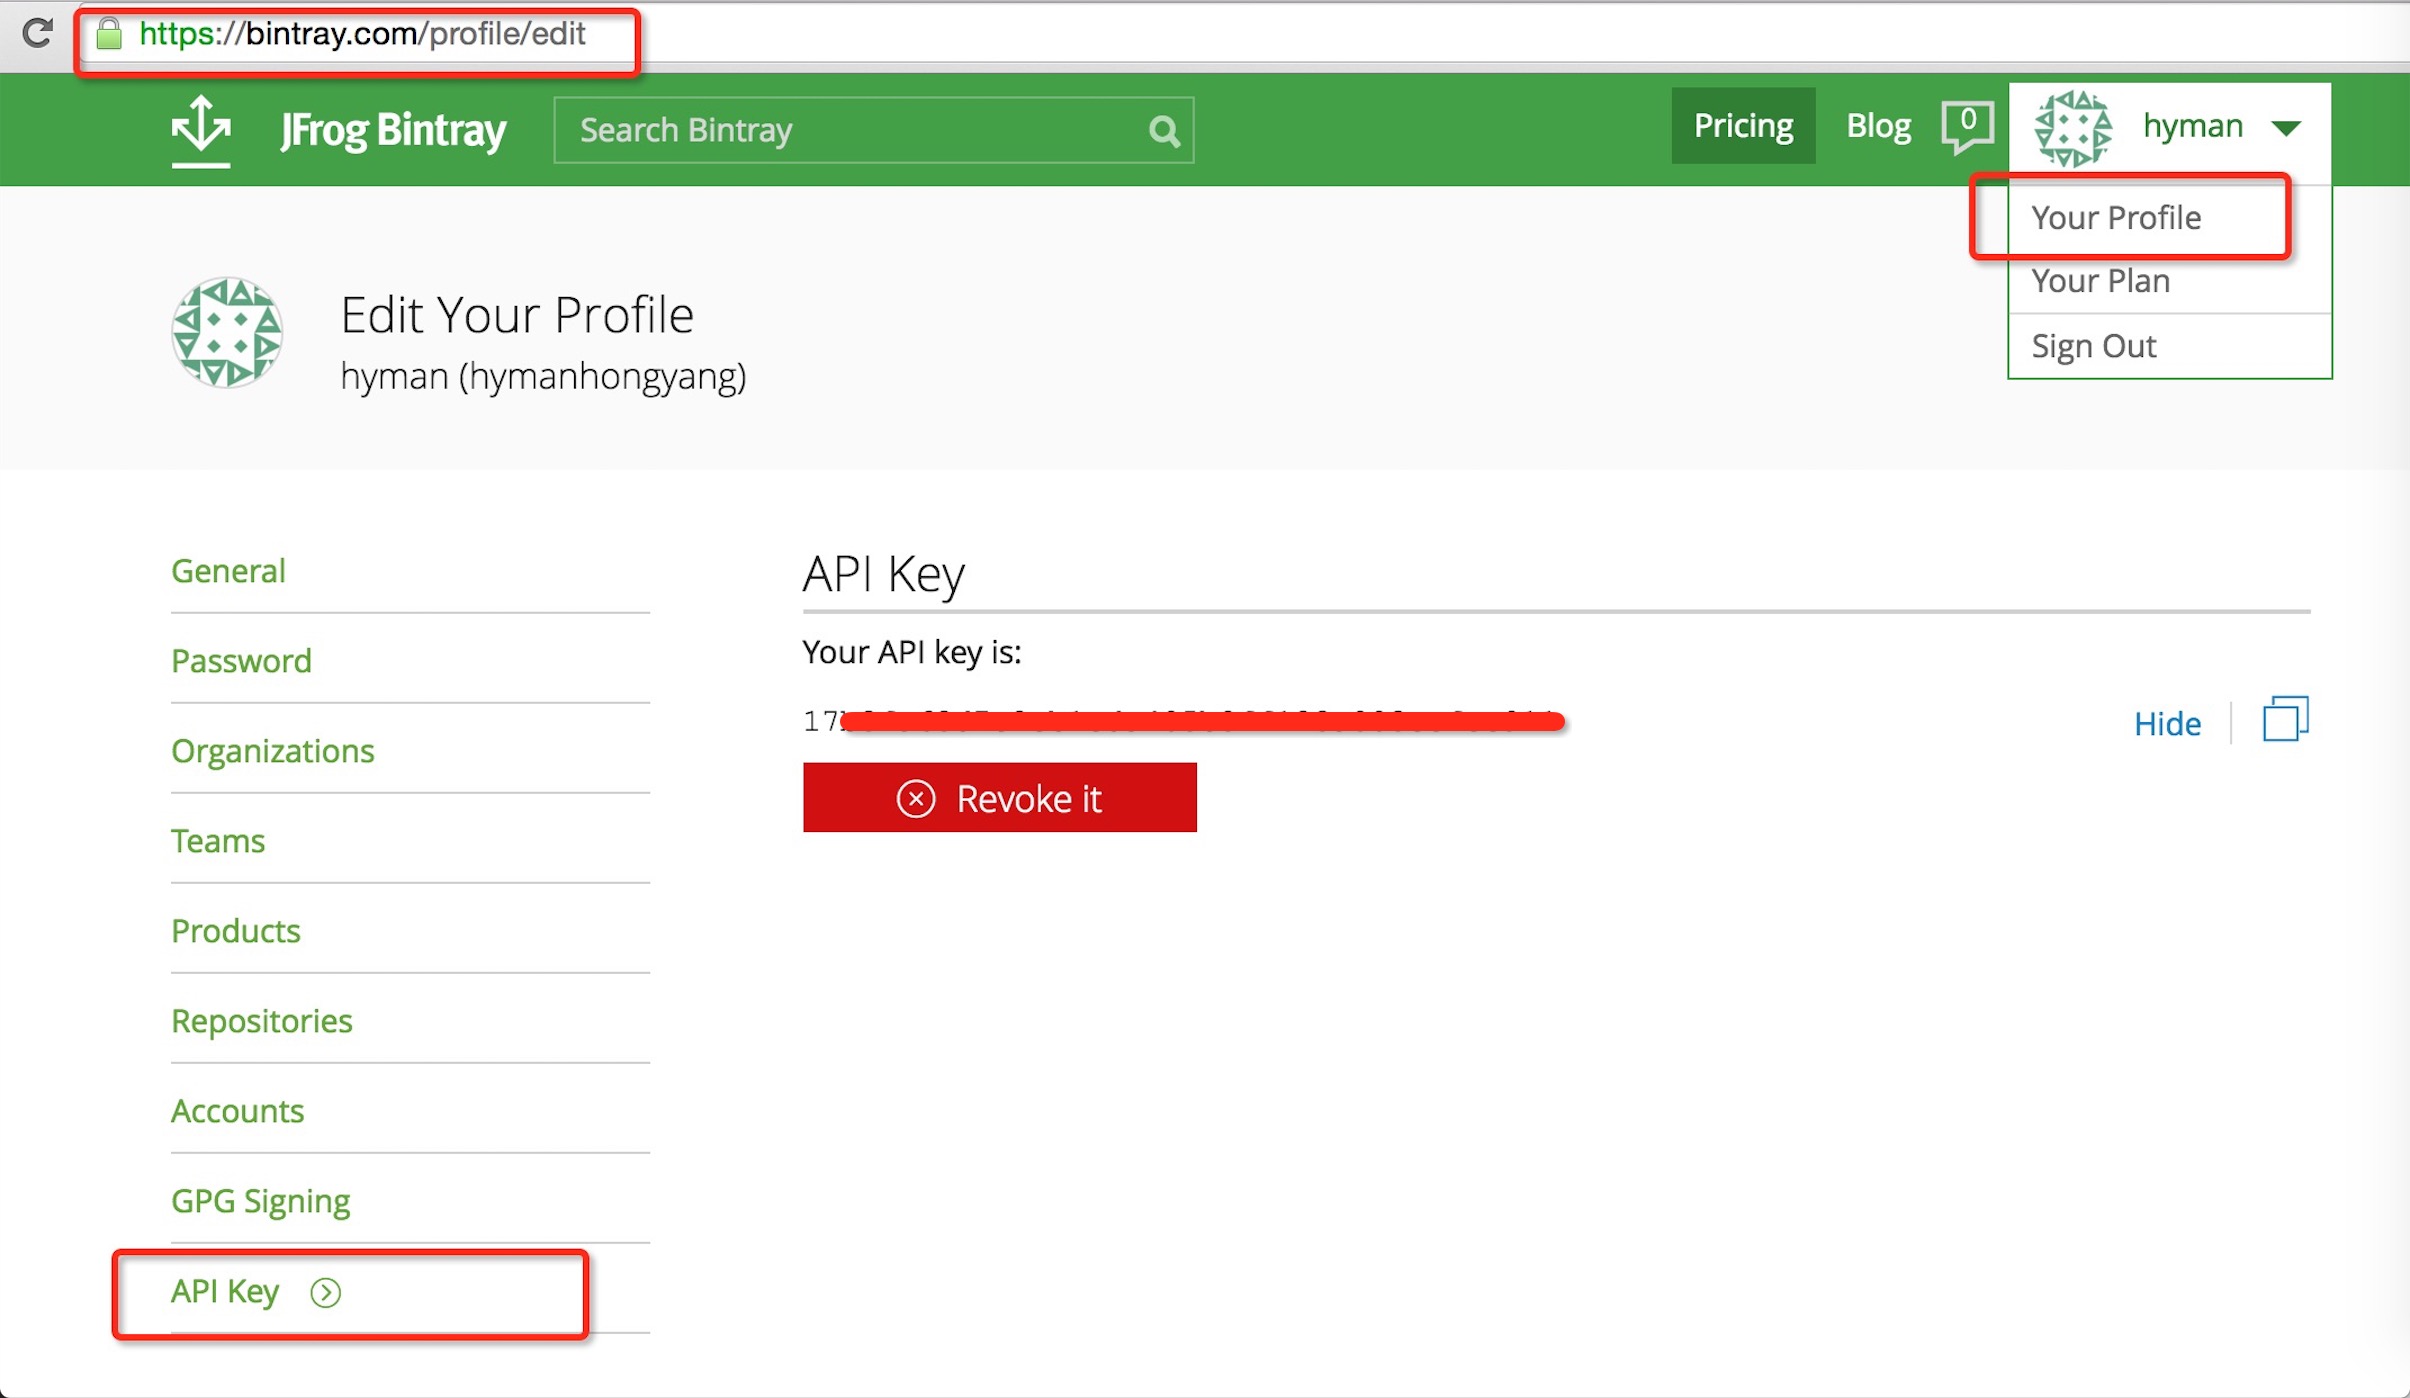
登陆后,你可以点击Your Profile->Edit然后就能看到上图的界面。
点击API Key,就可以看到你一段key字符串,把这个copy下放一边,一会上传要用。
(2)引入bintray-release
项目的build.gralde
在你的项目的build.gradle添加bintray-release的classpath,注意是项目的build.gradle,不是module的,针对文章开始的图即UploadJcenterTest/build.gradle。
buildscript {
    repositories {
        jcenter()
    }
    dependencies {
        classpath 'com.android.tools.build:gradle:1.2.3'
        classpath 'com.novoda:bintray-release:0.3.4'
    }
}
待上传moudle的build.gralde
来到你想要上传的module,针对文章开始的图即UploadJcenterTest/basetools/build.gradle。
apply plugin: 'com.android.library'
apply plugin: 'com.novoda.bintray-release'//添加

android {
  //保持不变
}

dependencies {
    //保持不变
}

//添加
publish {
    userOrg = 'hyman'//bintray.com用户名
    groupId = 'com.hyman'//jcenter上的路径
    artifactId = 'basetools'//项目名称
    publishVersion = '1.0.0'//版本号
    desc = 'Oh hi, this is a nice description for a project, right?'//描述,不重要
    website = 'https://github.com/hyman/basetools'//网站,不重要;尽量模拟github上的地址,例如我这样的;当然你有地址最好了
}
按照上面编写即可,细节有标识注释了,假设按照上述的编写,最终引入的方式为:
compile 'com.hyman:basetools:1.0.0
完成上面的配置后,就准备上传了。
上传很简单,执行下面的代码即可
 ./gradlew clean build bintrayUpload
 -PbintrayUser=hyman
 -PbintrayKey=xxxxxxxxxxxxxxxxxxxxxx
 -PdryRun=false
user就是用户名,key就是我们刚才的让你保存的key,dryRun是一个配置参数,当为true的时候,会运行所有的环节,但是不会上传。
ok,下面整理好上面的这段代码,运行即可。关于运行,你可以选择在Android Studio的Terminal面板进行,如下图。
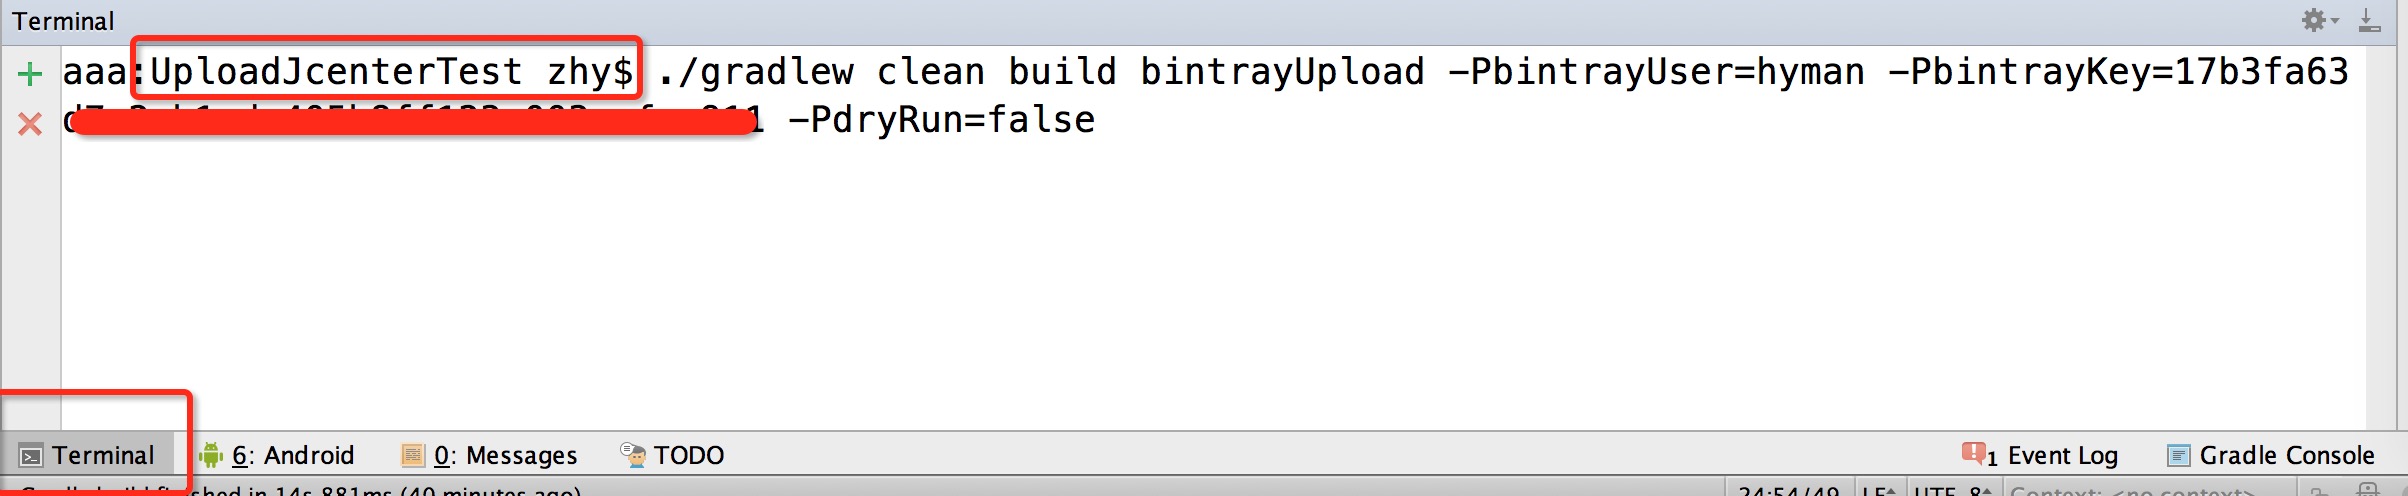
点击底部的Terminal即可,注意下你当前的路径是当前项目下,然后enter运行。
然后就是等待,当运行完成,看到BUILD SUCCESSFUL就没问题了,如果有什么问题呢,根据log排查下。
到此就上传完成了~~~
你可以访问https://bintray.com/你的用户名/maven,即可看到:

看到我们上传的项目了,你可以点击进去看该库的一些信息,但是注意此时还不能够直接被引用。
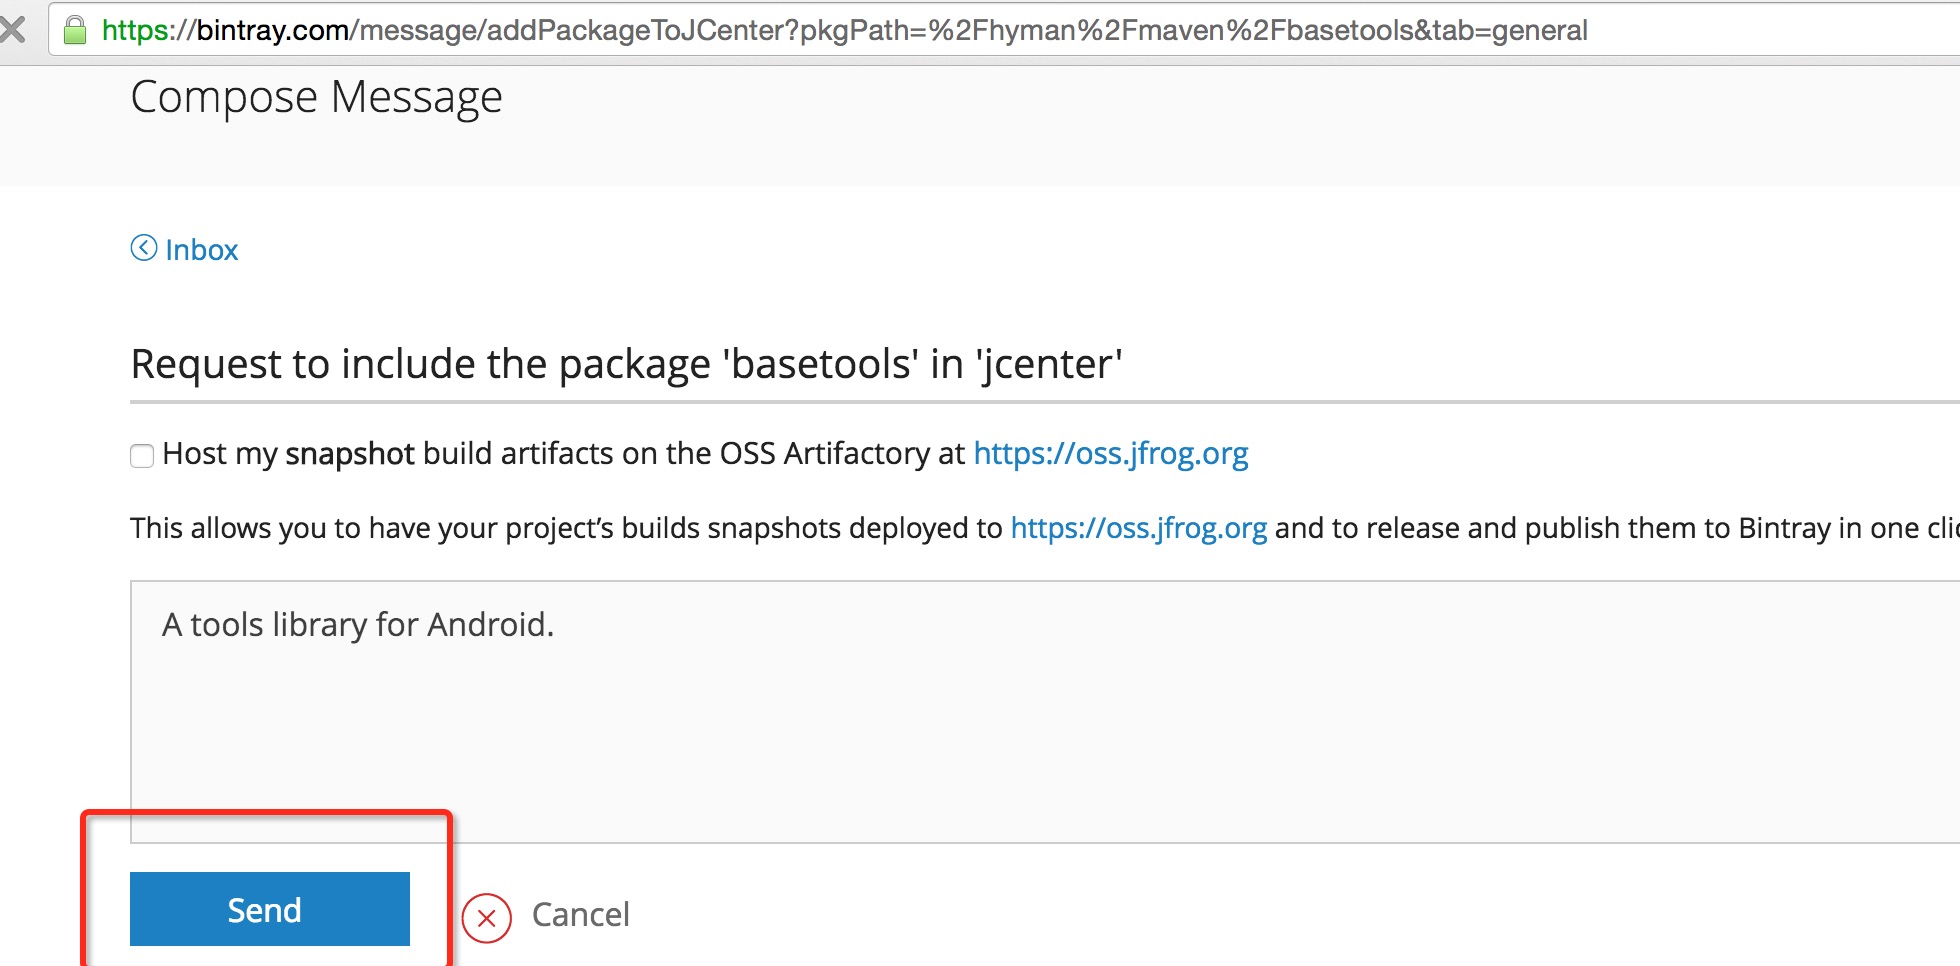
点击进去该库,按照下图,点击Add To jcenter
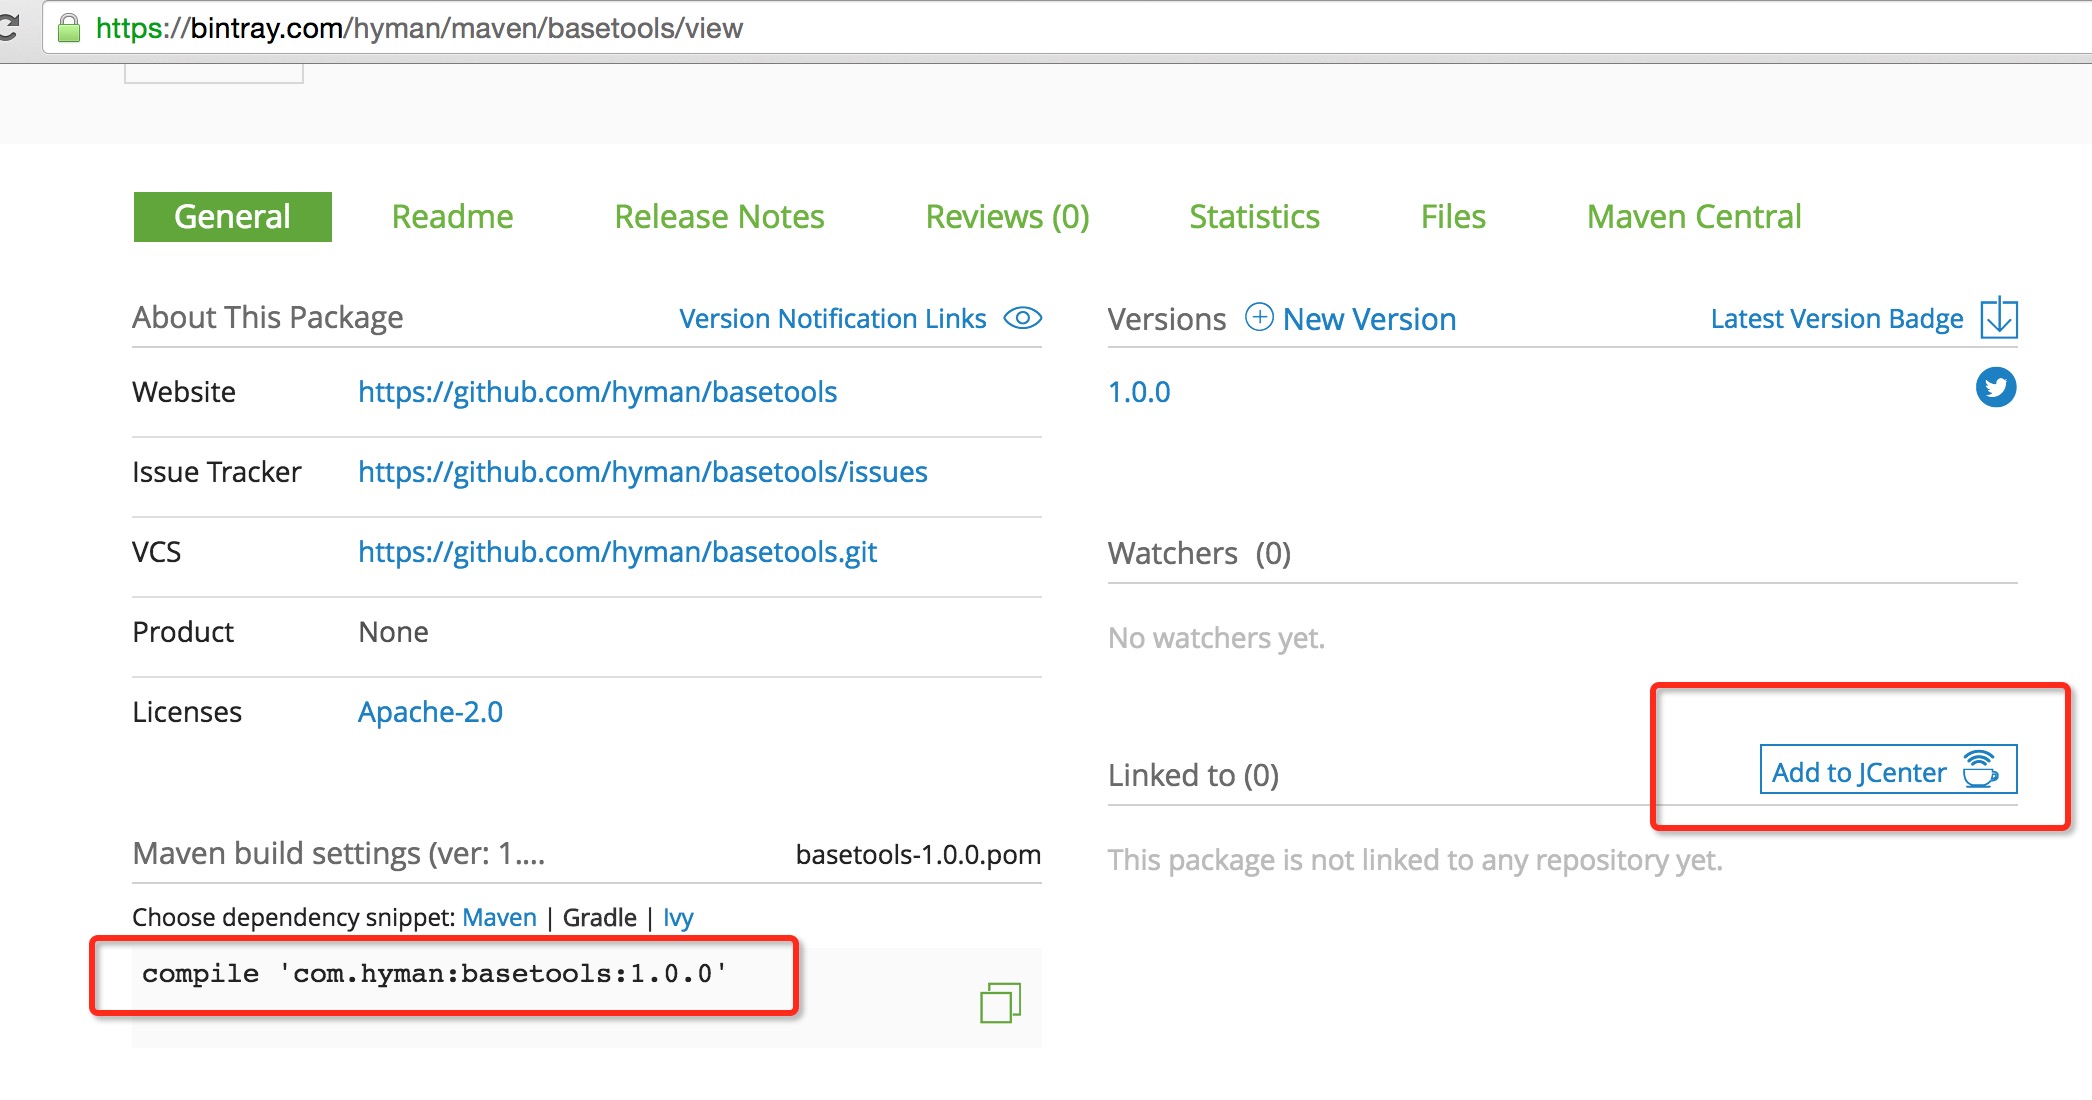
然后随便写一下对你该库的描述,然后点击发送就可以了。
ok,到此就结束了,不过目前还是不能直接引用的,你需要等待bintray的工作人员审核,审核通过会给你发送站内Message,并且Add to Jcenter那个按钮就小时了,此外你还可以根据你上传的groupId,访问该网站https://jcenter.bintray.com/你的groupId例如https://jcenter.bintray.com/com/hyman/
如果可以引用,则能看到如下:

最后总结下整个过程,其实非常简单:
- 引入bintray-release,在需要上传的module里面填写相关publish的信息
- 调用上传的命令
Add to Jcenter提交审核
基本都是步骤化的东西,真正需要我们填写的也就publish里面几个信息。
ok,接下来看上传编译时注解的项目。
二、编译时注解项目上传到jcenter
如果你暂时不需要这个需求,其实没必要往下看,因为并不属于技术类文章,了解这里有写,可以收藏下,遇到需求再回来看就好了。
其实也很简单,按照步骤做就好。
我们这里找一个项目作为演示。
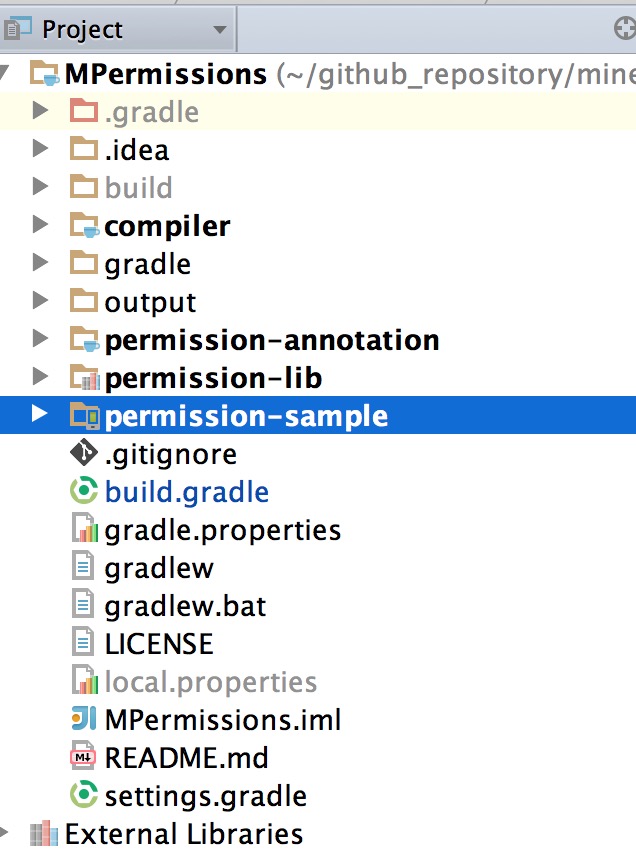
为什么说编译时注解的项目特殊呢?
因为它一般会涉及到多个moudle,比如上图,涉及到compilter、permission-annotation、permission-lib。
我们在上传时,这3个module都要进行上传,这里暂不涉及为啥会这么分module相关知识。
其实利用bintray-release上传的过程也很简单。
项目的build.gradle
首先针对项目的build.gradle,即图中MPermissions/build.gradle
buildscript {
    repositories {
        jcenter()
    }
    dependencies {
        classpath 'com.android.tools.build:gradle:1.2.3'
        classpath 'com.neenbedankt.gradle.plugins:android-apt:1.4'
        classpath 'com.novoda:bintray-release:0.3.4'//添加
    }
}

allprojects {
    repositories {
        jcenter()
    }
}

//添加
ext {
    userOrg = 'hongyangandroid'
    groupId = 'com.zhy'
    uploadName = 'MPermission'
    publishVersion = '1.0.1'
    desc = 'a easy API to use runtime permission for Android M '
    website = 'https://github.com/hongyangAndroid/MPermissions'
    licences = ['Apache-2.0']
}
只要关注添加的部分,底部的ext主要是为了上传多个module统一管理的。
module的build.gradle
剩下就是compilter、permission-annotation、permission-lib这三个module,这三个模块的处理其实是一致的:
- apply插件
- 填写publish信息
apply plugin: 'com.android.library'
apply plugin: 'bintray-release'//添加

android {
}

dependencies {

}

//添加
publish {
    artifactId = 'mpermission-api'
    userOrg = rootProject.userOrg
    groupId = rootProject.groupId
    uploadName = rootProject.uploadName
    publishVersion = rootProject.publishVersion
    desc = rootProject.description
    website = rootProject.website
    licences = rootProject.licences
}
3个模块的配置是一样的,唯一不同的就是publish中的artifactId,不同的module应该有它不同的名字。
对所有需要上传的module配置完成后,和上面一样,运行上传的命令即可。
 ./gradlew clean build bintrayUpload
 -PbintrayUser=hyman
 -PbintrayKey=xxxxxxxxxxxxxxxxxxxxxx
 -PdryRun=false
你可以选择在Android Studio的Terminal面板进行,如下图。
ok,然后就和上面普通项目的步骤一致了,去Add to Jcenter,之后等待。
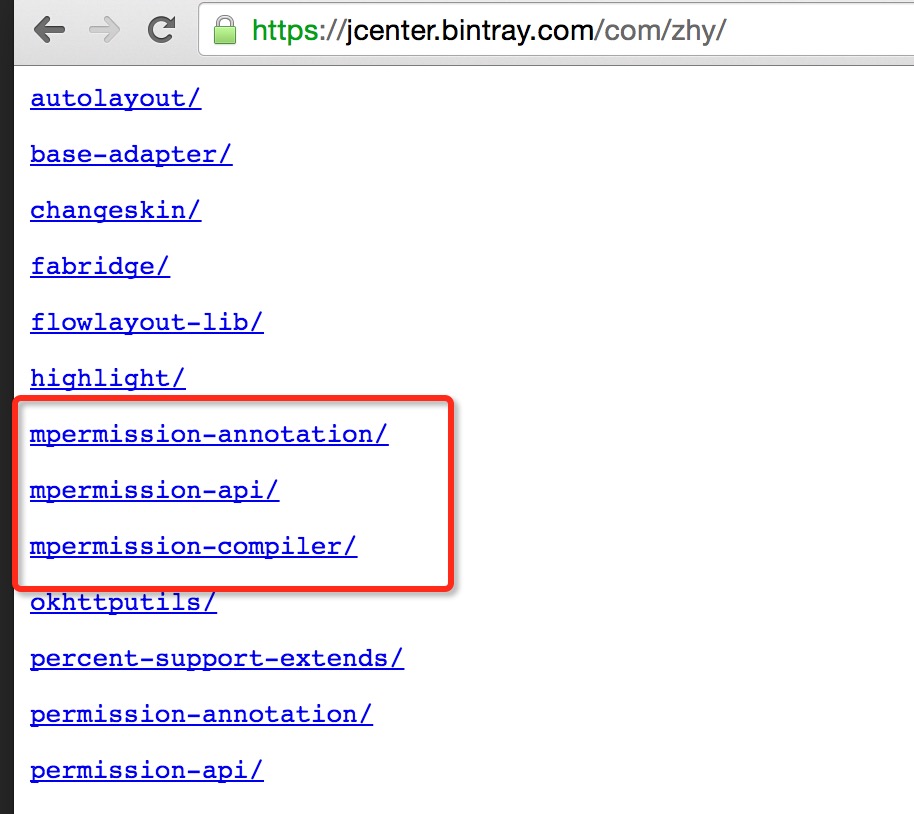
如果审核成功,你会发现3个module都会被同步到jcenter上,比如访问http://jcenter.bintray.com/com/zhy/:
在使用时,对于compiler需要引入apt的插件,大致类似如下用法:
apply plugin: ‘com.neenbedankt.android-apt’
dependencies {
apt ‘com.zhy:mpermission-compiler:1.0.0’
compile ‘com.zhy:mpermission-api:1.0.0’
}
ok,当然本文的重点在于上传,其他方面细节就不赘述了。
三、注意事项
(1)版本更新
我们上传完成后,肯定会涉及到更新问题,那么怎么更新呢?
publish {
    userOrg = 'hyman'//bintray.com用户名
    groupId = 'com.hyman'//jcenter上的路径
    artifactId = 'basetools'//项目名称
    publishVersion = '2.0.0'//修改版本号
    desc = 'Oh hi, this is a nice description for a project, right?'//描述,不重要
    website = 'https://github.com/hyman/basetools'
}
什么都不用动,唯独修改下版本号就可以了,修改完成,执行上传那段代码。
(2)你是windows系统
 gradlew clean build bintrayUpload
 -PbintrayUser=hyman
 -PbintrayKey=xxxxxxxxxxxxxxxxxxxxxx
-PdryRun=false前面的./就不要输入了,这属于比较基础的问题了。
(3)乱码问题
注释中有中文,可能会出现:编码GBK的不可映射字符
项目的build.gradle中添加:
 allprojects {
    tasks.withType(Javadoc) {
        options{
            encoding "UTF-8"
            charSet 'UTF-8'
            links "http://docs.oracle.com/javase/7/docs/api"
        }
    }
}
还有上传过程中的一些问题,确定你的用户名正确,偶尔需要科学上网。
那么如何利用bintray-release上传开源项目到jcenter就介绍完毕了,希望能够节省你的时间~
欢迎关注我的微博:
http://weibo.com/u/3165018720
关注微信公众号:hongyangAndroid
(欢迎关注,第一时间推送博文信息)

Recommend
About Joyk
Aggregate valuable and interesting links.
Joyk means Joy of geeK