

Extending MSBuild with custom command line tools, Part I – Console Errors
source link: https://stevedrivendevelopment.com/2017/01/09/extending-msbuild-with-custom-command-line-tools-part-i-console-errors/
Go to the source link to view the article. You can view the picture content, updated content and better typesetting reading experience. If the link is broken, please click the button below to view the snapshot at that time.
Extending MSBuild with custom command line tools, Part I – Console Errors
Ever wanted to extend your build process in Visual Studio, but found VS extensions to be bag-of-snakes crazy?
If you work on a decent-sized or complex solution, you’ll probably find yourself wanting to generate some code, or validate an input file, or process some configuration data, as part of your build. For example, I recently needed to validate some JSON files against a complex set of validation rules. If the JSON files didn’t ‘make sense’, then the build process needed to fail. So let’s say we have this JSON file;

Notice how the start date is after the end date, and that doesn’t make sense? I don’t want this file to accidentally go into production, so I want to validate it, and if the problem exists, fail, and fail properly, giving me an error in Visual Studio like this;

So I certainly need to write a piece of code like this;
var fileContent = File.ReadAllText(args[0]);
var file = JsonConvert.DeserializeObject<DataFile>(fileContent);
if (file.StartDate > file.EndDate)
{
    // start date must be before the end date -- fail!
}
But how do insert that into your build process? If you look as Visual Studio’s ‘recommended’ way to do things, it starts to look difficult. You can write your own MSBuild task by inheriting Task, but there’s a lot of ceremony and you have to write the task in a different solution. You can also write an extension, but that’s even harder.
In this post, I describe a small trick that you can use to dramatically simplify the process of writing your own build tools. That makes it simple to write your own tools and have them integrate with the Visual Studio / MSBuild build system. You can find the source code on github.
Outline
Visual Studio detects build errors in a really simple way — it looks at the console output produced during the build process and looks for lines like this;
c:\src\BlogPost\BlogPost\Program.cs(13,17,13,18): error CS0818: Implicitly
  -typed variables must be initialized
So this occurs when I write this code in C#;
namespace BlogPost
{
    class Program
    {
        static void Main(string[] args)
        {
            var x;
        }
    }
}
When I build, Visual Studio runs MSBuild, which runs the C# compiler (csc.exe), which writes to the console; internally, there will be a line like this in the compiler;
Console.WriteLine(@"c:\src\BlogPost\BlogPost\Program.cs(13,17,13,18): err
  or CS0818: Implicitly-typed variables must be initialized");
And visual studio picks up on that line in the output, detects the build error, stops the build, and puts the error into the error window.
And here’s the ‘secret’ — absolutely anyone writing a similar message during the build process gets the same privileges. There’s no API to invoke, no DLLs to register in the GAC, no nothing clever. Just make a console app and have it write messages with Console.WriteLine. You can now handle errors as easily as C# does.
Steps
The code for this post can be found on GitHub.
Step 1: Create your console app.
First, create a new console app. If you’re improving an existing solution, you can just add the app into the solution itself.
Here’s the guts of Program.cs from the console app;
static void Main(string[] args)
{
    try
    {
        var fileContent = File.ReadAllText(args[0]);
        var file = JsonConvert.DeserializeObject(fileContent);
        if (file.StartDate > file.EndDate)
        {
            WriteBuildError("Error", args[0], 1, $"The start date is after the end date");
            return;
        }
    }
    catch
    {
        WriteBuildError("Error", new Uri(Assembly.GetExecutingAssembly().Location).AbsolutePath, 1, $"This tool expects 1 command-line argument");
    }
}
So you can see what’s happening; the main function loading the JSON file, and checking a condition – when that condition fails, it writes out a build error and quits.
That build error method looks like this;
private  static void WriteBuildError(string type, string filePath, int lineNumber, string message)
{
    var msBuildMessage = string.Format(@"{0}({1}) : {2}: {3}.", filePath, lineNumber, type, message);
    Console.WriteLine(msBuildMessage);
}
Simply writing a formatted message to the console.
So now, you can see that it takes almost no code to write a console app which is going to be ‘compatible’ with MSBuild. Now if you want to do something — like generate content — now’s your chance. Read your input files, build source files, run tests, whatever else it is you want to do — and if there are problems with the inputs, or tests fail, you write out the errors.
So how do you integrate this console app into the build process?
Step 2: Altering the .csproj of your dependent project
So far you’ve written a console app that functions as your compiler, code generator, file vaidator, etc. You’ll also have a project that uses the output of that process — say, if you code-generate some C#, you can have a second project that then compiles it. Here’s an example solution structure;
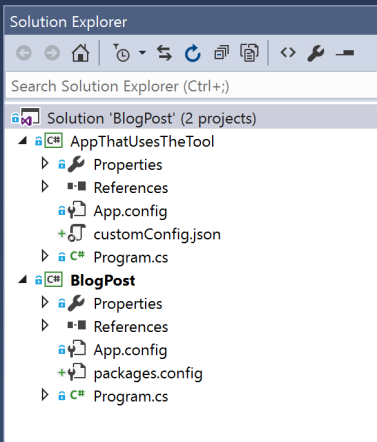
Solution Structure
We have BlogPost.csproj, which is the tool, and AppThatUsesTheTool. We want to invoke the tool to validate customConfig.json.
We open up the csproj file in a text editor and add this right at the bottom just above the tag;
  <PropertyGroup>
    <MyCustomToolPath>$([System.IO.Path]::GetFullPath("$(ProjectDir)..\BlogPost\$(OutDir)\BlogPost.exe"))</MyCustomToolPath>
    <MyInptuFile>$(ProjectDir)customConfig.json</MyInptuFile>
  </PropertyGroup>
  <Target Name="RunMyCustomTool" BeforeTargets="Build">
    <Exec Command="$(MyCustomToolPath) "$(MyInptuFile)"" IgnoreExitCode="true" />
  </Target>
Now, how does this work?
The <PropertyGroup> tag just defines a couple of properties and sets their content; those first four lines do the equivalent of C# like;
var MyCustomToolPath = System.IO.Path.GetFullPath($"{ProjectDir}..\BlogPost\{OutDir}\BlogPost.exe");
var MyInptuFile =$"{ProjectDir}customConfig.json";
The <Target> tag does the actual work. It extends the C# build with another arbitrary step. We give it an arbitrary name, and then tell it to run before the normal C# build. Inside, we say what we want to happen; we run the task, which just executes a batch command, and we feed it the path to BlogPost.exe, our command-line tool, passing it the file we want to validate. BlogPost’s Main method receives that as `args[0]`.
So now, we’re done. If you build the solution and the JSON file is invalid, BlogPost.exe writes the console error, the solution fails to build and you see a build error in Visual Studio;
And you can double-click the error and it’ll jump into customConfig.json, just as it would in a C# file with a syntax error.
Recommend
About Joyk
Aggregate valuable and interesting links.
Joyk means Joy of geeK