

Resolving Anypoint Studio7.x SSL handshake error
source link: https://medium.com/slalom-technology/anypoint-studio7-x-ssl-handshake-error-36be8758cd4b
Go to the source link to view the article. You can view the picture content, updated content and better typesetting reading experience. If the link is broken, please click the button below to view the snapshot at that time.
Resolving Anypoint Studio 7.x SSL handshake error

My development team recently faced a perplexing issue when trying to install the Anypoint Platform on laptops provided by one of Slalom’s clients. I looked in all the usual locations for a fix, but was not able to find a tangible solution. After researching for few days and trying different things, I was able to fix it. If you are facing a similar problem, I hope this article helps you resolve it.
Issue:
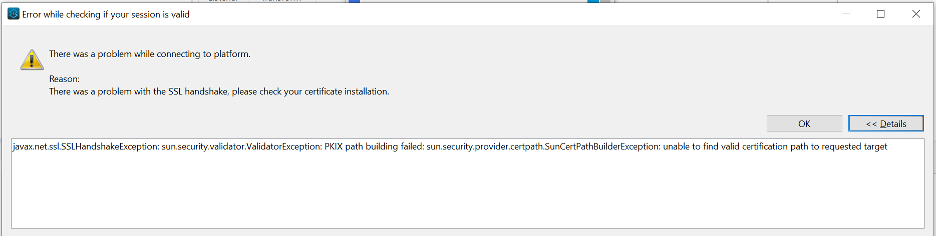
Setting up Anypoint Studio for the first time on some laptops (Windows laptop in my case) throws an SSL handshake error when trying to authenticate to anypoint.mulesoft.com. See the error screenshot below for more details. There are a couple of options out there which I will be mentioning here — as well as the resolution steps that worked for me.

Digging deeper:
A few things that I did to get to the crux of the issue were as follows:
- Tried switching JDK from studio’s built-in JDK to Adopt Open JDK 8.x (external JDK)
- Looked in into Anypoint studio’s log, in hopes of finding more details.
Just a side note, below are the steps to export Anypoint logs in case you want to investigate an error.
On Windows systems: Help / About Anypoint Studio/ Installation details / Configuration tab/click on View Error Log Button. Copy the Full output on a .txt file
On Mac systems: Anypoint Studio Menu / About Anypoint Studio/ Installation details / Configuration tab/click on View Error Log Button. Copy the Full output on a .txt file
When I was not able to find anything detailed, I had to finally use Wireshark to capture the HTTP network when trying to authenticate the studio. Luckily, I was able to find this:
“Expert Info (Warning/Security): Unencrypted HTTP protocol detected over encrypted port, could indicate a dangerous misconfiguration.”
Command line to export HTTP traffic using Wireshark shown below:
tcpdump -i any -s0 -w /tmp/platform.pcap host anypoint.mulesoft.com
This is when I started looking into this error specifically and learned that this can happen when a specific certificate being requested in HTTP request is missing from the local Java keystore. Let’s move on to next section where I have called out various resolution steps I tried.
Resolution Steps:
- First thing I found when researching on the internet was changing the network connection mode within the studio itself. Based on the screenshot below, I tried changing it to Direct, Native, and then to Manual. But the issue remained as is, and I was still not able to login to Anypoint using the studio.

2. Next up, I decided to try something else. I added the Anypoint certificate to local Java key store as mentioned above…and that’s it. I was able to authenticate my studio successfully.
Let’s explore the steps I performed to fix this issue:
Prerequisites to fix the error:
- Download and install OpenJDK 8, if not done already (download link).
- Anypoint Studio should use external Java instead of in-built Java plugin that comes with the studio.
- Once installed, follow the steps below to point the environment variables to OpenJDK installation


- Add the JAVA_HOME in the system variables and add the location of AdoptOpenJDK as shown below. This step needs to be done for both the sections, user variables and system variables

- Once the above step is completed, open command prompt and run java -version. If the setup above completed without any errors, you should see the screen below:

Applying the fix:
- Open any browser (chrome preferred) and navigate to https://anypoint.mulesoft.com/login/
- Login by providing your credentials
- Once logged in, click the lock icon appearing in the address bar before the URL

4. Follow the steps below to download the certificate


Click Next, then follow the steps below

Save the certificate to any preferred location and NOTE THE LOCATION

5. Navigate to the installation folder of OpenJDK 8 and take back up of “cacerts” file
e.g. C:\Program Files\AdoptOpenJDK\jdk-8.0.252.09-hotspot\jre\lib\security
6. Open PowerShell and run as admin
“cd” to OpenJDK cert location e.g. C:\Program Files\AdoptOpenJDK\jdk-8.0.252.09-hotspot\jre\lib\security
7. Run the following command
keytool -import -noprompt -trustcacerts -alias anypoint -file C:\Users\vsahay_c\Downloads\anypointcert.cer -keystore .\cacerts -storepass changeit
Note:
- Update the location with the location where you have downloaded the Anypoint cert in previous steps
· the password “changeit” is the default password for windows, any other values are unsupported
8. Once the command succeeds in the previous step you should expect a message similar to “Certificate has been added to the keystore”
9. Delete any previous version of Anypoint Studio
10. Download the latest Anypoint studio zip file from this link and extract the files in C:/ drive
11. Once the Anypoint is extracted from zip file, remember to right click the application shortcut and check “unblock” (only for windows laptop)
12. Navigate to Anypoint installation location and open the AnypointStudio.ini file with any text editor
13. Remove any other -vm JDK setting in the .ini file and add the following lines to point jvm startup to OpenJDK installation
-vm
C:\Program Files\AdoptOpenJDK\jdk-8.0.252.09-hotspot\jre\bin\server\jvm.dll
Location to jvm dll is where OpenJDK was installed in previous steps. Save the file
13. Open Anypoint Studio and click on preferences, then go to installed JREs and point it to OpenJDK 8 location as shown below

14. Add the home location where OpenJDK is installed

Apply the changes and close the pop-up window.
15. Once the changes are done, restart the laptop (this forces JVM to perform a clean exit)
16. Proceed to add the credentials and notice there are no SSL handshake errors now and the credentials are added successfully.

And that’s it! You should now be able to authenticate to Anypoint using the studio.
Got questions? Drop a note to [email protected] and I will try to reply as soon as possible.
Found this article useful? Hit that clap button. Really like it? Hold the clap, give it two, or fifty!
Follow Slalom Technology and read more articles on thought leadership in Technology.
Slalom and MuleSoft are doing amazing things together, want to know more check out the links below:
Recommend
About Joyk
Aggregate valuable and interesting links.
Joyk means Joy of geeK