

vloureiroblog
source link: https://vsloureiro.wordpress.com/
Go to the source link to view the article. You can view the picture content, updated content and better typesetting reading experience. If the link is broken, please click the button below to view the snapshot at that time.
Serilog: A simple and practical logging library.

Serilog is a logging library that can easily be built in into a classical .Net or Core application.
Installing and using Serilog is really straightforward and you can log to different storage types very easily as well with the so-called sinks.
Installation
Installing Serilog is as simple as installing the Serilog nuget package:
PM> Install-Package Serilog
Setup
The setup is very straightforward as well. An ILogger is created using LoggerConfiguration. This is normally done once at Startup and then used across all the other classes.
var log = new LoggerConfiguration()
    .WriteTo.ColoredConsole()
    .CreateLogger();
Then you can use the log variable like:
log.Information("Hello, Serilog!");
Sinks
Sinks generally record log events to some external representation, typically the console, a file or data store. Serilog sinks are distributed via NuGet packages. You can see a list of sinks by clicking here.
Sinks are similar to targets in NLog.
Configuration
You can configure Serilog in three different ways.
- Programmatically
- Using the web.config or appsettings file
- A mix of both
Programmatically
Sinks can be configured using the WriteTo configuration object.
Log.Logger = new LoggerConfiguration()
    .WriteTo.LiterateConsole()
    .CreateLogger();

Log.Information("Ah, there you are!");
As expected this log would write to the console.
Multiple sinks can be configured by chaining them together.
Using a config file
To configure Serilog through a config file, first you need to add the nuget package:
PM> Install-Package Serilog.Settings.AppSettings
and use the ReadFrom.AppSettings() extension method:
Log.Logger = new LoggerConfiguration()
  .ReadFrom.AppSettings()
  ... // Other configuration here, then
  .CreateLogger()
To configure the logger, an <appSettings> element should be included in the program’s App.config or Web.config file.
<?xml version="1.0" encoding="utf-8" ?>
<configuration>
  <appSettings>
    <add key="serilog:minimum-level" value="Verbose" />
    <!-- More settings here -->
for more config setting see here.
A mix of both
You can mix and match XML and code-based configuration, but each sink must be configured either using XML or in code – sinks added in code can’t be modified via app settings.
Using an IOC container
Serilog can be added through DI in several ways to your code. If you’re using .Net Core one that I found particularly good is by integrating Serilog with the Microsoft.Extensions.Logging library by using the Serilog provider for that library.
To do this you need to install the Serilog.Extensions.Logging
PM> Install-Package Serilog.Extensions.Logging
And then you can just add Serilog to the pipeline:
public void Configure(IApplicationBuilder app,
                        IHostingEnvironment env,
                        ILoggerFactory loggerfactory,
                        IApplicationLifetime appLifetime)
  {
      loggerfactory.AddSerilog();
And then simply add the Microsoft extensions logging ILogger to the ctor of the class you want to add logs to:
 public class MyClass{

     public MyClass(ILogger<MyClass> logger){
          logger.LogInformation("this is a log with a MyCLass source context!");
     }
...
}
Testing
Unit testing classes that use Serilog is really simple since if no configuration to Serilog is provided, it automatically creates a SilentLogger that does nothing, and by doing so it does not mess with your tests.
If you use Serilog with Microsoft extensions logging, then you will need to add the following code to register with autofac (if you use autofac) so that Serilog is correctly configured.
builder.RegisterInstance(new LoggerFactory().AddSerilog()).As<ILoggerFactory>();
builder.RegisterGeneric(typeof(Logger<>)).As(typeof(ILogger<>));
You should be then ready to go.
Conclusion
This post is just a scratch in the surface to what Serilog can do. But I think Serilog is doing some solid steps towards his future. Namely, the work done with sinks to make sure you can log to most storages out there. In this respect, Serilog is being more proactive than NLog. For instance logging to Elasticsearch is a real breeze with the Elasticsearch sink, but it’s way harder to do with NLog, the reason being that there are no good or up to date target libraries to work with NLog, at least at the time of writing of this post.
ElastAlert and Watcher: Alerting for ElasticSearch
The ELK stack has pretty much established itself as a must-have stack for searching and analysing data inside organisations that deal with high volumes of information every day.
But one of the features that the ELK stack does not natively have (at least without paying a lot of money) is an alerting system. And this is really important when you have a system that deals with big volumes of data because, typically, you need to know when something in your system starts to go wrong or does not behave as expected so that you can act as soon as possible.
To solve this problem Yelp developed ElastAlert and Elastic developed Watcher and in this post I will compare them according to my experience installing and using both.
Installation:
I will start from the assumption that you are using Docker to run the stack, if not I highly recommend you to start using it  but obviously you don’t have to run it with docker.
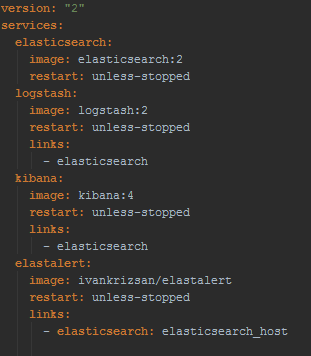
Installing both ElastAlert and Watcher is a pretty straightforward process. For ElastAlert you have a docker image with it already available on docker-hub. And basically, if you’re using Docker to run your ELK stack you just need to add this image as part of the stack and have a link to your elasticsearch container with elasticsearch_host as alias, something like this docker-compose file:
On the other hand, Watcher is installed as plugin for elasticsearch, so you just need to add the plugin installation to your elasticsearch dockerfile, something like:
RUN /usr/share/elasticsearch/bin/plugin install --batch watcherTo verify that watcher is correctly installed you can call the watcher stats API:
curl -XGET 'http://localhost:9200/_watcher/stats?pretty'
You should receive a response similar to:
{
  "watcher_state": "started",
  "watch_count": 0,
  "execution_thread_pool": {
    "queue_size": 0,
    "max_size": 0
  }
}
And that is basically it regarding installation. Watcher might have a slight edge here because is installed just as a plugin and you don’t have to add another image to your stack.
Creating alerts:
Watcher:
Configuring Watcher is really straightforward and you just need to tell watcher 3 things:
- A trigger and search input, i.e. how often will you query elasticsearch and the query itself
- A condition that when true will instruct watcher to take an action
- The action watcher will do when the condition is true
So imagine you want a watcher to periodically check your log data for error conditions, this is how the configuration would look like:
The trigger:
"trigger" : {
    "schedule" : { "interval" : "10s" }
  }
This trigger instructs Watcher to query elasticsearch every 10 seconds. The trigger is fully configurable and you can even use a cron expression.
The query:
"input" : {
    "search" : {
      "request" : {
        "indices" : [ "logs" ],
        "body" : {
          "query" : {
            "match" : { "message": "error" }
          }
        }
      }
    }
  }
This input will query the logs index in elasticsearch and search for messages where the message field is error. Obviously, you can add any elasticsearch DSL query in the body.
The condition:
"condition" : {
    "compare" : { "ctx.payload.hits.total" : { "gt" : 0 }}
  }
This condition will be true if the query to elasticsearch returns any result.
The action:
"actions" : {
    "log_error" : {
      "logging" : {
        "text" : "Found {{ctx.payload.hits.total}} errors in the logs"
      }
    }
  }
This action will write a message in the elasticsearch log. But you have at your disposal a bunch of different actions you can take like send emails, call third-parties webhooks, etc.
Here is the full watcher configuration:
curl -XPUT 'http://localhost:9200/_watcher/watch/log_error_watch' -d '{
  "trigger" : { "schedule" : { "interval" : "10s" } },
  "input" : {
    "search" : {
      "request" : {
        "indices" : [ "logs" ],
        "body" : {
          "query" : {
            "match" : { "message": "error" }
          }
        }
      }
    }
  },
  "condition" : {
    "compare" : { "ctx.payload.hits.total" : { "gt" : 0 }}
  },
  "actions" : {
    "log_error" : {
      "logging" : {
        "text" : "Found {{ctx.payload.hits.total}} errors in the logs"
      }
    }
  }
}'
This is just a simple example, and you can do much more complex watchers, like having cascading inputs, where you can use the result of an input in another input, and much more.
ElastAlert:
Configuring ElastAlert is also very easy, you need to create a .yaml file for each alert and, similarly to Watcher, when you configure an alert you have to give ElastAlert a query to perform, parameters on what triggers a match, and a list of alerts to fire for each match. The only difference is that the trigger, i.e. when ElastAlert will query elasticsearch, is defined in a separate configuration .yaml file and this trigger will run all the alerts configured at the same time.
For example, this alert would do the exact same thing as the above, except this would send an email:
# From example_rules/example_frequency.yaml
es_host: elasticsearch.example.com
es_port: 14900
name: Example rule
type: any
index: logs
filter:
- match:
    message: "error"
alert:
- "email"
email:
- "[email protected]"
es_host and es_port should point to the Elasticsearch cluster we want to query.
name is the unique name for this rule.
type: Each rule has a different type which may take different parameters. The any type means “Match everything. Every hit that the query returns will generate an alert”. For information other types, see Rule types.
index: The name of the index(es) to query. If you are using Logstash, by default the indexes will match “logstash-*”.
filter is a list of Elasticsearch filters that are used to filter results. Here we have a single match filter for documents with a messages field matching error. See Writing Filters For Rules for more information.
alert is a list of alerts to run on each match. For more information on alert types, see Alerts.
email is a list of addresses to which alerts will be sent.
Depending on the alert type, different properties need to be present in the alert. To read about all the alert types and respective properties follow this link.
ElastAlert is very configurable, so it’s very easy to define your own rule type, all you need to know is python. For more info on how to create your own rules follow this link.
Also, like Watcher, ElastAlert saves all its state back to elasticsearch, so even if you stop and start ElastAlert it will know the last time it ran, so you don’t get repeated alerts.
CRUD operations
In both cases, doing CRUD operations is very easy, although Watcher gets a small hedge because it comes with an API straight out of the box. You can just simply do Get, Post and Delete Http requests to get, create, update and delete watches.
In the case of ElastAlert, you need to create a .yaml file and place it under a certain folder where ElastAlert is installed every time you want to create an alert. Fortunately, someone already took the time to develop an API for ElastAlert, and you can follow this link to see it. The good thing is that is written in javascript so it’s very easy to “dockerize”, and you can then deploy it with your ELK stack.
Conclusion
Both alerting systems are good and can deal with most of the alerting scenarios out of the box.
Obviously, Watcher is paid and ElastAlert is free. So if your company already has a paid license for elasticsearch I recommend going with Watcher, as it seamlessly integrates with the elastic stack. If not, and be aware that elasticsearch does not sell Watcher as a standalone product, so you will be required to get it as part of a (very) expensive package, then go with ElastAlert, which is a very good product and out of the box can even deal better than Watcher for a lot of scenarios.
Design Patterns: The builder pattern
The builder pattern is the first design pattern I intend to write about during the next weeks. Design patterns as introduced by the GoF (gang of four) are, in its essence, solutions to software design problems. I have some favorite design patterns that I tend to use many times during my projects, and the builder pattern is one of them.
Although I use the builder pattern in development code, I tend to use it more in my unit tests. To demonstrate the advantages of using the builder pattern in unit tests lets explain them with a classic example:
public class Person{public Person(string firstname, string lastname, DateTime birthdate, string gender){this.FirstName = firstname;this.LastName = lastname;this.BirthDate = birthdate;this.Gender = gender;}public string FirstName { get; private set; }public string LastName { get; private set; }public DateTime BirthDate { get; private set; }public string Gender{ get; private set; }public string GetFullName(){return this.FirstName + " " + this.LastName;}}public class PersonTest{[Test]public void GetFullName(){ // Arrange Person p = new Person("Andrew", "Stevens", new DateTime(1980, 1, 1), "male");// Actstring fullname = e.GetFullName();// AssertAssert.That(fullname, Is.EqualTo("Andrew Stevens"));}}- Although we are only testing the GetFullName method, which only requires the FirstName and LastName to be filled, we need to pass the birth date, and gender, so we basically we are bound to the constructor.
- If we were to change the constructor signature, we would need to change all the tests where we instantiate the Person class.
The solution:
- Build a PersonBuilder class that takes care of creating a person in an expressive way, decoupling ourselves from calling the constructor directly.
Steps:
1. Create the PersonBuilder class:
public class PersonBuilder{private string firstname = "first";private string lastname = "last";private DateTime birthdate = DateTime.Today;private string gender = "male";public Person Build(){return new Person(firstname, lastname, birthdate, gender);}}2. Create helper methods set the private properties:
public PersonBuilder AddFirstName(string firstname){this.firstname = firstname;return this;}public PersonBuilder AddLastName(string lastname){this.lastname = lastname;return this;}Now with these methods, we can easily build our Person in a flexible and expressive way:
Person p = new PersonBuilder().AddFirstName("Andrew").AddLastName("Stevens").Build();Person p = new PersonBuilder().AddFirstName("Andrew").AddLastName("Stevens");public class PersonTest{[Test]public void TestFullName(){ // Arrange Person p = new PersonBuilder().AddFirstName("Andrew").AddLastName("Stevens");// Actstring fullname = p.GetFullName();// AssertAssert.That(fullname, Is.EqualTo("Andrew Stevens"));}publicclass PersonBuilder{privatestringfirstname = "first";privatestringlastname = "last";privateDateTime birthdate = DateTime.Today;privatestring gender= "male";public Person Build(){returnnew Person(firstname, lastname, birthdate, gender);}public PersonBuilder AddFirstName(stringfirstname){this.firstname = firstname;returnthis;}public PersonBuilder AddLastName(stringlastname){this.lastname = lastname;returnthis;}public PersonBuilder AddGender(string gender){this.gender = gender;return this;}public PersonBuilder AddBirthDate(DateTime birthdate){this.birthdate = birthdate;returnthis;}publicstaticimplicitoperator Person(PersonBuilder instance){returninstance.Build();}}- Expressiveness
- You can build your code in an expressive way, making your tests more readable.
- Reliability
- Your builder acts as a wrapper around the Person class in this example, and by doing that if you need to change the signature of the Person constructor you don’t need to touch your tests, but only the builder class. As your code matures, this will make a huge difference.
Hopefully, this will help you make your tests a little more readable. If you want to add something just contact me or comment.
Javascript: testing mediators using sinon and inject-loader
Unit testing in javascript is not always easy, especially when it comes to testing asynchronous code. And searching the internet might not always give you an answer or, at least, the best answer…
I personally like the mediator pattern and I use it a lot in my projects. Mediators allow you to decouple your front-end components from your services, and by doing so, testing all the different parts of your application becomes easier.
I like to use Postal.js for communication between the different parts of my applications, especially between the front-end components, the mediators and the services. Postal.js is a very well known in-memory message bus inspired by AMQP and allows you to post and subscribe to messages in a very simple fashion.
Now, testing front-end components and services is relatively straightforward, but testing mediators is not so easy. And the reason is that you mediators will normally call services to do some kind of logic, and you need to mock those services, which is not trivial if you’re using bundlers like webpack or requirejs.
If you’re using webpack, fortunately, a very simple library is available that allows you to mock the required dependencies that your mediator uses. So if you imagine you have a service like this:
//myService.js
exports default () => {
    this.doWork = () => {
        return 'doing some work...';
    }
}
and a mediator like this:
//myMediator.js
import postal from 'postal';
import myService from 'myService';

var channel = postal.channel('channel.name');

channel.subscribe('topic.name', () => {
       console.log(myService.doWork()); // doing some work...
});
Then you can easily test this mediator like this:
//myMediator-test.js

var postal = require('postal');
var sinon = require('sinon/pkg/sinon');
var expect = require('chai').expect;

describe('My mediator', function(){
      var myServiceStub, myServiceMock;
      var channel = postal.channel('channel.name');

      beforeAll(function(){
            var MyModuleInjector = require('inject!myMediator');

            //Create stub for doWork
            myServiceStub = sinon.stub().returns('Mock do work...');

            //Creating mock to be injected
            myServiceMock = function (){
                 this.doWork = myServiceStub;
            });

            //Injecting the mock
            MyModuleInjector({
                   'myService': myServiceMock
            });
      });

      it('should use mock service', function(){
         channel.publish('topic.name');
         expect(myServiceStube.called).to.be.true;
      });
});
Some clarifications about the code above.
First, in the mediator test where I do something like require(‘inject!myMediator’), I’m using the inject-loader an awesome webpack loader that allows you to mock your required dependencies. With the inject loader you can mock all or just the dependencies you want, which makes it extremely flexible!
Second, I’m using sinon to create my stubs, because it’s an amazing library for stubbing, mocking and spying. Really, if you don’t know what it is you should look it out, it is extremely easy to use and is agnostic to your application infrastructure, so you can always use it.
As you see, if you’re using webpack, testing your mediators should be simple enough, and now you don’t have an excuse not to test them. 
Building a yeoman X-Tag WebComponent generator


Yeoman generators are very useful and they allow you to focus on implementing your application without having to reinvent the wheel over and over again…
Building a yeoman generator is not rocket science and a very comprehensive tutorial on how to do it can be seen at yeoman’s website.
WebComponents are also in a trend these days, and I strongly believe they are the future. Apart from Polymer, X-Tag is probably the most used and talked WebComponents library out there. X-Tag started as a Mozilla project but is now supported by Microsoft. It’s a very clever library, that does not rely on all WebComponents API to work, which is a big advantage over Polymer. It only needs the browser to support custom elements, which means that it supports IE9+. It’s also very simple to understand, which means the learning curve is not that steep.
Now, building a yeoman generator that allows you to scaffold an X-Tag WebComponent is very useful and will save you a lot of copy and past on an X-Tag application.
I won’t go throw all the details in this post, that’s not the objective, but instead I’ll give you an overview of the steps required to create your own yeoman X-Tag webcomponent generator.
The first thing you need to do is create the folder where you want to create the yeoman generator and then type:
$npm init
This command allows you to create the package.json file. You’ll be asked several questions, the first one is the name of your generator, and you have to name it generator-name-of-your-generator, this allows the generator to be indexed by the yeoman generators page when you publish the generator.
You’ll also be asked to give keywords to describe your generator, and you have to include at least the “yeoman-generator” keywords, for the same reason as the paragraph above.
After the creation of the package.json file you need to add the yeoman generator as a dependency for the module by typing:
npm install --save yeoman-generator
Now if you follow the tutorial on how to create yeoman generators, there’s a part about templating. This is the most important part because it’s the one that copies files and allows you to replace anchors inside those files with text such as the yeoman generator’s name and so on.
The template for the X-Tag WebComponent file in its simplest form will be something like:
import xtag from 'x-tag';
import './<%= filename %>.css';

(function () {
 xtag.register('<%= filename %>', {
          lifecycle: {
             // Fires when an instance of the element is created
             created: function () { },

             // Fires when an instance was inserted into the document
             inserted: function () { },

             // Fires when an instance was removed from the document
             removed: function () { },

             // Fires when an attribute was added, removed, or updated
             attributeChanged: function (attr, oldVal, newVal) { }
          },
        events: { },
        accessors: { },
        methods: {}
 });
}());
Here <%= filename %> is an anchor that will be replaced by the webcomponent’s name. This might change depending one your own specific implementation.
Apart from the main webcomponent module file above, there are at least 3 or 4 files that should be included in the generator. A file to contain your unit tests, and as a good practice, this file should contain a failing test, so that you are sure that you’ll look at the tests :). A css, less or sass file depending on what you use, a template for the readme file and a small html file where you can test your webcomponent.
It’s also a good practice to use some kind of templating engine like handlbars or mustache so that you have your html in a different file and not inside the webcomponent itself.
Following these simple steps above, you can create your own yeoman generator, in this case, to generate an X-Tag webcomponent.
Feel free to have a look at the X-Tag webcomponent generator I built, and do a pull request if you want to do improvements on it:
From Requirejs to Webpack, the old and the new…


As you already figured out by the title, this post will try to show you why I and my team decided to move from requirejs to webpack. They are both widely used and requirejs is clearly the oldest of the two, hence, this is somehow comparing the old with the new.
And, for me at least, in this case, old doesn’t mean gold :). Don’t get me wrong, requirejs was a great library when it was built and set the standards for many of the similar bundlers that came after, like webpack.
But in my experience requirejs is not dealing well with how new web applications are evolving, and I’ll try to explain, according to my experience using the tool, why we decided to move to webpack.
Why move:
Well, we first started thinking about moving from requirejs to webpack after we started extracting modules from a big application we had into separate npm modules. Because requirejs doesn’t import node modules, we had to start “hacking” and we installed our private npm modules into a folder inside the source path of our application so that they could be bundled by requirejs.
Well this has a lot of problems, first we don’t want a separate folder inside our source folder just to have external dependencies imported by requirejs. Second, if any of these modules has a dependency on a module that is already installed in the outer “primary” node_modules folder you would end up with that dependency being installed twice.
Webpack was built to support NPM modules, so you don’t have to worry about placing node modules inside the application source folder.
Requirejs follows the AMD (Asynchronous Module Definition) proposal, which for anyone used to work with node and CJS (CommonJS) modules can be annoying. They provide a way to convert CJS into AMD, but is really not flexible, and you have to follow specific steps to make it work, and really why should we care about that anyway, it should be transparent to us.
Webpack supports both AMD and CJS, so you don’t have to worry about converting AMD to CJS or vice versa, it just works. You might think that this is not a big deal, but when you think that you can use any nodejs library in the browser out of the box, things start to get exciting.
Another problem with requirejs is the loaders plugins. I really don’t want to explicitly have to do something like this:
define(['css!styles/cssfile'], function() { /* .. */})
Applying processors explicitly is not a good idea, it should be a responsibility of the bundler to detect different types of files and process them in the background, and it should be transparent to you.
Webpack loaders are really amazing, configuring the loaders is really simple and the overall plugin system is more robust. Also, ES6 support is very easy to add with the babel-loader in webpack, while making ES6 to function in requirejs is a little bit of a battle.
Conclusion:
For all this, we decided to take the hit of converting a big application from requirejs to webpack, but I think it is the right thing to do and will undoubtedly pay off in the future.
TeamCity vs Jenkins, an overview.
TeamCity and Jenkins are two of the most used CI’s out there, and having used both of them I have a pretty solid idea of the pros and cons of each one and I’ll list some of them in this post according to my experience using both products.
Jenkins:
Jenkins was the first CI I’ve used and I must admit is a really good product, even more when you think that is an open source project and you don’t have to pay anything to use it.
Pros:
- Very easy to use.
- Backed up by a huge community.
- Lots of plugins to choose from.
- Open source.
Cons:
- Some server instability (at least when installed in a windows machine).
- Outdated interface.
- Node js plugin doesn’t work on windows machine installations yet (This was the main reason for me to start using TeamCity )
So if your an opensource enthusiast this might be the right tool for you. It’s a very mature product with lots of plugins providing all the heavy lifting for you and an enormous community to help you as well.
TeamCity:

TeamCity developed by JetBrains is the CI I now use the most. Although the reason for me to start using TeamCity wasn’t at first related to its features, I’m glad I choose to use TeamCity. The simplicity and ease of usage caught my attention from the first day.
Although being a commercial product, meaning you have to pay for it, you have 20 builds and 3 free agent installations, which should be enough for you to start using it and show the business guys how awesome it is, so you can ask for the license purchase :). Also, if you work on a startup you get 50% discount, and if you’re working on an open source project the license is free.
Pros:
- Very easy to install and maintain.
- Lots of plugins to choose from.
- Multi-platform builds.
- Excellent backup functionality.
- Excellent source control support.
Cons:
- Free edition limited to 20 builds.
- Built in Java, meaning that if you want to create your own plugin you have to know java.
Having used both of them, and still use them both in my current company, I tend to prefer TeamCity over Jenkins mainly because TeamCity is so easy to use and it behaves better under node js deployments, which gives it a bit of an edge over Jenkins, not to mention the ancient Jenkins interface :).
But don’t understand me wrong, Jenkins is an awesome CI and should be always considered as a viable option.
A Gulp set up suited for most javascript projects
One of the most important things to think about when starting a new javascript project is which building tasks we want to create and automate to make sure we increase our development speed. This might not sound like a big thing, but it becomes evident when you think that a big portion of your time is spent doing building related tasks, like running unit tests, bundling components, transpiling less files, linting and so on.
I’ve done this process quite a few times now and I think I managed to get a pretty good automated building setup which definitely increases our productivity.
Depending on the javascript project you’re doing some of the tasks will vary. But I’ll explain that later.
But more to the point, if you’re thinking of starting a new React, Knockout, Angular or any of the fancy javascript libraries/frameworks projects, these are the bare minimum tasks you’ll have to automate:
- Unit tests
- Karma, webcomponents-tester and so on. This assumes you’re a TDD oriented developer, as you should
- Karma, webcomponents-tester and so on. This assumes you’re a TDD oriented developer, as you should
- Local development server
- Local server that you’re going to use to test your application
- Bundling
- Bundles your application into small sized files for browser performance purposes.
- Linting
- To make sure your code doesn’t have errors or potential problems.
- File Minification
- To minify javascript, css and html files. This is normally an option on the bundling library, but for the sake of clarity I separate those.
These are, for me, the minimum building tasks every javascript project should have.
I’ll go through each one of them now, giving my preference about the library I normally use.
Unit tests:
Unit tests are one the most important parts of your application. They ensure your code does what is supposed to do and give you confidence to change your code.
If you’re not using a webcomponents library, my first choice to optimize your tests is Karma. Karma is maintained by the AngulaJs team, and it allows you to run your unit tests in an automated fashion.
gulp-karma is my favorite gulp task for this. It’s very simple to set up.
var gulp = require('gulp');
var Server = require('karma').Server;

/* Run test once and exit  */

gulp.task('test', function (done) {
            new Server(
                      {
                         configFile: __dirname + '/karma.conf.js',
                         singleRun: true
                      },
                      done).start();
});
This code will run all your tests on your application. You can see more in the karma GitHub page. Combine karma with jasmine or mocha and you have all you need to unit test your application.
If you’re using webcomponents the web-component-tester library is the one to go. It was built by google for Polymer, but it can be used with other frameworks like x-tag and so on.
Local development server:
This is an absolute must have in every project. If you don’t want to spend all your time doing a release every time you change your code, a fast local development server is obligatory.
You have several options here, if you’re using webpack as your bundler, the webpack dev server is the best choice, is easy to configure and the hot module replacement is a very cool functionality. You can see more clicking here.
If you’re using requirejs or other bundlers, gulp-connect is one of my favorites. Is essentially a gulp plugin that allows you to use a webserver.
Bundling:
Modern web applications should be fast and responsive, and choosing the most suited bundler for your project goes a long way to achieve it. It helps to shrink your application into one or more small chunks so that you can load them when your browser needs them. It also helps your application access node js libraries that would normally not work in the browser, only on the server.
Depending on the type of project you have, several options are available.
Requirejs is one of the oldest bundlers around and is still very used today. Although very good, I personally prefer webpack or browserify for the same type of projects. They are easy to set up, and webpack is so powerful that if you want you can basically substitute your gulp tasks with webpack plugins.
Webpack and browserify have the added benefit of allowing you to use node js libraries in the browser.
To see how you can use webpack with gulp click here, and for browserify click here.
If you’re using webcomponents the best and, as of the time of writing this post, the only bundler that supports html imports in an efficient manner is vulcanize developed by google for Polymer, but it works with other frameworks like x-tag and so on.
Linting:
This is a very useful task to have if you don’t want to spend lots of time correcting errors in your javascript and doing potentially harm code.
gulp-jshint is perhaps my favorite due to the complete set of options you can use to configure it. You can also choose from a set of different reporters so you can choose the one you like the most.
var jshint = require('gulp-jshint');
var gulp   = require('gulp');

gulp.task('lint', function() {
  return gulp.src('./lib/*.js')
    .pipe(jshint())
    .pipe(jshint.reporter('YOUR_REPORTER_HERE'));
});
File Minification:
This is essential if you want to keep your release files small. Minifying html, css and javascript files can be done with several libraries, and bundlers like webpack or browserify can be set up with their own minification options.
But if you want to separate those tasks into different gulp tasks you can use gulp-cssnano, gulp-htmlmin and gulp-minify to minify css, html and javascript files respectively.
Conclusion:
These are, for me, the bare minimum tasks you should have to automate/streamline your building process.
All these tasks can be done using grunt as well, but I prefer gulp because it’s more javascript-ish like
Recommend
About Joyk
Aggregate valuable and interesting links.
Joyk means Joy of geeK