

Hangfire for dotNET Core Applications: The BackGround Method
source link: https://keyholesoftware.com/2020/12/10/configuring-hangfires-background-method-for-net-core-applications/
Go to the source link to view the article. You can view the picture content, updated content and better typesetting reading experience. If the link is broken, please click the button below to view the snapshot at that time.
Configuring Hangfire’s BackGround Method for .NET Core Applications
Bernardo Leite December 10, 2020 .NET, .NET Core, C#, Tutorial Leave a Comment
For dotNET and dotNET Core applications, Hangfire provides an easy way to perform background processing. You might have found a variety of use cases for background tasks or scheduled jobs in application development. For example, in my case using Hangfire was the perfect solution to call an external API within my method, but not have to wait for its response in order to return. With its so-called fire-and-forget jobs, jobs are executed only once and almost immediately after creation.
In this article, we will go over how to install the Hangfire NuGet package within the NuGet Package Manager in Visual Studio. Then, we’ll walk through how to configure it within the .NET Core framework using Service Fabric. Lastly, we’ll learn how to use the BackgroundJob.Enqueue method in order to schedule a background task to be performed and at the same time not disturb the flow of your code.
Installing Hangfire
First things first, we need to install the Hangfire package within our .NET Core application. It must be installed in the project both where Startup.cs file lives and also where you’ll be using the BackgroundJob method.
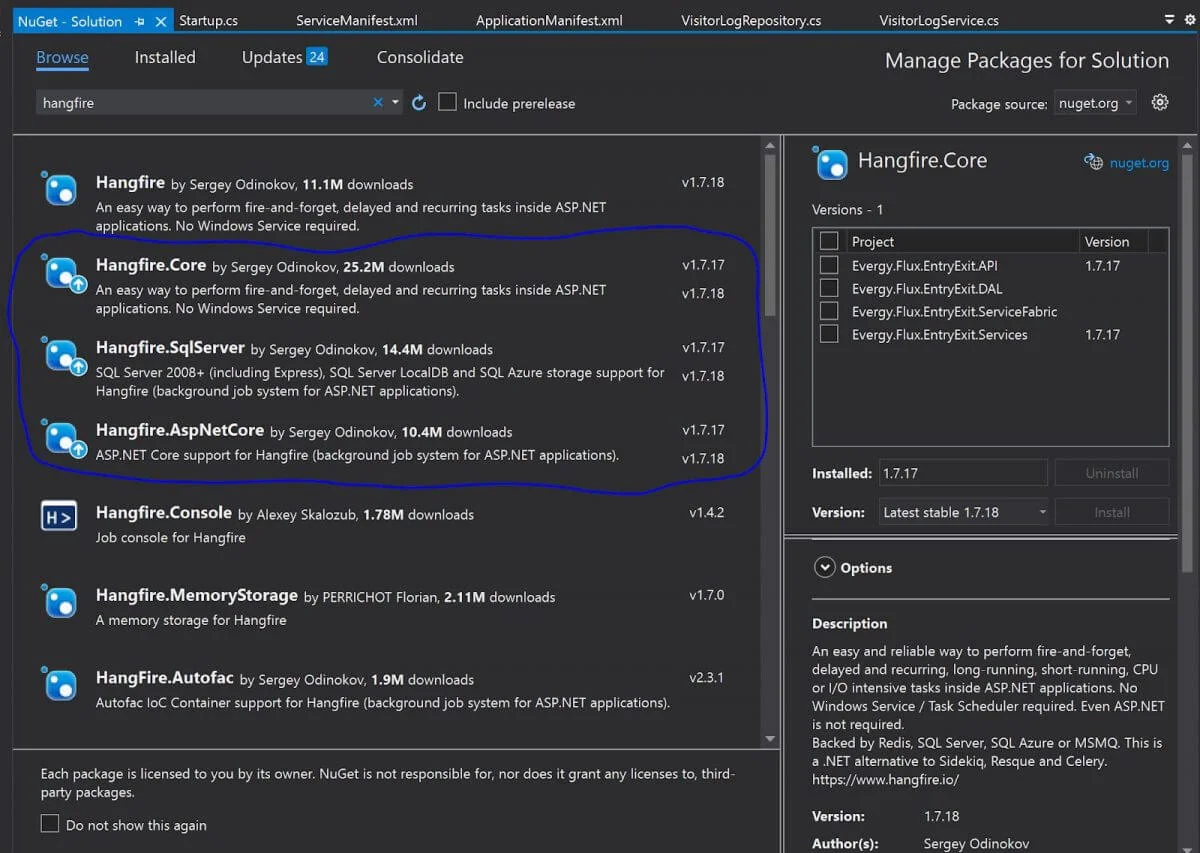
Open Manage NuGet Packages for Solution and search for Hangfire. Install Hangfire.Core, Hangfire.SqlServer, and Hangfire.AspNetCore (Hangfire.SqlServer only needs to be installed in the project where Startup.cs is).
After installation is complete, you should see the following code in your .csproj file:
	<PackageReference Include=”Hangfire.AspNetCore” Version=”1.7.17” />
	<PackageReference Include=”Hangfire.Core” Version=”1.7.17” />
	<PackageReference Include=”Hangfire.SqlServer” Version=”1.7.17” />
Creating the Database
Before configuring Hangfire, you either need to create a database to store your jobs or you can use an existing one. In my case, since I already had a database created, all I had to do was point my ConnectionStrings to my database living in the SQLEXPRESS instance on my local machine.
We’ll go over how to do that next.
Configuring Hangfire
Now, we need to configure Hangfire to work with our .NET Core application. Because we are using Service Fabric to connect to our database, we will not add our ConnectionStrings to the appsettings.json file. Instead, we’ll put it inside the AddHangfire method in Startup.cs.
The startup class is the heart of an ASP.NET Core application’s configuration. First, we need to import the Hangfire namespace.

Next, we need to add Hangfire services. Dependency injection is one of the primary techniques introduced in ASP.NET Core. The Hangfire.AspNetCore integration package adds an extension method to register all the services, their implementation, logging, and a job activator. As a parameter, it takes an action that allows it to configure Hangfire itself.
We add the Hangfire services inside the ConfigureServices(IServiceCollection services) method.
// Add Hangfire services
services.AddHangfire(configuration => configuration
	.SetDataCompatibilityLevel(CompatibilityLevel.Version_170)
	.UseSimpleAssemblyNameTypeSerializer()
	.UseRecommendedSerializerSettings()
	.UseSqlServerStorage(Environment.GetEnvironmentVariable(“Writeable ConnectionString”), new SqlServerStorageOptions
	{
		CommandBatchMaxTimeout = TimeSpan.FromMinutes(5),
		SlidingInvisibilityTimeout = TimeSpan.FromMinutes(5),
		QueuePollInterval = TimeSpan.Zero,
		UseRecommendedIsolationLevel = true,
		DisableGlobalLocks = true
	}));

// Add the processing server as IHostedService
services.AddHangfireServer();
// Add framework services
services.AddMvc();
As we mentioned before, our ConnectionStrings goes inside the AddHangfire method. This points to an environmental variable in the ApplicationManifest.xml file.

Using Hangfire in Your Project
Lastely, we need to import Hangfire into the class we want to use the background jobs and then call the BackGround class.
BackgroundJob.Enqueue(() => PostToEMSLocal(entity, currentUserId));
And that’s it – you’re all set up! In this example, we used the BackGround.Enqueue method to process data in the background while the main method returned without having to wait for the Hangfire background processing to finish. After Hangfire finishes processing the data, the application continues to work smoothly without any interruptions.
Now that you’re all set up, you can use Hangfire like we did in this project or in other ways that fit your project goals and needs. Check out the Hangfire docs for more information!
Conclusion
And that is how you use Hangfire within Service Fabric for dotNET Core applications! Following the above steps, we have set up a basic application with Hangfire server running and recurring jobs will execute at desired times. Don’t forget that your application runner account needs to have write permission to Hangfire schema in your SQL storage.
I hope you found this post helpful. If you have questions or feedback, drop a comment below. Happy Programming!
Recommend
About Joyk
Aggregate valuable and interesting links.
Joyk means Joy of geeK