

分布式锁之 Apache Curator InterProcessMutex
source link: https://www.diguage.com/post/distributed-lock-apache-curator-interprocessmutex/
Go to the source link to view the article. You can view the picture content, updated content and better typesetting reading experience. If the link is broken, please click the button below to view the snapshot at that time.

分布式锁之 Apache Curator InterProcessMutex

对分布式锁耳熟能详。不过,一直关注的是基于 Redis 实现的分布式锁。知道 ZooKeeper 也可以实现分布式锁。但是,原来的想法是把 Redis 那个思路切换到 ZooKeeper 上来实现就好。今天了解到 Apache Curator 内置了分布式锁的实现: InterProcessMutex。查看了一下源码实现,发现跟基于 Redis 实现的源码相比,在思路上还是有很大不同的。所以,特别作文记录一下。
先来看一下,整体流程:
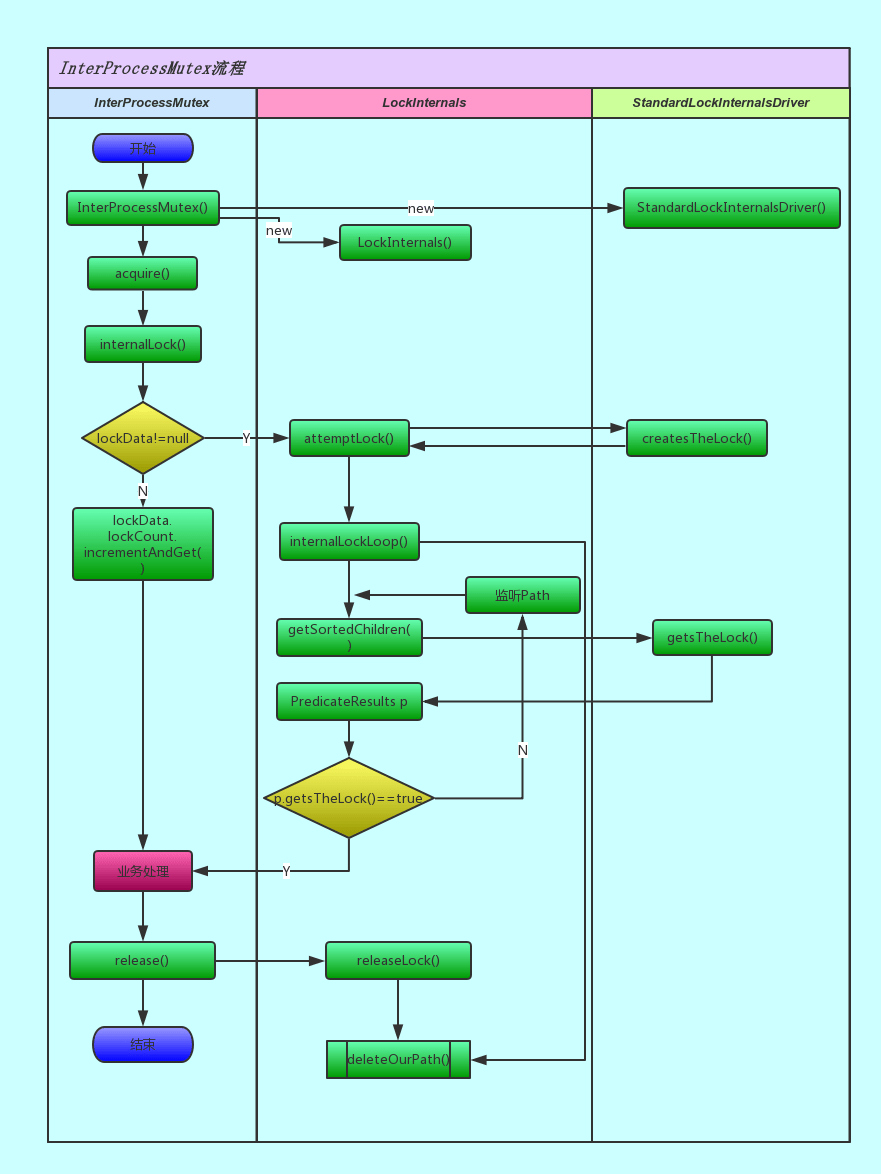
结合流程图和源码,加锁的过程是这样的:
-
先判断本地是否有锁数据,如果有则对锁定次数自增一下,然后返回
true; -
如果没有锁数据,则尝试获取锁:
-
在指定路径下创建临时顺序节点
-
获取指定路径下,所有节点,检查自身是否是序号最小的节点:
-
如果自身序号最小,则获得锁;否则
-
如果自身不是序号最小的节点,则通过
while自旋 +wait(times)不断尝试获取锁,直到成功。
-
-
获得锁后,把锁信息缓存在本地
ConcurrentMap<Thread, LockData> threadData变量中,方便计算重入。
-
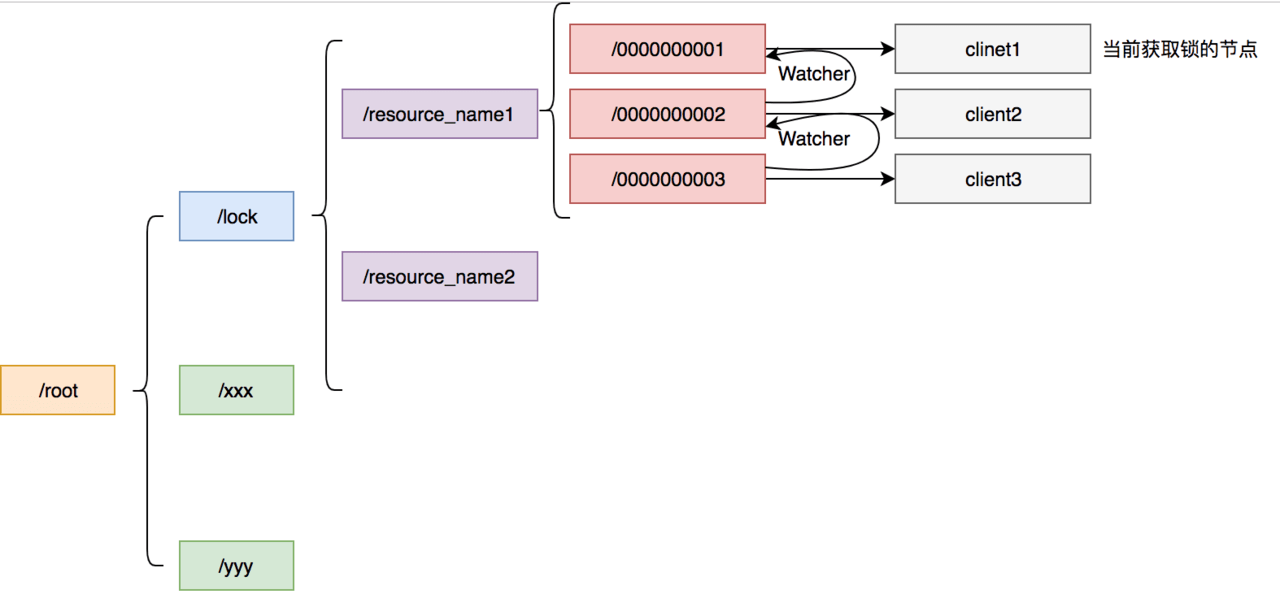
在 ZooKeeper 中的结构大致如下:
下面我们逐个方法进行分析说明。先来看一下 InterProcessMutex 的注释:
/**
 * A re-entrant mutex that works across JVMs. Uses Zookeeper to hold the lock. All processes in all JVMs that
 * use the same lock path will achieve an inter-process critical section. Further, this mutex is
 * "fair" - each user will get the mutex in the order requested (from ZK's point of view)
 */
public class InterProcessMutex implements InterProcessLock, Revocable<InterProcessMutex>
从注释中,我们可以得出这么几点信息:
-
这是一个可以跨越 JVM 的可重入互斥锁。
-
使用 ZooKeeper 来保存锁信息。
-
所有线程都使用相同的锁路径来锁定跨线程的关键部分。
-
这是一个公平锁。
private final LockInternals internals;
private final String basePath;

private final ConcurrentMap<Thread, LockData> threadData = Maps.newConcurrentMap();

private static class LockData
{
    final Thread owningThread;
    final String lockPath;
    final AtomicInteger lockCount = new AtomicInteger(1);

    private LockData(Thread owningThread, String lockPath)
    {
        this.owningThread = owningThread;
        this.lockPath = lockPath;
    }
}

private static final String LOCK_NAME = "lock-";

/
 * @param client client
 * @param path   the path to lock
 */
public InterProcessMutex(CuratorFramework client, String path)
{
    this(client, path, new StandardLockInternalsDriver());
}

/
 * @param client client
 * @param path   the path to lock
 * @param driver lock driver
 */
public InterProcessMutex(CuratorFramework client, String path, LockInternalsDriver driver)
{
    this(client, path, LOCK_NAME, 1, driver);
}

InterProcessMutex(CuratorFramework client, String path, String lockName, int maxLeases, LockInternalsDriver driver) // (1)
{
    basePath = PathUtils.validatePath(path);
    internals = new LockInternals(client, driver, path, lockName, maxLeases);
}-
注意这个构造函数没有
public修饰符。
从这段代码我们可以看出:
-
可以利用
CuratorFramework实例和path就可以创建一个锁对象; -
锁数据包含持有线程(
owningThread),锁路径(lockPath)和锁定次数(lockCount); -
使用
ConcurrentMap建立起线程和锁数据的关联。
来看一下获取锁的流程:
acquire 方法
/
 * Acquire the mutex - blocking until it's available. Note: the same thread
 * can call acquire re-entrantly. Each call to acquire must be balanced by a call
 * to {@link #release()}
 *
 * @throws Exception ZK errors, connection interruptions
 */
@Override
public void acquire() throws Exception
{
    if ( !internalLock(-1, null) )
    {
        throw new IOException("Lost connection while trying to acquire lock: " + basePath);
    }
}

/
 * Acquire the mutex - blocks until it's available or the given time expires. Note: the same thread
 * can call acquire re-entrantly. Each call to acquire that returns true must be balanced by a call
 * to {@link #release()}
 *
 * @param time time to wait
 * @param unit time unit
 * @return true if the mutex was acquired, false if not
 * @throws Exception ZK errors, connection interruptions
 */
@Override
public boolean acquire(long time, TimeUnit unit) throws Exception
{
    return internalLock(time, unit);
}这里面有一点需要注意:the same thread can call acquire re-entrantly. Each call to acquire must be balanced by a call to {@link #release()}.(相同线程可以重复调用 acquire,但是每次调用 acquire,也必须有对应的 release 方法。)这点跟 Java 的 ReentrantLock 语义是相同的。
由于两个 acquire 方法都调用了 internalLock 方法,我们来看一下这个方法:
internalLock 方法
private boolean internalLock(long time, TimeUnit unit) throws Exception
{
    /*
       Note on concurrency: a given lockData instance
       can be only acted on by a single thread so locking isn't necessary
    */

    Thread currentThread = Thread.currentThread();

    LockData lockData = threadData.get(currentThread);
    if ( lockData != null )
    {
        // re-entering
        lockData.lockCount.incrementAndGet();
        return true;
    }

    String lockPath = internals.attemptLock(time, unit, getLockNodeBytes());
    if ( lockPath != null )
    {
        LockData newLockData = new LockData(currentThread, lockPath);
        threadData.put(currentThread, newLockData);
        return true;
    }

    return false;
}
这段代码,就可以看出 InterProcessMutex 对重入的处理:针对对应的锁数据自增调用次数,然后直接返回 true。
如果没有则尝试去获取锁,成功后将锁数据放入到上面提到的 threadData 变量中。
在上面介绍构造函数时,在构造函数创建了 internals 对象,接下来看一下 attemptLock 方法。
attemptLock 方法
org.apache.curator.framework.recipes.locks.LockInternals#attemptLockString attemptLock(long time, TimeUnit unit, byte[] lockNodeBytes) throws Exception
{
final long startMillis = System.currentTimeMillis();
final Long millisToWait = (unit != null) ? unit.toMillis(time) : null;
final byte[] localLockNodeBytes = (revocable.get() != null) ? new byte[0] : lockNodeBytes;
int retryCount = 0;
String ourPath = null;
boolean hasTheLock = false;
boolean isDone = false;
while ( !isDone )
{
isDone = true;
try
{
ourPath = driver.createsTheLock(client, path, localLockNodeBytes);
hasTheLock = internalLockLoop(startMillis, millisToWait, ourPath);
}
catch ( KeeperException.NoNodeException e )
{
// gets thrown by StandardLockInternalsDriver when it can't find the lock node
// this can happen when the session expires, etc. So, if the retry allows, just try it all again
if ( client.getZookeeperClient().getRetryPolicy().allowRetry(retryCount++, System.currentTimeMillis() - startMillis, RetryLoop.getDefaultRetrySleeper()) )
{
isDone = false;
}
else
{
throw e;
}
}
}
if ( hasTheLock )
{
return ourPath;
}
return null;
}这个方法中,可以看出获取锁要进行:
-
创建锁节点
-
调用
internalLockLoop获取锁
这里还通过 while 循环来达到重试效果。
先来看一下是如何创建锁节点的:
createsTheLock 方法
org.apache.curator.framework.recipes.locks.StandardLockInternalsDriver#createsTheLock@Override
public String createsTheLock(CuratorFramework client, String path, byte[] lockNodeBytes) throws Exception
{
String ourPath;
if ( lockNodeBytes != null )
{
ourPath = client.create().creatingParentContainersIfNeeded().withProtection().withMode(CreateMode.EPHEMERAL_SEQUENTIAL).forPath(path, lockNodeBytes);
}
else
{
ourPath = client.create().creatingParentContainersIfNeeded().withProtection().withMode(CreateMode.EPHEMERAL_SEQUENTIAL).forPath(path);
}
return ourPath;
}这里就是通过 CuratorFramework 实例来创建 CreateMode.EPHEMERAL_SEQUENTIAL 类型的节点。
再来看一下 internalLockLoop 方法
internalLockLoop 方法
org.apache.curator.framework.recipes.locks.LockInternals#internalLockLoopprivate boolean internalLockLoop(long startMillis, Long millisToWait, String ourPath) throws Exception
{
boolean haveTheLock = false;
boolean doDelete = false;
try
{
if ( revocable.get() != null )
{
client.getData().usingWatcher(revocableWatcher).forPath(ourPath);
}
while ( (client.getState() === CuratorFrameworkState.STARTED) && !haveTheLock )
{
List<String> children = getSortedChildren();
String sequenceNodeName = ourPath.substring(basePath.length() + 1); // +1 to include the slash
PredicateResults predicateResults = driver.getsTheLock(client, children, sequenceNodeName, maxLeases);
if ( predicateResults.getsTheLock() )
{
haveTheLock = true;
}
else
{
String previousSequencePath = basePath + "/" + predicateResults.getPathToWatch();
synchronized(this)
{
try
{
// use getData() instead of exists() to avoid leaving unneeded watchers which is a type of resource leak
client.getData().usingWatcher(watcher).forPath(previousSequencePath);
if ( millisToWait != null )
{
millisToWait -= (System.currentTimeMillis() - startMillis);
startMillis = System.currentTimeMillis();
if ( millisToWait <= 0 )
{
doDelete = true; // timed out - delete our node
break;
}
wait(millisToWait);
}
else
{
wait();
}
}
catch ( KeeperException.NoNodeException e )
{
// it has been deleted (i.e. lock released). Try to acquire again
}
}
}
}
}
catch ( Exception e )
{
ThreadUtils.checkInterrupted(e);
doDelete = true;
throw e;
}
finally
{
if ( doDelete )
{
deleteOurPath(ourPath);
}
}
return haveTheLock;
}这个方法是 InterProcessMutex 锁最关键的一个方法:
-
它使用
while自旋实现了不断尝试获得锁; -
为了避免不必要的自旋浪费资源,使用
wait(time)来“限时”等待; -
如果超时,则结束循环,删除节点信息。
这个方法中,有一行代码要特别注意,D瓜哥把上下文相关的代码都整理出来:
org.apache.curator.framework.recipes.locks.LockInternals#internalLockLoopString previousSequencePath = basePath + "/" + predicateResults.getPathToWatch();
// 注意下面这行代码
client.getData().usingWatcher(watcher).forPath(previousSequencePath);
// watcher 变量对应的
private final Watcher watcher = new Watcher()
{
@Override
public void process(WatchedEvent event)
{
client.postSafeNotify(LockInternals.this);
}
};
// org.apache.curator.framework.CuratorFramework#postSafeNotify 的代码
default CompletableFuture<Void> postSafeNotify(Object monitorHolder)
{
return runSafe(() -> {
synchronized(monitorHolder) {
monitorHolder.notifyAll();
}
});
}这行关键的代码的意思是:监听上一个节点(排序后前一个节点)的变化。因为在 internalLockLoop 方法中调用了 wait(time) 方法,将运行线程等待;所以,需要一个唤醒操作。而这个监听事件就实现了唤醒操作。
监听上一个节点变化是为了防止羊群效应的出现。因为只有一个线程获得锁,过多线程唤醒只会造成无用的操作,浪费资源。
这里有一个需要深入思考的点:如果前一个节点删除,这个线程还会被唤醒吗?答案是可以的。逻辑这样的:前一个节点删除,必然触发一个事件,这个事件就可以唤醒已经等待的线程;线程就会做一个循环,检查是否能获得锁,如果可以就结束循环;如果不可以,则会再次选择前一个节点注册监听器,然后进入等待状态。
来看一下它如何获取孩子节点的:
getSortedChildren 方法
org.apache.curator.framework.recipes.locks.LockInternals#getSortedChildrenpublic static List<String> getSortedChildren(CuratorFramework client, String basePath, final String lockName, final LockInternalsSorter sorter) throws Exception
{
try
{
List<String> children = client.getChildren().forPath(basePath);
List<String> sortedList = Lists.newArrayList(children);
Collections.sort
(
sortedList,
new Comparator<String>()
{
@Override
public int compare(String lhs, String rhs)
{
return sorter.fixForSorting(lhs, lockName).compareTo(sorter.fixForSorting(rhs, lockName));
}
}
);
return sortedList;
}
catch ( KeeperException.NoNodeException ignore )
{
return Collections.emptyList();
}
}
List<String> getSortedChildren() throws Exception
{
return getSortedChildren(client, basePath, lockName, driver);
}这个方法也比较简单,获取所有孩子节点,然后对其进行排序,返回排序后的结果。
再来看看 getsTheLock 方法:
getsTheLock 方法
org.apache.curator.framework.recipes.locks.StandardLockInternalsDriver#getsTheLock@Override
public PredicateResults getsTheLock(CuratorFramework client, List<String> children, String sequenceNodeName, int maxLeases) throws Exception
{
int ourIndex = children.indexOf(sequenceNodeName);
validateOurIndex(sequenceNodeName, ourIndex);
boolean getsTheLock = ourIndex < maxLeases;
String pathToWatch = getsTheLock ? null : children.get(ourIndex - maxLeases);
return new PredicateResults(pathToWatch, getsTheLock);
}初次看这个方法,还有些懵逼。从上往下捋下来,现在看其实很简单,对一个排过序的数组,检查自己是否是第一个节点,如果是就表示自身是最小节点,获得锁。
上面还有超时后删除节点的操作,也顺道看一下:
deleteOurPath 方法
private void deleteOurPath(String ourPath) throws Exception
{
    try
    {
        client.delete().guaranteed().forPath(ourPath);
    }
    catch ( KeeperException.NoNodeException e )
    {
        // ignore - already deleted (possibly expired session, etc.)
    }
}
这个方法很简单,就是直接删除自身节点信息。
release 方法
org.apache.curator.framework.recipes.locks.InterProcessMutex#release/*
* Perform one release of the mutex if the calling thread is the same thread that acquired it. If the
* thread had made multiple calls to acquire, the mutex will still be held when this method returns.
*
* @throws Exception ZK errors, interruptions, current thread does not own the lock
*/
@Override
public void release() throws Exception
{
/
Note on concurrency: a given lockData instance
can be only acted on by a single thread so locking isn't necessary
*/
Thread currentThread = Thread.currentThread();
LockData lockData = threadData.get(currentThread);
if ( lockData === null )
{
throw new IllegalMonitorStateException("You do not own the lock: " + basePath);
}
int newLockCount = lockData.lockCount.decrementAndGet();
if ( newLockCount > 0 )
{
return;
}
if ( newLockCount < 0 )
{
throw new IllegalMonitorStateException("Lock count has gone negative for lock: " + basePath);
}
try
{
internals.releaseLock(lockData.lockPath);
}
finally
{
threadData.remove(currentThread);
}
}因为是重入锁,所以需要将锁定次数减少到零才能彻底释放锁。
releaseLock 方法
org.apache.curator.framework.recipes.locks.LockInternals#releaseLockfinal void releaseLock(String lockPath) throws Exception
{
client.removeWatchers();
revocable.set(null);
deleteOurPath(lockPath);
}释放锁也很简单,删除节点上的监听器,删除节点即可。
由于 ZooKeeper 本身支持创建顺序节点,所以可以监听前一个节点,这样就可以打打减少事件传播的广度,减少无用的唤醒。这一点是和基于 Redis 实现的分布式锁有很大的区别。
另外,ZooKeeper 是一个 CP 系统,支持操作正确返回,就不需要考虑系统一致性问题。这一点和基于 Redis 实现的分布式锁也有很大的区别。
Apache Curator 不仅仅实现了分布式锁,还是实现了分布式读写锁。下一篇文章就来分析一下这个分布式读写锁: 分布式锁之 Apache Curator InterProcessReadWriteLock。
Recommend
About Joyk
Aggregate valuable and interesting links.
Joyk means Joy of geeK