

RabbitMQ 实现延迟队列
source link: https://www.extlight.com/2020/11/25/RabbitMQ-%E5%AE%9E%E7%8E%B0%E5%BB%B6%E8%BF%9F%E9%98%9F%E5%88%97/
Go to the source link to view the article. You can view the picture content, updated content and better typesetting reading experience. If the link is broken, please click the button below to view the snapshot at that time.
最近开发一个活动功能,需要在活动结束后给榜单 Top10 用户发放奖励。由于活动的榜单是通过 RabbitMQ 进行异步统计分值排名的,因此在活动结束时队列中可能还存在消息未消费完全,排名不准确,此时发放活动奖励必然会出错。
那么,如果解决这个问题呢? 与产品经理协商,允许延迟 10 分钟发放奖励。目前有 2 个方案:
使用定时器:判断当前时间与活动结束时间的时间差,如果 >= 10分钟就发放奖励
    -- 缺点:除了需要调度线程,还需要定期访问数据库获取活动结束时间来判断,这样既浪费资源也不优雅

使用 RabbitMQ 延迟队列
    -- 优点:既能满足需求也规避定时器实现方案的缺点
因此,最终选定 RabbitMQ 的延迟队列实现方案。但是,RabbitMQ 没有直接提供延迟队列我们该如何实现呢?请继续阅读下文。
二、TTL
TTL 全称 Time To Live(存活时间/过期时间),当消息到达存活时间后,还没有被消费,会被自动清除。
RabbitMQ 提供 2 种方式给消息设置过期时间:
设置队列过期时间参数:x-message-ttl,单位:ms(毫秒),会对整个队列消息统一过期

调用消息过期时间方法,设置过期时间:expiration。单位:ms(毫秒),当该消息在队列头部时(消费时),会单独判断这一消息是否过期

如果两者都进行了设置,以时间短的为准
TTL实战
@Bean
public Queue ttlQueue() {
	Map<String,Object> map = new HashMap<>(1);
	// 设置队列过期参数
    map.put("x-message-ttl", 10000);
	return new Queue("ttl.queue", true, false, false, map);
}

@Bean
public DirectExchange ttlDirectExchange() {
	return new DirectExchange("ttl.direct.exchange", true, false);
}

@Bean
public Binding ttlDirectBinding() {
  return BindingBuilder
  		.bind(ttlQueue())
  		.to(ttlDirectExchange())
  		.with("ttl");
}
@RunWith(SpringRunner.class)
@SpringBootTest
public class RabbitmqTestApplicationTests {

@Autowired
	private RabbitTemplate rabbitTemplate;

@Test
	public void test() throws Exception {
		for (int i = 0; i < 10; i++) {
			this.rabbitTemplate.convertAndSend("ttl.direct.exchange", "ttl", "hello ttl", new MessagePostProcessor() {

@Override
				public Message postProcessMessage(Message message) throws AmqpException {
				    // 调用消息过期方法
					message.getMessageProperties().setExpiration("5000");
					return message;
				}
			});
		}
	}
}
测试结果如下图:
ttl.queue 队列创建后,可以看出 ttl 属性为 10000(10秒),里边的的 10 条消息在 5 秒后被清除了。
三、死信队列
DLX 全称 Dead Letter Exchange(死信交换机),当消息成为死信 (Dead Message) 后,可以被重新发送到另一个交换机,这个交换机就是死信交换机,由于交换机是 RabbitMQ 特有的,通常我们把死信交换机也成为死信队列。
原理图如下:

要实现上边的流程,我们需要解决 2 个问题:
队列中的消息怎么成为死信:
    --原队列消息长度到达限制
    --原队列存在消息过期设置,消息到达超时时间未被消费
    --消费者拒接消费消息,basicNack/basicReject,并且不把消息重新放入原目标队列,requeue=false

消息成为死信后如何投递到死信队列中:
    --给原队列设置参数: x-dead-letter-exchange 和 x-dead-letter-routing-key
死信队列实战
@Bean
public Queue ttlQueue() {
	Map<String,Object> map = new HashMap<>(1);
    map.put("x-message-ttl", 10000);
    // 设置消息成为死信后,传发到的路由器
    map.put("x-dead-letter-exchange","dead.direct.exchange");
    map.put("x-dead-letter-routing-key", "dead");
	return new Queue("ttl.queue", true, false, false, map);
}

@Bean
public DirectExchange ttlDirectExchange() {
	return new DirectExchange("ttl.direct.exchange", true, false);
}

@Bean
public Binding ttlDirectBinding() {
  return BindingBuilder
  		.bind(ttlQueue())
  		.to(ttlDirectExchange())
  		.with("ttl");
}

// =======================以下为死信队列相关配置=========================

@Bean
public Queue deadQueue() {
	return new Queue("dead.queue", true);
}

@Bean
public DirectExchange deadDirectExchange() {
	return new DirectExchange("dead.direct.exchange", true, false);
}

@Bean
public Binding deadDirectBinding() {
  return BindingBuilder
  		.bind(deadQueue())
  		.to(deadDirectExchange())
  		.with("dead");
}
测试类代码不变,为了方便测试,我们这里就不写消费者代码。我们需要先把 ttl.queue 队列删除再执行代码。结果如下图:
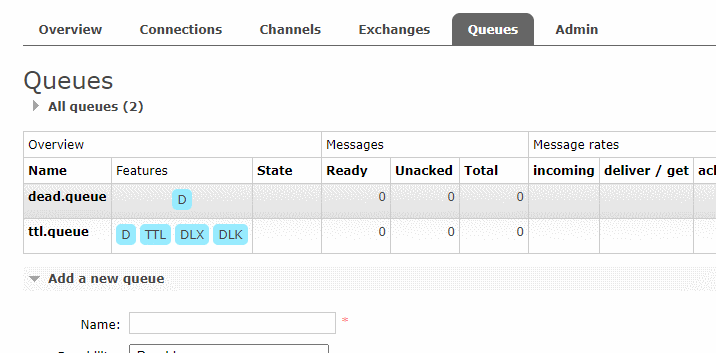
由图可知,ttl.queue 队列里的消息在 5 秒后转移 dead.queue 队列中了,其实这样就已经实现了延迟队列。
我们把需要实现的功能套用到上边的案例中:活动结束后我们发送一条有过期时间的消息(10分钟)到 ttl.queue 队列中,该队列不需要消费者。10分钟后由于消息没被消费被转发到死信队列 dead.queue 队列中,dead.queue 设置消费者,消费者用于执行发放活动奖励。
四、参考资料
Recommend
About Joyk
Aggregate valuable and interesting links.
Joyk means Joy of geeK