

Angular CRUD With ASP.NET Core And Entity Framework Core
source link: https://dotnetgik.com/2019/12/20/angular-crud-with-asp-net-core-and-entity-framework-core/
Go to the source link to view the article. You can view the picture content, updated content and better typesetting reading experience. If the link is broken, please click the button below to view the snapshot at that time.
Angular CRUD With ASP.NET Core And Entity Framework Core
It feels great to be back with this, my 18th article on Angular with the recently updated Angular 7. With this article, let’s try to explore the Angular 7 features and get hands on with the CRUD operations using Angular 7, .NET Core, and Entity Framework Core. Let us first set the agenda for this article.
Agenda
- Introduction to Angular 7
- New Features
- Angular CLI Changes
- Angular Material Changes
- Upgrading to Angular 7
- Adding New Project
- Front-end design and implementation using Angular 7
- Adding Components
- Adding Models and Config files
- Adding Bootstrap popups
- Adding Data service
- Back-end Web API Development using ASP.NET Core and Entity Framework Core
- Set up .NET Core project
- Setup Entity framework core
- Set up CORS to allow cross-origin resource sharing.
- Future expansion of this article
- Source code link
Angular 7
Finally, the wait for Angular 7 is over!! This version of the Angular has given us some exciting features. Primarily, the changes are in Angular Core, CLI, and then Angular Material. Let’s explore it one by one.
Angular Core Changes
Some of the added features in the Angular Core are listed down here.
- Introduced new interface – UrlSegment [] to CanLoad interface
- New Interface DoBootStrap
- Added a new elements features – enable Shadow DOM v1 and slots
- Added a new router features – warn if navigation triggered outside Angular zone
- Added a new ability to recover from malformed URLs
- Added a new compiler support dot (.) in import statements and avoid a crash in ngc-wrapped
- Added a new “original” placeholder value on extracted XMB
- Updated dependencies to support TypeScript 3.1, RxJS 6.3 and Node 10.
Angular CLI Changes
CLI Prompts
Angular 7 CLI has some exciting feature like prompt as shown in the screen below. This lets you set up the Angular project with a couple of questions.
Angular Material and CDK
Angular Material and CDK have come out with new advanced features like virtual scrolling and Drag and Drop. Let’s explore them in brief
Virtual Scrolling
This allows us to use the noticeable aspect of the list to load and unload the DOM element in the page. That means if we have a large chunk of the data and we want to show it in the list, we can make use of this feature.
Drag and Drop
“Drag and Drop” gets the support from CDK and includes the features like automatic rendering as the user moves items and including the helper methods for the record or transfer of items in the lists.
Application performance
Everything revolves around the application and Google has invested plenty of things and introduced some features which will help us to boost the performance . The first one is the Bundle Budget which lets us set the application bundle size and gives some errors when the limit is exceeded. The default size for bundle budget is 2 MB which can be increased later. The next thing is the removal of the Pollyfill.ts file which is used only during the development. Now, it gets removed from the production automatically.
Upgrading to Angular 7
Well, many of us have the project built on the older versions of Angular. In order to upgrade the old versions to the new one, the official website has provided the ways and the detailed explanation of how to do that. You can find it here. If we are migrating from the Angular 6 to Angular 7, the following command will do the work for us. ng update @angular/cli @angular/core So far, we learned about Angular 7 features and upgrading. Now, let’s have some real action and add the project.
Adding New Project
To add an Angular project, we have some prerequisites to proceed further with this article.
- Installing latest Node.js
This will install the NPM (Node package manager) and download all the dependencies or packages for our application. The latest version of the Node.js can be found here. - Getting Angular CLI
Once we are done with Node.js and NPM, the next step will be to download Angular CLI which will help us in setting up the things quickly. For installing CLI, we will need the following command.
npm install -g @angular/cli - Getting Visual Studio Code
This is the IDE that we will be using in this article and for installing this, you can find the latest version of this right here.
Creating a new project
Now, it’s time to add a new project with Angular 7. For this, let’s follow the steps as below in the figure.
- Create the Directory where you want to save the project
- Use command ng New Angular7CRUDDemo
- Choose the proper option to add the Routing and CSS
Note
Depending on your machine and internet speed, it may take some time to download the package and project is ready. Once the project is ready, let’s open it from the File menu and we can see the directory structure, like below.
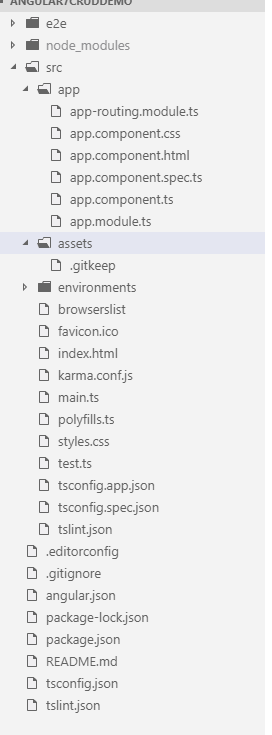
One change we can see from the old version is the addition of the app-routing file which is added from the CLI prompt options while setting up the project. Now, the question is how can we check if our project is Angular 7 compatible. For that, we need to check the package.json file which has the structure as below.
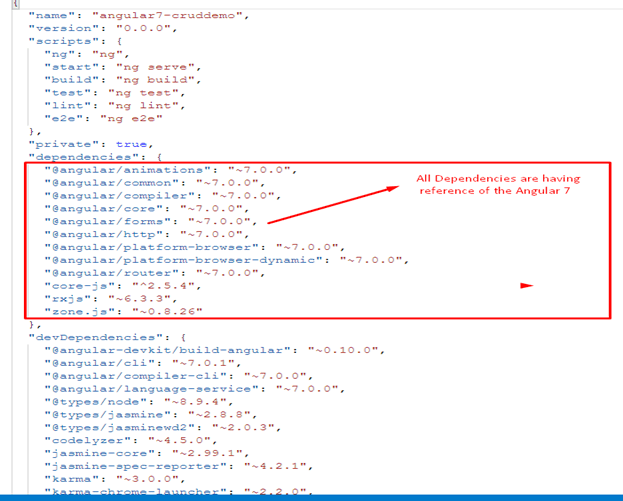
When we see the highlighted section, we can say that the current project is configured to use the latest version of Angular dependencies. Now, it is time for actual coding. We have divided our coding part into 2 sections – the first one being the UI in Angular 7 and the second one is Web API part in .NET Core and Entity Framework Core. Let us first see the UI part and then, we will see the Web API part with .NET Core and Entity Framework core
Front-end design and implementation using Angular
As we all know the front-end or any Angular application is made up of the components, let’s see what will be the structure of the application. Before that, we should understand what we are going to achieve in this article. Here, we are going to add the demo application which will be used to list, add, update, and delete the employees. For that, we will have the following directory structure.

Above is the directory structure of the application where we have 7 components namely –
- Angular-crud.component.ts
This is the component which will list down all the employees and will hold other components. - employee-add.component.ts
This is the component to create the employee record. - app.component.ts
This is the app component where all the components will be loaded through <router-outlet></router-outlet>. - Employeeupdate.component.ts
This is responsible for handling the Edit operation of the Employee record. - DataService.ts
This will hold all the API calls with various verbs using the Httpclient in Angular 7. - Data Models
This folder holds the Employee data model which will be the base for all and the config.ts file which will hold the configuration related data. - App-routing.module.ts
This is the Router which will be added to the application while configuring the project.
Let’s explore these components one by one.
Code Description
employee-Add.component.ts
import { Component, OnInit,Input, ViewChild, ElementRef, EventEmitter, Output } from '@angular/core'; import { NgForm } from '@angular/forms'; import { Employee } from 'src/Models/Employee'; import { Router } from '@angular/router'; import {EmployeeDataService} from '../DataService/EmployeeDataService' @Component({ selector: 'app-employee-add', templateUrl: './employee-add.component.html', styleUrls: ['./employee-add.component.sass'] }) export class EmployeeAddComponent implements OnInit { @Input() cleardata: boolean = false; @Output() nameEvent = new EventEmitter<string>(); objtempemp:Employee; @Input() objemp :Employee=new Employee();; @ViewChild('closeBtn') cb: ElementRef; constructor(private dataservice:EmployeeDataService,private route:Router) { } ngOnInit() { } Register(regForm:NgForm){ this.objtempemp=new Employee(); this.objtempemp.email=regForm.value.email; this.objtempemp.firstname=regForm.value.firstname; this.objtempemp.lastname=regForm.value.lastname; this.objtempemp.gender=regForm.value.gender; this.dataservice.AddEmployee(this.objtempemp).subscribe(res=>{ alert("Employee Added successfully"); this.TakeHome(); } ) } TakeHome(){ this.nameEvent.emit("ccc"); this.cb.nativeElement.click(); this.route.navigateByUrl(''); } } Employee-add.component.html
<div class="container" style="border:thin"> <form #empadd='ngForm' (ngSubmit)="Register(empadd)" class="form-horizontal" style="width:50%" > <div class="form-group" > <label class="control-label col-sm-2" for="fname" >First Name:</label> <div class="col-sm-10"> <input style="width:50%" type="text" class="form-control" width="50%" id="fname" placeholder="Enter first name" name="firstname" firstname required [(ngModel)]='objemp.firstname' #firstname="ngModel"> <span class="help-bpx" *ngIf="firstname.touched && !firstname.valid ">Required</span> </div> </div> <div class="form-group" > <label class="control-label col-sm-2" for="email">Last Name:</label> <div class="col-sm-10"> <input style="width:50%" required type="text" class="form-control" width="50%" id="lastname" placeholder="Enter Last Name" name="lastname" lastname required [(ngModel)]='objemp.lastname' #lastname="ngModel"> <span class="help-bpx" *ngIf="lastname.touched && !lastname.valid ">Required</span> </div> </div> <div class="form-group" > <label class="control-label col-sm-2" for="Gender">Gender:</label> <div class="col-sm-10"> <select name="gender" gender required [(ngModel)]='objemp.gender' #gender="ngModel"> <option value="0" selected disabled>Please Select</option> <option value="1">Male</option> <option value="2">Female</option> <span class="help-bpx" *ngIf="gender.touched && !gender.valid ">required</span> </select> </div> </div> <div class="form-group" > <label class="control-label col-sm-2" for="email">Email:</label> <div class="col-sm-10"> <input #email="ngModel" style="width:50%" type="email" [(ngModel)]='objemp.email' class="form-control" width="50%" id="email" placeholder="Enter email" name="email"> <span class="help-bpx" *ngIf="email.touched && !email.valid ">**</span> </div> </div> <div class="form-group"> <div class="col-sm-offset-2 col-sm-10"> <button id="btnsubmit" type="submit" class="btn btn-primary">Submit</button> </div> </div> </form> </div> <button style="display:none" type="button" #closeBtn class="btn btn-default" data-dismiss="modal">Close</button> Above is the code for the Employee Add Component and template for the same. Code Description
- In this code, we have the import section which is needed for the app.
- In Constructor, we have injected the data service and the Router.
- We have a function Register(regForm:NgForm ). Here, we are using the template-driven approach for adding an employee. So, we have declared the form object of type NgForm.
- In this method, we are subscribing the Addemployee Data service. On the success, we are showing the alert and redirecting the route to the Home component.
- We have a TakeHome method that will emit the method to refresh the parent component and reload the data from there.
In Template, we have added the Form tag and named the form as #empadd here in this. On NgSubmit event of the form, we are calling the Register() which will submit the form along with its values. - For Validation purposes, we are using basic HTML validation.
- In the last line, we have added the code for the Close button which is dummy code and will be fired in the template when the Employee is added successfully.
This is about the Add Component. Let’s see the Update component and its template which has the same structure and description as that of the Add Component.
employeeupdate.component.ts
import { Component, OnInit, ViewChild, Input, EventEmitter, Output, ElementRef } from '@angular/core'; import { EmployeeDataService } from '../DataService/EmployeeDataService'; import { Router } from '@angular/router'; import { NgForm } from '@angular/forms'; import { Employee } from 'src/Models/Employee'; @Component({ selector: 'app-employeeupdate', templateUrl: './employeeupdate.component.html', styleUrls: ['./employeeupdate.component.sass'] }) export class EmployeeupdateComponent implements OnInit { constructor(private dataservice:EmployeeDataService,private route:Router) { } @Output() nameEvent = new EventEmitter<string>(); @ViewChild('closeBtn') cb: ElementRef; ngOnInit() { } @Input() reset:boolean = false; @ViewChild('regForm') myForm: NgForm; @Input() isReset: boolean = false; objtempemp:Employee; @Input() objemp :Employee=new Employee(); EditEmployee(regForm:NgForm) { this.dataservice.EditEmployee(this.objemp).subscribe(res=> { alert("Employee updated successfully"); this.nameEvent.emit("ccc"); this.cb.nativeElement.click(); }, }; } employeeupdate.component.html
<div class="container" style="border:thin"> <form #EditForm='ngForm' name="editform" (ngSubmit)="EditEmployee(EditForm)" class="form-horizontal" style="width:50%"> <div class="form-group"> <label class="control-label col-sm-2" for="fname">First Name:</label> <div class="col-sm-10"> <input style="width:50%" type="text" class="form-control" width="50%" id="fname" placeholder="Enter first name" name="firstname" firstname required [(ngModel)]='objemp.firstname' #firstname="ngModel"> <span class="help-bpx" *ngIf="firstname.touched && !firstname.valid ">Required</span> </div> </div> <div class="form-group"> <label class="control-label col-sm-2" for="email">Last Name:</label> <div class="col-sm-10"> <input style="width:50%" required type="text" class="form-control" width="50%" id="lastname" placeholder="Enter Last Name" name="lastname" lastname required [(ngModel)]='objemp.lastname' #lastname="ngModel"> <span class="help-bpx" *ngIf="lastname.touched && !lastname.valid ">Required</span> </div> </div> <div class="form-group"> <label class="control-label col-sm-2" for="Gender">Gender:</label> <div class="col-sm-10"> <select name="gender" gender required [(ngModel)]='objemp.gender' #gender="ngModel"> <option value="0" selected disabled>Please Select</option> <option value="1">Male</option> <option value="2">Female</option> <span class="help-bpx" *ngIf="gender.touched && !gender.valid ">required</span> </select> </div> </div> <div class="form-group"> <label class="control-label col-sm-2" for="email">Email:</label> <div class="col-sm-10"> <input #email="ngModel" style="width:50%" type="email" [(ngModel)]='objemp.email' class="form-control" width="50%" id="email" placeholder="Enter email" name="email"> <span class="help-bpx" *ngIf="email.touched && !email.valid ">**</span> </div> </div> <div class="form-group"> <div class="col-sm-offset-2 col-sm-10"> <button type="submit" class="btn btn-primary">Submit</button> </div> </div> </form> </div> <button style="display:none" type="button" #closeBtn class="btn btn-default" data-dismiss="modal">Close</button> Above is the code for the employee update component. Again, the description of this component is the same as that of the Add Component. Let’s explore the List component for clarity.
Employeelist.component.ts
import { Component, OnInit, ViewChild } from '@angular/core'; import { EmployeeAddComponent } from '../employee-add/employee-add.component'; import { EmployeeDataService } from '../DataService/EmployeeDataService' import { Employee } from 'src/Models/Employee' import { Router } from '@angular/router'; import { EmployeeupdateComponent } from '../employeeupdate/employeeupdate.component'; @Component({ selector: 'app-angular-crud', templateUrl: './angular-crud.component.html', styleUrls: ['./angular-crud.component.sass'] }) export class AngularCRUDComponent implements OnInit { emplist: Employee[]; dataavailbale: Boolean = false; tempemp: Employee constructor(private dataservce: EmployeeDataService, private route: Router) { } ngOnInit() { this.LoadData(); } LoadData() { this.dataservce.getEmployee().subscribe((tempdate) => { this.emplist = tempdate; console.log(this.emplist); if (this.emplist.length > 0) { this.dataavailbale = true; } else { this.dataavailbale = false; } } ) , err => { console.log(err); } } deleteconfirmation(id: string) { if (confirm("Are you sure you want to delete this ?")) { this.tempemp = new Employee(); this.tempemp.id = id; this.dataservce.DeleteEmployee(this.tempemp).subscribe(res => { alert("Deleted successfully !!!"); this.LoadData(); }) } } @ViewChild('empadd') addcomponent: EmployeeAddComponent @ViewChild('regForm') editcomponent: EmployeeupdateComponent loadAddnew() { this.addcomponent.objemp.email = "" this.addcomponent.objemp.firstname = "" this.addcomponent.objemp.lastname = "" this.addcomponent.objemp.id = "" this.addcomponent.objemp.gender = 0 } loadnewForm(id: string, email: string, firstname: string, lastname: string, gender: number) { console.log(gender); this.editcomponent.objemp.email = email this.editcomponent.objemp.firstname = firstname this.editcomponent.objemp.lastname = lastname this.editcomponent.objemp.id = id this.editcomponent.objemp.gender = gender } RefreshData() { this.LoadData(); } } EmployeeList.html
<div class="container"> <input type="button" class="btn btn-primary" (click)="loadAddnew()" data-toggle="modal" data-target="#myModal" value="Create New"> <hr> <div *ngIf="!dataavailbale"> <h4> No Employee Data is present Click Add new to add Data.</h4> </div> <table class="table" *ngIf="dataavailbale"> <thead> <tr> <th scope="col">Sr.No</th> <th scope="col">First name</th> <th scope="col">Last Name</th> <th scope="col">Email</th> <th scope="col">Gender</th> <th scope="col" style="align-content: center">Action</th> </tr> </thead> <tbody> <tr *ngFor="let e of emplist let i = index "> <td scope="col">{{i+1}}</td> <td scope="col">{{e.fname}}</td> <td scope="col">{{e.lname}}</td> <td scope="col">{{e.email}}</td> <td scope="col">{{e.gender=="1"?'Male':'Female'}}</td> <td style="display:none">{{e.id}}</td> <td scope="col"> <button type="button" class="btn btn-default btn-primary" (click)="loadnewForm(e.id,e.email,e.fname,e.lname,e.gender)" data-toggle="modal" data-target="#myModaledit"> <span class="glyphicon glyphicon-edit"></span> Edit </button> | <button type="button" class="btn btn-default btn-danger" (click)="deleteconfirmation(e.id)"> <span class="glyphicon glyphicon-trash"></span> Delete </button> </td> </tr> </tbody> </table> <div id="myModal" class="modal fade" role="dialog"> <div class="modal-dialog"> <div class="modal-content"> <div class="modal-header"> <button type="button" class="close" data-dismiss="modal">×</button> <h4 class="modal-primary">Employee Add</h4> </div> <div class="modal-body"> <app-employee-add #empadd (nameEvent)="RefreshData($event)"></app-employee-add> </div> <div class="modal-footer"> <button type="button" #closeBtn class="btn btn-danger" data-dismiss="modal">Close</button> </div> </div> </div> </div> <div id="myModaledit" class="modal fade" role="dialog"> <div class="modal-dialog"> <div class="modal-content"> <div class="modal-header"> <button type="button" class="close" data-dismiss="modal">×</button> <h4 class="modal-title">Edit</h4> </div> <div class="modal-body"> <app-employeeupdate (nameEvent)="RefreshData($event)" [isReset]="resetForm" #regForm></app-employeeupdate> </div> <div class="modal-footer"> <button type="button" class="btn btn-danger" data-dismiss="modal">Close</button> </div> </div> </div> </div> Code Description
- We are doing some import package that we needed in the component.
- We have declared the variables as per the requirement and in the constructor, we have imported the Data service and the Router.
Following are the things which get us the reference of the child component added to the Parent component, i.e., the Employee list component.
@ViewChild('empadd') addcomponent: EmployeeAddComponent @ViewChild('regForm') editcomponent: EmployeeupdateComponent Why do we will need this? Let’s see in the next two functions – loadAddnew(), loadAddnewForm(). We are using these two viewChild elements where we are resetting and setting the values of the particular form.
- Next thing we have is the LoadData(). It subscribes the get method in the data service and assigns the data to the employee list object we have.
- Delete Employee is called which takes the id from the Table Above and then call the delete service from the Data service and then show an alert if it successfully deletes the Employee Data from the database.
- Template code is simply displaying the list of the employees and added. The add and edit components in the code will render in the Popup.
After components, let’s explore rest of the UI and front-end part.
Adding Models and Config File
Employee.ts
export class Employee{ firstname:string; lastname:string ; email:string; gender:number; id:string } Here is the class which we will use in overall application to send and receive data. Config.ts This class will hold the Configuration related data. Right now we have only the App URL in the class but we can have rest of the data here.
Adding Bootstrap popups
We are using the Popups to show the Add and Edit form so to do this we have the code defined in the Employee List components template.
<div id="myModal" class="modal fade" role="dialog"> <div class="modal-dialog"> <div class="modal-content"> <div class="modal-header"> <button type="button" class="close" data-dismiss="modal">×</button> <h4 class="modal-primary">Employee Add</h4> </div> <div class="modal-body"> <app-employee-add #empadd (nameEvent)="RefreshData($event)"></app-employee-add> </div> <div class="modal-footer"> <button type="button" #closeBtn class="btn btn-danger" data-dismiss="modal">Close</button> </div> </div> </div> </div> In this we have used the normal Popup code and inside the modal-body we have rendered out child componets
Adding Data service
Data service is the layer where we have separated the service calling logic from the rest of the application. Our data service looks like below,
import { HttpClient, HttpParams, HttpHeaders } from '@angular/common/http'; import { Injectable } from '@angular/core'; import { Employee } from 'src/Models/Employee' import { ROOT_URL } from 'src/Models/Config' import { Observable } from 'rxjs'; @Injectable() export class EmployeeDataService { employees: Observable<Employee[]>; newemployee: Employee; constructor(private http: HttpClient) { } getEmployee() { return this.http.get<Employee[]>(ROOT_URL + 'Employees'); } AddEmployee(emp: Employee) { const headers = new HttpHeaders().set('content-type', 'application/json'); var body = { Fname: emp.firstname, Lname: emp.lastname, Email: emp.email, gender: emp.gender } console.log(ROOT_URL); return this.http.post<Employee>(ROOT_URL + '/Employees', body, { headers }); } /// EditEmployee(emp: Employee) { console.log(emp); const params = new HttpParams().set('ID', emp.id); const headers = new HttpHeaders().set('content-type', 'application/json'); var body = { Fname: emp.firstname, Lname: emp.lastname, Email: emp.email, ID: emp.id , gender: emp.gender } return this.http.put<Employee>(ROOT_URL + 'Employees/' + emp.id, body, { headers, params }) } DeleteEmployee(emp: Employee) { const params = new HttpParams().set('ID', emp.id); const headers = new HttpHeaders().set('content-type', 'application/json'); var body = { Fname: emp.firstname, Lname: emp.lastname, Email: emp.email, ID: emp.id } return this.http.delete<Employee>(ROOT_URL + '/Employees/' + emp.id) } } In this we have all the methods which will make use of the Httpclient and Return the observable for each of the Basic HTTP verb like Get, Put, Post and delete. We have imported the basic Http essentials at the Top like HttpParams and HttpClient which is the part of the Angular/Common/http So far we are done with the front-end design and Implementations of the things, so let’s move to the server side setup which is done using the .net Core and Entity Framework core so let’s have a look into it
. Back-end Web API Development using Asp.net Core and Entity Framework Core
In this section let’s explore the API which we use for the implementations of the CRUD operation for the employee. This section can be broken down into 4 sections. Mainly these are how we set up the ..NET Core project, then setting up the entity framework core, and then adding the CORS ( Cross-origin resource sharing ) section so that it will allow the Angular app to communicate with the Server.
Adding .NET Core Web API project
To add .NET Core web API project let’s follow the below steps,
Once we are done with adding the project let’s move towards the Added Project and make the necessary changes
using System; using System.Collections.Generic; using System.Linq; using System.Threading.Tasks; using Angular7DemoServices; using Microsoft.AspNetCore.Builder; using Microsoft.AspNetCore.Hosting; using Microsoft.AspNetCore.Mvc; using Microsoft.EntityFrameworkCore; using Microsoft.Extensions.Configuration; using Microsoft.Extensions.DependencyInjection; using Microsoft.Extensions.Logging; using Microsoft.Extensions.Options; namespace Angular6DemoServices { public class Startup { public Startup(IConfiguration configuration) { Configuration = configuration; } public IConfiguration Configuration { get; } // This method gets called by the runtime. Use this method to add services to the container. public void ConfigureServices(IServiceCollection services) { services.AddMvc(); services.AddCors(); services.AddDbContext<AppDbContext>(opt => opt.UseSqlServer(@"Your connection string")); } // This method gets called by the runtime. Use this method to configure the HTTP request pipeline. public void Configure(IApplicationBuilder app, IHostingEnvironment env) { if (env.IsDevelopment()) { app.UseDeveloperExceptionPage(); } app.UseMiddleware(); app.UseCors(); app.UseMvc(); } } } This is our startup class where we are configuring the services and registering the services In this, the first thing is to Add the Database context where we are using the SQL server as a database
The next thing that we need to do is to configure the CORS Option where we allow the Cross origin resource sharing from the Angular application. Apart from that we have added the Middleware which will again helps us in the CORS issue.
The middleware code can be like below
using System; using System.Collections.Generic; using System.Linq; using System.Threading.Tasks; using Microsoft.AspNetCore.Builder; using Microsoft.AspNetCore.Http; namespace Angular7DemoServices { // You may need to install the Microsoft.AspNetCore.Http.Abstractions package into your project public class CorsMiddleware { private readonly RequestDelegate _next; public CorsMiddleware(RequestDelegate next) { _next = next; } public Task Invoke(HttpContext httpContext) { httpContext.Response.Headers.Add("Access-Control-Allow-Origin", "*"); httpContext.Response.Headers.Add("Access-Control-Allow-Credentials", "true"); httpContext.Response.Headers.Add("Access-Control-Allow-Headers", "Content-Type, Accept"); httpContext.Response.Headers.Add("Access-Control-Allow-Methods", "POST,GET,PUT,PATCH,DELETE,OPTIONS"); return _next(httpContext); } } // Extension method used to add the middleware to the HTTP request pipeline. public static class MiddlewareExtensions { public static IApplicationBuilder UseMiddleware(this IApplicationBuilder builder) { return builder.UseMiddleware<CorsMiddleware>(); } } } This will be the middleware which will add the needed headers in the request and response to and from the API. The Rest part in the Code is nothing but a simple CRUD Operation which we are familiar with, but if not we can find it on the Github which will be shared below. So when we Run the web API and the Angular Application we can see the output as below,
Future Expansion of this article
After seeing the output you might be wondering what these signup and login buttons are doing there, so they are for future articles, and what we would have in that includes:
- Login and Signup with the external authentication like Facebook and Gmail and twitter
- Using Identity server at the Web api end
- Adding new Modules for the employee where they can login and add their daily timesheet
- For the Admin Tracking their daily activities
If anyone is interested you can contribute to this project which is present at the below link.
Source code Link Here is the Source code link for the above article
Referenceshttps:
angular.io/
Recommend
About Joyk
Aggregate valuable and interesting links.
Joyk means Joy of geeK