

如何在Kubernetes中创建一个自定义Controller?
source link: https://silenceper.com/blog/202005/custom-resources-and-controllers/
Go to the source link to view the article. You can view the picture content, updated content and better typesetting reading experience. If the link is broken, please click the button below to view the snapshot at that time.
如何在Kubernetes中创建一个自定义Controller?
Custom Resource是扩展Kubernetes的一种方式(另外一种就是通过聚合层API apiserver-aggregation),而controller对指定的resource进行监听和执行对应的动作(watch,diff,action)。
Operator与Controller区别
- 所有的Operator都是用了Controller模式,但并不是所有Controller都是Operator。只有当它满足: controller模式 + API扩展 + 专注于某个App/中间件时,才是一个Operator。
- Operator就是使用CRD实现的定制化的Controller. 它与内置K8S Controller遵循同样的运行模式(比如 watch, diff, action)
- Operator是特定领域的Controller实现
讨论两者区别:https://github.com/kubeflow/tf-operator/issues/300
所以先学习如何构建出一些自定义的Controller肯定是之后实现Operator的基础。
实现一个自定义的Controller由两部分组成:CRD和Controller逻辑代码
这里以sample-controller的代码为例,同时我们自己写的Controller也可以参考这个代码结构。
CRD资源定义
以sample-controler中的为例,我们需要创建的一个 Foo 如下example-foo.yaml
:
创建该 Foo 自定义资源后,期望创建出一个名称为 example-foo ,副本数为 1 的deployment。
apiVersion: samplecontroller.k8s.io/v1alpha1
kind: Foo
metadata:
  name: example-foo
spec:
  deploymentName: example-foo
  replicas: 1
它的CRD定义如下:
 1
 2
 3
 4
 5
 6
 7
 8
 9
10
11
12
13
14
15
16
17
18
19
20
21
apiVersion: apiextensions.k8s.io/v1beta1
kind: CustomResourceDefinition
metadata:
  name: foos.samplecontroller.k8s.io
spec:
  group: samplecontroller.k8s.io
  version: v1alpha1 #版本
  names:
    kind: Foo # kind类型
    plural: foos # API中使用的名称:/apis/<group>/<version>/<plural>
  scope: Namespaced # Namespaced/Cluster,表示该CRD是命令空间属性还是集群属性
  validation: # 对参数进行验证,应用openAPIV3Schema规则
    openAPIV3Schema:
      properties:
        spec:
          properties:
            # 定义了一个 replicas 字段,类型为integer ,并且在1-10的范围内
            replicas:
              type: integer
              minimum: 1
              maximum: 10
更多关于crd定义规则可以参考官方文档:
https://kubernetes.io/docs/tasks/access-kubernetes-api/custom-resources/custom-resource-definitions/
当把这个crd资源apply到集群中后,我们可以通过 kubectl get apiservice v1alpha1.samplecontroller.k8s.io -o yaml 命令看到注册这个 apiservice
只需要将我们 Foo resource相关的struct,其余的类似自定义资源的 informers , listers , clientset 以及 deepcopy 的代码都可以通过工具code-generator
自动生成。
以及编写我们自定义Controller的业务逻辑代码就好了
struct资源定义
 1
 2
 3
 4
 5
 6
 7
 8
 9
10
11
12
13
14
15
16
17
18
19
20
21
22
23
24
25
26
27
28
29
30
31
32
33
34
35
36
37
38
39
package v1alpha1

import (
	metav1 "k8s.io/apimachinery/pkg/apis/meta/v1"
)

// +genclient
// +k8s:deepcopy-gen:interfaces=k8s.io/apimachinery/pkg/runtime.Object

// Foo is a specification for a Foo resource
type Foo struct {
	metav1.TypeMeta   `json:",inline"`
	metav1.ObjectMeta `json:"metadata,omitempty"`

	Spec   FooSpec   `json:"spec"`
	Status FooStatus `json:"status"`
}

// FooSpec is the spec for a Foo resource
// FooSpec 定义
type FooSpec struct {
	DeploymentName string `json:"deploymentName"`
	Replicas       *int32 `json:"replicas"`
}

// FooStatus is the status for a Foo resource
type FooStatus struct {
	AvailableReplicas int32 `json:"availableReplicas"`
}

// +k8s:deepcopy-gen:interfaces=k8s.io/apimachinery/pkg/runtime.Object

// FooList is a list of Foo resources
type FooList struct {
	metav1.TypeMeta `json:",inline"`
	metav1.ListMeta `json:"metadata"`

	Items []Foo `json:"items"`
}
其中类似 +k8s: 的注释是代码生成来识别的。
register.go
中将 Foo , FooList 注册进入 scheme 中。
代码生成能帮我处理大部分重复代码,主要通过 https://github.com/kubernetes/code-generator 这个包进行解析tag并生成。
全局tag
必须在目标包的doc.go文件中声明,典型路径是 pkg/apis///doc.go。
内容示例:
// 为包中任何类型生成深拷贝方法,可以在局部tag覆盖此默认行为
// +groupName=example.com
// +k8s:deepcopy-gen=package
// +groupName=samplecontroller.k8s.io  // groupName指定API组的全限定名

// Package v1alpha1 is the v1alpha1 version of the API.
package v1alpha1 // import "k8s.io/sample-controller/pkg/apis/samplecontroller/v1alpha1"
局部tag
- +genclient: 为这个 package 创建 client。
- +genclient:noStatus: 当创建 client 时,不存储 status。
- +k8s:deepcopy-gen:interfaces=k8s.io/apimachinery/pkg/runtime.Object: 为结构体生成 deepcopy 的代码,实现了 runtime.Object 的 Interface。
代码生成:
通过./hack/update-codegen.sh
方法可以生成,client以及deepcopy代码。
包含:
sample-controller/pkg/apis/samplecontroller/v1alpha1/zz_generated.deepcopy.go
sample-controller/pkg/generated/clientset
sample-controller/pkg/generated/informers
sample-controller/pkg/generated/informers
_前提:code-generator 已经在vendor中,执行 go mod vendor _
update-codegen.sh 内容如下
bash "${CODEGEN_PKG}"/generate-groups.sh "deepcopy,client,informer,lister" \
  k8s.io/sample-controller/pkg/generated k8s.io/sample-controller/pkg/apis \
  samplecontroller:v1alpha1 \
  --output-base "$(dirname "${BASH_SOURCE[0]}")/../../.." \
  --go-header-file "${SCRIPT_ROOT}"/hack/boilerplate.go.txt
完整使用说明:
 1
 2
 3
 4
 5
 6
 7
 8
 9
10
11
12
13
Usage: generate-groups.sh <generators> <output-package> <apis-package> <groups-versions> ...

  <generators>        the generators comma separated to run (deepcopy,defaulter,client,lister,informer) or "all".
  <output-package>    the output package name (e.g. github.com/example/project/pkg/generated).
  <apis-package>      the external types dir (e.g. github.com/example/api or github.com/example/project/pkg/apis).
  <groups-versions>   the groups and their versions in the format "groupA:v1,v2 groupB:v1 groupC:v2", relative
                      to <api-package>.
  ...                 arbitrary flags passed to all generator binaries.


Examples:
  generate-groups.sh all             github.com/example/project/pkg/client github.com/example/project/pkg/apis "foo:v1 bar:v1alpha1,v1beta1"
  generate-groups.sh deepcopy,client github.com/example/project/pkg/client github.com/example/project/pkg/apis "foo:v1 bar:v1alpha1,v1beta1"
interface{}处理
场景:如果我们需要一个通用的类型的object,如下:
  validation:
    openAPIV3Schema:
      properties:
        spec:
          properties:
            fields:
              type: object
我们在spec里面定义了一个fields字段,类型是object(即key ,value的形式),value的值可能是int也可能是string或者bool
在type定义的时候我是这么写的,定义为map[string]interface{}
// FooSpec is the spec for a Foo resource
type FooSpec struct {
	Fields map[string]interface{} `json:"fields"`
}
当在代码生成的时候,发现会报错:
Generating deepcopy funcs
F0518 17:53:33.568567   39986 deepcopy.go:750] DeepCopy of "interface{}" is unsupported. Instead, use named interfaces with DeepCopy<named-interface> as one of the methods.
goroutine 1 [running]:
k8s.io/klog/v2.stacks(0xc000132001, 0xc0002e9000, 0xad, 0xfd)
	/Users/silenceper/workspace/golang/pkg/mod/k8s.io/klog/[email protected]/klog.go:972 +0xb8
 ......
遇到这种问题,需要自己实现深拷贝,例如这种:
 1
 2
 3
 4
 5
 6
 7
 8
 9
10
11
12
13
14
15
16
17
18
19
20
21
22
23
24
25
26
27
28
29
type HelmReleaseSpec struct {
    HelmValues    `json:",inline"`
}

// +k8s:deepcopy-gen=false
type HelmValues struct {
    helm.Values `json:"values,omitempty"`
}

// helm.Values定义:
type Values map[string]interface{}

// 自己实现深拷贝
func (in *HelmValues) DeepCopyInto(out *HelmValues) {
    if in == nil {
        return
    }

    b, err := yaml.Marshal(in.Values)
    if err != nil {
        return
    }
    var values helm.Values
    err = yaml.Unmarshal(b, &values)
    if err != nil {
        return
    }
    out.Values = values
}
Controller编写
在编写Controller之前需要了解client-go中的informer机制:
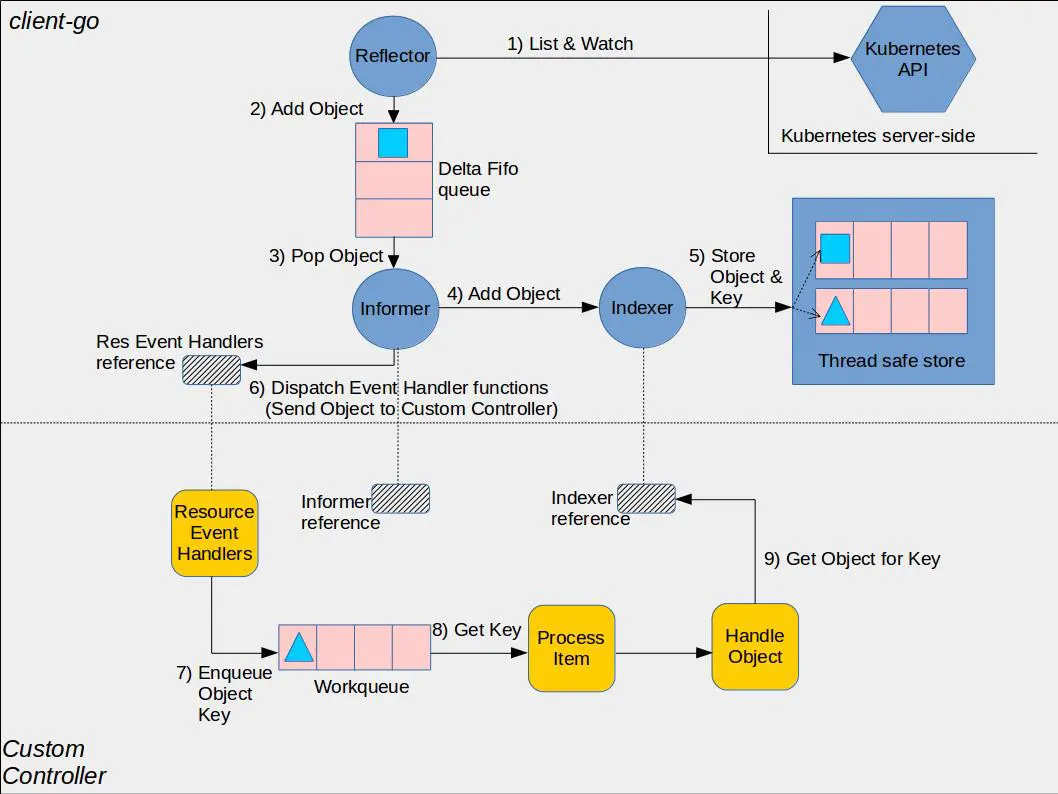
黄色的部分是controller相关的框架,包括workqueue。蓝色部分是client-go的相关内容,包括informer, reflector(其实就是informer的封装), indexer。从流程上看,reflector从apiserver中通过list&watch机制接收事件变化,进入Delta FIFO队列中,由informer进行处理。informer会将delta FIFO队列中的事件交给indexer组件,indexer组件会将事件持久化存储在本地的缓存中。之后,由于用户事先将为informer注册各种事件的回调函数,这些回调函数将针对不同的组件做不同的处理。例如在controller中,将把object放入workqueue中,之后由controller的业务逻辑中进行处理。处理的时候将从缓存中获取object的引用。即各组件对资源的处理仅限于本地缓存中,直到update资源的时候才与apiserver交互。
简单来讲通过list/watch机器提供了本地缓存避免每次去请求apiserver。
并且提供了Event Handler方法,在将数据保存进入cache时,通过调用自定义handler方法,增加自定义处理。
所以Controller 的代码结构,就是如下:
 1
 2
 3
 4
 5
 6
 7
 8
 9
10
11
12
13
14
15
16
17
18
19
20
21
22
23
24
25
26
27
28
29
30
31
32
33
34
35
36
37
38
39
40
41
42
43
44
45
46
47
48
49
50
51
52
53
54
55
56
func NewController(
	kubeclientset kubernetes.Interface,
	sampleclientset clientset.Interface,
	deploymentInformer appsinformers.DeploymentInformer,
	fooInformer informers.FooInformer) *Controller {
    ....
		fooInformer.Informer().AddEventHandler(cache.ResourceEventHandlerFuncs{
		AddFunc: controller.enqueueFoo,
		UpdateFunc: func(old, new interface{}) {
			controller.enqueueFoo(new)
		},
	})
    ....
}
func (c *Controller) Run(threadiness int, stopCh <-chan struct{}) error {

    // Launch two workers to process Foo resources
	for i := 0; i < threadiness; i++ {
		go wait.Until(c.runWorker, time.Second, stopCh)
	}
}
func (c *Controller) runWorker() {
	for c.processNextWorkItem() {
	}
}
func (c *Controller) processNextWorkItem() bool {
	obj, shutdown := c.workqueue.Get()
    ...

    err := func(obj interface{}) error {
    	...
        // Run the syncHandler, passing it the namespace/name string of the
		// Foo resource to be synced.
		if err := c.syncHandler(key); err != nil {
			// Put the item back on the workqueue to handle any transient errors.
			c.workqueue.AddRateLimited(key)
			return fmt.Errorf("error syncing '%s': %s, requeuing", key, err.Error())
		}
        ...
    }(obj)
    ...
}
func (c *Controller) syncHandler(key string) error {
    // Convert the namespace/name string into a distinct namespace and name
	namespace, name, err := cache.SplitMetaNamespaceKey(key)
	if err != nil {
		utilruntime.HandleError(fmt.Errorf("invalid resource key: %s", key))
		return nil
	}

    //TODO 处理逻辑
}
func (c *Controller) enqueueFoo(obj interface{}) {
    ...
	c.workqueue.Add(key)
}
- 在NewController中通过fooInformer添加
AddEventHandler,执行enqueueFoo - enqueueFoo 中将获取的变更放入队列
- 启动一个或多个work从队列中取数据,最终通过syncHandler进行业务判断
- 在sample-controller中同时还监听了deployment,在
handleObject判断是否归属FooKind ,同时执行enqueueFoo入队。
具体代码判断参考controller.go
在main.go
方法中调用如下:
 1
 2
 3
 4
 5
 6
 7
 8
 9
10
11
12
13
14
15
16
exampleClient, err := clientset.NewForConfig(cfg)
if err != nil {
    klog.Fatalf("Error building example clientset: %s", err.Error())
}
kubeInformerFactory := kubeinformers.NewSharedInformerFactory(kubeClient, time.Second*30)
exampleInformerFactory := informers.NewSharedInformerFactory(exampleClient, time.Second*30)

controller := NewController(kubeClient, exampleClient,
                            kubeInformerFactory.Apps().V1().Deployments(),
                            exampleInformerFactory.Samplecontroller().V1alpha1().Foos())

// notice that there is no need to run Start methods in a separate goroutine. (i.e. go kubeInformerFactory.Start(stopCh)
// Start method is non-blocking and runs all registered informers in a dedicated goroutine.
kubeInformerFactory.Start(stopCh)
exampleInformerFactory.Start(stopCh)   //启动informer
就是调用通过coge-gen生成代码创建informer并启动,创建client。
**思考:为什么要通过队列来控制数据的变化? **
我觉得用队列一方面是解耦,因为往往一个Controller里面可能要通过informer监听各类资源对象,通过队列借助了各个informer的依赖。另一方便可以通过不同类型的队列比如限速队列,延迟队列达到不同的并发控制。
- 先定义crd,再实现Controller逻辑
- 可以通过code-generator生成informer,client,listers代码
- 注意针对interface{}类型需要自己实现deepCopy方法
- 实现一个Operator,集成更多更复杂的Controller的话,我们一般使用Operator框架,比如kubebuilder

Recommend
About Joyk
Aggregate valuable and interesting links.
Joyk means Joy of geeK