

从0到1搭建个人网站 五-开启网站首页的大门
source link: http://www.lcsays.com/blogshow?blogId=130
Go to the source link to view the article. You can view the picture content, updated content and better typesetting reading experience. If the link is broken, please click the button below to view the snapshot at that time.
从0到1搭建个人网站 五-开启网站首页的大门

请尊重原创,转载请注明来源网站www.shareditor.com以及原始链接地址
模板属于mvc中的view这一层,是用来为网页布局的,乍一看来就是个html页面,但是里面会嵌入模板引擎提供给我们的特殊语法。模板引擎有很多,不同语言或框架都会实现自己一套,还有一些通用的模板引擎,但是他们语法和功能都比较类似,无非就是模板继承、模板引入、读透传的变量、循环、逻辑判断、filters、自定义标签等。我们这里直接用django原生的django-template就足够了。
创建web/templates/web/index.html,内容如下:
<!DOCTYPE html>
<html lang="en">
<head>
    <meta charset="UTF-8">
    <title>Title</title>
</head>
<body>
<h1>Hello {{ name }}</h1>
</body>
</html>
修改web/views.py中的index函数如下:
def index(request):
    return render(request, 'web/index.html', {'name': 'lichuang'})
打开网页我们看到了一个大大的Hello lichuang
这里的{{}}就是变量透传的语法,直接获取到python传进去的变量。另外这个模板文件的路径用的是web/index.html而不是直接index.html,原因是django里多个app如果用相同的模板文件名,在python代码里指定模板名时它分辨不出是哪个,所以一般把app的名字作为模板文件的目录
我们网站的所有页面都有一个共同的布局,那就是顶部是logo,底部是版权声明,所以这个框架可以抽象出来一个基类模板,而所有页面模板都继承自这一模板,下面我们创建这个基类模板web/templates/web/base.html,内容如下:
<!DOCTYPE html>
<html lang="zh-CN">
<head>
    <meta charset="UTF-8">
    <meta http-equiv="X-UA-Compatible" content="IE=edge">
    <meta name="viewport" content="width=device-width, initial-scale=1, maximum-scale=1, user-scalable=no">
    <link rel="stylesheet" href="//cdn.bootcss.com/bootstrap/3.3.5/css/bootstrap.min.css">
    <link rel="stylesheet" href="//cdn.bootcss.com/bootstrap/3.3.5/css/bootstrap-theme.min.css">
    <link rel="stylesheet" href="http://netdna.bootstrapcdn.com/font-awesome/4.0.3/css/font-awesome.css">
    <script src="//cdn.bootcss.com/jquery/1.11.3/jquery.min.js"></script>
    <script src="//cdn.bootcss.com/bootstrap/3.3.5/js/bootstrap.min.js"></script>

    <title>{% block title %}SharEDITor - 关注大数据技术{% endblock title %}</title>
    {% block head %}
    {% endblock head %}
</head>
<body>

<div class="row bg-primary" style="margin-right: 0">
    <div class="col-sm-1 col-xs-1"></div>
    <div class="col-sm-2 col-xs-11">
        <h1><a href="" style="text-decoration: none;color: white;">SharEDITor</a></h1>
    </div>
    <div class="col-sm-6"></div>
</div>

{% block body %}
{% endblock body %}

<div class="row" style="margin-right: 0">
    <div class="col-sm-2"></div>
    <div class="col-sm-8 col-xs-12 text-center" style="color: #959595;margin-bottom: 10px;">
        Copyright © <a href="">shareditor.com</a> | 京ICP备13047771号 | shareditor.com^_^gmail.com
    </div>
</div>

</body>
</html>
这里面有一些叫做block的代码块,它的作用是声明可重写的部分,下面你就会看到这个代码块是怎么在子模板中使用的。下面我们重新修改web/templates/web/index.html:
{% extends "web/base.html" %}

{% block title %}
{% endblock %}

{% block body %}
{% endblock %}
这里我们只是做了继承,并没有重写,打开网页看到如下的效果:

下面我们来完善首页的部分
在{% block body %}块
中添加如下代码:
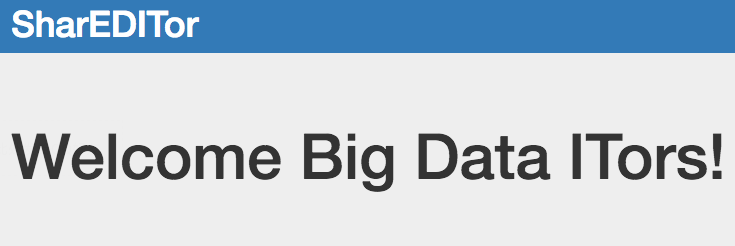
    <div class="row jumbotron" style="margin-right: 0">
        <div class="col-md-1 col-xs-1"></div>
        <div class="col-md-10 col-xs-10"><h1>Welcome Big Data ITors!</h1></div>
        <div class="col-md-1 col-xs-1"></div>
    </div>
重新打开网页看到如下效果:
动态数据展示
下面我们来从数据获取tag数据,并展示到首页里。修改web/views.py的index函数,把tag数据取出来并传到模板中,如下:
def index(request):
    tags = Tag.objects.all()
    return render(request, 'web/index.html', {'tags': tags})
修改web/templates/web/index.html:
{% extends "web/base.html" %}

{% block title %}
{% endblock %}

{% block body %}

    <div class="row jumbotron" style="margin-right: 0">
        <div class="col-md-1 col-xs-1"></div>
        <div class="col-md-10 col-xs-10"><h1>Welcome Big Data ITors!</h1></div>
        <div class="col-md-1 col-xs-1"></div>
    </div>

    <div class="row" style="margin-right: 0">
        <div class="col-sm-1 col-xs-1"></div>
        {% for tag in tags %}
            <div class="col-sm-2 col-xs-12">
                <div class="thumbnail">
                    <img src="{{ tag.image }}" alt="tag">
                    <div class="caption">
                        <h3>{{ tag }}({{ tag.blogpost_set.count }})</h3>
                        <p>
                            {% for blogpost in tag.blogpost_set.all %}
                                {{ blogpost.title }}
                            {% endfor %}
                        </p>
                        <h5>更多>>></h5>
                    </div>
                </div>
            </div>
        {% endfor %}
        <div class="col-sm-1 col-xs-1"></div>
    </div>

{% endblock %}
看下效果如何了:

渐渐高大上了有木有
不过在这里其实有一些步骤我省略了,需要你自己去发觉,比如说为Tag添加image属性
展示最新文章
为了用户能找到最新的文章(其实是为了SEO),我们在所有页面的底部显示最新发表的文章,这需要我们修改基类模板了,首先在views.py中透传latest_blog_posts变量,如下:
def index(request):
    tags = Tag.objects.all()
    latest_blog_posts = BlogPost.objects.order_by('create_time')[0:5]
    return render(request, 'web/index.html', {'tags': tags, 'latest_blog_posts': latest_blog_posts})
然后修改web/templates/web/base.html,在body中添加如下代码:
<div class="row navbar navbar-inverse" style="margin:0">
    <div class="row" style="margin:0">
        <div class="col-sm-1 col-xs-1"></div>
        <div class="col-sm-5 col-xs-5">
            <h4 style="color: #FFFFFF; border-bottom: 1px solid #695d69; padding-bottom: 10px; margin-top: 30px;">最新文章</h4>
            {% for blogpost in latest_blog_posts %}
                <div class="row" style="margin: 10px; margin-left: 0; overflow:hidden;text-overflow:ellipsis;white-space:nowrap;">
                    <span style="color: #959595;">({{ blogpost.create_time|date:"Y-m-d" }})</span>
                    <a title="{{ blogpost }}" style="color: #959595;">{{ blogpost }}</a>
                </div>
            {% endfor %}
        </div>
        <div class="col-sm-1 col-xs-1"></div>
    </div>
</div>
效果如下:
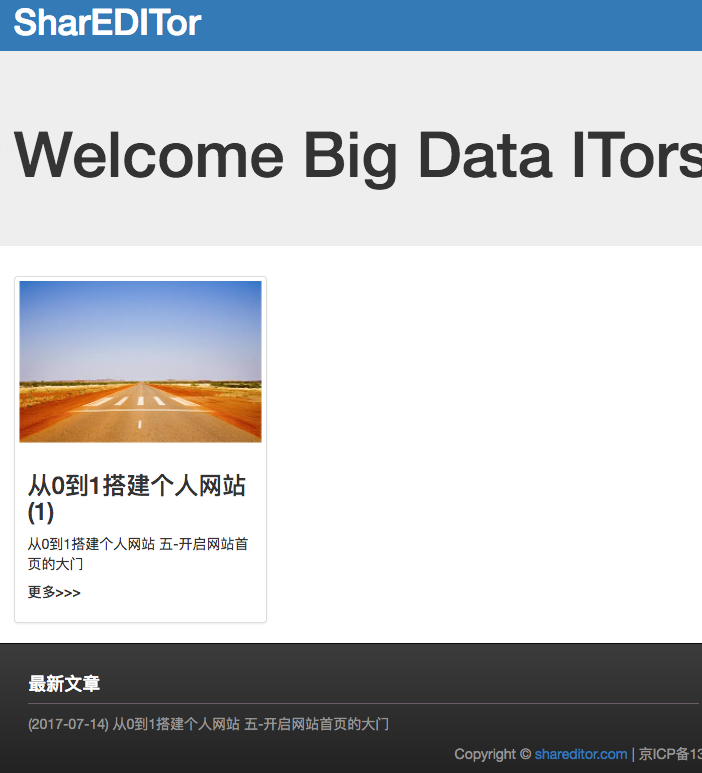
现在我们的首页初见雏形了,剩下的就是充实数据啦。今天到此为止,下一节我们继续完善其他页面。
Recommend
About Joyk
Aggregate valuable and interesting links.
Joyk means Joy of geeK