

iOS/iPadOS device feature settings in Microsoft Intune - Azure | Microsoft Docs
source link: https://docs.microsoft.com/en-us/mem/intune/configuration/ios-device-features-settings
Go to the source link to view the article. You can view the picture content, updated content and better typesetting reading experience. If the link is broken, please click the button below to view the snapshot at that time.

iOS and iPadOS device settings to use common iOS/iPadOS features in Intune
- 11/09/2020
- 22 minutes to read
In this article
Intune includes some built-in settings to allow iOS/iPadOS users to use different Apple features on their devices. For example, you can control AirPrint printers, add apps and folders to the dock and home screen pages, show app notifications, show asset tag details on the lock screen, use single sign-on authentication, and use certificate authentication.
Use these features to control iOS/iPadOS devices as part of your mobile device management (MDM) solution.
This article lists these settings, and describes what each setting does. For more information on these features, go to Add iOS/iPadOS or macOS device feature settings.
Before you begin
Create an iOS/iPadOS device features configuration profile.
These settings apply to different enrollment types, with some settings applying to all enrollment options. For more information on the different enrollment types, see iOS/iPadOS enrollment.
AirPrint
Settings apply to: All enrollment types
Be sure to add all printers to the same profile. Apple prevents multiple AirPrint profiles from targeting the same device.
- IP address: Enter the IPv4 or IPv6 address of the printer. If you use hostnames to identify printers, you can get the IP address by pinging the printer in the terminal. Get the IP address and path (in this article) provides more details.
- Path: The path is typically
ipp/printfor printers on your network. Get the IP address and path (in this article) provides more details. - Port: Enter the listening port of the AirPrint destination. If you leave this property blank, AirPrint uses the default port. Available on iOS 11.0+, and iPadOS 13.0+.
- TLS: Enable secures AirPrint connections with Transport Layer Security (TLS). Available on iOS 11.0+, and iPadOS 13.0+.
To add AirPrint servers, you can:
- Add adds the AirPrint server to the list. Many AirPrint servers can be added.
- Import a comma-separated file (.csv) with this information. Or, Export to create a list of the AirPrint servers you added.
Get server IP address, resource path, and port
To add AirPrinter servers, you need the IP address of the printer, the resource path, and the port. The following steps show you how to get this information.
On a Mac that's connected to the same local network (subnet) as the AirPrint printers, open Terminal (from /Applications/Utilities).
In the Terminal, type
ippfind, and select enter.Note the printer information. For example, it may return something similar to
ipp://myprinter.local.:631/ipp/port1. The first part is the name of the printer. The last part (ipp/port1) is the resource path.In the Terminal, type
ping myprinter.local, and select enter.Note the IP address. For example, it may return something similar to
PING myprinter.local (10.50.25.21).Use the IP address and resource path values. In this example, the IP address is
10.50.25.21, and the resource path is/ipp/port1.
Home screen layout
This feature applies to:
- iOS 9.3 or newer
- iPadOS 13.0 and newer
Settings apply to: Automated device enrollment (supervised)
Only add one app to the dock, a page, or a folder on a page. Adding the same app in all places prevents the app from showing on devices, and may show reporting errors.
For example, if you add the camera app to a dock and a page, the camera app isn't shown, and reporting might show an error for the policy. To add the camera app to the home screen layout, choose only the dock or a page, not both.
Use the Dock settings to add up to six items or folders to the dock on the screen. Many devices support fewer items. For example, iPhone devices support up to four items. In this case, only the first four items you add are shown on devices.
You can add up to six items (apps and folders combined) for the device dock.
Add: Adds apps or folders to the dock on devices.
Type: Add an App or a Folder:
App: Choose this option to add apps to the dock on the screen. Enter:
- App Name: Enter a name for the app. This name is used for your reference in the Microsoft Endpoint Manager admin center. It isn't shown on the iOS/iPadOS device.
- App Bundle ID: Enter the bundle ID of the app. See Bundle IDs for built-in iOS/iPadOS apps for some examples.
Folder: Choose this option to add a folder to the dock on the screen.
Apps that you add to a page in a folder are arranged from left to right, and in the same order as the list. If you add more apps than can fit on a page, the apps are moved to another page.
Folder name: Enter the name of the folder. This name is shown to users on their devices.
List of pages: Add a page, and enter the following properties:
- Page name: Enter a name for the page. This name is used for your reference in the Microsoft Endpoint Manager admin center. It isn't shown on the iOS/iPadOS device.
- App Name: Enter a name for the app. This name is used for your reference in the Microsoft Endpoint Manager admin center. It isn't shown on the iOS/iPadOS device.
- App Bundle ID: Enter the bundle ID of the app. See Bundle IDs for built-in iOS/iPadOS apps for some examples.
You can add up to 20 pages for the device dock.
When you use the Home Screen Layout settings to add pages, or add pages and apps to the Dock, the icons on the Home Screen and pages are locked. They can't be moved or deleted. This behavior might be by design with iOS/iPadOS and Apple's MDM policies.
Example
In the following example, the dock screen shows the Safari, Mail, and Stocks apps. The Mail app is selected to show its properties:

When you assign the policy to an iPhone, the dock looks similar to the following image:

Pages
Add the pages you want shown on the home screen, and the apps you want shown on each page. Apps that you add to a page are arranged from left to right, in the same order as the list. If you add more apps than can fit on a page, the apps are moved to another page.
To reorder items in any Home screen and pages lists, you can drag and drop them.
You can add up to 40 pages on a device.
List of pages: Add a page, and enter the following properties:
- Page name: Enter a name for the page. This name is used for your reference in the Microsoft Endpoint Manager admin center, and isn't shown on the iOS/iPadOS device.
You can add up to 60 items (apps and folder combined) on a device.
Add: Adds apps or folders to a page on devices.
Type: Add an App or a Folder:
App: Choose this option to add apps to a page on the screen. Also enter:
- App Name: Enter a name for the app. This name is used for your reference in the Microsoft Endpoint Manager admin center. It isn't shown on the iOS/iPadOS device.
- App Bundle ID: Enter the bundle ID of the app. See Bundle IDs for built-in iOS/iPadOS apps for some examples.
Folder: Choose this option to add a folder to the dock on the screen.
Apps that you add to a page in a folder are arranged from left to right, and in the same order as the list. If you add more apps than can fit on a page, the apps are moved to another page.
Folder name: Enter a name for the folder. This name is shown to users on devices.
Add: Adds pages to the folder. Also enter the following properties:
- Page name: Enter a name for the page. This name is used for your reference in the Microsoft Endpoint Manager admin center. It isn't shown on the iOS/iPadOS device.
- App Name: Enter a name for the app. This name is used for your reference in the Microsoft Endpoint Manager admin center. It isn't shown on the iOS/iPadOS device.
- App Bundle ID: Enter the bundle ID of the app. See Bundle IDs for built-in iOS/iPadOS apps for some examples.
Example
In the following example, a new page named Contoso is added. The page shows the Find Friends and Settings apps:

The Settings app is selected to show its properties:

When you assign the policy to an iPhone, the page looks similar to the following image:

App notifications
Settings apply to: Automated device enrollment (supervised)
Add: Add notifications for apps:
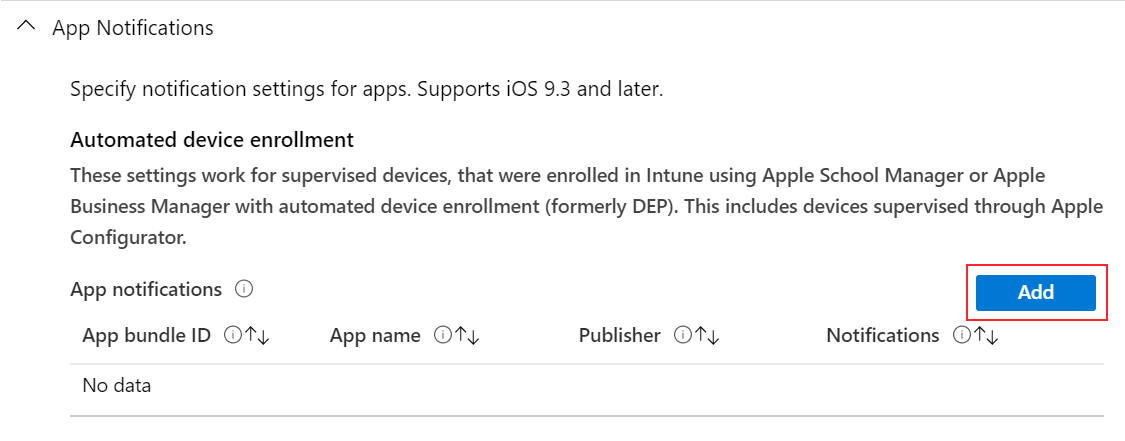
- App bundle ID: Enter the App Bundle ID of the app you want to add. See Bundle IDs for built-in iOS/iPadOS apps for some examples.
- App name: Enter the name of the app you want to add. This name is used for your reference in the Microsoft Endpoint Manager admin center. It isn't shown on devices.
- Publisher: Enter the publisher of the app you're adding. This name is used for your reference in the Microsoft Endpoint Manager admin center. It isn't shown on devices.
- Notifications: Enable or Disable the app from sending notifications to devices.
Show in Notification Center: Enable allows the app to show notifications in the device Notification Center. Disable prevents the app from showing notifications in the Notification Center.
Show in Lock Screen: Enable shows app notifications on the device lock screen. Disable prevents the app from showing notifications on the lock screen.
Alert type: When devices are unlocked, choose how the notification is shown. Your options:
- None: No notification is shown.
- Banner: A banner is briefly shown with the notification.
- Modal: The notification is shown and users must manually dismiss it before continuing to use the device.
Badge on app icon: Select Enable to add a badge to the app icon. The badge means the app sent a notification.
Sounds: Select Enable to play a sound when a notification is delivered.
Show previews: Shows a preview of recent app notifications. Select when to show the preview. The value you choose overrides the user configured value on the device (Settings > Notifications > Show Previews). Your options:
- Not configured: Intune doesn't change or update this setting.
- When unlocked: The preview only shows when the device is unlocked.
- Always: The preview always shows on the lock screen.
- Never: The preview never shows.
This feature applies to:
- iOS/iPadOS 14.0 and newer
Lock screen message
This feature applies to:
- iOS 9.3 and later
- iPadOS 13.0 and newer
Settings apply to: Automated device enrollment (supervised)
Asset tag information: Enter information about the asset tag of the device. For example, enter
Owned by Contoso CorporSerial Number: {{serialnumber}}.The text you enter is shown on the sign in window and lock screen on devices.
Lock screen footnote: If devices are lost or stolen, enter a note that might help get the device returned. You can enter any text you want. For example, enter something like
If found, call Contoso at ....Device tokens can also be used to add device-specific information to these fields. For example, to show the serial number, enter
Serial Number: {{serialnumber}}orDevice ID: {{DEVICEID}}. On the lock screen, the text shows similar toSerial Number 123456789ABC. When entering variables, be sure to use curly brackets{{ }}. App configuration tokens includes a list of variables that can be used. You can also useDEVICENAMEor any other device-specific value.Variables aren't validated in the UI, and are case sensitive. As a result, you may see profiles saved with incorrect input. For example, if you enter
{{DeviceID}}instead of{{deviceid}}or '{{DEVICEID}}', then the literal string is shown instead of the device's unique ID. Be sure to enter the correct information. All lowercase or all uppercase variables are supported, but not a mix.
Single sign-on
Settings apply to: Device enrollment, Automated device enrollment (supervised)
Realm: Enter the domain part of the URL. For example, enter
contoso.com.Kerberos principal name: Intune looks for this attribute for each user in Azure AD. Intune then populates the respective field (such as UPN) before generating the XML that gets installed on devices. Your options:
Not configured: Intune doesn't change or update this setting. By default, the OS will prompt users for a Kerberos principal name when the profile is deployed to devices. A principal name is required for MDMs to install SSO profiles.
User principal name: The user principal name (UPN) is parsed in the following way:

You can also overwrite the realm with the text you enter in the Realm text box.
For example, Contoso has several regions, including Europe, Asia, and North America. Contoso wants their Asia users to use SSO, and the app requires the UPN in the
[email protected]format. When you select User Principal Name, the realm for each user is taken from Azure AD, which iscontoso.com. So for users in Asia, select User Principal Name, and enterasia.contoso.com. The user's UPN becomes[email protected], instead of[email protected].Intune device ID: Intune automatically selects the Intune Device ID.
By default, apps only need to use the device ID. But if your app uses the realm and the device ID, you can type the realm in the Realm text box.
By default, keep the realm empty if you use device ID.
Azure AD device ID
SAM account name: Intune populates the on-premises Security Accounts Manager (SAM) account name.
Apps: Add apps on users devices that can use single sign-on.
The
AppIdentifierMatchesarray must include strings that match app bundle IDs. These strings may be exact matches, such ascom.contoso.myapp, or enter a prefix match on the bundle ID using the * wildcard character. The wildcard character must appear after a period character (.), and may appear only once, at the end of the string, such ascom.contoso.*. When a wildcard is included, any app whose bundle ID begins with the prefix is granted access to the account.Use App Name to enter a user-friendly name to help you identify the bundle ID.
URL prefixes: Add any URLs in your organization that require user single sign-on authentication.
For example, when a user connects to any of these sites, the iOS/iPadOS device uses the single sign-on credentials. Users don't need to enter any additional credentials. If multi-factor authentication is enabled, then users are required to enter the second authentication.
These URLs must be properly formatted FQDN. Apple requires these to be in the
http://<yourURL.domain>format.The URL matching patterns must begin with either
http://orhttps://. A simple string match is run, so thehttp://www.contoso.com/URL prefix doesn't matchhttp://www.contoso.com:80/. With iOS 10.0+ and iPadOS 13.0+, a single wildcard * may be used to enter all matching values. For example,http://*.contoso.com/matches bothhttp://store.contoso.com/andhttp://www.contoso.com.The
http://.comandhttps://.compatterns match all HTTP and HTTPS URLs, respectively.Renewal certificate: If using certificates for authentication (not passwords), select the existing SCEP or PFX certificate as the authentication certificate. Typically, this certificate is the same certificate that's deployed to users for other profiles, such as VPN, Wi-Fi, or email.
Web content filter
Settings apply to: Automated device enrollment (supervised)
Filter Type: Choose to allow specific web sites. Your options:
Configure URLs: Use Apple's built-in web filter that looks for adult terms, including profanity and sexually explicit language. This feature evaluates each web page as it's loaded, and identifies and blocks unsuitable content. You can also add URLs that you don't want checked by the filter. Or, block specific URLs, regardless of Apple's filter settings.
Permitted URLs: Add the URLs you want to allow. These URLs bypass Apple's web filter.
The URLs you enter are the URLs you don't want evauluated by the Apple web filter. These URLs aren't a list of allowed web sites. To create a list of allowed websites, set the Filter Type to Specific websites only.
Blocked URLs: Add the URLs you want to stop from opening, regardless of the Apple web filter settings.
Specific websites only (for the Safari web browser only): These URLs are added to the Safari browser's bookmarks. Users are only allowed to visit these sites; no other sites can be opened. Use this option only if you know the exact list of URLs that users can access.
- URL: Enter the URL of the website you want to allow. For example, enter
https://www.contoso.com. - Bookmark Path: Apple changed this setting. All bookmarks go into the Approved Sites folder. Bookmarks don't go in to the bookmark path you enter.
- Title: Enter a descriptive title for the bookmark.
If you don't enter any URLs, then users can't access any websites except for
microsoft.com,microsoft.net, andapple.com. These URLs are automatically allowed by Intune.- URL: Enter the URL of the website you want to allow. For example, enter
Single sign-on app extension
This feature applies to:
- iOS 13.0 and later
- iPadOS 13.0 and later
Settings apply to: All enrollment types
SSO app extension type: Choose the type of SSO app extension. Your options:
Not configured: Intune doesn't change or update this setting. By default, the OS doesn't use app extensions. To disable an app extension, you can switch the SSO app extension type to Not configured.
Microsoft Azure AD: Uses the Microsoft Enterprise SSO plug-in, which is a redirect-type SSO app extension. This plug-in provides SSO for Active Directory accounts across all applications that support Apple's Enterprise Single Sign-On feature. Use this SSO app extension type to enable SSO on Microsoft apps, organization apps, and websites that authenticate using Azure AD.
Important
The Microsoft Azure AD SSO extension is in public preview. This preview version is provided without a service level agreement (SLA). It's not recommended to use in production. Certain features might not be supported, or might have restricted behavior. For more information, see Supplemental Terms of Use for Microsoft Azure Previews.
The SSO plug-in acts as an advanced authentication broker that offers security and user experience improvements. All apps that used the Microsoft Authenticator app for authentication continue to get SSO with the Microsoft Enterprise SSO plug-in for Apple devices.
Important
To achieve SSO with the Microsoft Azure AD SSO app extension type, first install the iOS/iPadOS Microsoft Authenticator app on devices. The Authenticator app delivers the Microsoft Enterprise SSO plug-in to devices, and the MDM SSO app extension settings activate the plug-in. Once Authenticator and the SSO app extension profile are installed on devices, users must enter their credentials to sign in, and establish a session on their devices. This session is then used across different applications without requiring users to authenticate again. For more information about Authenticator, see What is the Microsoft Authenticator app.
Redirect: Use a generic, customizable redirect app extension to use SSO with modern authentication flows. Be sure you know the extension ID for your organization's app extension.
Credential: Use a generic, customizable credential app extension to use SSO with challenge-and-response authentication flows. Be sure you know the extension ID for your organization's app extension.
Kerberos: Use Apple's built-in Kerberos extension, which is included on iOS 13.0+ and iPadOS 13.0+. This option is a Kerberos-specific version of the Credential app extension.
With the Redirect and Credential types, you add your own configuration values to pass through the extension. If you're using Credential, consider using built-in configuration settings provided by Apple in the Kerberos type.
Shared device mode (Microsoft Azure AD only): Choose Enable if you're deploying the Microsoft Enterprise SSO plug-in to iOS/iPadOS devices configured for Azure AD's shared device mode feature. Devices in shared mode allow many users to globally sign in and out of applications that support shared device mode. When set to Not configured, Intune doesn't change or update this setting. By default, iOS/iPadOS devices aren't intended to be shared among multiple users.
For more information about shared device mode and how to enable it, see Overview of shared device mode and Shared device mode for iOS devices.
This feature applies to:
- iOS/iPadOS 13.5 and newer
Extension ID (Redirect and Credential): Enter the bundle identifier that identifies your SSO app extension, such as
com.apple.extensiblesso.Team ID (Redirect and Credential): Enter the team identifier of your SSO app extension. A team identifier is a 10-character alphanumerical (numbers and letters) string generated by Apple, such as
ABCDE12345. The team ID isn't required.Locate your Team ID (opens Apple's website) has more information.
Realm (Credential and Kerberos): Enter the name of your authentication realm. The realm name should be capitalized, such as
CONTOSO.COM. Typically, your realm name is the same as your DNS domain name, but in all uppercase.Domains (Credential and Kerberos): Enter the domain or host names of the sites that can authenticate through SSO. For example, if your website is
mysite.contoso.com, thenmysiteis the host name, and.contoso.comis the domain name. When users connect to any of these sites, the app extension handles the authentication challenge. This authentication allows users to use Face ID, Touch ID, or Apple pincode/passcode to sign in.- All the domains in your single sign-on app extension Intune profiles must be unique. You can't repeat a domain in any sign-on app extension profile, even if you're using different types of SSO app extensions.
- These domains aren't case-sensitive.
- The domain must begin with a period (
.).
URLs (Redirect only): Enter the URL prefixes of your identity providers on whose behalf the redirect app extension uses SSO. When users are redirected to these URLs, the SSO app extension intervenes and prompts SSO.
- All the URLs in your Intune single sign-on app extension profiles must be unique. You can't repeat a domain in any SSO app extension profile, even if you're using different types of SSO app extensions.
- The URLs must begin with
http://orhttps://.
Additional configuration (Microsoft Azure AD, Redirect, and Credential): Enter additional extension-specific data to pass to the SSO app extension:
Key: Enter the name of the item you want to add, such as
user nameor 'AppAllowList'.Type: Enter the type of data. Your options:
- String
- Boolean: In Configuration value, enter
TrueorFalse. - Integer: In Configuration value, enter a number.
Value: Enter the data.
Add: Select to add your configuration keys.
Keychain usage (Kerberos only): Block prevents passwords from being saved and stored in the keychain. If blocked, users aren't prompted to save their password, and need to reenter the password when the Kerberos ticket expires. When set to Not configured (default), Intune doesn't change or update this setting. By default, the OS might allow passwords to be saved and stored in the keychain. Users aren't prompted to reenter their password when the ticket expires.
Face ID, Touch ID, or passcode (Kerberos only): Require forces users to enter their Face ID, Touch ID, or device passcode when the credential is needed to refresh the Kerberos ticket. When set to Not configured (default), Intune doesn't change or update this setting. By default, the OS might not require users to use biometrics or device passcode to refresh the Kerberos ticket. If Keychain usage is blocked, then this setting doesn't apply.
Default realm (Kerberos only): Enable sets the Realm value you entered as the default realm. When set to Not configured (default), Intune doesn't change or update this setting. By default, the OS might not set a default realm.
- Enable this setting if you're configuring multiple Kerberos SSO app extensions in your organization.
- Enable this setting if you're using multiple realms. It sets the Realm value you entered as the default realm.
- If you only have one realm, leave it Not configured (default).
Principal name (Kerberos only): Enter the username of the Kerberos principal. You don't need to include the realm name. For example, in
[email protected],useris the principal name, andcontoso.comis the realm name.- You can also use variables in the principal name by entering curly brackets
{{ }}. For example, to show the username, enterUsername: {{username}}. - However, be careful with variable substitution because variables aren't validated in the UI and they are case sensitive. Be sure to enter the correct information.
- You can also use variables in the principal name by entering curly brackets
Active Directory site code (Kerberos only): Enter the name of the Active Directory site that the Kerberos extension should use. You may not need to change this value, as the Kerberos extension may automatically find the Active Directory site code.
Cache name (Kerberos only): Enter the Generic Security Services (GSS) name of the Kerberos cache. You most likely don't need to set this value.
App bundle IDs (Microsoft Azure AD, Kerberos): Enter the bundle IDs of the additional apps that should get single sign-on through an extension on your devices.
If you're using the Microsoft Azure AD SSO app extension type, these apps use the Microsoft Enterprise SSO plug-in to authenticate the user without requiring a sign-in. The app bundle IDs you enter have permission to use the Microsoft Azure AD SSO app extension if they don't use any Microsoft libraries, such as Microsoft Authentication Library (MSAL). The experience for these apps may not be as seamless compared to the Microsoft libraries. Older apps that use MSAL authentication, or apps that don't use the newest Microsoft libraries, must be added to this list to work properly with the Microsoft Azure SSO app extension.
If you're using the Kerberos SSO app extension type, these apps have access to the Kerberos Ticket Granting Ticket, the authentication ticket, and authenticate users to services they’re authorized to access.
Domain realm mapping (Kerberos only): Add the domain DNS suffixes that should map to your realm. Use this setting when the DNS names of the hosts don't match the realm name. You most likely don't need to create this custom domain-to-realm mapping.
PKINIT certificate (Kerberos only): Select the Public Key Cryptography for Initial Authentication (PKINIT) certificate that can be used for Kerberos authentication. You can choose from PKCS or SCEP certificates that you've added in Intune. For more information about certificates, see Use certificates for authentication in Microsoft Intune.
Wallpaper
You may experience unexpected behavior when a profile with no image is assigned to devices with an existing image. For example, you create a profile without an image. This profile is assigned to devices that already have an image. In this scenario, the image may change to the device default, or the original image may stay on the device. This behavior is controlled and limited by Apple's MDM platform.
Settings apply to: Automated device enrollment (supervised)
- Wallpaper Display Location: Choose a location on devices to show the image. Your options:
- Not configured: Intune doesn't change or update this setting. A custom image isn't added to devices. By default, the OS might set its own image.
- Lock screen: Adds the image to the lock screen.
- Home screen: Adds the image to the home screen.
- Lock screen and Home screen: Uses the same image on the lock screen and home screen.
- Wallpaper Image: Upload an existing .png, .jpg, or .jpeg image you want to use. Be sure the file size is less than 750 KB. You can also remove an image that you added.
To display different images on the lock screen and home screen, create a profile with the lock screen image. Create another profile with the home screen image. Assign both profiles to your iOS/iPadOS user or device groups.
Next steps
Assign the profile and monitor its status.
You can also create device feature profiles for macOS devices.
Is this page helpful?
Recommend
About Joyk
Aggregate valuable and interesting links.
Joyk means Joy of geeK