

Arduino / ATMega and interrupts
source link: https://michael.bouvy.net/post/arduino-atmega-interrupts-timer-serial-uart-i2c
Go to the source link to view the article. You can view the picture content, updated content and better typesetting reading experience. If the link is broken, please click the button below to view the snapshot at that time.

Arduino / ATMega and interrupts
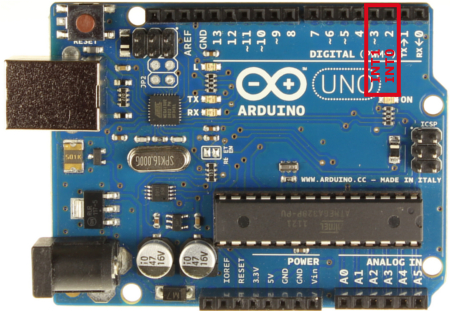
As you certainly already know, Arduino boards (Uno, Mega, Due, etc.) allow us to handle interrupts. Arduino Uno (based on Atmel's ATMega328 microcontroller) can handle to external interrupts on it's pins INT 0 and INT1, mapped to Arduino's D2 and D3 (respectively pins 4 and 5 of ATMega328 in PDIP package).
Interesting fact, ATMega328 (and therefore Arduino Uno) can handle state change interrupts on 20 of it's pins ; however, handling these interrupts is not as simple as it is with external ones : you need to determine which pin has generated the interrupt, for which reason, etc. Good thing, an Arduino library exists to help us handling these interrupts : arduino-pinchangeint.
Interrupts can me triggered uppon 4 modes :
- LOW : pin is in a low state
- RISING : pin state goes from low to high
- FALLING : pin state goes from high to low
- CHANGE : pin state changes
One line of code is enough to "listen" for an interrupt on Arduino ; for example, on the pin INT0 (which is D2), we attach an interrupt, that will call the method "myInterrupt" when the pin's state goes from LOW to HIGH :
attachInterrupt(0, myInterrupt(), RISING);
Please notice that although the Arduino pin is "D2", we define here pin "0" which is the interrupt pin number (0 for INT0 / D2, 1 for INT1 / D3). We now define the method that will be called by the interrupt (this method does not take any argument and does not return anything) :
void myInterrupt() {
  // do something ...
}
A few limitations
As interrupts are based on your microcontroler's timers, method delay() wont work and method millis() wont increment, within the method attached to an interrupt. Usually, it is not recommended to run time based operations in your interrupts, which will hang your µC ; for example, serial data transmission (UART), I2C, etc.
Best practices
Using interrupts is very useful to detect user actions, as a button pressed, a keypad, or even to detect a fast state change (infrared signal cut), without having to constantly poll a pin state. Basically, a method attached to an interrupt should be the shortest and fastest possible : a good practice consists in using interrupts to set a flag in a variable (defined as "volatile"). The execution of the matching action will be done within the main loop. For example :
volatile int change = 0;

void main() {
  attachInterrupt(0, myInterrupt(), RISING);
}

void loop() {
  if(change == 1) {
    // do something ...
    change = 0;
  }
}

void myInterrupt() {
  change = 1;
}
Useful links
Recommend
About Joyk
Aggregate valuable and interesting links.
Joyk means Joy of geeK