

IRL Offline T-Rex Game powered by JavaScript
source link: https://www.javascriptjanuary.com/blog/irl-offline-t-rex-game-powered-by-javascript
Go to the source link to view the article. You can view the picture content, updated content and better typesetting reading experience. If the link is broken, please click the button below to view the snapshot at that time.

IRL Offline T-Rex Game powered by JavaScript

Written by Uri Shaked and edited by Aaron Careaga
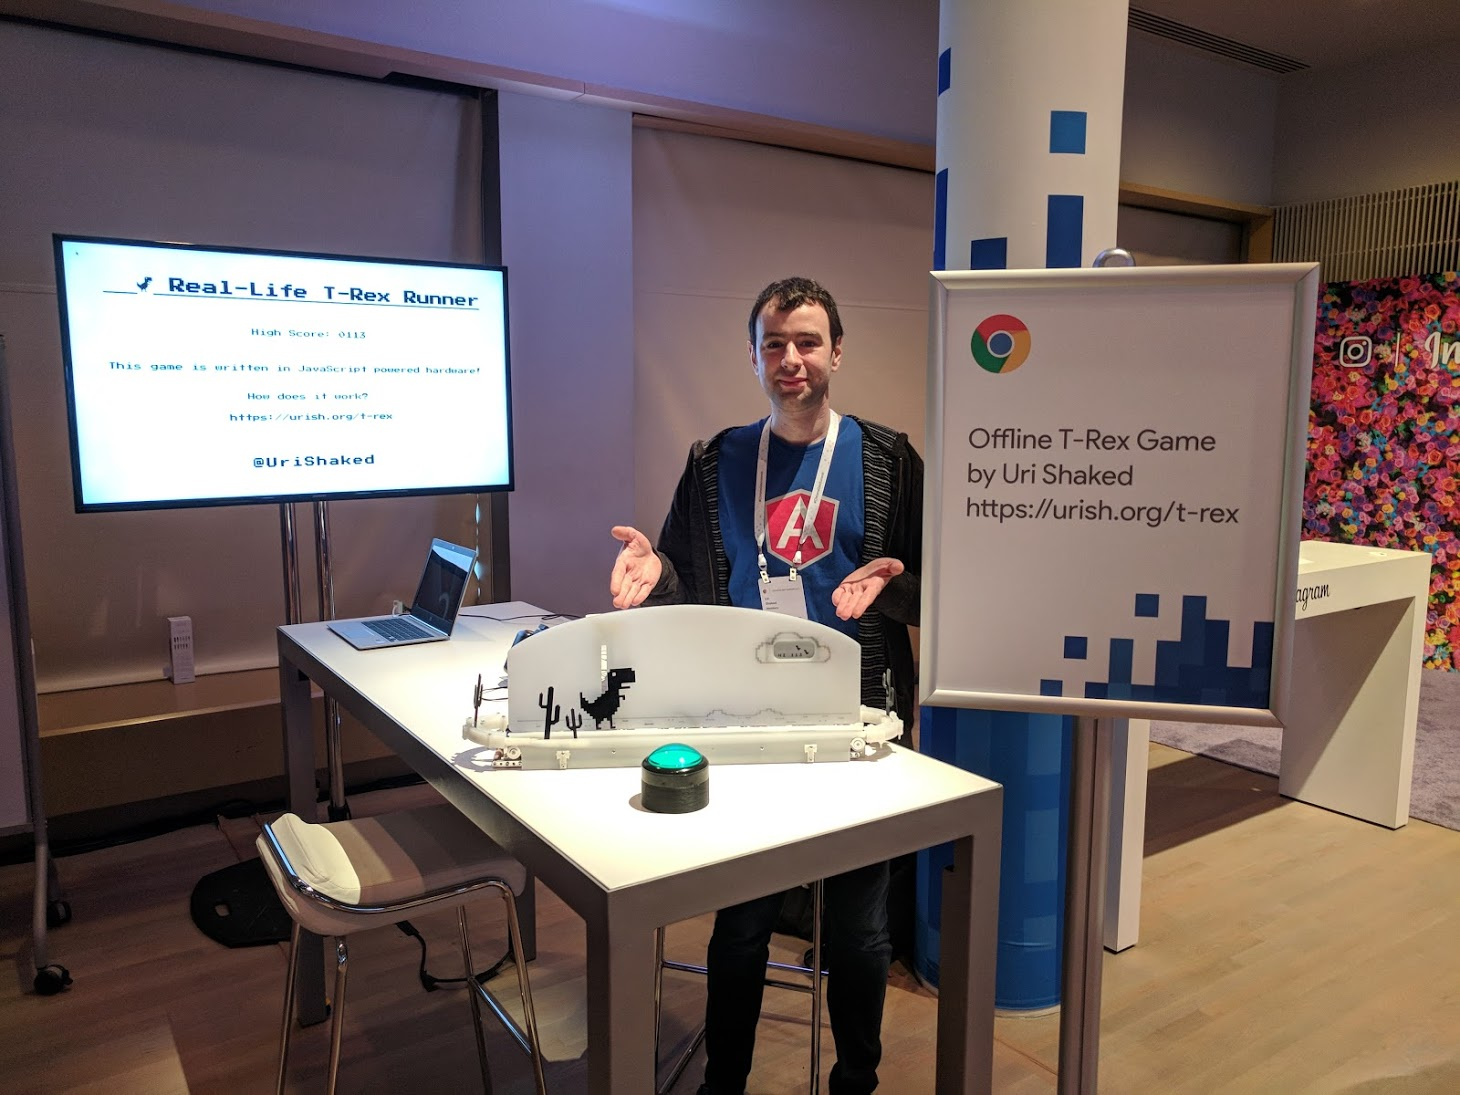
This year, for the Chrome Dev Summit, I built a real-life version of the Chrome T-Rex offline game. I have already told the story of how the project was born, and the hardware challenges we faced while building it in my previous blog post, I Saw a Dinosaur, or How I Built a Real-Life Version of Chrome T-Rex Game. This post will be all about the software.
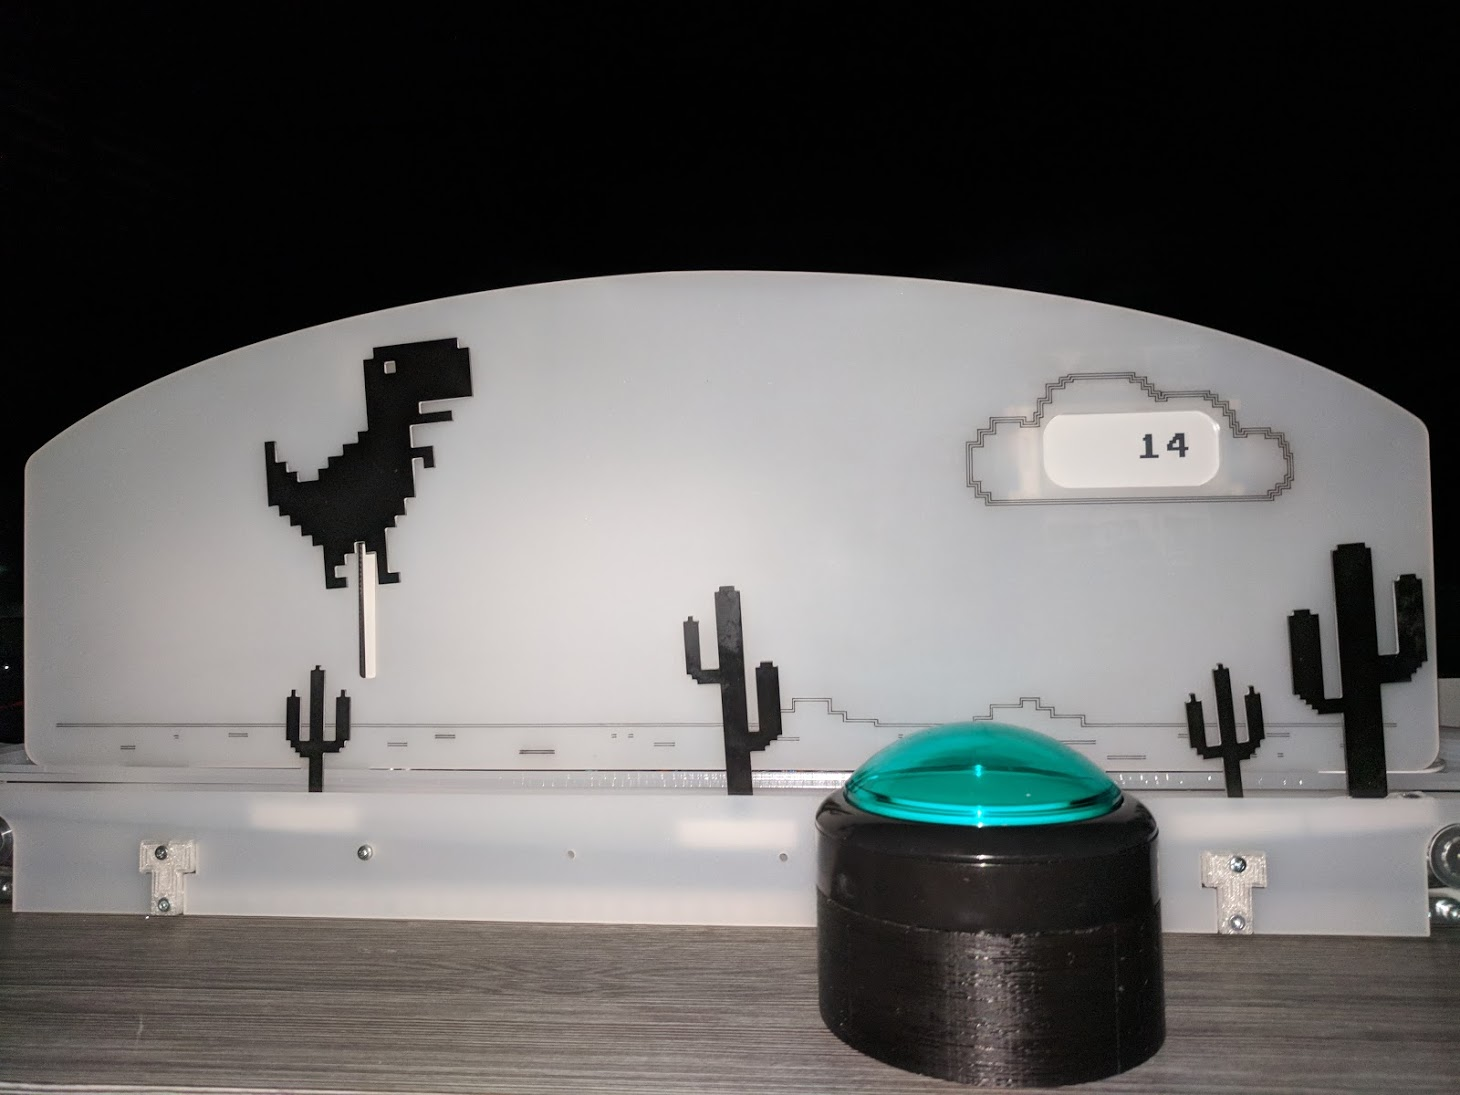
To rehearse, the project was born during a single-weekend "make-useless-but-cool-stuff" hackathon in Israel, called Geekcon. This is what the first prototype looked like, and then my life partner and I worked for about a month to get to the final version for the summit. The hardware used laser-cut and 3D-printed parts, and the actual T-Rex and cacti pieces were manufactured from electronic printed circuit boards, using a technique I explain here. Finally, everything was controlled by a bluetooth-enabled Microcontroller, powered by nRF52832 chip, and running… you guessed right, JavaScript!
JavaScript? Why?
Hardware projects are usually programmed using C++ with Arduino, and sometimes Python (especially on a Raspberry Pi), so before we dive into the code, you might be wondering why I decided to go with JavaScript for this project.
First of all, as a Web Developer, JavaScript (and lately also TypeScript) is my go-to language for projects. While I did some nice projects with Arduino and C++, when it comes to JavaScript, I feel home and I barely need to consult the documentation (well, unless I am intrigued about the blink() method strings have…). Also, being a dynamic language, I can prototype quickly and make changes on the go - I don't need to compile the code, upload it to the device, and restart the program. Iterating is much faster when I can modify a running function and see the result immediately, especially when dealing with tricky hardware such as the E-Paper display (more on that later).
JavaScript is also backed by the entire NPM ecosystem, and comes with so many useful tools - for this project, I was able to use Jest and Rollup as part of my development workflow.
Finally, as the project was created for the Chrome Dev Summit, JavaScript felt like an obvious choice, being the programming language that powers the web.

Espruino - Embedded JavaScript
When I showed the project to fellow developers and told them it runs JavaScript, many asked whether the hardware was Arduino. Arduino has somehow become an umbrella term for "some electronics that I can program to control stuff". However, Arduino is the name of a specific, very popular brand of boards, and a programming environment that uses a simplified version of the C++ language to program them. Since I wanted to use JavaScript, it wasn't a good fit.
As I mentioned before, the main CPU board I used for the project was powered by a chip from Nordic Semiconductor, called nRF52832. This is one of my favorite chips for hardware projects for two reasons: it combines a powerful ARM Cortex-M4 processor with Bluetooth Low Energy functionality, while on the other hand, it is really really power efficient and has a really small physical size.

So how do I run JavaScript on it?
The challenge is, being a microprocessor, this chip has a limited amount of resources - just 64kb of RAM, and 512kb of Flash program storage. Unfortunately, this means that fully-blown JavaScript engine, such as Node.js, can't really run in this constrained environment - it requires a fully-fledged operating system, such as Linux, as well as more memory and storage. Luckily, there are a growing number of JavaScript implementations that can run on embedded hardware devices - Espruino, JerryScript, DukTape and mJS to name a few.
For this project, I went with Espruino - a tiny JavaScript interpreter that runs on the nRF52832 chip, and has several advantages: you can program it and debug your code via Bluetooth, over the air (no cables was a huge advantage during the Chrome Dev Summit). It has a very comprehensive API Reference and many useful tutorials showing how to interface with different kinds of hardware. On top of all, the creator of Espruino, a British guy called Gordon Williams is very responsive and helped me with any questions that I had.
To program Espruino, you can use an Online Web IDE that they provide, which uses Web Bluetooth to upload your JavaScript code, or get a live REPL console on the device for quick prototyping. Flashing the chip with the Espruino firmware for the first time requires an ARM Cortex debugger (such as J-Link or ST-Link) and is out of the scope for this post, but you can also get a pre-programmed Puck.js board if you just wish to start hacking JavaScript on cool hardware device.
In the beginning… there was no scoring!
If you check the first commit for the firmware code of the game, you will immediately notice a few things.
First of all, everything is in one big file, about 100 lines of code. It is much easier to prototype this way, as you don't have to set up any build steps before uploading the code to the device, and you can easily tinker with implementation minutes (like the timings of the jump() function) directly on the device while adjusting the hardware and fine tuning the mechanics accordingly.
You will also note some scary constants related to Bluetooth, such as 0xfefe, 0xfe02, and a lot of "magic" numbers in the setName() functions. We won't dive into the bluetooth specifics, but you can learn about the basics of Bluetooth Low Energy in this blog post. Initially, I thought about creating a Web interface that will connect to the game and control it, allowing you to start/stop the game, make the dino jump and change the speed of the game, but eventually I decided that the hardware interface would be enough.

Finally, you will see a lot of calls to functions like digitalWrite, analogWrite, Serial1.write, servo.move, etc. - these are functions that controls that actual hardware that was connected to the CPU board by sending it electronic signals. If you ever used the Arduino environment, these names will probably be familiar to you - Espruino borrowed many of the hardware APIs from Arduino.
The onInit() function runs automatically whenever the board is powered on, and sets up all the hardware peripherals. At the time this code was written, the game only had the following hardware: a Stepper motor for moving the track where the cacti travelled, a Servo motor for the T-Rex jump mechanism, a big button to trigger the jumps (you hit the button - the T-Rex jumps), and an small board that would play the sound effects from an SD card (it's called DFPlayer Mini and has pretty messy protocol).

So at this stage, with just a little more than 100 lines of code, and quickly prototyped hardware - the game was playable, albeit it would not detect the t-rex hitting a cactus, had no scoring mechanism, and the cacti wouldn't loop back to the end of the track. It was a trust based game - you had to keep track of the score yourself, and pull the plug as soon as the t-rex was hit.
Leveling up - Let there be modules!
Next, when I wanted to implement scoring, I needed to add two more pieces of code: a display, and a magnetic sensor to detect the cacti passing by. For the display, I went with a 2.9" E-Paper display as it is able to show black text over a white background with very high contrast, matching the design and style of the original game. These are the kind of displays used by e-readers such as the Kindle.
Interfacing with the display proved challenging. Although it had some documentation, as well as Arduino and Raspberry Pi reference libraries, converting the code to JavaScript was not straight-forward. The main challenge was JavaScript being an asynchronous, event-based language - while the reference libraries were written in C and Python, in a synchronous fashion.
For instance, before you could interact with the display, you had to write 0 to the wire connected to the RST pin of the display (meaning it'd have low voltage), wait for 200ms, then write 1 (high voltage), waiting for an extra 200 ms, and only then the display was ready at your command. I ended up using Promises - as you can see in the source code (the resetModule() function).
Similarly, whenever you send a command to the module, you have to wait for the display to process it. Once it's done, it will signal by writing 0 (low voltage) to the BUSY pin. Again, I wrapped this with a promise, as you can see in the implementation of waitReady().

Overall, the ability of chaining promises greatly simplified the async code, and eventually I even got it to work. At that point, the code for driving the display grew to around 150 lines, and it started feeling like breaking the code base into modules made more sense.
Espruino does have some kind of module support, but these modules are downloaded from the internet, minified and bundled whenever you upload your code, which is not what I was looking for. So, I decided to tackle it using the same tools I use when I write frontend code - module bundlers. After looking at several alternatives (namely WebPack and FuseBox), I decided to go with rollup.js, as it also does tree-shaking, dead code elimination and can creates flat-bundles. This is especially important for code running on an embedded processor with a so little memory where every single byte matters.
Other than easier to maintain code structure, there was an additional advantage for breaking down the code into modules - the code was much more testing-friendly.
Testing Firmware Code
Many would argue unit-testing improves your productivity as a developer. While working the display driving code, I discovered that the display had no built-in font, so I'd need to store the bitmaps for all the characters that I wanted to display, and send them down the wire whenever I wanted to draw some character. Furthermore, it turned out that I in some cases, depending on where I wanted the character to appear on the screen, I had to split the bitmap payload into several chunks, due to how the protocol worked.
This all turned out to be pretty complicated. The development cycle of changing one or two lines of code, sending it to the hardware and watching the display to figure out the result was exhausting. At that point, I decided to set up unit-tests so that I'd be able to test the logic of my code without having to run it on the actual hardware.

For this task, I went with Jest, a JavaScript test runner from Facebook, which is also what I use when I write Frontend code. Jest only runs the tests that were affected by files modified since your last commit, and it can run tests in parallel, making it much more efficient for larger projects. It has several others features that I like, such as snapshot support and a nice mocking library. My setup also included Wallaby.js, which allows me to see the test results update in my IDE in real-time, as I write the code.
Once I configured Jest, I was able to quickly iterate with the more complex display control functions. If you look into the test code, you can see how I mocked the Espruino functions that interface with the hardware - such as digitalWrite and pinMode. This allowed me to make assertions on the actual bytes that would go down the wire whenever I call the writeChar function.
Another place where the unit-testing proved very useful was persisting the high scores. The embedded processor had Flash Memory, just like your smartphone. Flash memory has an interesting property that is usually abstracted by the Operating System (meaning we, as developers, don't have to worry about it). Generally speaking, you can only write to each memory location once, and then, if you ever want to update that memory location, you need to erase the entire 4KB memory block, which is a time consuming operation, and also slowly wears out the memory cells.

Thus, we aim to minimize the cases where a memory address has to be rewritten and cause a block to be erased. As the nRF52832 chip does not have an operating system, I had to come up with such implementation when I wanted the game to persist the high score. The code would always store the latest high score at the next available memory location until it would reach the end of the block. In this case, it would erase the entire block and start over. This got further complicated by the fact I wanted to store the high score as a short integer (2-bytes), but the hardware only supports 4-byte writes.
This all required some bitwise trickery, as you can see in the final code. It was also the very last feature I added just a day before the Dev Summit, so I was writing it in the hotel room in San Francisco and I had no spare hardware. Having the ability to prototype and test the logic with unit-tests and not on the real hardware was a blessing.
First, I created a mock for the Flash API of Espruino (you can read about this API here), and then created individual test cases for all the different scenarios I could think of. So what did the test suite look like? You can find out here.
To sum up, when working with frontend code, having a good unit-testing infrastructure can be a big time saver, especially when testing features that are buried in the application, and a fortiori in hardware projects such as this one.
Not everything is JavaScript
While my intention was to write the entire game logic in JavaScript, I couldn't get away without writing some C code. The jump mechanism of the game comprised of a stepper motor, which had to turn an exact number of steps - 4100 whenever the dino had to go up, and 3900 when it went down (gravity, go-figure…). Each step required a pulse of voltage to be sent to the motor control board, and the timing of the steps had to be accurate for the movement to be smooth.
At first, I tried implementing this logic in pure JavaScript, using the hardware interfacing functions provided by Espruino (such as analogWrite), but I was never able to get the timing right - as things like readings from the magnetic sensor would get into the event loop and interfere with the timing of the jump. After all, JavaScript was not designed to be a real-time language, which is what is needed to achieve precise control of the timing.

Eventually, I decided to implement a small Stepper Motor Library in C which I called from my JavaScript code. It used a hardware feature of the NRF52832 chip, that causes it to send pulses on a specific pin at every given interval and increment a counter until a target value is reached - which is exactly what I needed to do.
While JavaScript was a great fit for the project, I learned that sometimes the best solution is to combine the strength of JavaScript as a dynamic language with the powers of C as a low-level language that can better interface with the hardware.
Summary
Building the T-Rex game in real-life was quite an adventure, and I learned a lot from this project. On the software side, I wasn't sure JavaScript was a good fit but I am happy I gave it a chance. The ability to use tooling that I am already familiar with, prototype quickly and unit-test my code while not having to worry about memory allocations, pointers and memory corruption, was essential to getting the project done in time. And when I had to do timing-critical stuff, I was able to resort to C for that specific part.
I hope this project will inspire more JavaScript developers to get their hands "dirty" with hardware. The landscape of solutions for programming hardware with JavaScript is vast - Johhny Five, Tessel 2 and Cylon.JS to name a few more examples.
Recommend
About Joyk
Aggregate valuable and interesting links.
Joyk means Joy of geeK