

Designing 3D Printable Mechanisms in OpenSCAD
source link: https://urish.medium.com/designing-3d-printable-mechanisms-in-openscad-5838dcb65b39
Go to the source link to view the article. You can view the picture content, updated content and better typesetting reading experience. If the link is broken, please click the button below to view the snapshot at that time.
Designing 3D Printable Mechanisms in OpenSCAD
My Trumpet-Playing Robot Needed Motor-Controlled Fingers. This Is How I Designed Them
OpenSCAD is my favorite tool for designing 3D-printed parts. It has a feature which appeals to software developers (like me): you create your 3D models by writing code. This means you can use variables, loops and functions, create re-usable components, and make parametric designs (such as the small shelf I designed for my bathroom).
I started my journey with OpenSCAD thanks to a great tutorial called Know only 10 things to be dangerous in OpenSCAD. I spent about 20 minutes following the tutorial, and by the end of the tutorial, I was able to start modeling simple shapes.
After working with OpenSCAD for several years, I developed a workflow which allows modeling complex mechanisms with multiple 3D-printed parts. In this post, I am going to share my workflow with you. I will use the finger mechanism I designed for my Trumpet Playing Robot, which will hopefully be ready for display in the Chrome Dev Summit in a few weeks.
My 3D Design Workflow Was Very Inefficient
When I started designing 3d-printed mechanisms, I did it one part at a time. I’d usually sketch a solution in my head or scribble it on a piece of paper, take some measurements, and then start designing each of the parts that comprised the mechanism. For instance, this is a linear-motion mechanism I designed a few months ago:
I downloaded the rack and the pinion models from Thingiverse, and then designed the other part that would attach the rack to the motor. The first version of the design didn’t work — the rack was too tight with the gear, and it wouldn’t really moved. I had to iterate on this part twice until it worked.
Later, I wanted to create a more complex version of this mechanism and design motorized syringe pump. The final design had 11 different 3D-printed parts, 16 screws and a bearing:
My design process was the same — designing a single part, printing it, trying to attach it to the other parts, failing, and then iterating until it worked. I printed each part at least 3 different times until I got it right (well, only 2 times for the big ladders).
As you can imagine, designing this part took several days, as I had to wait for the parts to print before I could test them, making each iteration taking an hour or more. Overall, the process was very inefficient and also wasted a lot of plastic (but I recycle my failed prints ♻).
Integration Tests Before Going To Product
After finishing the Motorized Syringe Pump project, I reflected on how I can improve my workflow. I wanted to find a way to design the entire mechanism upfront, and only after thoroughly checking the complete design in the computer and making sure everything fits together, send everything to the printer.
In other words, I wanted a way to do Integration Tests for my designs before I go to production. Just like I do when creating Web apps 😎
I spent a couple of days looking for information online, reading discussions in the OpenSCAD forums, and found an incomplete tutorial about using OpenSCAD for Machine Design. And this is what I came up with:
You Need To Take Vitamins 💊
In order to test my designs before printing them, I need some kind of simulated environment, that would contain all the non-printed parts that I will be using in my design. These parts are called “Vitamins”. Just like the vitamins in our body, these are essentials parts for the design which can’t be synthesized (3D-printed).
You will need to model these Vitamins, despite the facts that you are not going to print them. This will allow you to use them in your design’s integration tests — it is similar to mocking a database server, if we continue with the web application analogy.
The first Vitamin I modeled for the finger mechanism project was the trumpet itself. Obviously, the mechanism would need to attach to the trumpet and press its keys. Modeling the complete trumpet would take me a long of time, so I only modeled the relevant section: the keys (and the attached values), and part of the lead pipe that goes in front of the keys, as I wanted to attach the mechanism to it:

Modeling this took me roughly half an hour. I spent most of the time measuring different parts of the trumpet with the calipers and translating then to OpenSCAD code. I ended up with about 40 lines of code for this Vitamin.
The next Vitamin was a Micro-servo motor. I had a couple of MG90S Servos servos that I wanted to use in this design, so I needed a model for these as well. This time, I didn’t have to work hard — I simply found a ready-made model on Thingiverse and used it.

At this point, I had the basic Vitamins I needed, so I moved on to the next step: designing the actual parts.
Designing Parts, Creating Assemblies
After you have your Vitamins ready, you can start designing your 3D-printed parts. Then you use your parts and the Vitamins to make assemblies. Assemblies are, as the name suggested, just some parts, Vitamins, and possibly other assemblies put together in a specific way. To recap, this is our terminology so far:
- Part — whatever you 3D print (or laser-cut, mill, etc.)
- Vitamin — whatever you don’t 3D Print (screws, motors, electronics, 🎺)
- Assembly — Parts, Vitamins and other Assemblies put together
The directory structure that I use also follows these three concepts — each part, vitamin or assembly is defined in a single OpenSCAD source file, and there are 3 directories in my project: parts, vitamins and assemblies.
Top-Down Breakdown
I ended up with 5 different parts and 3 assemblies for the project. I began with the top-level assembly, which contained the Trumpet Keys Vitamin, and then started to the design parts around it.
This is what the completed design looks like (in OpenSCAD):


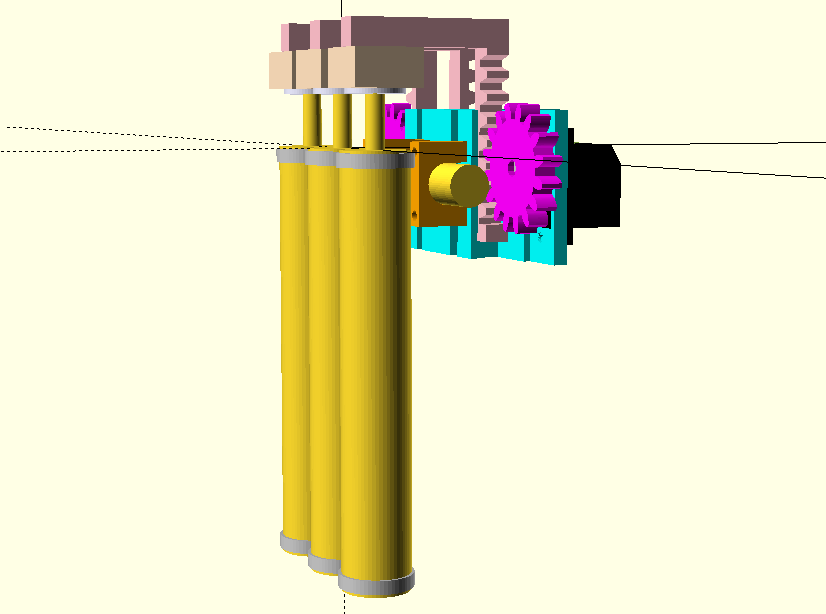
The design includes two sub-assemblies, each of them is repeated 3 times in the final design. The Servo assembly and the Finger assembly:


These assemblies are parametric — they have a slightly different variation that I use for the middle finger. As you can see in the assembly of the complete mechanism (the photo above), the middle finger mechanism is oriented in a different direction, so the angle of the rack has to be different:

My Design Process
Before starting to design the mechanism, I wanted to confirm that the servos were indeed powerful enough to push down the keys of the trumpet. So I quickly printed a design I found on Thingiverse, and put together a proof-of-concept design:
During this process, I created the initial version of the Servo mount part and and fingertip part (that’s the square part on top of the key).
Then, I started creating the Servo Assembly and the Finger Assembly. Initially, these weren’t separated assemblies — I started by putting everything into the top-level assembly, but later refactored the code and split it to smaller sub-assemblies.
At this point, I started to move around the assemblies in place the parts in different ways. For instance, this is one of the initial sketches, where I tried to mount all the 3 servos in the same orientation:

As you can see, the fingers in this design are far-off the center of the keys, so I decided to ditch this approach and experiment with putting together the parts differently.
The Code Editing Workflow
OpenSCAD has a built-in editor with Syntax highlighting, but it is very inconvenient to use when working on more than one file. Therefore, I edit my files in Visual Studio Code (with the scad extension), and have a split-screen setup so I can see the changes whenever I save the file I am working on:

You can configure OpenSCAD to automatically reload and render the model whenever you change one of the source files. In order to do this, go to the Design menu, and enable Automatic Reload and Preview there. I also keep the small OpenSCAD output console open, so see any error messages.
I also find this similar to developing Web Applications: It is just like having a browser open with live reload and the Devtools Console for spotting any error messages and debug prints.
Even More Vitamins!
My design is actually missing a crucial part — the screws and the nuts that I use to put everything together. Screws and nuts are also considered Vitamins, and the best practice is to include them in your assemblies. This way you can know in advance the length of the screws, and ensure that the screw heads won’t interfere with other parts.
I plan to add the screws and the nuts as soon as I figure out how the lips for the robot will work. After all, the goal of my project is to get some nice sounds out of the trumpet!
Testing The Mechanism In Action
OpenSCAD can also animate your designs. It defines a global variable called $t which gets values between 0 and 1. You can use $t in your code to define how things should move during the animation. For instance, in my design, I wanted to make sure that the fingers had enough range of motion to press down the keys all the way, so I created an animation for this:
I implemented this animation by translating both the Finger Assembly (the pink part) and the Trumpet’s keys by $t * -15.45 (this is the distance that the actually keys go down when depressed, measured using the calipers).
I also rotated the servo gear by $t * 50, so it rotates 50 degrees as the rack goes down. This is not very accurate, but was good enough for me just to get a feeling how everything works together.
Printing, Assembling and Testing!
The good thing about designing everything upfront, is that you can then print a bunch of parts at once:
After printing everything, it took me about an hour to assemble and fine-tune the mechanism. Everything fit nicely, except for the leftmost finger which did not have a tight enough grip on the lead pipe (seems like my measurements were a little bit off, after all). After fixing this issue, the printed mechanism was assembled and ready for testing!
And the final mechanism in action:
You can find the current version of the project (as well as the JavaScript code that controls the fingers, running on Espruino) in the GitHub repo. The parts are also available on Thingiverse.
Wait, There Is More!
I found the new workflow incredibly useful in this project. I also find it similar in many ways to how I develop web applications. In addition to speeding up iterations and saving plastic, this approach has another advantage. In past projects, like my In-Real-Life Chrome T-Rex Game, I also had a bunch of 3D-printed parts. I published the models online, but if anyone (or future me) wanted to build the project, there wasn’t any documentation on how to put everything together.
The assembly files that I produced during the design also double as documentation. They show you exactly how many copies of each part you need, how to put everything together. You can also learn from these files about the Vitamins — for instance, how many screws and nuts are needed, their sizes, and where each one goes in the final design.
OpenSCAD is a very capable tool, but it seems to lack well-established coding conventions and best-practices. It also lacks a widely-adopted package manager (many library authors simply use Thingiverse as their distributed channel). I hope to see the ecosystem evolve and that this blog post will serve as a step forward in this direction.
Happy modeling!
Recommend
About Joyk
Aggregate valuable and interesting links.
Joyk means Joy of geeK