

Strobaek Blog
source link: http://blog.strobaek.org/
Go to the source link to view the article. You can view the picture content, updated content and better typesetting reading experience. If the link is broken, please click the button below to view the snapshot at that time.
Guide to staying safe during a hacker conference
Some weeks back Microsoft held its bi-annual technical conference. This time, however, the event was moved from Seattle to Las Vegas and it happened to run right into when hackers were coming to Vegas for DefCon, the famed hacker convention that is notorious for publishing zero day exploits, running the Wall of Sheep, a website that showcases all of the people (and their information) that the attendees hacked during the conference.
To draw awareness to this and keep the rest of us safe in Vegas, a colleague shared some of his learnings to help keep everyone safe. It is good advice, which can be shared with all.
The following is a quick bulleted list of the things you should do when going to any Black Hat/White Hat security event:
- Do not use public WiFi!
- Always use your VPN (the real one, not AutoVPN if that is an option on your box) to ensure end to end encryption of network traffic, when connection to ANY network in Vegas.
- Turn off 3G/4G on your phone (only allow LTE).
- Disable NFC and Bluetooth on all of your devices.
- Turn off Auto-Join WiFi networks for all devices.
- Ideally only carry a clean, non-work device with no personal email, files or other accounts attached. Just use it as a dummy browser tool, and never log into any personal sites.
- Do not go to personal sites such as banks and alike when out in the open.
- NEVER TYPE YOUR PASSWORD in a public forum.
- Make sure you system is fully patched with all of the latest security updates.
- Turn off non-essential services such as:
- File and Printer Sharing and NetBIOS over TCP/IP
- Telnet
- SSH/RDP
- Do not use USB outlets to charge your phones. Always use a real electrical outlet.
- Never use a USB drive that someone gives you or that you find on the ground.
- Have a shielded wallet/purse/carrying case for your credit cards.
- When using an ATM, make sure that there is not any loose devices attached to the card reader, nor any small cameras that are pointed to the keypad.
- Change all of your passwords after you leave Vegas.
Resources:
- Wall of Sheep
- USA Today write up of staying safe @ hacker conferences
Azure Machine Learning and Management REST API
I’m currently involved in an IoT project where we have to call a number of R-models hosted in Azure Machine Learning.
This post is not about publishing the models and calling the endpoints; this is pretty straight forward.
Rather this post is about utilizing the Management REST APIs.
I initially had problems with the authentication. To authenticate towards the endpoint (both the model and the management) you have to set the Authentication header to a JSON Web Token.
The following is a short guide on how to get everything working.
The first thing you have to find out is if your Azure ML endpoints are hosted the old/classic way or the new way.
- If the former the security token can be found in Azure ML Studio under Settings for the given model.
- If the later you need to create an AAD token.
For a number of reasons I have my endpoints hosted the new way, hence the need to get an AAD token. This can be a little tricky if you have never done it before.
- Create a new app in AAD. For instructions see Use portal to create an Azure Active Directory application and service principal that can access resources. You can point it to https://management.azure.com/ This is less important.
- Get the Client Id (called the App Id) and the Secret (called the key).
- Using the Microsoft.IdentityModel.Clients.ActiveDirectory namespace – also the name of the nuget package – you can request a token which you can place in the Authentication header and call the management REST API.
That is really all there is to it.
A small code example is given below.
// Constants
var addInstance = "https://login.microsoftonline.com/{0}";
var tenant = "Contoso.onmicrosoft.com"
var authority = String.Format(CultureInfo.InvariantCulture, addInstance, tenant);
var clientId = "[Your Client Id]";
var appKey = "[The App Key]"
var subscriptionid = "[Your Azure Subscription Id]";
var resourceGroupName = "[Resource Group that hosts the Machine Learning workspace]";

// Create Authentication Context
var authContext = new AuthenticationContext(authority);
var clientCredential = new ClientCredential(clientId, appKey);

// Get Security Token
var azureMlResourceId = "https://management.azure.com/";
var result = await authContext.AcquireTokenAsync(azureMlResourceId, clientCredential);
var token = result.AccessToken;

var client = new HttpClient();

var address = $"subscriptions/{subscriptionId}/resourceGroups/{resourceGroupName}/providers/Microsoft.MachineLearning/webServices?api-version=2016-05-01-preview";

client.DefaultRequestHeaders.Authorization = new AuthenticationHeaderValue("Bearer", token);
var response = await client.GetAsync(endpoint + address);

if (response.IsSuccessStatusCode)
{
 // Do stuff
}
On a side note I should mention, that my solution is running inside Azure Service Fabric. I have Services and Actors call a library handling the actual communication that is making the REST call. I had to install the nuget packet in BOTH the library and the Service/Actor, otherwise I got an initialization error when trying to create the AuthenticationContext.
Continuous deployment of Azure Service Fabric Application
I’m doing a fair amount of work where the backend is made up using a Azure Service Fabric Application.
Setting up a continuous build and deployment pipeline in VSTS (Visual Studio Team Services) I ran into the following problem when the deployment step ran:
[error]Exception while parsing XML file: d:\a\_temp\TestApplicationPackage_2648631722\o0cl5dgw.ynx\applicationpackage\ApplicationManifest.xml
FileName: d:\a\_temp\TestApplicationPackage_2648631722\o0cl5dgw.ynx\applicationpackage\ApplicationManifest.xml
I’m (still) using VS2015. The version of the Service Fabric SDK is 5.7.0-preview5718. The current fabric version is 5.6.210.9494.
So it did not look like an issue with the versions. Note, that there was a bug in the version 5.5 of the SDK, which gave you errors when you tried to deploy your application to a newer cluster.
When I created the deployment step in VSTS I just seleted the default task and made no modifications apart from pointing the environment to the correct cluster. Here you must be sure to use the correct method of authentication (I use certificate based).
Digging a little further I noticed that the default agent was “Hosted”. I changed this to “Hosted2017” and voila Problem solved.
For consistency I also changed the default agent on the build task to “Hosted2017”.
Now to set up semantic versioning and maybe upgrade my VS to 2017.
Death to the SLA
During my work I’m often asked what the SLA (Service Level Agreement) is for a given system. I’ve tried to summarize my reply in the following blog post.
The SLA way of thinking works badly with cloud services and the highly distributed systems we create these days.
The SLA of services is insufficient because there is going to be solution-specific code in many places, which often is where problems get introduces.
If, for arguments sake, you have a perfectly efficient, bug-free solution that will never exceed its scale targets, you will still have a problem. A solution build on multiple services – like most IoT solutions I work on – will experience failures. If we look at the services in a give hot path and look at what their SLA translates into monthly downtime (in minutes), we get the following (the actual SLA numbers may not be correct, but it does not matter for the conclusion):
Monthly downtime (minutes) IoT Hub 99,9 43,83 Event Hub 99,9 43,83 Cloud Gateway/Service 99,95 21,92 Azure Blob Storge 99,9 43,83 Azure SQL DB 99,9 43,83 Document DB 99,95 21,92 Azure Table Storage 99,9 43,83 Azure Stream Analytics 99,9 43,83 Notification Hub 99,9 43,83
350,65
Worse case, each service would fail independently so their downtime is cumulative. That means that the SLA-acceptable downtime is 350 minutes or almost 6 hours per month which translates to a solution availability of 99.19%. And this is just the “unplanned” downtime. Also this assumes that you have no bugs or inefficient code in your solution.
Another issue with the old or traditional way of thinking is that failure to meet SLA often results in a service credit of some percentage. So, in effect, customers are really asking what’s the % of likelihood I’ll get a refund. This is completely the wrong question to ask. SLA doesn’t help build great solutions that meet users’ needs.
At this point, you may be thinking: this is all good, but the customer will still require some sort of guarantee as to the uptime. How do you answer that question?
Well, no one said it would be easy.
Usually I try to change the discussion:
- What if we had an SLA and we went offline/down and the millions of IoT devices could not check in for an hour. How much money and goodwill would that cost you? Would an SLA of service credit for that hour make you whole?
- What if we had an SLA and were up, but you had a bug – or something else outside the scope of the SLA – that took you down end-to-end for an hour. An SLA would not help at all in that situation.
So that means we need to take a different approach.
Given that an SLA would not solve things, we need to move past that and talk about how to be successful
So what is the desired approach?
- Design the app/service to be resilient
- Design the monitoring and operations tool and process to be ready for new services
#1 is usually a focus as most customer development teams are thinking this way. Howeer, the operations team are not.
#2 is usually the elephant in the room that blocks deployments. Either by operations or compliance as they still think the old way in terms of SLA.
Customers want an SLA because that is how they are used to thinking. If they really want to take full advantage of the cloud they need to move on.
Microsoft simplifies IoT and data analysis further
Next week is the yearly Hannover Messe in Hannover, Germany.
It is the main fair for manufacturing companies and their partners and Microsoft will, of course, have a strong present.
I’m actually going this year and must say that I’m quite excited. If a reader of this blog happens to be in Hannover next week, give me a shout; could be fun to meet in real life.
Microsoft has just announced a number of solutions that will greatly simplify IoT and help businesses speed up their digital transformation.
Microsoft IoT Central, a new software-as-a-service (SaaS) offering that reduces the complexity of IoT solutions. Microsoft IoT Central is a fully managed SaaS offering for customers and partners that enables powerful IoT scenarios without requiring cloud solution expertise.
A new preconfigured solution called Connected Factory also looks very promising.
If you are more into time series analysis, check out Azure Time Series Insights.
Time Series Insights gives you a near real time global view of your data across various event sources and lets you quickly validate IoT solutions and avoid costly downtime of mission-critical devices. It helps you discover hidden trends, spot anomalies, conduct root-cause analysis in near real-time, all without writing a single line of code through its simple and intuitive user experience. Additionally, it provides rich API’s to enable you to integrate its powerful capabilities in your own existing workflow or application.
See you in Hannover!
Simplifying IoT Architecture
I’ve been working with IoT projects for the last couple of years. A very common pattern is illustrated in the figure below:
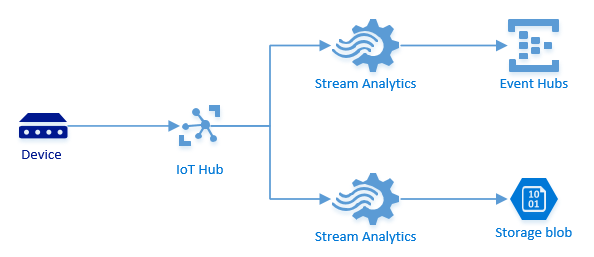
Your devices are sending in data. The Azure IoT hub is used as cloud gateway or ingestion point. You persist all the incoming messages so you can retrieve them later and at the same time you forward them to the Event Hub for (near) real-time processing. This is not illustrated, but you can have a consumer picking off messages from the Event Hub.
Until recently you had to create two consumer groups on your IoT hub and have Azure Stream Analytics do the forwarding. I’ve shown two jobs here, but depending on the load, you might have been able to do with just one, including two select statements.
With the introduction of Endpoints and Routes in the IoT hub and the Archive functionality in th Event Hub this pattern can be simplified quite a lot, cutting out components, hence making the architecture simpler, more manageable and more robust.
The new pattern is illustrated below:
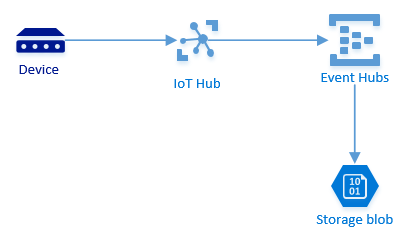
We now use endpoints and routes to forward the messages to the Event Hub. It is possible to use filtering, so if this was done in Azure Stream Analytics it is not a problem.
Messages are archived to blob storage directly from the Event Hub. Note, that archived data is written in Apache Avro format.
Minecraft Management Code Example
A couple of years ago I wrote a blob post where I mentioned a small taskbar utility I had written to stop and start an Azure virtual machine.
In the post I promised to put the code on GitHub. Well, that never happened and today someone asked again, so here is a link to OneDrive and a Zip-file.
Knock yourself out, but please note that this is sample code, no guarantees, bla bla bla.
Azure Management Libraries
This is the second blog post in the small series on experiences and learnings gained while setting up a Minecraft server for the kids. The first spoke primarily about Azure Automation, this one will touch upon the new .NET libraries for Azure Management.
The challenge was the following: enable the kids to start the virtual machine running the Minecraft server without giving them access to the overall subscription
We create a small app running in the taskbar. When the app starts it will show a yellow triangle indicating that the status of the virtual machine is being established.

Depending on the whether the instance status is StoppedDeallocated or ReadyRole either a red cross

or a green check mark will be shown

Right clicking will display the menu items (they should be self-explanatory)
For this to work a couple of setting values are required. They are the following:
- Service Name: This is the name of the cloud service where you virtual machine is deployed.
- Virtual Machine: This is the name of the virtual machine.
- Management Certificate: The thumbprint of the management certificate for your subscription.
- Subscription ID: The ID for your Azure subscription.
Easiest way to get the thumbprint and subscription ID is using the PowerShell command Get-AzurePublishSettingsFile. This will download a file containing both as well as some other information.
<?xml version="1.0" encoding="utf-8"?><PublishData><PublishProfileSchemaVersion="2.0"PublishMethod="AzureServiceManagementAPI"><SubscriptionServiceManagementUrl="https://management.core.windows.net"Id="5fbxxxxxxxxxxxxxxxxxxxxxxxxxxxfe06e"Name="[Name of your Azure subscripton]"ManagementCertificate="MIIKPAIBAzCeI2S2N5Sbz4kAyL60DtKY=" /></PublishProfile></PublishData>The settings dialog can be seen below.

Note: Yes, I know. If you changes the values of the service name and the virtual machine you could start and stop other VMs, so this is not something you would give to your evil nephew. However, for the case of my kids then, with the fear of loosing their pocket money for the next 200 years, I think we are OK.
So much for the app, but how does it work? How to communicate with Azure?
Create a new project in Visual Studio (I’m using 2013, so I don’t know if it will work in 2012).
Load the Microsoft Azure Management Libraries using Nuget. This package contains everything.
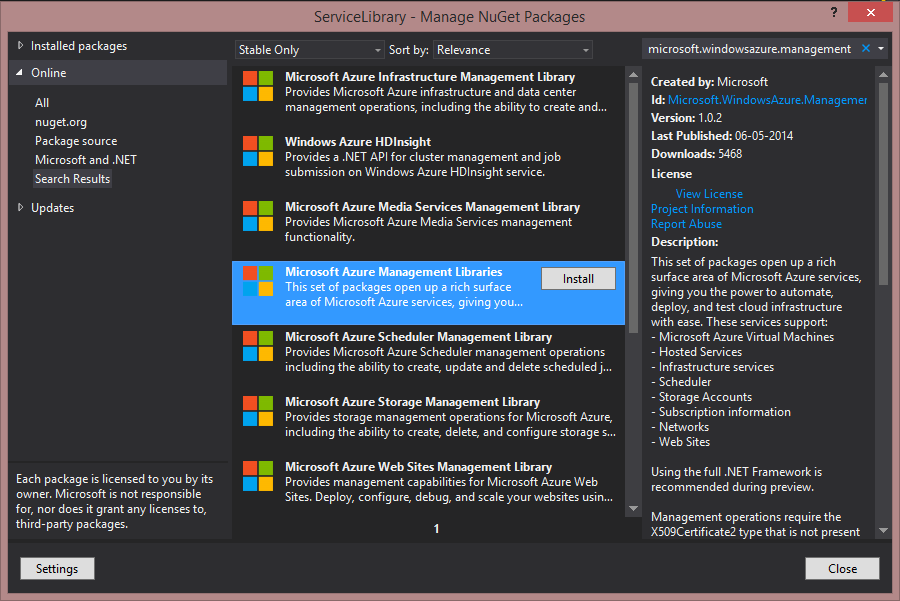
You could do with only the Microsoft Azure Compute Management Library if you want to minimize the footprint, but why settle for anything but the whole package.
Before we can do anything we need to authenticate towards Azure.
The way this is currently done is by using a X509 certificate. So in my helper class I’ve created a small method returning a SubscriptionCloudCredentials. It can be seen below.
public SubscriptionCloudCredentials GetCredentials(){return new CertificateCloudCredentials(this.subscriptionId, new X509Certificate2(Convert.FromBase64String(this.base64EncodedCert)));}The subscriptionId and base64EncodedCert are two member variables containing the ID and certificate thumbprint.
Using the CloudContext it is possible to create a ComputeManagementClient. I’ve defined a private member
private ComputeManagementClient computeManagement;and create it like
computeManagement =CloudContext.Clients.CreateComputeManagementClient(GetCredentials());To get the DeploymentStatus you can call the following:
var status = this.computeManagement.Deployments.GetByName(this.serviceName, this.virtualMachineName).Status;Where this.serviceName and this.virtualMachineName are two private string members containing the two values respectively.
To start the virtual machine I’ve defined an async method
public async Task StartVMAsync(DeploymentStatus status)The reason for passing in the status is to check that if
status.Equals(DeploymentStatus.Running)we return.
The actual call to start the virtual machine is
var task = await this.computeManagement.VirtualMachines.StartAsync(this.serviceName, this.virtualMachineName, this.virtualMachineName,new CancellationToken());Likewise a StopVMAsync method is defined containing the call to stop the virtual machine:
var task = await this.computeManagement.VirtualMachines.ShutdownAsync(this.serviceName, this.virtualMachineName, this.virtualMachineName,new VirtualMachineShutdownParameters(){PostShutdownAction = PostShutdownAction.StoppedDeallocated},new CancellationToken());And that is basically it. Of course the above should be packaged nicely and then called from the taskbar app.
Time permitting I will push the code to GitHub, Codeplex or similar for people to download.
The official Service Management Client Library Reference can be found on MSDN.
Azure Automation
As indicated in my last blog post this is the first of two posts describing my experiences and learning in connection with setting up a Minecraft server.
In this one we will look at Azure Automation and create a small scheduled runbook or job that will ensure the server is closed down for the night (to save on the pocket money).
If you don’t have an Azure subscription, you can get a free trial.
I will not go into details of how to actually set up the Minecraft server as Jon Buckley has already created this excellent instruction video. If you know Azure and don’t want to see the whole video, the steps are the following:
- Create a new VM using the Windows Server gallery image.
- Create a new endpoint opening up port 25565.
- Open up the Windows firewall on the VM to allow traffic to this port.
- Download Minecraft.
To leverage Azure Automation, you’ll need to activate the preview feature. This can be done from the Preview Features page.

It may take a few minutes for the feature to be activated. Once available you will see a new menu item in the left navigation bar.

Select this and click the Create button at the bottom of the page to create a new Automation account.
I have create one called strobaek. Note, that the Automation feature is currently only available in the region East US.

Azure Automation authenticates to Microsoft Azure subscriptions using certificate-based authentication. You can create a new management certificate in a number of ways. I usually open up a Visual Studio command-prompt and issue the following command
makecert -sky exchange -r -n CN=KarstenCert -pe -a sha1 -len 2048 -ss My "KarstenCert.cer"This will insert a new certificate in the Personal certificate store

Export this certificate twice, both without the private key (as DER encoded binary X.509 .CER) and with the private key (as .pfx file).
You should end up with something like this:

Now that we have a management certificate we need to upload it to the Azure Management Portal.
Log in – if you are not already – and select Settings in the left navigation bar; it is the last menu item.
Select Management Certificates from the top menu and click Upload at the bottom of the screen. Browse for you CER-file and select OK.
Make a note of the Subscription and Subscription ID as we will need these later (I have blanked out some of my subscription ID in the figure below)
OK, that was one part of the deal using the .CER file. Now for the second part using the .PFX file you also created. For your Azure Automation account to be able to authenticate to your Azure subscription, you’ll need to upload the certificate .PFX file. You’ll create what is known as an Asset in the Azure Automation account. This way it can be consistently leveraged across multiple runbooks.
Click on the Automation item in the left navigation bar and enter the Azure Automation account you created earlier. Click on the Assets tab and then Add Setting at the bottom. When prompted, select Add Credential.

On the Define Credential page, select Certificate in the Credential Type list and enter a name

Click the Next button and browse to the .PFX file to upload the certificate. Enter the password used while exporting the certificate and press OK.

Your new asset has now been created

Next step is to create a connection asset. Doing so allows you to easily relate your Azure subscription name, subscription ID and management certificate together as a centralized definition for use in all of your runbooks.
Again click Add Setting, but this time select Add Connection

On the Configure connection page, select Azure as the Connection Type and enter a Name that matches your Azure subscription name recorded earlier.

Click Next

Enter the name of the management certificate asset previously uploaded/created and enter your Azure subscription ID (which you should also have recorded previously).
We are now ready to create the actual runbook.
There is a few lines of code that are used to connect a runbook to your Azure subscription using the management certificate asset and connection asses that were previously defined. To promote easy maintenance of runbooks, it is recommended to centralize this code into one runbook, called e.g. Connect-Azure, that other runbooks can reference.
The Azure Automation team has made this approach super-easy by providing us with a standard runbook template on the Azure Automation Script Center.
Go to the script center and download the Connect-Azure runbook template.
On the details page of your Azure Automation account, click the Runbooks tab.
At the bottom of the page click the Import button. Browse to the Connect-Azure.ps1 file just downloaded and click OK to import the template.

On the Runbooks tab click on Connect-Azure to drill into the details of the runbook.
Then click the Author tab and click the Publish button at the bottom of the page to publish the runbook. Until this is done the runbook is in “draft” mode and can be edited, but not used.
When prompted select Yes to confirm that you really want to publish the runbook.
We now have the fundamentals for creating our own runbook.
Click New | App Services | Automation | Runbook | Quick Create

Enter a name, e.g. Stop-VMs and a description, e.g. ‘Stop all VMs at night’. Select your automation account from the drop down and verify the subscription is correct. Then click Create.
Note that runbook automation scripts are defined using PowerShell workflows. As such, the recommended practice is to name runbooks using a PowerShell verb-noun cmdlet naming convention.
On the runbook page you should see the new runbook after creation is done.

Drill into the detailed property pages of the runbook.
Click the Author tab and then the Draft tab to begin editing the PowerShell code for the new runbook.
The first thing to do is leverage the Connect-Azure runbook to connect to your Azure subscription. Inside the Workflow code block enter the following:
workflow Stop-VMs{# Specify Azure Subscription Name$subName = '[Enter your Azure subscription name]'# Connect to Azure SubscriptionConnect-Azure -AzureConnectionName $subNameSelect-AzureSubscription -SubscriptionName $subName}Now that we are connected to the subscription we can enter the code to actually stop and deallocate the VMs.
$vmList = ('App1','App2','App3','DC')$svcName = 'mycloudservice'foreach($vm in $vmList){$anon = Get-AzureVM -ServiceName $svcName -Name $vmWrite-Output $anon.Name $anon.InstanceStatusif ($anon.InstanceStatus -eq 'ReadyRole'){Stop-AzureVM -ServiceName $svcName -Name $anon.Name -Force}}Update the two variables $vmList and $svcName with the name of the virtual machines you wish to stop and the name of the cloud service they live in.
The whole script is shown below for your convenience.
workflow Stop-MyVMs{# Specify Azure Subscription Name$subName = '[Enter your Azure subscription name]'# Connect to Azure SubscriptionConnect-Azure -AzureConnectionName $subNameSelect-AzureSubscription -SubscriptionName $subName$vmList = ('App1','App2','App3','DC')$svcName = 'mycloudservice'foreach($vm in $vmList){$anon = Get-AzureVM -ServiceName $svcName -Name $vmWrite-Output $anon.Name $anon.InstanceStatusif ($anon.InstanceStatus -eq 'ReadyRole'){Stop-AzureVM -ServiceName $svcName -Name $anon.Name -Force}}}Click the Save button at the bottom of the page.
Once the runbook is saved you can test it to confirm that it runs successfully.
Click the Test buttton next to the Save button. NOTE: When you test the runbook it is actually executed against your subscription, hence if you test the new Stop-VMs runbook, your virtual machines will be stopped.
When the runbook is tested and confirmed that it executes successfully, it can be published.
Click the Publish button on the bottom toolbar (and confirm when prompted) and then click the Published tab to confirm that is has been published successfully.

The final step is to create a schedule and attach it to the runbook. This is to make sure the Minecraft server is automatically stopped and deallocated when not being used (read: when the kids are supposed to sleep). To execute a runbook on a scheduled basis, we can link the runbook to a recurring schedule.
Next to the Author tab you can see the Schedule tab. Click this.

Click Link to a New Schedule and give the schedule a name

and click next.
On the Configure Schedule page set type as Daily and a start time, e.g. 21:00. Note, the time is not adjusted for daylight saving. However, the time entered seems to be based on the time on the work station creating the schedule. If I enter 21:00 the runbook is executed at 21:00 CET which is my local daylight saving adjusted time.

Click OK and you are done!
The next post will look at how to use the Azure Management Libraries from a small .NET library to start and stop our virtual machine.
Recommend
About Joyk
Aggregate valuable and interesting links.
Joyk means Joy of geeK