

助力ssr,使用concent为nextjs应用加点料
source link: https://segmentfault.com/a/1190000038544775
Go to the source link to view the article. You can view the picture content, updated content and better typesetting reading experience. If the link is broken, please click the button below to view the snapshot at that time.

开源不易,感谢你的支持,❤ star concent^_^

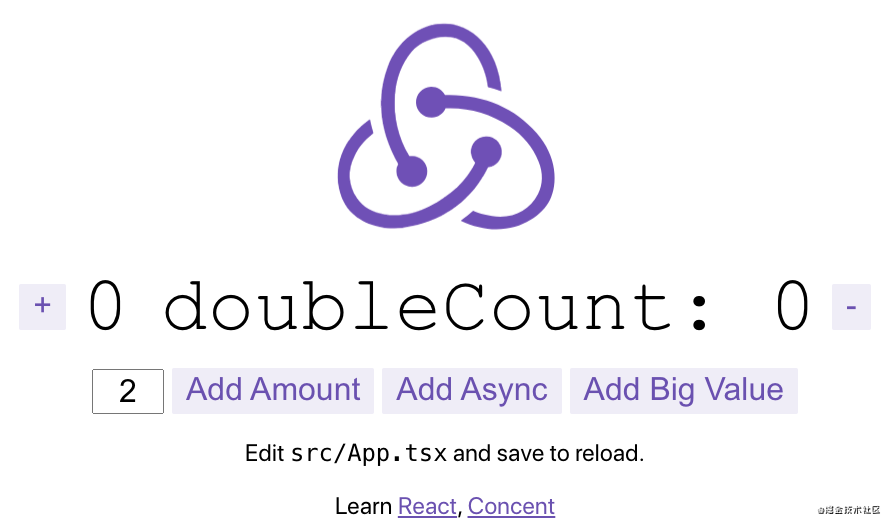
nextjs是一个非常流行的 React 服务端渲染应用框架,它很轻量,简单易上手,社区活跃,所以当我们使用react写一个需要ssr(server side render)的应用的话,基本都会首选nextjs,concent是一个新生代的react状态管理方案,它内置依赖收集系统,同时兼具有0入侵、可预测、渐进式、高性能的特点,并提供了lifecyle、composition api等灵活的api且写法超级简单,让你轻松驾驭超大规模的react应用。
Hello next
这里我们将使用create-next-app命令来安装一个基础的next示例应用
npx create-next-app hello-next执行完毕后,可以看到一个如下的目录结构
|____public
|____pages
| |____ _app.js   // next应用默认的根组件
| |____index.js   // 默认首页
| |____api        // api路由文件
| | |____hello.js 之后我们在项目根目录执行npm run dev将看到一个由next驱动的ssr默认首页

Hello concent
这里我们将使用create-react-app命令来安装一个基础的concent示例应用
npx create-react-app hello-concent --template concent-ts执行完毕后,可以看到一个如下的目录结构
|____index.tsx
|____App.tsx
|____types            // store的类型定义处
|____features           // 功能组件列表
| |____counter          // counter功能
| | |____Counter.tsx        // counter组件
| | |____model            // counter模型(包含state,reducer,computed)
|____models            // 其它全局通用的模型定义
|____configs进入项目目录执行npm i,然后执行npm start即可看到一个默认的计数器页面
你也可以点击这里在线了解和编辑它。
当然了在已有的项目里集成concent里也超级简单,因为它无需顶层提供Provider,只需要提前配置好模型即可。
import { run } from 'concent';

run({ // 定义一个counter模型
  counter: {
    state: { num: 1, bigNum: 10 },
    reducer: {
      add(payload, moduleState) {
        return { num: moduleState + 1 };
      },
      async asyncAddBig() {
        await new Promise(resolve => setTimeout(resolve, 1000));
        return { bigNum: moduleState + 10 };
      }
    },
    computed: {
      doubleNum: ({ num }) => num * 2, // 仅当num发生变化才触发此函数
    }
  }
})之后就可以全局即插即用啦,类组件和函数组件都可以用同样的方式去读取数据或调用方法,敲重点啦,如果ui处是有条件语句控制是否要消费状态或衍生数据的话,推荐延迟解构的写法,这样可以让concent在每一轮渲染完毕后收集到视图对数据的最小粒度依赖
// ###### 函数组件
function Demo(){
  // 如 state 和 moduleComputed 是按需读取的,推荐延迟解构的写法
  const { state: { num, numBig }, moduleComputed: { doubleNum }, mr } = useConcent('counter');
  // ... ui 逻辑,绑数据、绑方法
}

// ###### 类组件
const DemoCls = register('counter')(
  class DemoCls extends React.Component{
   render(){
      const { state: { num, numBig }, moduleComputed: { doubleNum }, mr } = this.ctx;
      // ... ui 逻辑,绑数据、绑方法
    }
  }
)
在next里引入concent
next的基础示例目录里有个_app.js文件,它是next应用的根组件
import '../styles/globals.css'

function MyApp({ Component, pageProps }) {
  return <Component {...pageProps} />
}

export default MyApp因使用concent之前必需提前配置好模型,所以我们只需提前创建一个runConcent.js文件
import { run } from 'concent'
import * as models from './models';

run(models);然后在_app.js文件引入即可,这样根组件下的所有子组件都能够正确获取到store的数据和调动store的方法了。
import '../styles/globals.css'
+ import './runConcent'

function MyApp({ Component, pageProps }) {
  return <Component {...pageProps} />
}

export default MyApp接着我们在next的pages目录下创建一个counter.js文件,代表这是一个页面组件,这样浏览器端可以用/counter路由来访问到这个组件的渲染视图了。
import React from 'react'
import { useConcent } from 'concent'
import router from 'next/router'

// use next/router to do browser side router jump
function toHomePage(){
  router.push('/');
}

export default function Counter() {
  const { state, mr, moduleComputed } = useConcent('home')

  return (
    <div>
      this is counter page
      <h1>num: {state.num}</h1>
      <h1>doubleNum: {moduleComputed.doubleNum}</h1>
      <button onClick={mr.add}>add</button>
      <button onClick={toHomePage}>to home page</button>
    </div>
  );
}大功告成,一个接入了concent的next应用就这样产生了,是不是特别简单呢?^_^
支持预渲染
next提供两种级别的预渲染接口,即getServerSideProps和getStaticProps,两种的区别是执行时机不同,getServerSideProps是每次请求页面都会执行,而getStaticProps是构建时执行,我们先处理getServerSideProps这种情况吧,看看如何集合concent做预渲染支持。
首先我们不考虑concent的存在,在next里做预渲染支持,只需要在你的页面组件里暴露一个getServerSideProps接口即可。
// 此函数在每次请求改页面时被调用
export async function getServerSideProps() {
  // 调用外部 API 获取博文列表
  const res = await fetch('https://.../posts')
  const posts = await res.json()

  // 通过返回 { props: posts } 对象,PostPage 组件在渲染时将接收到 `posts` 参数
  return {
    props: { posts },
  }
}

function PostPage({ posts }) { // 这里接收到了 posts 参数
  // Render posts...
}

export default PostPage之所以Blog能够接到posts,除了暴露这个getServerSideProps这个接口之外,我们再观察一下_app.js这个根组件文件内容,可以发现关键点所在!
function MyApp({ Component, pageProps }) {
  return <Component {...pageProps} />
}
export default MyApp参数列表里的pageProps即是getServerSideProps返回结果里props指向的对象,然后next将其透传到目标页面组件上,所以我们才能够在PostPage参数列表里解构出posts。
所以我们的切入点就可以从这里入手了,我们把getStaticProps的返回结果做一下格式约束,形如{module:string, state: object}这样的结构,然后在_app.js文件里记录到store即可
// 此函数在每次请求时被调用
export async function getServerSideProps() {
  // 调用外部 API 获取博文列表
  await delay();
  const posts = [
    { id: 1, name: 'post1 -----' },
    { id: 2, name: 'post2 --- welcome to use concent' },
  ];
  // 这个返回对象会透传给根组件的pageProps,在此返回状态所属的模块和状态实体对象
  // 在那里将状态记录到store
  return {
    props: {
      module: 'test',
      state: { posts },
    }
  };
}
此时的根组件文件改变如下
import '../styles/globals.css';
+ import './runConcent';
+ import { setState } from 'concent';

function MyApp({ Component, pageProps }) {
  // 这里记录 getServerSideProps 的返回状态到store的对应模块
+  if (pageProps.module) {
+    setState(pageProps.module, pageProps.state);
+  }
  return <Component {...pageProps} />
}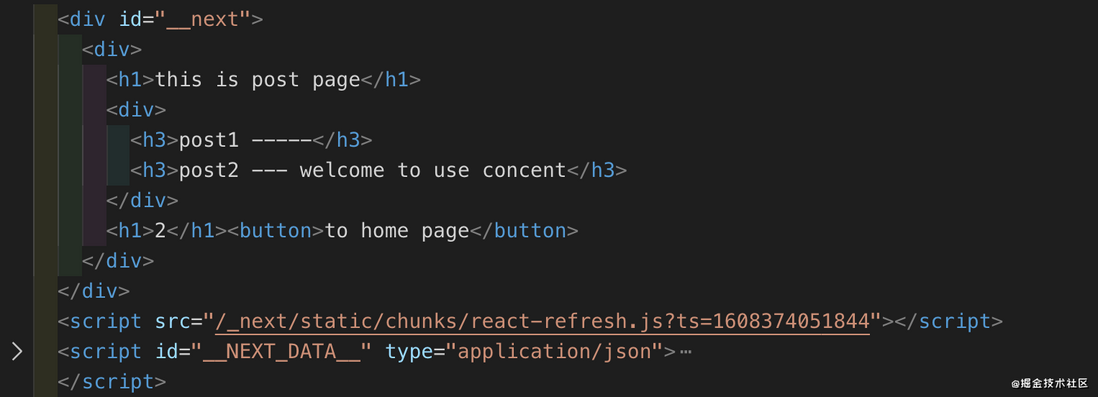
export default MyApp;然后我们实现的页面组件post-page代码如下
const PostList = React.memo(function () {
  const { state } = useConcent('test');
  return (
    <div>
      {state.posts.map(item => <h3 key={item.id}>{item.name}</h3>)}
    </div>
  );
});

const PostLength = React.memo(function () {
  const { state } = useConcent('test');
  return <h1>{state.posts.length}</h1>;
});

export default function PostPage() {
  return (
    <div>
      <h1>this is post page</h1>
      <PostList />
      <PostLength />
      <button onClick={toHomePage}>to home page</button>
    </div>
  );
}接着我们打开浏览器访问/post-page页面吧,点击查看源码将会看到这是一个服务器端预渲染的页面
同理,我们也可将getServerSideProps替换为getStaticProps,上面的整个流程将依然正常工作,欢迎各位看官clone示例代码来亲自体验一下。
git clone https://github.com/concentjs/ssr-demo-1CloudBase CMS

欢迎小哥哥们来撩CloudBase CMS ,打造一站式云端内容管理系统,它是云开发推出的,基于 Node.js 的 Headless 内容管理平台,提供了丰富的内容管理功能,安装简单,易于二次开发,并与云开发的生态体系紧密结合,助力开发者提升开发效率。
concent已为其管理后台提供强力支持,新版的管理界面更加美观和体贴了。
FFCreator

也欢迎小哥哥们来撩FFCreator,它是一个基于node.js的轻量、灵活的短视频加工库。您只需要添加几张图片或视频片段再加一段背景音乐,就可以快速生成一个很酷的视频短片。
FFCreator是一种轻量又简单的解决方案,只需要很少的依赖和较低的机器配置就可以快速开始工作。并且它模拟实现了animate.css90%的动画效果,您可以轻松地把 web 页面端的动画效果转为视频,真的很给力。
Recommend
-
156
我来增加点论坛纯投资话题。公布新价值投资标的。卖出桂冠电力后我买入的是国投电力。 - 国投电力。又买了这个免不了被当做是在轮动水电。其实不是这样的。其实国投最被低估的是在火电部分,火电今年很差但国投的火电很不错算是弯道超车了。火电强行停建大闸落下的...
-
73
2017-12-08 14:53 沙土里加点胶,就能“沙漠变良田”,这事我该信吗?重庆交通大学副校长易志坚这几天或许会感到委屈,自己在一年多前已发表在学术期刊上的研究成果,突然在知乎上又被网友挖了出来成了争议话题...
-
65
移动互联网时代有三个关键词,第一个是碎片化,第二个是个性化,第三个是场景化。如果把这三点往下拆分,内容化和社区化是这三个关键词的精华提炼。 第一次写的文章效果还不错,有订阅的朋友留言私信都催着更新,那就写第二篇试试吧,反正招牌总是要砸的,指不定就...
-
43
2019年11月18日 阅读 9316 应战Vue3 setup,Concent携手React出招了!
-
19
来给我们的生活「加点糖」。
-
11
编者按:本文来自微信公众号 “咖门”(ID:KamenClub) ,作者:大龙,36氪经授权发布。 最近,在茶叶里加点“香”似乎有火的趋势。 在小红书,以白桃...
-
15
React数据流对比:recoil vs concent TNTWeb - 全称腾讯新闻前端团队,组内小伙伴在Web前端、NodeJS开发、UI设计、移动APP等大前端领域都有所实践和积累。目前团队主要...
-
5
加点滋味、Heylulu获融资;老乡鸡筹备上市 作者:
-
5
【Less】给 CSS 加点料博客说明文章所涉及的资料来自互联网整理和个人总结,意在于个人学习和经验汇总,如有什么地方侵权,请联系本人删除,谢谢!相比Sass的高调宣言,Less就比较低调了,看...
-
2
通过函数给Typecho博客添加点赞功能 2021-12-2816:07:21...
About Joyk
Aggregate valuable and interesting links.
Joyk means Joy of geeK