

Android 热修复 Tinker Gradle Plugin解析
source link: https://blog.csdn.net/lmj623565791/article/details/72667669
Go to the source link to view the article. You can view the picture content, updated content and better typesetting reading experience. If the link is broken, please click the button below to view the snapshot at that time.
Android 热修复 Tinker Gradle Plugin解析
本文已在我的公众号hongyangAndroid原创首发。
转载请标明出处:
http://blog.csdn.net/lmj623565791/article/details/72667669
本文出自张鸿洋的博客
前面写了两篇分析了tinker的loader部分源码以及dex diff/patch算法相关解析,那么为了保证完整性,最后一篇主要写tinker-patch-gradle-plugin相关了。
(距离看的时候已经快两个月了,再不写就忘了,赶紧记录下来)
本文基于1.7.7
前两篇文章分别为:
有兴趣的可以查看~
在介绍细节之前,我们可以先考虑下:通过一个命令生成一个patch文件,这个文件可以用于下发做热修复(可修复常规代码、资源等),那么第一反应是什么呢?
正常思维,需要设置oldApk,然后我这边build生成newApk,两者需要做diff,找出不同的代码、资源,通过特定的算法将diff出来的数据打成patch文件。
ok,的确是这样的,但是上述这个过程有什么需要注意的么?
- 我们在新增资源的时候,可能会因为我们新增的一个资源,导致非常多的资源id发生变化,如果这样直接进行diff,可能会导致资源错乱等(id指向了错误的图片)问题。所以应当保证,当资源改变或者新增、删除资源时,早已存在的资源的id不会发生变化。
- 我们在上线app的时候,会做代码混淆,如果没有做特殊的设置,每次混淆后的代码难以保证规则一致;所以,build过程中理论上需要设置混淆的mapping文件。
- 当项目比较大的时候,我们可能会遇到方法数超过65535的问题,我们很多时候会通过分包解决,这样就有主dex和其他dex的概念。集成了tinker之后,在应用的Application启动时会非常早的就去做tinker的load操作,所以就决定了load相关的类必须在主dex中。
- 在接入一些库的时候,往往还需要配置混淆,比如第三方库中哪些东西不能被混淆等(当然强制某些类在主dex中,也可能需要配置相对应的混淆规则)。
如果大家尝试过接入tinker并使用gradle的方式生成patch相关,会发现在需要在项目的build.gradle中,添加一些配置,这些配置中,会要求我们配置oldApk路径,资源的R.txt路径,混淆mapping文件路径、还有一些比较tinker相关的比较细致的配置信息等。
不过并没有要求我们显示去处理上述几个问题(并没有让你去keep混淆规则,主dex分包规则,以及apply mapping文件),所以上述的几个实际上都是tinker的gradle plugin 帮我们做了。
所以,本文将会以这些问题为线索来带大家走一圈plugin的代码(当然实际上tinker gradle plugin所做的事情远不止上述)。
其次,tinker gradle plugin也是非常好的gradle的学习资料~
二、寻找查看代码入口
下载tinker的代码,导入后,plugin的代码都在tinker-patch-gradle-plugin中,不过当然不能抱着代码一行一行去啃了,应该有个明确的入口,有条理的去阅读这些代码。
那么这个入口是什么呢?
其实很简单,我们在打patch的时候,需要执行tinkerPatchDebug(注:本篇博客基于debug模式讲解)。
当执行完后,将会看到执行过程包含以下流程:
:app:processDebugManifest
:app:tinkerProcessDebugManifest(tinker)
:app:tinkerProcessDebugResourceId (tinker)
:app:processDebugResources
:app:tinkerProguardConfigTask(tinker)
:app:transformClassesAndResourcesWithProguard
:app:tinkerProcessDebugMultidexKeep (tinker)
:app:transformClassesWidthMultidexlistForDebug
:app:assembleDebug
:app:tinkerPatchDebug(tinker)
注:包含(tinker)的都是tinker plugin 所添加的task
可以看到部分task加入到了build的流程中,那么这些task是如何加入到build过程中的呢?
在我们接入tinker之后,build.gradle中有如下代码:
if (buildWithTinker()) {
    apply plugin: 'com.tencent.tinker.patch'
    tinkerPatch {} // 各种参数
}如果开启了tinker,会apply一个plugincom.tencent.tinker.patch:

名称实际上就是properties文件的名字,该文件会对应具体的插件类。
对于gradle plugin不了解的,可以参考http://www.cnblogs.com/davenkin/p/gradle-learning-10.html,后面写会抽空单独写一篇详细讲gradle的文章。
下面看TinkerPatchPlugin,在apply方法中,里面大致有类似的代码:
// ... 省略了一堆代码
TinkerPatchSchemaTask tinkerPatchBuildTask
        = project.tasks.create("tinkerPatch${variantName}", TinkerPatchSchemaTask)
tinkerPatchBuildTask.dependsOn variant.assemble

TinkerManifestTask manifestTask
        = project.tasks.create("tinkerProcess${variantName}Manifest", TinkerManifestTask)
manifestTask.mustRunAfter variantOutput.processManifest
variantOutput.processResources.dependsOn manifestTask

TinkerResourceIdTask applyResourceTask
        = project.tasks.create("tinkerProcess${variantName}ResourceId", TinkerResourceIdTask)
applyResourceTask.mustRunAfter manifestTask
variantOutput.processResources.dependsOn applyResourceTask

if (proguardEnable) {
    TinkerProguardConfigTask proguardConfigTask
            = project.tasks.create("tinkerProcess${variantName}Proguard", TinkerProguardConfigTask)
    proguardConfigTask.mustRunAfter manifestTask

    def proguardTask = getProguardTask(project, variantName)
    if (proguardTask != null) {
        proguardTask.dependsOn proguardConfigTask
    }

}
if (multiDexEnabled) {
    TinkerMultidexConfigTask multidexConfigTask
            = project.tasks.create("tinkerProcess${variantName}MultidexKeep", TinkerMultidexConfigTask)
    multidexConfigTask.mustRunAfter manifestTask

    def multidexTask = getMultiDexTask(project, variantName)
    if (multidexTask != null) {
        multidexTask.dependsOn multidexConfigTask
    }
}
可以看到它通过gradle Project API创建了5个task,通过dependsOn,mustRunAfter插入到了原本的流程中。
TinkerManifestTask manifestTask = ...
manifestTask.mustRunAfter variantOutput.processManifest
variantOutput.processResources.dependsOn manifestTask
TinkerManifestTask必须在processManifest之后执行,processResources在manifestTask后执行。
所以流程变为:
processManifest-> manifestTask-> processResources其他同理。
ok,大致了解了这些task是如何注入的之后,接下来就看看每个task的具体作用吧。
注:如果我们有需求在build过程中搞事,可以参考上述task编写以及依赖方式的设置。
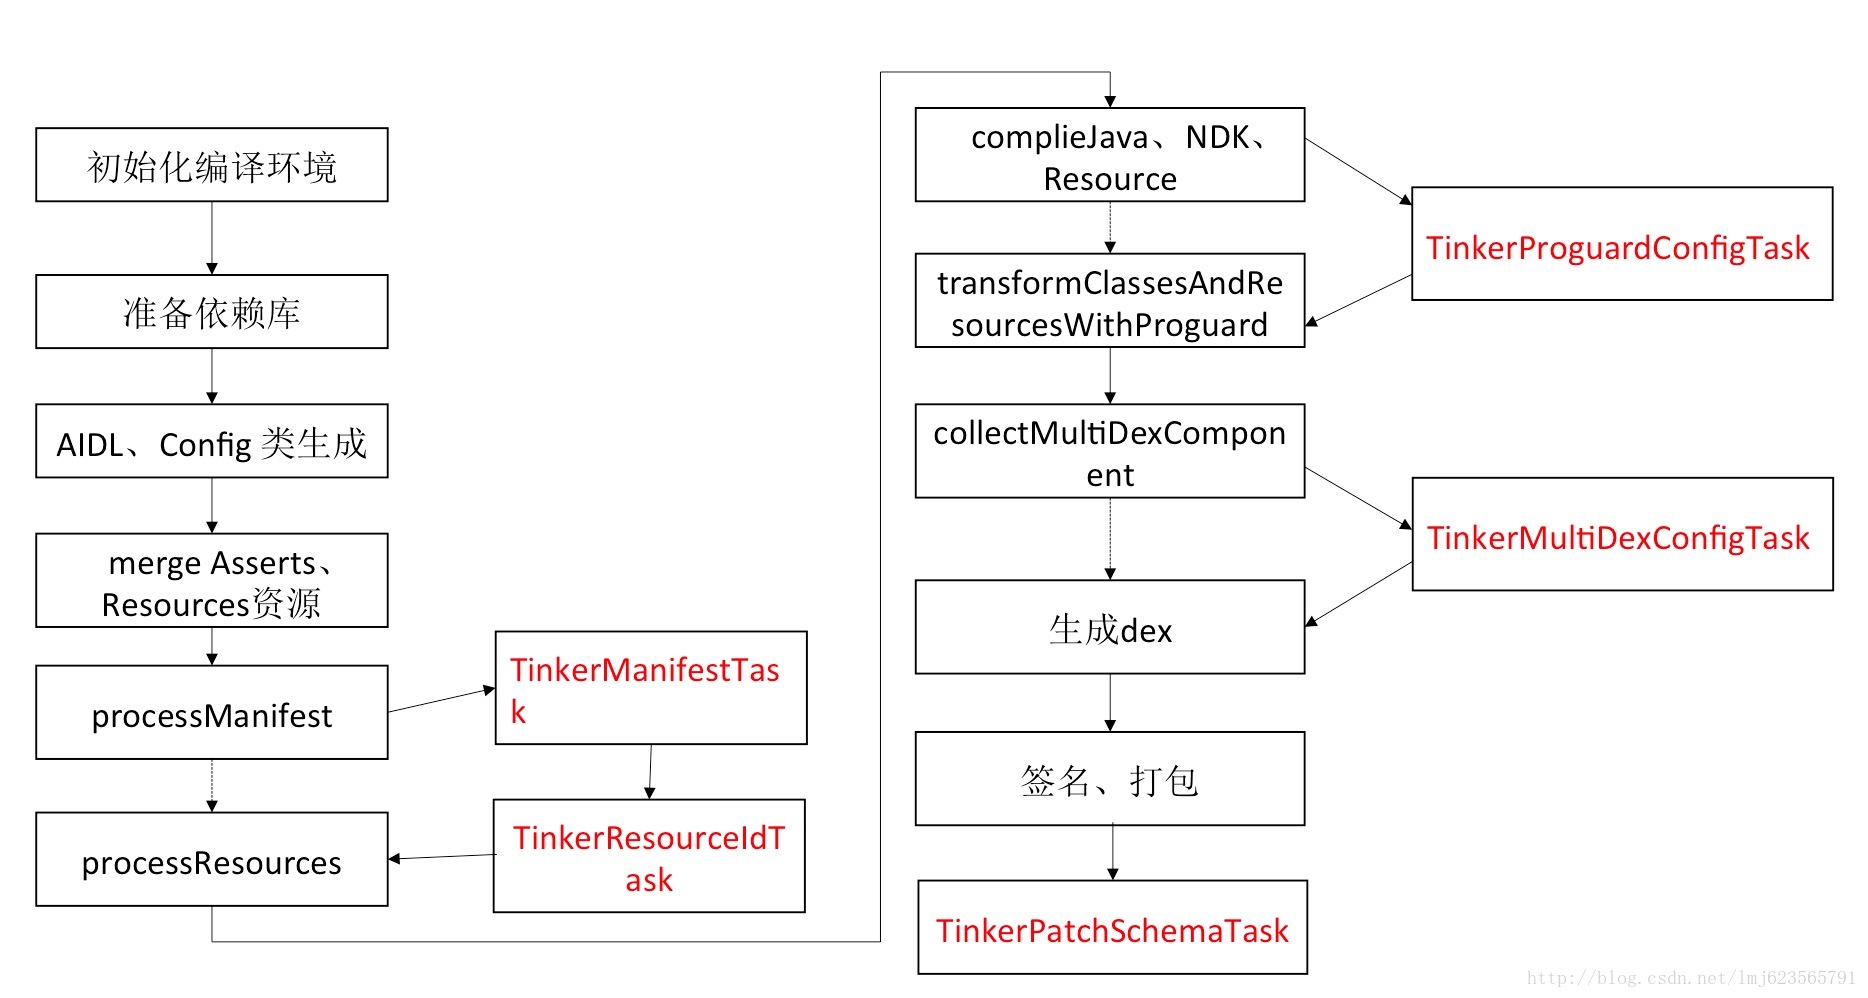
三、每个Task的具体行为
我们按照上述的流程来看,依次为:
TinkerManifestTask
TinkerResourceIdTask
TinkerProguardConfigTask
TinkerMultidexConfigTask
TinkerPatchSchemaTask
丢个图,对应下:
四、TinkerManifestTask
#TinkerManifestTask
@TaskAction
def updateManifest() {
    // Parse the AndroidManifest.xml
    String tinkerValue = project.extensions.tinkerPatch.buildConfig.tinkerId

    tinkerValue = TINKER_ID_PREFIX + tinkerValue;//"tinker_id_"

    // /build/intermediates/manifests/full/debug/AndroidManifest.xml
    writeManifestMeta(manifestPath, TINKER_ID, tinkerValue)

    addApplicationToLoaderPattern()
    File manifestFile = new File(manifestPath)
    if (manifestFile.exists()) {
        FileOperation.copyFileUsingStream(manifestFile, project.file(MANIFEST_XML))
    }
}
这里主要做了两件事:
writeManifestMeta主要就是解析AndroidManifest.xml,在
<application>内部添加一个meta标签,value为tinkerValue。<meta-data android:name="TINKER_ID" android:value="tinker_id_com.zhy.abc" />
这里不详细展开了,话说groovy解析XML真方便。
- addApplicationToLoaderPattern主要是记录自己的application类名和tinker相关的一些load class
com.tencent.tinker.loader.*,记录在project.extensions.tinkerPatch.dex.loader中。
最后copy修改后的AndroidManifest.xml至build/intermediates/tinker_intermediates/AndroidManifest.xml。
这里我们需要想一下,在文初的分析中,并没有想到需要tinkerId这个东西,那么它到底是干嘛的呢?
看一下微信提供的参数说明,就明白了:
在运行过程中,我们需要验证基准apk包的tinkerId是否等于补丁包的tinkerId。这个是决定补丁包能运行在哪些基准包上面,一般来说我们可以使用git版本号、versionName等等。
想一下,在非强制升级的情况下,线上一般分布着各个版本的app。但是。你打patch肯定是对应某个版本,所以你要保证这个patch下发下去只影响对应的版本,不会对其他版本造成影响,所以你需要tinkerId与具体的版本相对应。
ok,下一个TinkerResourceIdTask。
五、TinkerResourceIdTask
文初提到,打patch的过程实际上要控制已有的资源id不能发生变化,这个task所做的事就是为此。
如果保证已有资源的id保持不变呢?
实际上需要public.xml和ids.xml的参与,即预先在public.xml中的如下定义,在第二次打包之后可保持该资源对应的id值不变。
注:对xml文件的名称应该没有强要求。
<public type="id" name="search_button" id="0x7f0c0046" />很多时候我们在搜索固化资源,一般都能看到通过public.xml去固化资源id,但是这里有个ids.xml是干嘛的呢?
下面这篇文章有个很好的解释~
http://blog.csdn.net/sbsujjbcy/article/details/52541803
首先需要生成public.xml,public.xml的生成通过aapt编译时添加-P参数生成。相关代码通过gradle插件去hook Task无缝加入该参数,有一点需要注意,通过appt生成的public.xml并不是可以直接用的,该文件中存在id类型的资源,生成patch时应用进去编译的时候会报resource is not defined,解决方法是将id类型型的资源单独记录到ids.xml文件中,相当于一个声明过程,编译的时候和public.xml一样,将ids.xml也参与编译即可。
ok,知道了public.xml和ids.xml的作用之后,需要再思考一下如何保证id不变?
首先我们在配置old apk的时候,会配置tinkerApplyResourcePath参数,该参数对应一个R.txt,里面的内容涵盖了所有old apk中资源对应的int值。
那么我们可以这么做,根据这个R.txt,把里面的数据写成public.xml不就能保证原本的资源对应的int值不变了么。
的确是这样的,不过tinker做了更多,不仅将old apk的中的资源信息写到public.xml,而且还干涉了新的资源,对新的资源按照资源id的生成规则,也分配的对应的int值,写到了public.xml,可以说该task包办了资源id的生成。
分析前的总结
好了,由于代码非常长,我决定在这个地方先用总结性的语言总结下,如果没有耐心看代码的可以直接跳过源码分析阶段:
首先将设置的old R.txt读取到内存中,转为:
- 一个Map,key-value都代表一个具体资源信息;直接复用,不会生成新的资源信息。
- 一个Map,key为资源类型,value为该类资源当前的最大int值;参与新的资源id的生成。
接下来遍历当前app中的资源,资源分为:
- values文件夹下文件
对所有values相关文件夹下的文件已经处理完毕,大致的处理为:遍历文件中的节点,大致有item,dimen,color,drawable,bool,integer,array,style,declare-styleable,attr,fraction这些节点,将所有的节点按类型分类存储到rTypeResourceMap(key为资源类型,value为对应类型资源集合Set)中。
其中declare-styleable这个标签,主要读取其内部的attr标签,对attr标签对应的资源按上述处理。
- res下非values文件夹
打开自己的项目有看一眼,除了values相关还有layout,anim,color等文件夹,主要分为两类:
一类是对 文件 即为资源,例如R.layout.xxx,R.drawable.xxx等;另一类为xml文档中以@+(去除@+android:id),其实就是找到我们自定义id节点,然后截取该节点的id值部分作为属性的名称(例如:@+id/tv,tv即为属性的名称)。
如果和设置的old apk中文件中相同name和type的节点不需要特殊处理,直接复用即可;如果不存在则需要生成新的typeId、resourceId等信息。
会将所有生成的资源都存到rTypeResourceMap中,最后写文件。
这样就基本收集到了所有的需要生成资源信息的所有的资源,最后写到public.xml即可。
总结性的语言难免有一些疏漏,实际以源码分析为标准。
开始源码分析
@TaskAction
def applyResourceId() {
     // 资源mapping文件
    String resourceMappingFile = project.extensions.tinkerPatch.buildConfig.applyResourceMapping

    // resDir /build/intermediates/res/merged/debug
    String idsXml = resDir + "/values/ids.xml";
    String publicXml = resDir + "/values/public.xml";
    FileOperation.deleteFile(idsXml);
    FileOperation.deleteFile(publicXml);

    List<String> resourceDirectoryList = new ArrayList<String>();
    // /build/intermediates/res/merged/debug
    resourceDirectoryList.add(resDir);

    project.logger.error("we build ${project.getName()} apk with apply resource mapping file ${resourceMappingFile}");

    project.extensions.tinkerPatch.buildConfig.usingResourceMapping = true;

    // 收集所有的资源,以type->type,name,id,int/int[]存储
    Map<RDotTxtEntry.RType, Set<RDotTxtEntry>> rTypeResourceMap = PatchUtil.readRTxt(resourceMappingFile);

    AaptResourceCollector aaptResourceCollector = AaptUtil.collectResource(resourceDirectoryList, rTypeResourceMap);

    PatchUtil.generatePublicResourceXml(aaptResourceCollector, idsXml, publicXml);
    File publicFile = new File(publicXml);
    if (publicFile.exists()) {
        FileOperation.copyFileUsingStream(publicFile, project.file(RESOURCE_PUBLIC_XML));
        project.logger.error("tinker gen resource public.xml in ${RESOURCE_PUBLIC_XML}");
    }
    File idxFile = new File(idsXml);
    if (idxFile.exists()) {
        FileOperation.copyFileUsingStream(idxFile, project.file(RESOURCE_IDX_XML));
        project.logger.error("tinker gen resource idx.xml in ${RESOURCE_IDX_XML}");
    }
}
大体浏览下代码,可以看到首先检测是否设置了resource mapping文件,如果没有设置会直接跳过。并且最后的产物是public.xml和ids.xml。
因为生成patch时,需要保证两次打包已经存在的资源的id一致,需要
public.xml和ids.xml的参与。
首先清理已经存在的public.xml和ids.xml,然后通过PatchUtil.readRTxt读取resourceMappingFile(参数中设置的),该文件记录的格式如下:
int anim abc_slide_in_bottom 0x7f050006
int id useLogo 0x7f0b0012
int[] styleable AppCompatImageView { 0x01010119, 0x7f010027 }
int styleable AppCompatImageView_android_src 0
int styleable AppCompatImageView_srcCompat 1
大概有两类,一类是int型各种资源;一类是int[]数组,代表styleable,其后面紧跟着它的item(熟悉自定义View的一定不陌生)。
PatchUtil.readRTxt的代码就不贴了,简单描述下:
首先正则按行匹配,每行分为四部分,即idType,rType,name,idValue(四个属性为RDotTxtEntry的成员变量)。
- idType有两种
INT和INT_ARRAY。 - rType包含各种资源:
ANIM, ANIMATOR, ARRAY, ATTR, BOOL, COLOR, DIMEN, DRAWABLE, FRACTION,
 ID, INTEGER, INTERPOLATOR, LAYOUT, MENU, MIPMAP, PLURALS, RAW,
 STRING, STYLE, STYLEABLE, TRANSITION, XML
name和value就是普通的键值对了。
这里并没有对styleable做特殊处理。
最后按rType分类,存在一个Map中,即key为rType,value为一个RDotTxtEntry类型的Set集合。
回顾下剩下的代码:
//...省略前半部分
     AaptResourceCollector aaptResourceCollector = AaptUtil.collectResource(resourceDirectoryList, rTypeResourceMap);
    PatchUtil.generatePublicResourceXml(aaptResourceCollector, idsXml, publicXml);
    File publicFile = new File(publicXml);
    if (publicFile.exists()) {
        FileOperation.copyFileUsingStream(publicFile, project.file(RESOURCE_PUBLIC_XML));
        project.logger.error("tinker gen resource public.xml in ${RESOURCE_PUBLIC_XML}");
    }
    File idxFile = new File(idsXml);
    if (idxFile.exists()) {
        FileOperation.copyFileUsingStream(idxFile, project.file(RESOURCE_IDX_XML));
        project.logger.error("tinker gen resource idx.xml in ${RESOURCE_IDX_XML}");
    }
那么到了AaptUtil.collectResource方法,传入了resDir目录和我们刚才收集了资源信息的Map,返回了一个AaptResourceCollector对象,看名称是对aapt相关的资源的收集:
public static AaptResourceCollector collectResource(List<String> resourceDirectoryList,
                                                    Map<RType, Set<RDotTxtEntry>> rTypeResourceMap) {
    AaptResourceCollector resourceCollector = new AaptResourceCollector(rTypeResourceMap);
    List<com.tencent.tinker.build.aapt.RDotTxtEntry> references = new ArrayList<com.tencent.tinker.build.aapt.RDotTxtEntry>();
    for (String resourceDirectory : resourceDirectoryList) {
        try {
            collectResources(resourceDirectory, resourceCollector);
        } catch (Exception e) {
            throw new RuntimeException(e);
        }
    }
    for (String resourceDirectory : resourceDirectoryList) {
        try {
            processXmlFilesForIds(resourceDirectory, references, resourceCollector);
        } catch (Exception e) {
            throw new RuntimeException(e);
        }
    }
    return resourceCollector;
}
首先初始化了一个AaptResourceCollector对象,看其构造方法:
public AaptResourceCollector(Map<RType, Set<RDotTxtEntry>> rTypeResourceMap) {
    this();
    if (rTypeResourceMap != null) {
        Iterator<Entry<RType, Set<RDotTxtEntry>>> iterator = rTypeResourceMap.entrySet().iterator();
        while (iterator.hasNext()) {
            Entry<RType, Set<RDotTxtEntry>> entry = iterator.next();
            RType rType = entry.getKey();
            Set<RDotTxtEntry> set = entry.getValue();

            for (RDotTxtEntry rDotTxtEntry : set) {
                originalResourceMap.put(rDotTxtEntry, rDotTxtEntry);

                ResourceIdEnumerator resourceIdEnumerator = null;
                    // ARRAY主要是styleable
                if (!rDotTxtEntry.idType.equals(IdType.INT_ARRAY)) {
                        // 获得resourceId
                    int resourceId = Integer.decode(rDotTxtEntry.idValue.trim()).intValue();
                    // 获得typeId
                    int typeId = ((resourceId & 0x00FF0000) / 0x00010000);


                    if (typeId >= currentTypeId) {
                        currentTypeId = typeId + 1;
                    }

                        // type -> id的映射
                    if (this.rTypeEnumeratorMap.containsKey(rType)) {
                        resourceIdEnumerator = this.rTypeEnumeratorMap.get(rType);
                        if (resourceIdEnumerator.currentId < resourceId) {
                            resourceIdEnumerator.currentId = resourceId;
                        }
                    } else {
                        resourceIdEnumerator = new ResourceIdEnumerator();
                        resourceIdEnumerator.currentId = resourceId;
                        this.rTypeEnumeratorMap.put(rType, resourceIdEnumerator);
                    }
                }
            }
        }
    }
}
对rTypeResourceMap根据rType进行遍历,读取每个rType对应的Set集合;然后遍历每个rDotTxtEntry:
- 加入到originalResourceMap,key和value都是rDotTxtEntry对象
- 如果是int型资源,首先读取其typeId,并持续更新currentTypeId(保证其为遍历完成后的最大值+1)
- 初始化rTypeEnumeratorMap,key为rType,value为ResourceIdEnumerator,且ResourceIdEnumerator中的currentId保存着目前同类资源的最大的resouceId,也就是说rTypeEnumeratorMap中存储了各个rType对应的最大的资源Id。
结束完成构造方法,执行了
- 遍历了resourceDirectoryList,目前其中只有一个resDir,然后执行了collectResources方法;
- 遍历了resourceDirectoryList,执行了processXmlFilesForIds
分别读代码了:
collectResources
private static void collectResources(String resourceDirectory, AaptResourceCollector resourceCollector) throws Exception {
    File resourceDirectoryFile = new File(resourceDirectory);
    File[] fileArray = resourceDirectoryFile.listFiles();
    if (fileArray != null) {
        for (File file : fileArray) {
            if (file.isDirectory()) {
                String directoryName = file.getName();
                if (directoryName.startsWith("values")) {
                    if (!isAValuesDirectory(directoryName)) {
                        throw new AaptUtilException("'" + directoryName + "' is not a valid values directory.");
                    }
                    processValues(file.getAbsolutePath(), resourceCollector);
                } else {
                    processFileNamesInDirectory(file.getAbsolutePath(), resourceCollector);
                }
            }
        }
    }
}
遍历我们的resDir中的所有文件夹
- 如果是values相关文件夹,执行processValues
- 非values相关文件夹则执行processFileNamesInDirectory
processValues处理values相关文件,会遍历每一个合法的values相关文件夹下的文件,执行processValuesFile(file.getAbsolutePath(), resourceCollector);
public static void processValuesFile(String valuesFullFilename,
                                     AaptResourceCollector resourceCollector) throws Exception {
    Document document = JavaXmlUtil.parse(valuesFullFilename);
    String directoryName = new File(valuesFullFilename).getParentFile().getName();
    Element root = document.getDocumentElement();

    for (Node node = root.getFirstChild(); node != null; node = node.getNextSibling()) {
        if (node.getNodeType() != Node.ELEMENT_NODE) {
            continue;
        }

        String resourceType = node.getNodeName();
        if (resourceType.equals(ITEM_TAG)) {
            resourceType = node.getAttributes().getNamedItem("type").getNodeValue();
            if (resourceType.equals("id")) {
                resourceCollector.addIgnoreId(node.getAttributes().getNamedItem("name").getNodeValue());
            }
        }

        if (IGNORED_TAGS.contains(resourceType)) {
            continue;
        }

        if (!RESOURCE_TYPES.containsKey(resourceType)) {
            throw new AaptUtilException("Invalid resource type '<" + resourceType + ">' in '" + valuesFullFilename + "'.");
        }

        RType rType = RESOURCE_TYPES.get(resourceType);
        String resourceValue = null;
        switch (rType) {
            case STRING:
            case COLOR:
            case DIMEN:
            case DRAWABLE:
            case BOOL:
            case INTEGER:
                resourceValue = node.getTextContent().trim();
                break;
            case ARRAY://has sub item
            case PLURALS://has sub item
            case STYLE://has sub item
            case STYLEABLE://has sub item
                resourceValue = subNodeToString(node);
                break;
            case FRACTION://no sub item
                resourceValue = nodeToString(node, true);
                break;
            case ATTR://no sub item
                resourceValue = nodeToString(node, true);
                break;
        }
        try {
            addToResourceCollector(resourceCollector,
                    new ResourceDirectory(directoryName, valuesFullFilename),
                    node, rType, resourceValue);
        } catch (Exception e) {
            throw new AaptUtilException(e.getMessage() + ",Process file error:" + valuesFullFilename, e);
        }
    }
}
values下相关的文件基本都是xml咯,所以遍历xml文件,遍历其内部的节点,(values的xml文件其内部一般为item,dimen,color,drawable,bool,integer,array,style,declare-styleable,attr,fraction等),每种类型的节点对应一个rType,根据不同类型的节点也会去获取节点的值,确定一个都会执行:
addToResourceCollector(resourceCollector,
    new ResourceDirectory(directoryName, valuesFullFilename),
    node, rType, resourceValue);
注:除此以外,这里在ignoreIdSet记录了声明的id资源,这些id是已经声明过的,所以最终在编写ids.xml时,可以过滤掉这些id。
下面继续看:addToResourceCollector
源码如下:
private static void addToResourceCollector(AaptResourceCollector resourceCollector,
                                           ResourceDirectory resourceDirectory,
                                           Node node, RType rType, String resourceValue) {
    String resourceName = sanitizeName(rType, resourceCollector, extractNameAttribute(node));

    if (rType.equals(RType.STYLEABLE)) {

        int count = 0;
        for (Node attrNode = node.getFirstChild(); attrNode != null; attrNode = attrNode.getNextSibling()) {
            if (attrNode.getNodeType() != Node.ELEMENT_NODE || !attrNode.getNodeName().equals("attr")) {
                continue;
            }
            String rawAttrName = extractNameAttribute(attrNode);
            String attrName = sanitizeName(rType, resourceCollector, rawAttrName);

            if (!rawAttrName.startsWith("android:")) {
                resourceCollector.addIntResourceIfNotPresent(RType.ATTR, attrName);
            }
        }
    } else {
        resourceCollector.addIntResourceIfNotPresent(rType, resourceName);
    }
}
如果不是styleable的资源,则直接获取resourceName,然后调用resourceCollector.addIntResourceIfNotPresent(rType, resourceName)。
如果是styleable类型的资源,则会遍历找到其内部的attr节点,找出非android:开头的(因为android:开头的attr的id不需要我们去确定),设置rType为ATTR,value为attr属性的name,调用addIntResourceIfNotPresent。
public void addIntResourceIfNotPresent(RType rType, String name) { //, ResourceDirectory resourceDirectory) {
    if (!rTypeEnumeratorMap.containsKey(rType)) {
        if (rType.equals(RType.ATTR)) {
            rTypeEnumeratorMap.put(rType, new ResourceIdEnumerator(1));
        } else {
            rTypeEnumeratorMap.put(rType, new ResourceIdEnumerator(currentTypeId++));
        }
    }

    RDotTxtEntry entry = new FakeRDotTxtEntry(IdType.INT, rType, name);
    Set<RDotTxtEntry> resourceSet = null;
    if (this.rTypeResourceMap.containsKey(rType)) {
        resourceSet = this.rTypeResourceMap.get(rType);
    } else {
        resourceSet = new HashSet<RDotTxtEntry>();
        this.rTypeResourceMap.put(rType, resourceSet);
    }
    if (!resourceSet.contains(entry)) {
        String idValue = String.format("0x%08x", rTypeEnumeratorMap.get(rType).next());
        addResource(rType, IdType.INT, name, idValue); //, resourceDirectory);
    }
}
首先构建一个entry,然后判断当前的rTypeResourceMap中是否存在该资源实体,如果存在,则什么都不用做。
如果不存在,则需要构建一个entry,那么主要是id的构建。
关于id的构建:
还记得rTypeEnumeratorMap么,其内部包含了我们设置的”res mapping”文件,存储了每一类资源(rType)的资源的最大resourceId值。
那么首先判断就是是否已经有这种类型了,如果有的话,获取出该类型当前最大的resourceId,然后+1,最为传入资源的resourceId.
如果不存在当前这种类型,那么如果类型为ATTR则固定type为1;否则的话,新增一个typeId,为当前最大的type+1(currentTypeId中也是记录了目前最大的type值),有了类型就可以通过ResourceIdEnumerator.next()来获取id。
经过上述就可以构造出一个idValue了。
最后调用:
addResource(rType, IdType.INT, name, idValue);查看代码:
public void addResource(RType rType, IdType idType, String name, String idValue) {
    Set<RDotTxtEntry> resourceSet = null;
    if (this.rTypeResourceMap.containsKey(rType)) {
        resourceSet = this.rTypeResourceMap.get(rType);
    } else {
        resourceSet = new HashSet<RDotTxtEntry>();
        this.rTypeResourceMap.put(rType, resourceSet);
    }
    RDotTxtEntry rDotTxtEntry = new RDotTxtEntry(idType, rType, name, idValue);

    if (!resourceSet.contains(rDotTxtEntry)) {
        if (this.originalResourceMap.containsKey(rDotTxtEntry)) {
            this.rTypeEnumeratorMap.get(rType).previous();
            rDotTxtEntry = this.originalResourceMap.get(rDotTxtEntry);
        }
        resourceSet.add(rDotTxtEntry);
    }

}
大体意思就是如果该资源不存在就添加到rTypeResourceMap。
首先构建出该资源实体,判断该类型对应的资源集合是否包含该资源实体(这里contains只比对name和type),如果不包含,判断是否在originalResourceMap中,如果存在(这里做了一个previous操作,其实与上面的代码的next操作对应,主要是针对资源存在我们的res map中这种情况)则取出该资源实体,最终将该资源实体加入到rTypeResourceMap中。
ok,到这里需要小节一下,我们刚才对所有values相关文件夹下的文件已经处理完毕,大致的处理为:遍历文件中的节点,大致有item,dimen,color,drawable,bool,integer,array,style,declare-styleable,attr,fraction这些节点,将所有的节点按类型分类存储到rTypeResourceMap中(如果和设置的”res map”文件中相同name和type的节点不需要特殊处理,直接复用即可;如果不存在则需要生成新的typeId、resourceId等信息)。
其中declare-styleable这个标签,主要读取其内部的attr标签,对attr标签对应的资源按上述处理。
处理完成values相关文件夹之后,还需要处理一些res下的其他文件,比如layout、layout、anim等文件夹,该类资源也需要在R中生成对应的id值,这类值也需要固化。
processFileNamesInDirectory
public static void processFileNamesInDirectory(String resourceDirectory,
                                               AaptResourceCollector resourceCollector) throws IOException {
    File resourceDirectoryFile = new File(resourceDirectory);
    String directoryName = resourceDirectoryFile.getName();
    int dashIndex = directoryName.indexOf('-');
    if (dashIndex != -1) {
        directoryName = directoryName.substring(0, dashIndex);
    }

    if (!RESOURCE_TYPES.containsKey(directoryName)) {
        throw new AaptUtilException(resourceDirectoryFile.getAbsolutePath() + " is not a valid resource sub-directory.");
    }
    File[] fileArray = resourceDirectoryFile.listFiles();
    if (fileArray != null) {
        for (File file : fileArray) {
            if (file.isHidden()) {
                continue;
            }
            String filename = file.getName();
            int dotIndex = filename.indexOf('.');
            String resourceName = dotIndex != -1 ? filename.substring(0, dotIndex) : filename;

            RType rType = RESOURCE_TYPES.get(directoryName);
            resourceCollector.addIntResourceIfNotPresent(rType, resourceName);

            System.out.println("rType = " + rType + " , resName = " + resourceName);

            ResourceDirectory resourceDirectoryBean = new ResourceDirectory(file.getParentFile().getName(), file.getAbsolutePath());
            resourceCollector.addRTypeResourceName(rType, resourceName, null, resourceDirectoryBean);
        }
    }
}
遍历res下所有文件夹,根据文件夹名称确定其对应的资源类型(例如:drawable-xhpi,则认为其内部的文件类型为drawable类型),然后遍历该文件夹下所有的文件,最终以文件名为资源的name,文件夹确定资源的type,最终调用:
resourceCollector
.addIntResourceIfNotPresent(rType, resourceName);
processXmlFilesForIds
public static void processXmlFilesForIds(String resourceDirectory,
                                         List<RDotTxtEntry> references, AaptResourceCollector resourceCollector) throws Exception {
    List<String> xmlFullFilenameList = FileUtil
            .findMatchFile(resourceDirectory, Constant.Symbol.DOT + Constant.File.XML);
    if (xmlFullFilenameList != null) {
        for (String xmlFullFilename : xmlFullFilenameList) {
            File xmlFile = new File(xmlFullFilename);

            String parentFullFilename = xmlFile.getParent();
            File parentFile = new File(parentFullFilename);
            if (isAValuesDirectory(parentFile.getName()) || parentFile.getName().startsWith("raw")) {
                // Ignore files under values* directories and raw*.
                continue;
            }
            processXmlFile(xmlFullFilename, references, resourceCollector);
        }
    }
}遍历除了raw*以及values*相关文件夹下的xml文件,执行processXmlFile。
public static void processXmlFile(String xmlFullFilename, List<RDotTxtEntry> references, AaptResourceCollector resourceCollector)
        throws IOException, XPathExpressionException {
    Document document = JavaXmlUtil.parse(xmlFullFilename);
    NodeList nodesWithIds = (NodeList) ANDROID_ID_DEFINITION.evaluate(document, XPathConstants.NODESET);
    for (int i = 0; i < nodesWithIds.getLength(); i++) {
        String resourceName = nodesWithIds.item(i).getNodeValue();


        if (!resourceName.startsWith(ID_DEFINITION_PREFIX)) {
            throw new AaptUtilException("Invalid definition of a resource: '" + resourceName + "'");
        }

        resourceCollector.addIntResourceIfNotPresent(RType.ID, resourceName.substring(ID_DEFINITION_PREFIX.length()));
    }

    // 省略了无关代码
}
主要找xml文档中以@+(去除@+android:id),其实就是找到我们自定义id节点,然后截取该节点的id值部分作为属性的名称(例如:@+id/tv,tv即为属性的名称),最终调用:
resourceCollector
    .addIntResourceIfNotPresent(RType.ID,
        resourceName.substring(ID_DEFINITION_PREFIX.length()));
上述就完成了所有的资源的收集,那么剩下的就是写文件了:
public static void generatePublicResourceXml(AaptResourceCollector aaptResourceCollector,
                                             String outputIdsXmlFullFilename,
                                             String outputPublicXmlFullFilename) {
    if (aaptResourceCollector == null) {
        return;
    }
    FileUtil.createFile(outputIdsXmlFullFilename);
    FileUtil.createFile(outputPublicXmlFullFilename);

    PrintWriter idsWriter = null;
    PrintWriter publicWriter = null;
    try {
        FileUtil.createFile(outputIdsXmlFullFilename);
        FileUtil.createFile(outputPublicXmlFullFilename);
        idsWriter = new PrintWriter(new File(outputIdsXmlFullFilename), "UTF-8");

        publicWriter = new PrintWriter(new File(outputPublicXmlFullFilename), "UTF-8");
        idsWriter.println("<?xml version=\"1.0\" encoding=\"utf-8\"?>");
        publicWriter.println("<?xml version=\"1.0\" encoding=\"utf-8\"?>");
        idsWriter.println("<resources>");
        publicWriter.println("<resources>");
        Map<RType, Set<RDotTxtEntry>> map = aaptResourceCollector.getRTypeResourceMap();
        Iterator<Entry<RType, Set<RDotTxtEntry>>> iterator = map.entrySet().iterator();
        while (iterator.hasNext()) {
            Entry<RType, Set<RDotTxtEntry>> entry = iterator.next();
            RType rType = entry.getKey();
            if (!rType.equals(RType.STYLEABLE)) {
                Set<RDotTxtEntry> set = entry.getValue();
                for (RDotTxtEntry rDotTxtEntry : set) {
                    String rawName = aaptResourceCollector.getRawName(rType, rDotTxtEntry.name);
                    if (StringUtil.isBlank(rawName)) {
                        rawName = rDotTxtEntry.name;
                    }
                    publicWriter.println("<public type=\"" + rType + "\" name=\"" + rawName + "\" id=\"" + rDotTxtEntry.idValue.trim() + "\" />");
                }
                Set<String> ignoreIdSet = aaptResourceCollector.getIgnoreIdSet();
                for (RDotTxtEntry rDotTxtEntry : set) {
                    if (rType.equals(RType.ID) && !ignoreIdSet.contains(rDotTxtEntry.name)) {
                        idsWriter.println("<item type=\"" + rType + "\" name=\"" + rDotTxtEntry.name + "\"/>");
                    }
                }
            }
            idsWriter.flush();
            publicWriter.flush();
        }
        idsWriter.println("</resources>");
        publicWriter.println("</resources>");
    } catch (Exception e) {
        throw new PatchUtilException(e);
    } finally {
        if (idsWriter != null) {
            idsWriter.flush();
            idsWriter.close();
        }
        if (publicWriter != null) {
            publicWriter.flush();
            publicWriter.close();
        }
    }
}主要就是遍历rTypeResourceMap,然后每个资源实体对应一条public标签记录写到public.xml中。
此外,如果发现该元素节点的type为Id,并且不在ignoreSet中,会写到ids.xml这个文件中。(这里有个ignoreSet,这里ignoreSet中记录了values下所有的<item type=id的资源,是直接在项目中已经声明过的,所以去除)。
六、TinkerProguardConfigTask
还记得文初说:
- 我们在上线app的时候,会做代码混淆,如果没有做特殊的设置,每次混淆后的代码差别应该非常巨大;所以,build过程中理论上需要设置混淆的mapping文件。
- 在接入一些库的时候,往往还需要配置混淆,比如第三方库中哪些东西不能被混淆等(当然强制某些类在主dex中,也可能需要配置相对应的混淆规则)。
这个task的作用很明显了。有时候为了确保一些类在main dex中,简单的做法也会对其在混淆配置中进行keep(避免由于混淆造成类名更改,而使main dex的keep失效)。
如果开启了proguard会执行该task。
这个就是主要去设置混淆的mapping文件,和keep一些必要的类了。
@TaskAction
def updateTinkerProguardConfig() {
    def file = project.file(PROGUARD_CONFIG_PATH)
    project.logger.error("try update tinker proguard file with ${file}")

    // Create the directory if it doesnt exist already
    file.getParentFile().mkdirs()

    // Write our recommended proguard settings to this file
    FileWriter fr = new FileWriter(file.path)

    String applyMappingFile = project.extensions.tinkerPatch.buildConfig.applyMapping

    //write applymapping
    if (shouldApplyMapping && FileOperation.isLegalFile(applyMappingFile)) {
        project.logger.error("try add applymapping ${applyMappingFile} to build the package")
        fr.write("-applymapping " + applyMappingFile)
        fr.write("\n")
    } else {
        project.logger.error("applymapping file ${applyMappingFile} is illegal, just ignore")
    }

    fr.write(PROGUARD_CONFIG_SETTINGS)

    fr.write("#your dex.loader patterns here\n")
    //they will removed when apply
    Iterable<String> loader = project.extensions.tinkerPatch.dex.loader
    for (String pattern : loader) {
        if (pattern.endsWith("*") && !pattern.endsWith("**")) {
            pattern += "*"
        }
        fr.write("-keep class " + pattern)
        fr.write("\n")
    }
    fr.close()
    // Add this proguard settings file to the list
    applicationVariant.getBuildType().buildType.proguardFiles(file)
    def files = applicationVariant.getBuildType().buildType.getProguardFiles()

    project.logger.error("now proguard files is ${files}")
}
读取我们设置的mappingFile,设置
-applymapping applyMappingFile然后设置一些默认需要keep的规则:
PROGUARD_CONFIG_SETTINGS =
"-keepattributes *Annotation* \n" +
"-dontwarn com.tencent.tinker.anno.AnnotationProcessor \n" +
"-keep @com.tencent.tinker.anno.DefaultLifeCycle public class *\n" +
"-keep public class * extends android.app.Application {\n" +
"    *;\n" +
"}\n" +
"\n" +
"-keep public class com.tencent.tinker.loader.app.ApplicationLifeCycle {\n" +
"    *;\n" +
"}\n" +
"-keep public class * implements com.tencent.tinker.loader.app.ApplicationLifeCycle {\n" +
"    *;\n" +
"}\n" +
"\n" +
"-keep public class com.tencent.tinker.loader.TinkerLoader {\n" +
"    *;\n" +
"}\n" +
"-keep public class * extends com.tencent.tinker.loader.TinkerLoader {\n" +
"    *;\n" +
"}\n" +
"-keep public class com.tencent.tinker.loader.TinkerTestDexLoad {\n" +
"    *;\n" +
"}\n" +
"\n"最后是keep住我们的application、com.tencent.tinker.loader.**以及我们设置的相关类。
TinkerManifestTask中:addApplicationToLoaderPattern主要是记录自己的application类名和tinker相关的一些load class
com.tencent.tinker.loader.*,记录在project.extensions.tinkerPatch.dex.loader。
七、TinkerMultidexConfigTask
对应文初:
当项目比较大的时候,我们可能会遇到方法数超过65535的问题,我们很多时候会通过分包解决,这样就有主dex和其他dex的概念。集成了tinker之后,在应用的Application启动时会非常早的就去做tinker的load操作,所以就决定了load相关的类必须在主dex中。
如果multiDexEnabled开启。
主要是让相关类必须在main dex。
"-keep public class * implements com.tencent.tinker.loader.app.ApplicationLifeCycle {\n" +
    "    *;\n" +
    "}\n" +
    "\n" +
    "-keep public class * extends com.tencent.tinker.loader.TinkerLoader {\n" +
    "    *;\n" +
    "}\n" +
    "\n" +
    "-keep public class * extends android.app.Application {\n" +
    "    *;\n" +
    "}\n"
Iterable<String> loader = project.extensions.tinkerPatch.dex.loader
for (String pattern : loader) {
if (pattern.endsWith("*")) {
if (!pattern.endsWith("**")) {
pattern += "*"
}
}
lines.append("-keep class " + pattern + " {\n" +
" *;\n" +
"}\n")
.append("\n")
}相关类都在loader这个集合中,在TinkerManifestTask中设置的。
八、TinkerPatchSchemaTask
主要执行Runner.tinkerPatch
protected void tinkerPatch() {
    try {
        //gen patch
        ApkDecoder decoder = new ApkDecoder(config);
        decoder.onAllPatchesStart();
        decoder.patch(config.mOldApkFile, config.mNewApkFile);
        decoder.onAllPatchesEnd();

        //gen meta file and version file
        PatchInfo info = new PatchInfo(config);
        info.gen();

        //build patch
        PatchBuilder builder = new PatchBuilder(config);
        builder.buildPatch();

    } catch (Throwable e) {
        e.printStackTrace();
        goToError();
    }
}
主要分为以下环节:
- 生成patch
- 生成meta-file和version-file,这里主要就是在assets目录下写一些键值对。(包含tinkerId以及配置中configField相关信息)
- build patch
(1)生成pacth
顾名思义就是两个apk比较去生成各类patch文件,那么从一个apk的组成来看,大致可以分为:
- dex文件比对的patch文件
- res文件比对的patch res文件
- so文件比对生成的so patch文件
看下代码:
public boolean patch(File oldFile, File newFile) throws Exception {
    //check manifest change first
    manifestDecoder.patch(oldFile, newFile);

    unzipApkFiles(oldFile, newFile);

    Files.walkFileTree(mNewApkDir.toPath(), new ApkFilesVisitor(config, mNewApkDir.toPath(),
            mOldApkDir.toPath(), dexPatchDecoder, soPatchDecoder, resPatchDecoder));

    soPatchDecoder.onAllPatchesEnd();
    dexPatchDecoder.onAllPatchesEnd();
    manifestDecoder.onAllPatchesEnd();
    resPatchDecoder.onAllPatchesEnd();

    //clean resources
    dexPatchDecoder.clean();
    soPatchDecoder.clean();
    resPatchDecoder.clean();
    return true;
}
代码内部包含四个Decoder:
- manifestDecoder
- dexPatchDecoder
- soPatchDecoder
- resPatchDecoder
刚才提到需要对dex、so、res文件做diff,但是为啥会有个manifestDecoder。目前tinker并不支持四大组件,也就是说manifest文件中是不允许出现新增组件的。
所以,manifestDecoder的作用实际上是用于检查的:
- minSdkVersion<14时仅允许dexMode使用jar模式(TODO:raw模式的区别是什么?)
- 会解析manifest文件,读取出组大组件进行对比,不允许出现新增的任何组件。
代码就不贴了非常好理解,关于manifest的解析是基于该库封装的:
然后就是解压两个apk文件了,old apk(我们设置的),old apk 生成的。
解压的目录为:
- old apk: build/intermediates/outputs/old apk名称/
- new apk: build/intermediates/outputs/app-debug/
解压完成后,就是单个文件对比了:
对比的思路是,以newApk解压目录下所有的文件为基准,去oldApk中找同名的文件,那么会有以下几个情况:
- 在oldApkDir中没有找到,那么说明该文件是新增的
- 在oldApkDir中找到了,那么比对md5,如果不同,则认为改变了(则需要根据情况做diff)
有了大致的了解后,可以看代码:
Files.walkFileTree(
    mNewApkDir.toPath(),
    new ApkFilesVisitor(
        config,
        mNewApkDir.toPath(),
        mOldApkDir.toPath(),
        dexPatchDecoder,
        soPatchDecoder,
resPatchDecoder));Files.walkFileTree会以mNewApkDir.toPath()为基准,遍历其内部所有的文件,ApkFilesVisitor中可以对每个遍历的文件进行操作。
重点看ApkFilesVisitor是如何操作每个文件的:
@Override
public FileVisitResult visitFile(Path file, BasicFileAttributes attrs) throws IOException {

    Path relativePath = newApkPath.relativize(file);
    // 在oldApkDir中找到该文件
    Path oldPath = oldApkPath.resolve(relativePath);

    File oldFile = null;
    //is a new file?!
    if (oldPath.toFile().exists()) {
        oldFile = oldPath.toFile();
    }

    String patternKey = relativePath.toString().replace("\\", "/");

    if (Utils.checkFileInPattern(config.mDexFilePattern, patternKey)) {
        dexDecoder.patch(oldFile, file.toFile());
    }
    if (Utils.checkFileInPattern(config.mSoFilePattern, patternKey)) {
        soDecoder.patch(oldFile, file.toFile());
    }
    if (Utils.checkFileInPattern(config.mResFilePattern, patternKey)) {
         resDecoder.patch(oldFile, file.toFile());
    }
    return FileVisitResult.CONTINUE;
}
首先去除newApkDir中的一个文件,在oldApkDir中寻找同名的apk;然后根据名称判断该文件属于:
- dexFile -> dexDecoder.patch 完成dex文件间的比对
- soFile -> soDecoder.patch 完成so文件的比对
- resFile -> resDecoder.patch 完成res文件的比对
各种文件的规则是可配置的。
(1)dexDecoder.patch
public boolean patch(final File oldFile, final File newFile)  {
    final String dexName = getRelativeDexName(oldFile, newFile);

    // 检查loader class,省略了抛异常的一些代码
    excludedClassModifiedChecker.checkIfExcludedClassWasModifiedInNewDex(oldFile, newFile);


    File dexDiffOut = getOutputPath(newFile).toFile();

    final String newMd5 = getRawOrWrappedDexMD5(newFile);

    //new add file
    if (oldFile == null || !oldFile.exists() || oldFile.length() == 0) {
        hasDexChanged = true;
        copyNewDexAndLogToDexMeta(newFile, newMd5, dexDiffOut);
        return true;
    }

    final String oldMd5 = getRawOrWrappedDexMD5(oldFile);

    if ((oldMd5 != null && !oldMd5.equals(newMd5)) || (oldMd5 == null && newMd5 != null)) {
        hasDexChanged = true;
        if (oldMd5 != null) {
            collectAddedOrDeletedClasses(oldFile, newFile);
        }
    }

    RelatedInfo relatedInfo = new RelatedInfo();
    relatedInfo.oldMd5 = oldMd5;
    relatedInfo.newMd5 = newMd5;

    // collect current old dex file and corresponding new dex file for further processing.
    oldAndNewDexFilePairList.add(new AbstractMap.SimpleEntry<>(oldFile, newFile));

    dexNameToRelatedInfoMap.put(dexName, relatedInfo);

    return true;
}
首先执行:
checkIfExcludedClassWasModifiedInNewDex(oldFile, newFile);
该方法主要用处是检查 tinker loader相关classes**必须存在primary dex中**,且不允许新增、修改和删除。
所有首先将两个dex读取到内存中,按照config.mDexLoaderPattern进行过滤,找出deletedClassInfos、addedClassInfos、changedClassInfosMap,必须保证deletedClassInfos.isEmpty() && addedClassInfos.isEmpty() && changedClassInfosMap.isEmpty()即不允许新增、删除、修改loader 相关类。
继续,拿到输出目录:
build/intermediates/outputs/tinker_result/
然后如果oldFile不存在,则newFile认为是新增文件,直接copy到输出目录,并记录log
copyNewDexAndLogToDexMeta(newFile, newMd5, dexDiffOut);如果存在,则计算两个文件的md5,如果md5不同,则认为dexChanged(hasDexChanged = true),执行:
collectAddedOrDeletedClasses(oldFile, newFile);该方法收集了addClasses和deleteClasses的相关信息,记录在:
- addedClassDescToDexNameMap key为addClassDesc 和 该dex file的path
- deletedClassDescToDexNameMap key为deletedClassDesc 和 该dex file的path
后续会使用这两个数据结构,mark一下。
继续往下走,初始化了一个relatedInfo记录了两个文件的md5,以及在oldAndNewDexFilePairList中记录了两个dex file,在dexNameToRelatedInfoMap中记录了dexName和relatedInfo的映射。
后续会使用该变量,mark一下。
到此,dexDecoder的patch方法就结束了,仅将新增的文件copy到了目标目录。
那么发生改变的文件,理论上应该要做md5看来在后面才会执行。
如果文件是so文件,则会走soDecoder.patch。
(2)soDecoder.patch
soDecoder实际上是BsDiffDecoder
@Override
public boolean patch(File oldFile, File newFile)  {
    //new add file
    String newMd5 = MD5.getMD5(newFile);
    File bsDiffFile = getOutputPath(newFile).toFile();

    if (oldFile == null || !oldFile.exists()) {
        FileOperation.copyFileUsingStream(newFile, bsDiffFile);
        writeLogFiles(newFile, null, null, newMd5);
        return true;
    }

    //new add file
    String oldMd5 = MD5.getMD5(oldFile);

    if (oldMd5.equals(newMd5)) {
        return false;
    }

    if (!bsDiffFile.getParentFile().exists()) {
        bsDiffFile.getParentFile().mkdirs();
    }
    BSDiff.bsdiff(oldFile, newFile, bsDiffFile);

    //超过80%,返回false
    if (Utils.checkBsDiffFileSize(bsDiffFile, newFile)) {
        writeLogFiles(newFile, oldFile, bsDiffFile, newMd5);
    } else {
        FileOperation.copyFileUsingStream(newFile, bsDiffFile);
        writeLogFiles(newFile, null, null, newMd5);
    }
    return true;
}
如果oldFile不存在,则认为newFile为新增文件,直接copy到目标文件(连着so相关目录)。
若oldFile存在,则比对二者md5,如果md5不一致,则直接进行bsdiff算法,直接在目标位置写入bsdiff产生的bsDiffFile。
本来到此应该已经结束了,但是接下来做了一件挺有意思的事:
继续判断了生成的patch文件是否已经超过newFile的80%,如果超过80%,则直接copy newFile到目标目录,直接覆盖了刚生成的patch文件。
那么soPatch整个过程:
- 如果是新增文件,直接copy至目标文件夹,记录log
- 如果是改变的文件,patch文件超过新文件的80%,则直接copy新文件至目标文件夹,记录log
- 如果是改变的文件,patch文件不超过新文件的80%,则copy patch文件至目标文件夹,记录log
如果newFile是res 资源,则会走resDecoder
(3)resDecoder.patch
@Override
public boolean patch(File oldFile, File newFile) throws IOException, TinkerPatchException {
    String name = getRelativePathStringToNewFile(newFile);

    File outputFile = getOutputPath(newFile).toFile();

    if (oldFile == null || !oldFile.exists()) {
        FileOperation.copyFileUsingStream(newFile, outputFile);
        addedSet.add(name);
        writeResLog(newFile, oldFile, TypedValue.ADD);
        return true;
    }

    //new add file
    String newMd5 = MD5.getMD5(newFile);
    String oldMd5 = MD5.getMD5(oldFile);

    //oldFile or newFile may be 0b length
    if (oldMd5 != null && oldMd5.equals(newMd5)) {
        return false;
    }
    if (Utils.checkFileInPattern(config.mResIgnoreChangePattern, name)) {
        Logger.d("found modify resource: " + name + ", but it match ignore change pattern, just ignore!");
        return false;
    }
    if (name.equals(TypedValue.RES_MANIFEST)) {
        Logger.d("found modify resource: " + name + ", but it is AndroidManifest.xml, just ignore!");
        return false;
    }
    if (name.equals(TypedValue.RES_ARSC)) {
        if (AndroidParser.resourceTableLogicalChange(config)) {
            Logger.d("found modify resource: " + name + ", but it is logically the same as original new resources.arsc, just ignore!");
            return false;
        }
    }
    dealWithModeFile(name, newMd5, oldFile, newFile, outputFile);
    return true;
}
如果oldFile不存在,则认为新增文件,直接copy且加入到addedSet集合,并记录log
如果存在,且md5不同调研dealWithModeFile(设置的sIgnoreChangePattern、MANIFEST和逻辑上相同的ARSC不做处理)。
private boolean dealWithModeFile(String name, String newMd5, File oldFile, File newFile, File outputFile) {
    if (checkLargeModFile(newFile)) {
        if (!outputFile.getParentFile().exists()) {
            outputFile.getParentFile().mkdirs();
        }
        BSDiff.bsdiff(oldFile, newFile, outputFile);
        //未超过80%返回true
        if (Utils.checkBsDiffFileSize(outputFile, newFile)) {
            LargeModeInfo largeModeInfo = new LargeModeInfo();
            largeModeInfo.path = newFile;
            largeModeInfo.crc = FileOperation.getFileCrc32(newFile);
            largeModeInfo.md5 = newMd5;
            largeModifiedSet.add(name);
            largeModifiedMap.put(name, largeModeInfo);
            writeResLog(newFile, oldFile, TypedValue.LARGE_MOD);
            return true;
        }
    }
    modifiedSet.add(name);
    FileOperation.copyFileUsingStream(newFile, outputFile);
    writeResLog(newFile, oldFile, TypedValue.MOD);
    return false;
}
这里,首先check了largeFile,即改变的文件是否大于100K(该值可以配置)。
如果非大文件,则直接copy至目标文件,且记录到modifiedSet,并记录了log。
如果是大文件,则直接bsdiff,生成patch File;接下来也检查了一下patch file是否超过newFile的80%,如果超过,则直接copy newFile覆盖刚生成的patch File;
总体和so patch基本一致。
到这里,除了dex patch中对改变的dex文件没有做处理以外,so 和 res都做了。
接下来执行了:
public boolean patch(File oldFile, File newFile) throws Exception {
    //...

    soPatchDecoder.onAllPatchesEnd();
    dexPatchDecoder.onAllPatchesEnd();
    manifestDecoder.onAllPatchesEnd();
    resPatchDecoder.onAllPatchesEnd();

    //clean resources
    dexPatchDecoder.clean();
    soPatchDecoder.clean();
    resPatchDecoder.clean();
    return true;
}
其中dexPatchDecoder和resPatchDecoder有后续实现。
(4) dexPatchDecoder.onAllPatchesEnd
# DexDiffDecoder
@Override
public void onAllPatchesEnd() throws Exception {
    if (!hasDexChanged) {
        Logger.d("No dexes were changed, nothing needs to be done next.");
        return;
    }

    generatePatchInfoFile();

    addTestDex();
}
如果dex文件没有改变,直接返回。
private void generatePatchInfoFile() throws IOException {
    generatePatchedDexInfoFile();

    logDexesToDexMeta();

    checkCrossDexMovingClasses();
}
主要看generatePatchedDexInfoFile
private void generatePatchedDexInfoFile() {
    // Generate dex diff out and full patched dex if a pair of dex is different.
    for (AbstractMap.SimpleEntry<File, File> oldAndNewDexFilePair : oldAndNewDexFilePairList) {
        File oldFile = oldAndNewDexFilePair.getKey();
        File newFile = oldAndNewDexFilePair.getValue();
        final String dexName = getRelativeDexName(oldFile, newFile);
        RelatedInfo relatedInfo = dexNameToRelatedInfoMap.get(dexName);
        if (!relatedInfo.oldMd5.equals(relatedInfo.newMd5)) {
            diffDexPairAndFillRelatedInfo(oldFile, newFile, relatedInfo);
        } else {
            // In this case newDexFile is the same as oldDexFile, but we still
            // need to treat it as patched dex file so that the SmallPatchGenerator
            // can analyze which class of this dex should be kept in small patch.
            relatedInfo.newOrFullPatchedFile = newFile;
            relatedInfo.newOrFullPatchedMd5 = relatedInfo.newMd5;
        }
    }
}
oldAndNewDexFilePairList中记录了两个dex文件,然后根据dex file获取到dexName,再由dexNameToRelatedInfoMap根据name获得到RelatedInfo。
RelatedInfo中包含了两个dex file的md5,如果不同,则执行diffDexPairAndFillRelatedInfo。
private void diffDexPairAndFillRelatedInfo(File oldDexFile,
                        File newDexFile, RelatedInfo relatedInfo) {
    //outputs/tempPatchedDexes
    File tempFullPatchDexPath = new File(config.mOutFolder
                + File.separator + TypedValue.DEX_TEMP_PATCH_DIR);
    final String dexName = getRelativeDexName(oldDexFile, newDexFile);

    File dexDiffOut = getOutputPath(newDexFile).toFile();
    ensureDirectoryExist(dexDiffOut.getParentFile());


    // dex diff , 去除loader classes
    DexPatchGenerator dexPatchGen = new DexPatchGenerator(oldDexFile, newDexFile);
    dexPatchGen.setAdditionalRemovingClassPatterns(config.mDexLoaderPattern);

    dexPatchGen.executeAndSaveTo(dexDiffOut);


    relatedInfo.dexDiffFile = dexDiffOut;
    relatedInfo.dexDiffMd5 = MD5.getMD5(dexDiffOut);

    File tempFullPatchedDexFile = new File(tempFullPatchDexPath, dexName);

    try {
        new DexPatchApplier(oldDexFile, dexDiffOut).executeAndSaveTo(tempFullPatchedDexFile);

        Logger.d(
                String.format("Verifying if patched new dex is logically the same as original new dex: %s ...", getRelativeStringBy(newDexFile, config.mTempUnzipNewDir))
        );

        Dex origNewDex = new Dex(newDexFile);
        Dex patchedNewDex = new Dex(tempFullPatchedDexFile);
        checkDexChange(origNewDex, patchedNewDex);

        relatedInfo.newOrFullPatchedFile = tempFullPatchedDexFile;
        relatedInfo.newOrFullPatchedMd5 = MD5.getMD5(tempFullPatchedDexFile);
    } catch (Exception e) {
        e.printStackTrace();
        throw new TinkerPatchException(
                "Failed to generate temporary patched dex, which makes MD5 generating procedure of new dex failed, either.", e
        );
    }

    if (!tempFullPatchedDexFile.exists()) {
        throw new TinkerPatchException("can not find the temporary full patched dex file:" + tempFullPatchedDexFile.getAbsolutePath());
    }
    Logger.d("\nGen %s for dalvik full dex file:%s, size:%d, md5:%s", dexName, tempFullPatchedDexFile.getAbsolutePath(), tempFullPatchedDexFile.length(), relatedInfo.newOrFullPatchedMd5);
}
开始针对两个dex文件做dex diff,最终将生成的patch 文件放置在目标文件夹中。
接下来,生成一个临时文件夹,通过DexPatchApplier针对生成的patch文件和old dex file,直接做了合并操作,相当于在本地模拟执行了在客户端上的patch操作。
然后再对新合并生成的patchedNewDex与之前的origNewDex,进行了checkDexChange,即这两者类级别对比,应该所有的类都相同。
最后在dexDecoder的onAllPatchesEnd中还执行了一个addTestDex
private void addTestDex() throws IOException {
    //write test dex
    String dexMode = "jar";
    if (config.mDexRaw) {
        dexMode = "raw";
    }

    final InputStream is = DexDiffDecoder.class.getResourceAsStream("/" + TEST_DEX_NAME);
    String md5 = MD5.getMD5(is, 1024);
    is.close();

    String meta = TEST_DEX_NAME + "," + "" + "," + md5 + "," + md5 + "," + 0 + "," + 0 + "," + dexMode;

    File dest = new File(config.mTempResultDir + "/" + TEST_DEX_NAME);
    FileOperation.copyResourceUsingStream(TEST_DEX_NAME, dest);
    Logger.d("\nAdd test install result dex: %s, size:%d", dest.getAbsolutePath(), dest.length());
    Logger.d("DexDecoder:write test dex meta file data: %s", meta);

    metaWriter.writeLineToInfoFile(meta);
}
copy了一个test.dex文件至目标文件夹,该文件存储在tinker-patch-lib的resources文件夹下,主要用于在app上进行测试。
完成了所有的diff工作后,后面就是生成patch文件了。
(2)打包所有生成的patch文件
//build patch
PatchBuilder builder = new PatchBuilder(config);
builder.buildPatch();
详细代码:
public PatchBuilder(Configuration config) {
    this.config = config;
    this.unSignedApk = new File(config.mOutFolder, PATCH_NAME + "_unsigned.apk");
    this.signedApk = new File(config.mOutFolder, PATCH_NAME + "_signed.apk");
    this.signedWith7ZipApk = new File(config.mOutFolder, PATCH_NAME + "_signed_7zip.apk");
    this.sevenZipOutPutDir = new File(config.mOutFolder, TypedValue.OUT_7ZIP_FILE_PATH);
}

public void buildPatch() throws Exception {
    final File resultDir = config.mTempResultDir;
    //no file change
    if (resultDir.listFiles().length == 0) {
        return;
    }
generateUnsignedApk(unSignedApk);
    signApk(unSignedApk, signedApk);

    use7zApk(signedApk, signedWith7ZipApk, sevenZipOutPutDir);

    if (!signedApk.exists()) {
        Logger.e("Result: final unsigned patch result: %s, size=%d", unSignedApk.getAbsolutePath(), unSignedApk.length());
    } else {
        long length = signedApk.length();
        Logger.e("Result: final signed patch result: %s, size=%d", signedApk.getAbsolutePath(), length);
        if (signedWith7ZipApk.exists()) {
            long length7zip = signedWith7ZipApk.length();
            Logger.e("Result: final signed with 7zip patch result: %s, size=%d", signedWith7ZipApk.getAbsolutePath(), length7zip);
            if (length7zip > length) {
                Logger.e("Warning: %s is bigger than %s %d byte, you should choose %s at these time!",
                    signedWith7ZipApk.getName(),
                    signedApk.getName(),
                    (length7zip - length),
                    signedApk.getName());
            }
        }
    }

}
主要会生成3个文件:unSignedApk,signedApk以及signedWith7ZipApk。
unSignedApk只要将tinker_result中的文件压缩到一个压缩包即可。
signedApk将unSignedApk使用jarsigner进行签名。
signedWith7ZipApk主要是对signedApk进行解压再做sevenZip压缩。
好了,到此茫茫长的文章就结束啦~~~
受限于本人知识,文中难免出现错误,可以直接留言指出。
一直关注tinker的更新,也在项目中对tinker进行了使用与定制,tinker中包含了大量的可学习的知识,项目本身在也具有非常强的价值。
对于tinker的“技术的初心与坚持”一文感触颇深,希望tinker越来越好~
可以阅读以下文章,继续了解tinker~~
支持我的话可以关注下我的公众号,每天都会推送新知识~
欢迎关注我的微信公众号:hongyangAndroid
(可以给我留言你想学习的文章,支持投稿)

Recommend
About Joyk
Aggregate valuable and interesting links.
Joyk means Joy of geeK