

Angular Tutorial for Beginners | Getting Started with Angular 8 | Edureka
source link: https://www.edureka.co/blog/angular-tutorial/
Go to the source link to view the article. You can view the picture content, updated content and better typesetting reading experience. If the link is broken, please click the button below to view the snapshot at that time.
Angular Tutorial: Getting Started With Angular 8
Last updated on Nov 25,2020 235.7K Views_(1)_1608017487.png)
_(1)_1608017487.png)
Angular is one of the best frameworks for Web Development. Surveys have shown that the number of skilled Angular developers are much less than the number of jobs available for it. The best way to land you a good job with a handsome salary in this domain is to get an Angular Certification. However, if you are still unaware of this technology, here is a complete Angular 8 Tutorial that will help you learn Angular 8 from scratch.
Before moving on, let’s take a quick look at all the topics that are discussed in this article:
For a complete video tutorial, refer to the following video:
Angular 8 Tutorial | Create Angular Project from Scratch | Angular Training | Edureka

What is Angular?
Angular is a Typescript-based open-source framework for building client-side web applications. Since Typescript is a superset of JavaScript, let us first understand JavaScript briefly. JavaScript runs on the client-side of the web, which can be used to design or program how the web pages behave on the occurrence of an event. Typically, JavaScript is used for interface interactions, slideshows, and other interactive components. JavaScript evolved quickly and has also been used for server-side programming (like in Node.js), game development, etc.
JavaScript deals with dynamic content, which is an important aspect of web development. Dynamic content refers to constantly changing content and it adapts to specific users. For example, JavaScript can be used to determine whether or not to render the mobile version of the website by checking the device, which is accessing the website.
This encouraged web developers to start creating their own custom JavaScript libraries for reducing the number of code lines and implementing complex functionalities easily. jQuery is a fast, small, and feature-rich JavaScript library, which makes things like HTML document traversal and manipulation, event handling, animation, and Ajax much simpler with an easy-to-use API. jQuery became the most popular one because it was easy to use and extremely powerful.
Since jQuery has no real structure, the developer has full freedom to build projects as they see fit. However, the lack of structure also means it’s easier to fall into the trap of “spaghetti code,” which can lead to confusion in larger projects with no clear design direction or code maintainability. For these situations, a framework like Angular can be a big help.
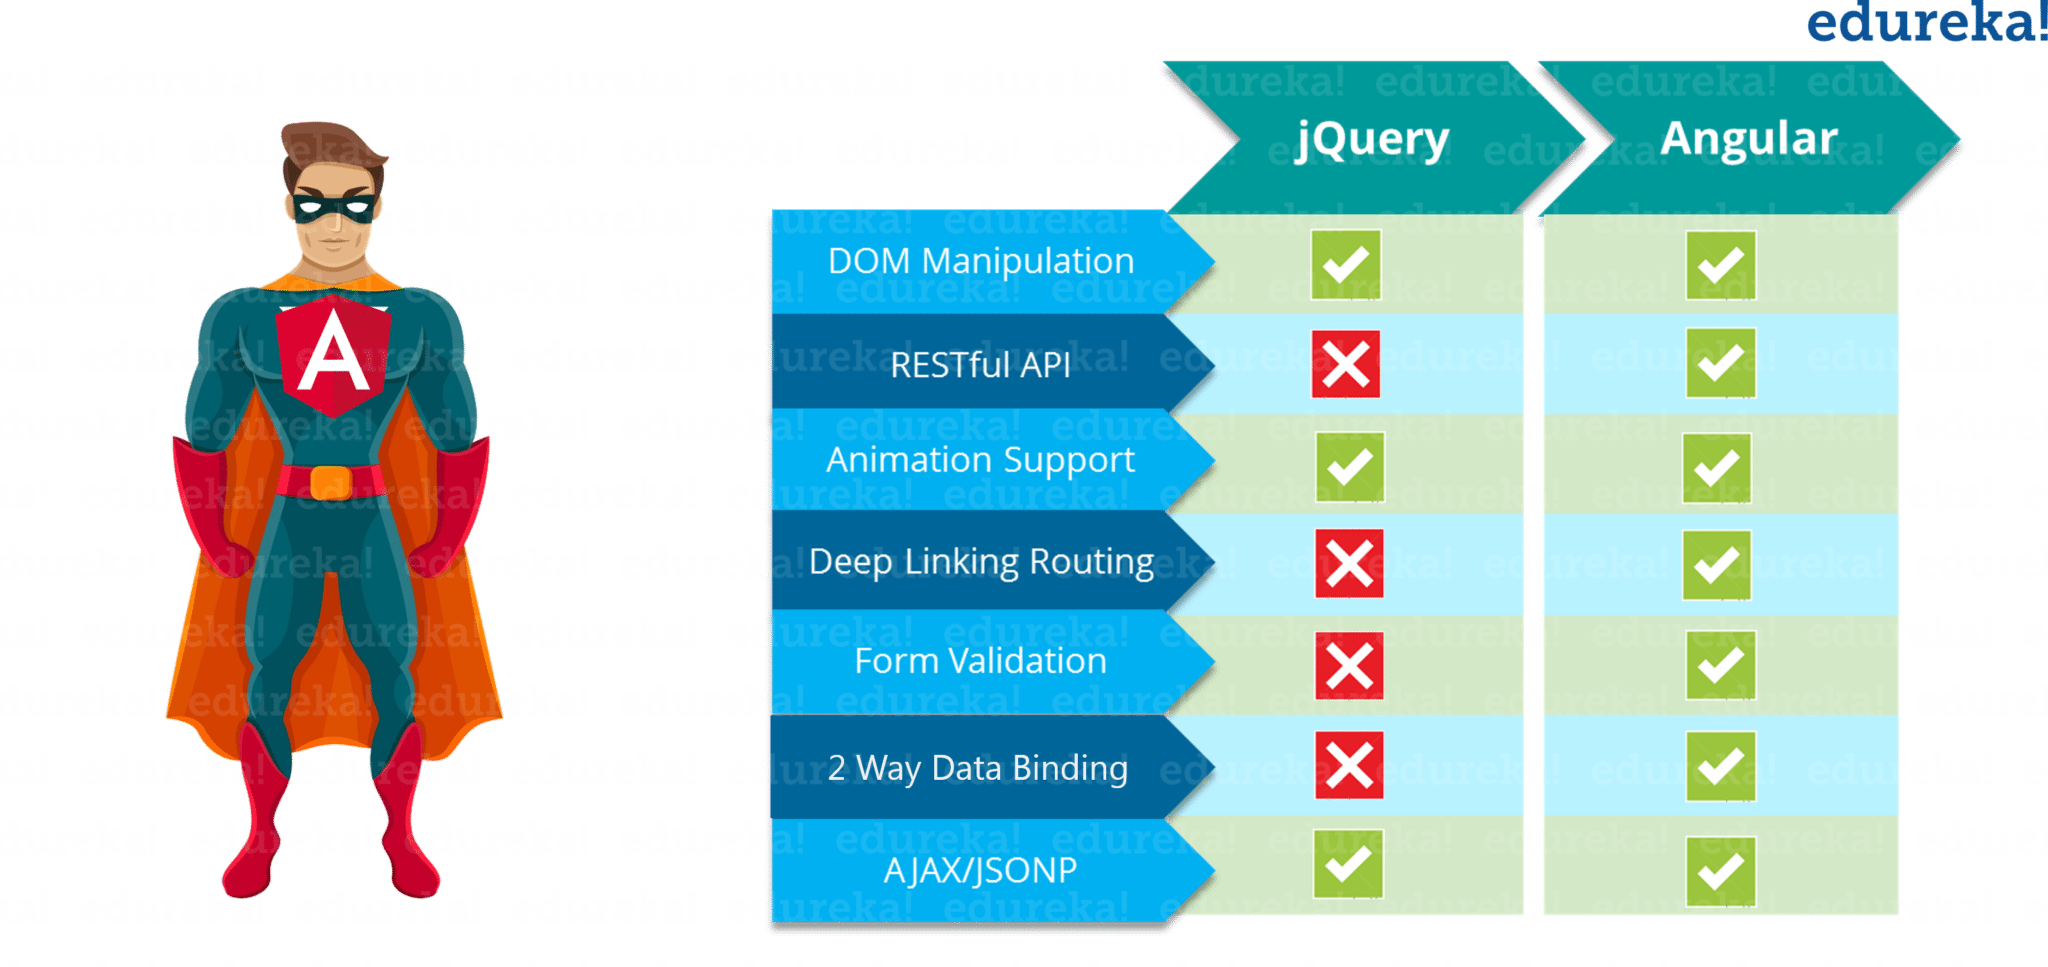
Angular is a client-side JavaScript framework that was specifically designed to help developers build SPAs (Single Page Applications) in accordance with best practices for web development. By providing a structured environment for building SPAs, the risk of producing “spaghetti code” is highly reduced. So, you must be wondering what is SPA?
Single-Page Applications (or SPA’s) are applications that are accessed via a web browser like other websites but offer more dynamic interactions resembling native mobile and desktop apps. The most notable difference between a regular website and SPA is the reduced amount of page refreshes. SPAs have a heavier usage of AJAX- a way to communicate with back-end servers without doing a full page refresh to get data loaded into our application. As a result, the process of rendering pages happens mostly on the client-side.
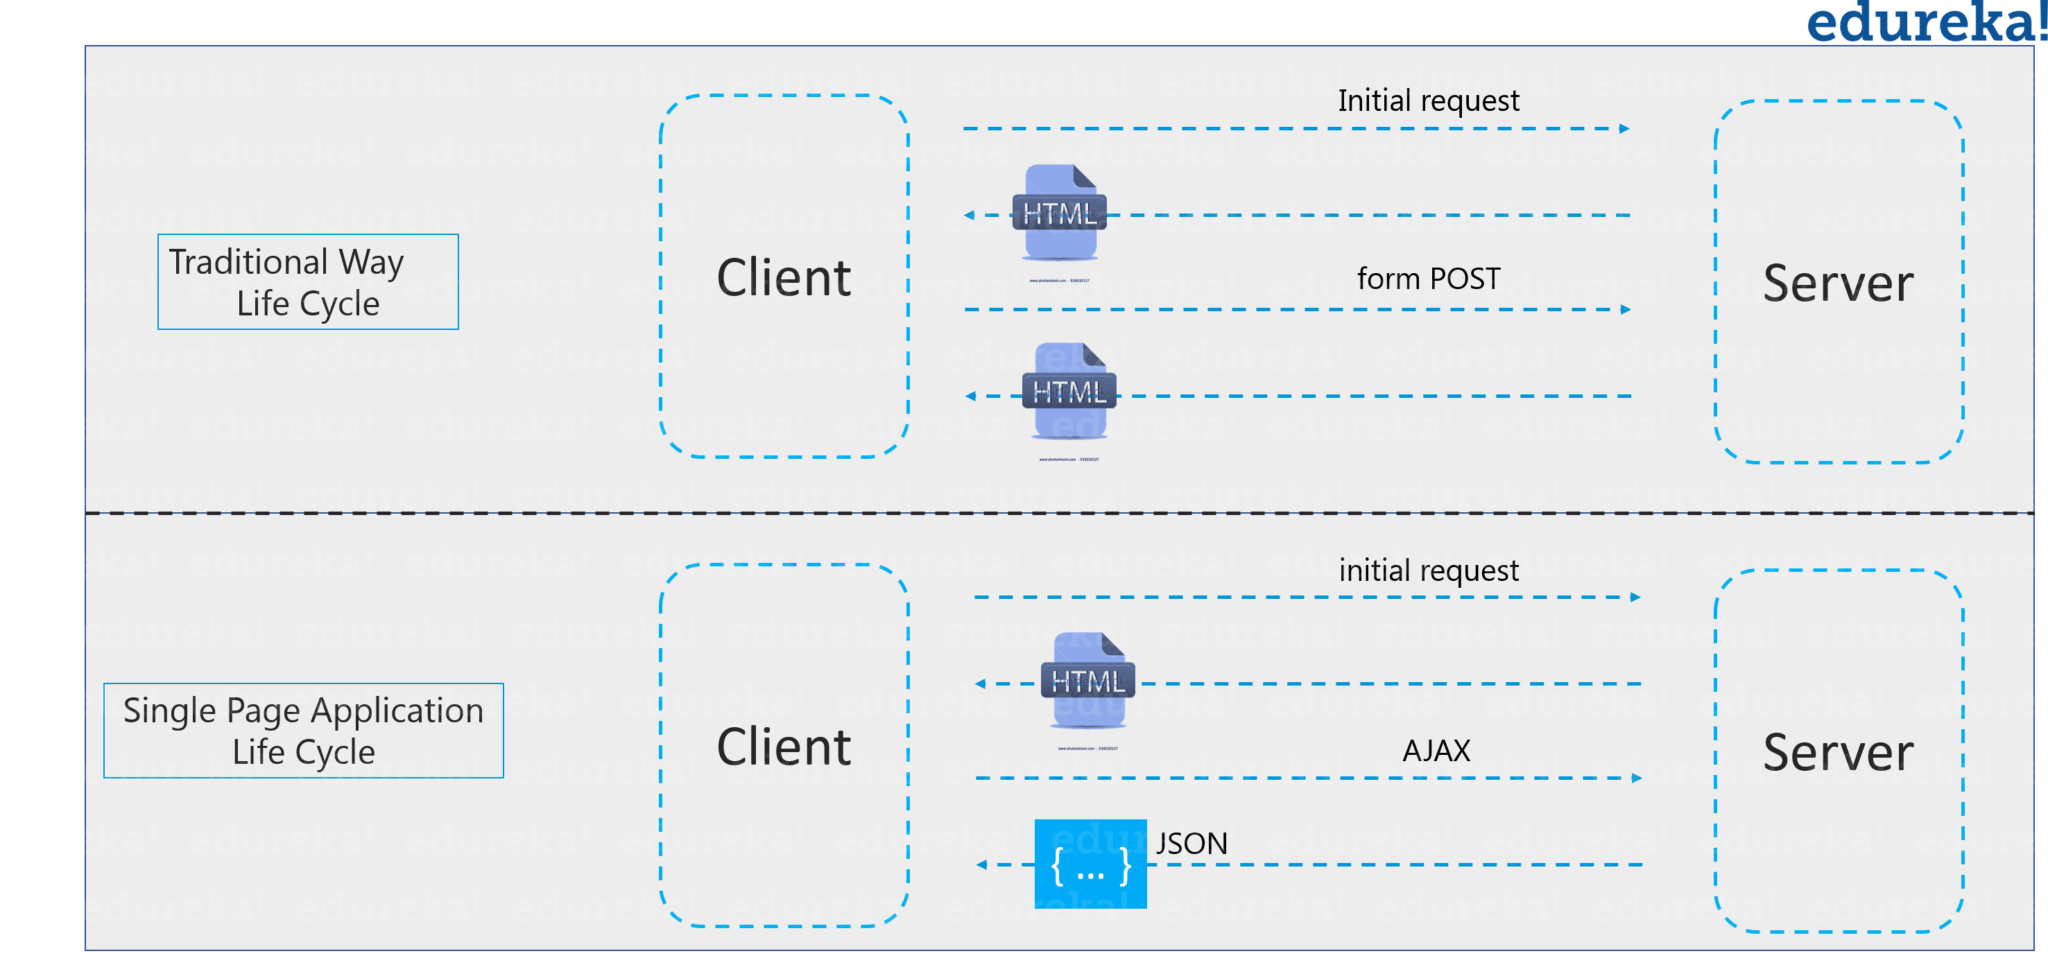
For example, if you go through Gmail, you will notice that while opening mail from the inbox will only fetch the email and display it in place of the e-mail list. The rest of the components like sidebar, navigation bar, etc. are not reloaded. It only refreshes the DOM (Document Object Model) for the required section. So, this reduces the overhead loading of the website.
So, now as we know what is Javascript & Jquery and how angular came into the picture. Moving ahead in Angular 8 Tutorial, we will look through the features of angular and understand how to work with Angular.
Angular 8 Tutorial
Angular is a TypeScript-based open-source front-end web application platform led by the Angular Team at Google and by a community of individuals and corporations. Angular is a complete rewrite from the same team that built AngularJS. But let me tell you that Angular is completely different from AngularJS. Let us understand the differences between Angular and AngularJS.
- The architecture of an Angular application is different from AngularJS. The main building blocks for Angular are modules, components, templates, metadata, data binding, directives, services, and dependency injection. We will be looking at it in a while.
- Angular does not have a concept of “scope” or controllers instead, it uses a hierarchy of components as its main architectural concept.
- Angular has a simpler expression syntax, focusing on “[ ]” for property binding, and “( )” for event binding
- Mobile development – Desktop development is much easier when mobile performance issues are handled first. Thus, Angular first handles mobile development.
- Modularity – Angular follows modularity. Similar functionalities are kept together in same modules. This gives Angular a lighter & faster core.
Angular recommends the use of Microsoft’s TypeScript language, which introduces the following features:
- Class-based Object-Oriented Programming
- Static Typing
TypeScript is a superset of ECMAScript 6 (ES6) and is backward compatible with ECMAScript 5. Angular 8 also includes the benefits of ES5 to ES2015+:
- Iterators
- For/ Of loops
- Reflection
- Improved dependency injection – bindings make it possible for dependencies to be named
- Dynamic loading
- Asynchronous template compilation
- Simpler Routing
- Replacing controllers and $scope with components and directives – a component is a directive with a template
- Support reactive programming using RxJS
Moving ahead in this Angular 8 tutorial, let’s understand the features of Angular.
Angular Features

Cross-Platform
Progressive web apps: It uses modern web platform capabilities to deliver an app-like experience. It gives high performance, offline, and zero-step installation. So, working with Angular is pretty much easy.
Native: You can build native mobile apps with strategies using Ionic Framework, NativeScript, and React Native.
Desktop: Create desktop-installed apps across Mac, Windows, and Linux using the same Angular methods you’ve learned for the web plus.
Speed and Performance
Code generation: Angular turns your templates into code that’s highly optimized for JavaScript virtual machines, giving you all the benefits of hand-written code with the productivity of a framework.
Universal: You can use any technology with Angular for serving the application like node.js, .NET, PHP and other servers
Code splitting: Angular apps load quickly with the new Component Router, which delivers automatic code-splitting, so users only load code required to render the view they request.
Productivity
Templates: Quickly create UI views with simple and powerful template syntax.

Angular CLI: Command-line tools: You can easily and quickly start building components, adding components, testing them, and then, instantly deploy them using Angular CLI.
IDEs: Get intelligent code completion, instant errors, and other feedback in popular editors and IDEs like Microsoft’s VS Code.
Full Development Story
Testing: With the Jasmine test framework, the Angular CLI downloads and installs everything required for testing your application. When you run ng test command, the app will be built in watch mode and the Karma test runner will be launched. Once that is done, you will see the output in the terminal plus, the chrome browser will open up showing the output in Jasmine HTML Reporter.
What’s new in Angular 8:
TypeScript 3.4:
Angular 8 requires TypeScript 3.4 for web development
Opt-n Ivy Preview:
Ivy is the name given to Angular’s next-generation compilation and rendering pipeline. This will help you optionally preview your website to see how it works
Differential Loading:
As a part of its build process, Angular 8 CLI will be able to produce both legacy and modern JS bundles i.e ES5 and ES2015+. This implies a differentially-loaded client-side with improved speed and TTI (Time to Interactive) for the present browsers
Backward compatibility of Router:
This helps in simplifying the upgrade path for large projects
Opt-in Usage Sharing:
With this feature, the Angular team will be able to collect anonymous information with your consent to keep a track of the commands that are used and the time taken to build your projects
Dependency Updates:
Angular 8 has updated the dependencies on tools like RxJS, Node, and TypeScript (as mentioned earlier) for better performance and sync with the current environment
Web Worker Building:
Web workers allow you to write code that runs separately from the main thread. This improves speed by parallelizing multiple tasks. The developers of Angular 8 have added bundling support for web workers as a result of requests from developers
Building Blocks of Angular
The main building blocks of Angular are:
- Modules
- Components
- Templates
- Metadata
- Data binding
- Directives
- Services
- Dependency injection
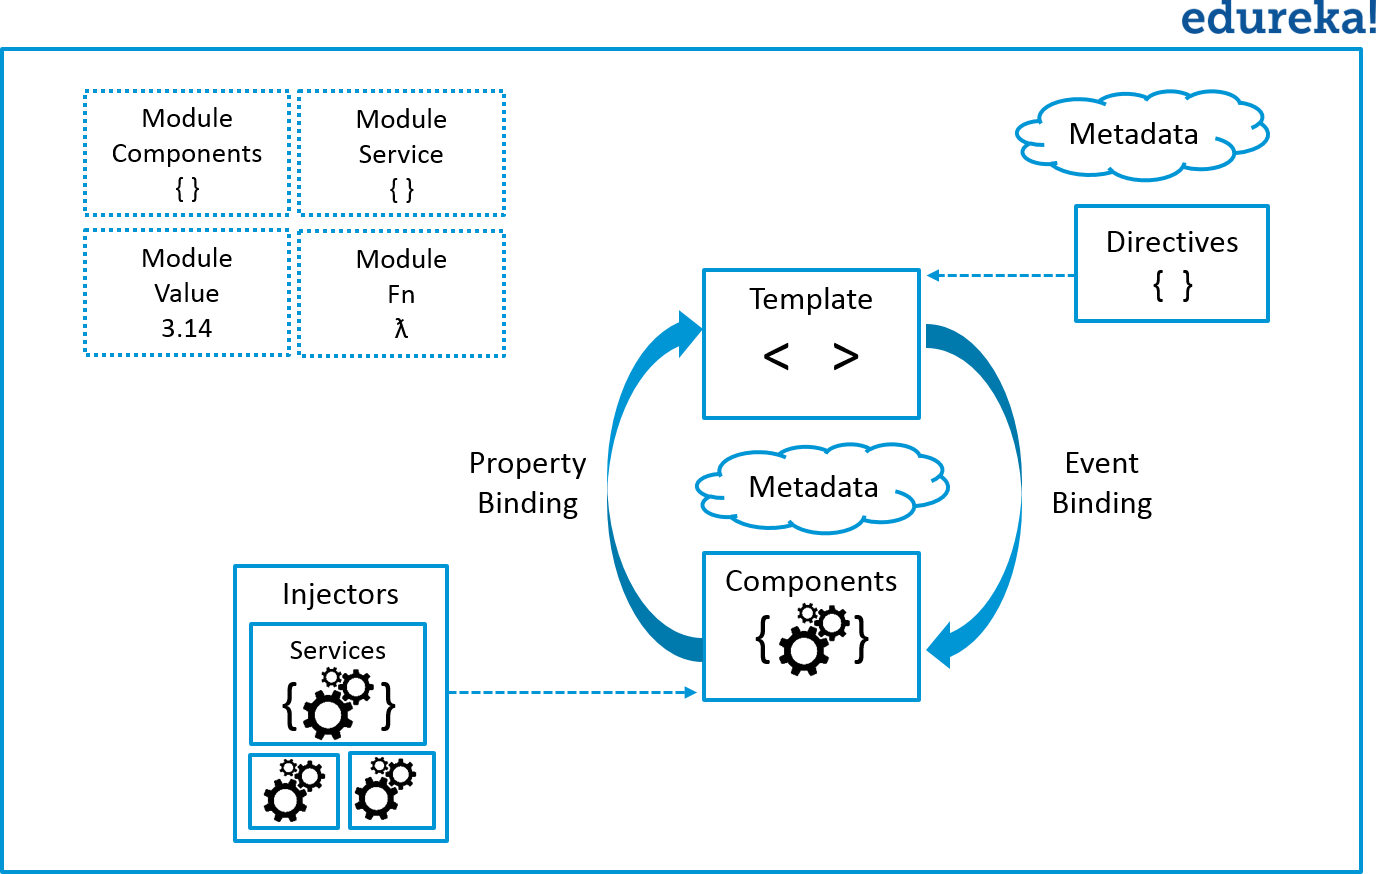
Figure: Angular 8 Tutorial – Architecture
Modules
Angular apps are modular and to maintain modularity, we have Angular modules or you can say NgModules. Every Angular app contains at least one Angular module, i.e. the root module. Generally, it is named as AppModule. The root module can be the only module in a small application. While most of the apps have multiple modules. You can say, a module is a cohesive block of code with a related set of capabilities that have a specific application domain or a workflow. Any angular module is a class with @NgModule decorator.
Decorators are functions that modify JavaScript classes. Decorators are basically used for attaching metadata to classes so that, it knows the configuration of those classes and how they should work. NgModule is a decorator function that takes metadata objects whose properties describe the module. The properties are:
- declarations: The classes that are related to views and they belong to this module. There are three classes of Angular that can contain view: components, directives, and pipes. We will talk about them in a while.
- exports: The classes that should be accessible to the components of other modules.
- imports: Modules whose classes are needed by the component of this module.
- providers: Services present in one of the modules which are to be used in the other modules or components. Once a service is included in the providers it becomes accessible in all parts of that application
- bootstrap: The root component which is the main view of the application. This root module only has this property and it indicates the component that is to be bootstrapped.
Let us take a look at how the root module (i.e. src/app/app.module.ts) looks like initially:
import { BrowserModule } from '@angular/platform-browser';import { NgModule } from '@angular/core';import { AppComponent } from './app.component';@NgModule({declarations: [AppComponent],imports: [BrowserModule],providers: [],bootstrap: [AppComponent]})export class AppModule { }A root module generally doesn’t export it’s class because as root module is the one which imports other modules & components to use them. We bootstrap the AppModule in a main.ts file, where we specify the bootstrap module and inside the bootstrap module, it contains the bootstrap component.
import { enableProdMode } from '@angular/core';import { platformBrowserDynamic } from '@angular/platform-browser-dynamic';import { AppModule } from './app/app.module';import { environment } from './environments/environment';if (environment.production) {enableProdMode();}platformBrowserDynamic().bootstrapModule(AppModule).catch(err => console.error(err));Angular libraries
Angular gives us a collection of JavaScript modules (library modules) that provide various functionalities. Each Angular library has @angular prefix, like @angular/core, @angular/compiler, @angular/compiler-cli, @angular/http, @angular/router. You can install them using the npm package manager and import parts of them with JavaScript import statements.
import { Component } from '@angular/core';In the above example, Angular’s Component decorator is imported from the @angular/core library.
Now moving ahead in Angular 8 Tutorial, let us understand the next and one of the important building blocks of Angular, i.e. Component.
Components
A component controls one or more sections on the screen called a view. For example, if you are building a course list application, you can have components like App Component (the bootstrapped component), Course Component, Course Detail Component, etc.
Inside the component, you define a component’s application logic i.e. how does it support the view—inside a class. The class interacts with the view through an API of properties and methods.
Every app has a main component that is bootstrapped inside the main module, i.e AppComponent.
import { Component } from '@angular/core';@Component({selector: 'app-root',templateUrl: './app.component.html',styleUrls: ['./app.component.css']})export class AppComponent {title = 'Edureka!';}import { Component, OnInit } from '@angular/core';import { Course } from '../courses';import { CoursesService } from '../courses.service';@Component({selector: 'app-course',templateUrl: './course.component.html',styleUrls: ['./course.component.css']})export class CourseComponent implements OnInit {courses: Course[];constructor(private courseService: CoursesService) { }ngOnInit() {this.getCourses();}getCourses(): void {this.courseService.getCourses().subscribe(course => this.courses = course);}}Templates
You associate the component’s view with its companion template. A template is nothing but a form of HTML tags that tells Angular about how to render the component. A template looks like regular HTML, except for a few differences. Here is a template for our CourseComponent as we discussed above:
<h2>All Courses</h2><ul class="course"><li *ngFor="let course of courses"><a routerLink="/detail/{{course.id}}"></a><span class="badge">{{course.id}}</span> {{course.name}}</ul>Metadata
@Component({selector: 'app-course',templateUrl: './course.component.html',styleUrls: ['./course.component.css']})Here is the @Component decorator, which identifies the class immediately below it as a component class. The @Component decorator takes the required configuration object which Angular needs to create and present the component and its view.
The most important configurations of @Component decorator are:
- selector: Selector tells Angular to create and insert an instance of this component where it finds <app-course> tag. For example, if an app’s HTML contains <app-course></app-course>, then Angular inserts an instance of the CourseComponent view between those tags.
- templateUrl: It contains the path of this component’s HTML template.
- styleUrls: It is the component-specific style sheet.
The metadata in the @Component tells Angular where to get the major building blocks you specify for the component. The template, metadata, and component together describe a view. The architectural takeaway is that you must add metadata to your code so that Angular knows what to do.
Data Binding
If you are not using a framework, you have to push data values into the HTML controls and turn user responses into some actions and value updates. Writing such push/pull logic is tedious, error-prone, and a nightmare to read. Angular supports data binding, a mechanism for coordinating parts of a template with parts of a component. You should add binding markup to the template HTML to tell Angular how to connect both sides.

Figure: Angular 8 Tutorial – Data Binding
Each form has a direction — to the DOM, from the DOM, or in both directions.
<li> {{course.name}}</li><course-detail [course]="selectedCourse"></course-detail><li (click)="selectCourse(Course)"></li>- The {{course.name}} interpolation displays the component’s name property value within the <li> element.
- The [course] property binding passes the value of selectedCourse from the CourseComponent to the course property of the child CourseDetailComponent.
- The(click) event binding calls the component’s selectCourse method when the user clicks a courses’ name.
Two-way data binding is an important part as it combines property and event binding in a single notation, using the ngModel directive. Here’s an example from the CourseDetailComponent template:
<input [(ngModel)]="courses.name" placeholder="name"/>In two-way binding, a data property value flows to the input box from the component as with property binding. The user’s changes also flow back to the component, resetting the property to the latest value, as with event binding. Angular processes all data bindings once per JavaScript event cycle, from the root of the application component tree through all child components.
Data binding plays an important role in communication between a template and its component. Data binding is also important for communication between parent and child components.
Moving further in this Angular 8 Tutorial, we will discuss the next building block, i.e. directive.
Directives
Angular templates are dynamic. When Angular renders them, it transforms the DOM according to the instructions given by directives. A directive is a class with a @Directive decorator. A component is a directive-with-a-template; a @Component decorator is actually a @Directive decorator extended with template-oriented features.
While a component is technically a directive, components are so distinctive and central to Angular applications that this architectural overview separates components from directives.
Two other kinds of directives exist: structural and attribute directives.
Directive tends to appear within an element tag as attributes do, sometimes by name but more often as the target of an assignment or a binding.
Structural directives alter layout by adding, removing, and replacing elements in DOM.
This example template uses two built-in structural directives:
<li *ngFor="let course of coursess"></li><course-detail *ngIf="selectedCourse"></course-detail>- *ngFor tells Angular to retrieve one <li> per course in the courses
- *ngIf includes the CourseDetail component only if a selected course exists.
Attribute directives alter the appearance or behavior of an existing element. In templates, they look like regular HTML attributes. The ngModel directive, which implements two-way data binding, is an example of an attribute directive. ngModel modifies the behavior of an existing element by setting its display value property and responding to change events.
<input [(ngModel)]="courses.name" placeholder="name"/>You can also write your own directives, i.e. Custom Directive.
Services
Service is a broad category encompassing any value, function, or feature that your application needs. A service is typically a class with a well-defined purpose. Anything can be a service. Examples include:
- logging service
- data service
- message bus
- tax calculator
- application configuration

Figure: Angular 8 Tutorial – Services
Angular has no definition of a service. There is no service base class and no place to register a service. Yet services are fundamental to any Angular application. Components are the consumers of services.
Here’s an example of a service class:
import { Injectable } from '@angular/core';import {Course} from './courses';import { Observable, of } from 'rxjs';import {COURSES} from './mock-course';import { MessageService } from './messages.service';@Injectable({providedIn: 'root'})export class CoursesService {constructor(private messageService: MessageService) { }getCourses(): Observable<Course[]> {// TODO: send the message _after_ fetching the heroesthis.messageService.add('CourseService: fetched courses');return of(COURSES);}getCourse(id: number): Observable<Course>{this.messageService.add(`CoursesService: fetched courses id=${id}`);return of (COURSES.find(courses => courses.id === id));}}Services are everywhere. Component classes don’t fetch data from the server, validate user input, or log directly to the console. They delegate such tasks to services.
A component’s job is to enable the user experience and nothing more. It mediates between the view (rendered by the template) and the application logic. A good component presents properties and methods for data binding. Angular does help you follow these principles by making it easy to factor your application logic into services and make those services available to components through dependency injection.
So, now let us understand dependency injection, in this Angular 8 Tutorial blog.
Dependency Injection
Dependency injection is a way to supply a new instance of a class with the fully-formed dependencies it requires. Most dependencies are services. Angular uses dependency injection to provide new components with the services they need. Angular can tell which services a component needs by looking at the types of its constructor parameters.
When Angular creates a component, it first asks an injector for the services that the component requires.
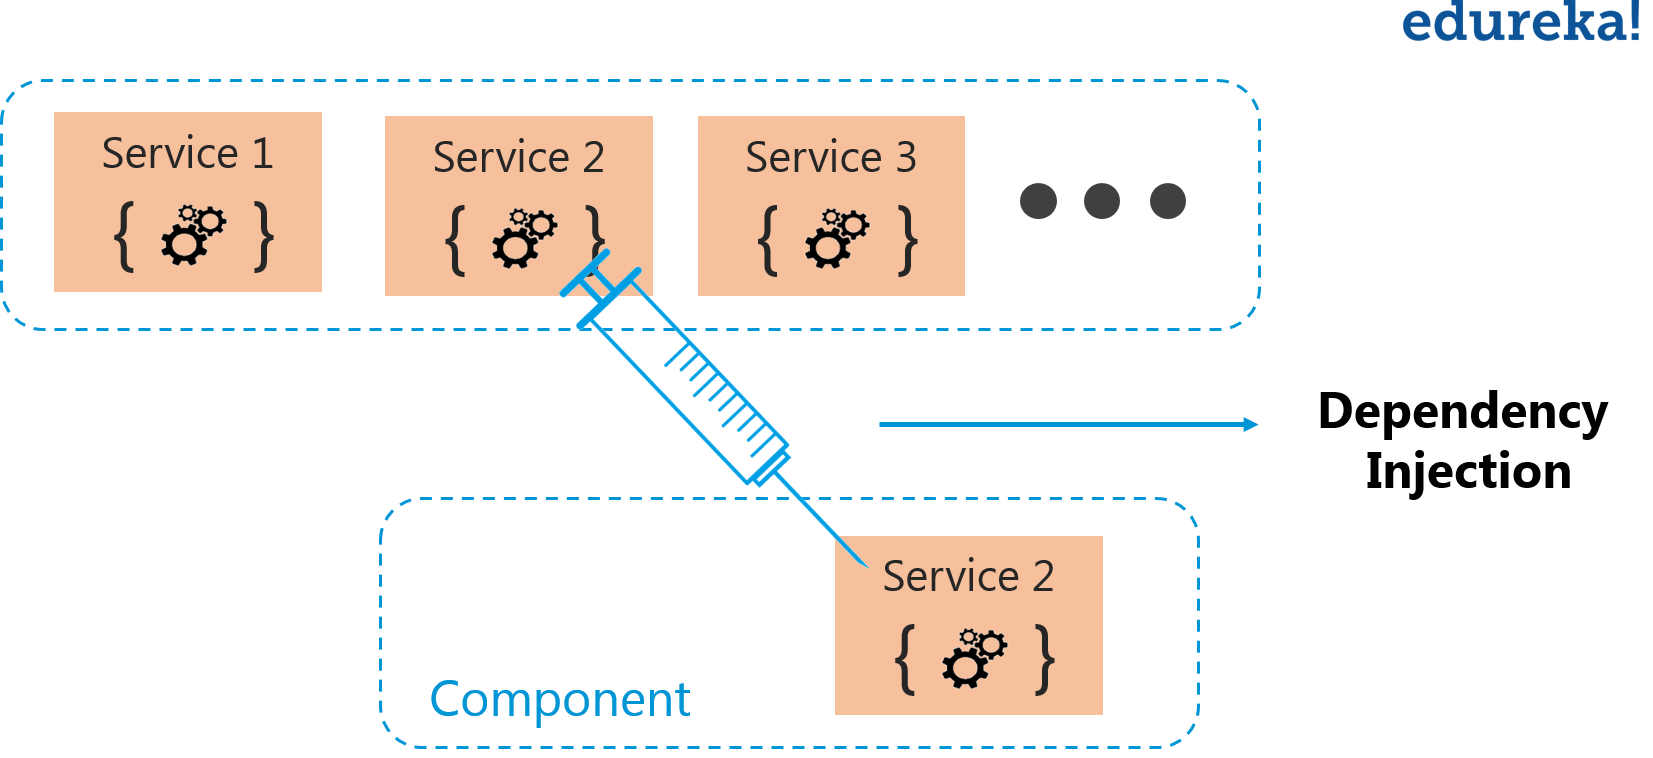
Figure: Angular 8 Tutorial – Dependency Injection
An injector maintains a container of service instances that it has previously created. If a requested service instance is not in the container, the injector makes one and adds it to the container before returning the service to Angular. When all requested services have been resolved and returned, Angular can call the component’s constructor with those services as arguments. This is a dependency injection.
In the below example you can see, we are registering a provider of the Firebase Service with the injector. A provider is something that can create or return service, typically the service class itself. You can register providers in modules or in components.
In general, add providers to the root module so that the same instance of a service is available everywhere as shown in the code below.
import { BrowserModule } from '@angular/platform-browser';import { NgModule } from '@angular/core';import { FormsModule } from '@angular/forms'; // <-- NgModel lives hereimport { AppRoutingModule } from './app-routing.module';import { AppComponent } from './app.component';import { CourseComponent } from './course/course.component';import { CourseDetailComponent } from './course-detail/course-detail.component';import { MessagesComponent } from './messages/messages.component';import { DashboardComponent } from './dashboard/dashboard.component';import {NgbModule} from '@ng-bootstrap/ng-bootstrap';import { FooterComponent } from './footer/footer.component';@NgModule({declarations: [AppComponent,CourseComponent,CourseDetailComponent,MessagesComponent,DashboardComponent,FooterComponent],imports: [BrowserModule,FormsModule,AppRoutingModule,NgbModule,],providers: [],bootstrap: [AppComponent]})export class AppModule { }Alternatively, you can register a service at a component level in the providers property of the @Component decorator:
import { Component } from '@angular/core';import { FirebaseService } from './services/firebase.service';@Component({selector:'app-root',templateUrl:'./app.component.html',styleUrls: ['./app.component.css'],providers: [FirebaseService]})export class AppComponent {title = 'app works!';}(NOTE: For complete code, refer to the video specified above)
Registering at a component level means you get a new instance of the service with each new instance of that component.
Concluding about dependency injection, you can say that:
- Dependency injection is wired into the Angular framework and used everywhere.
- The injector is the main mechanism.
- An injector maintains a container of service instances that it created.
- An injector can create a new service instance from a provider.
- A provider is a recipe for creating a service.
- Register providers with injectors.
This brings us to the end of the Angular 8 Tutorial blog. I hope this blog was informative and added value to you. Now, you must be clear with the building blocks of Angular and ready to create an Angular application. I would recommend you to go through this Angular 8 Tutorial Edureka video playlist to watch videos and learn how to create an Angular application.
Now that you know the building blocks of Angular, check out the Angular 8 training by Edureka, a trusted online learning company with a network of more than 250,000 satisfied learners spread across the globe. Angular is a JavaScript framework which is used to create scalable, enterprise, and performance client-side web applications. With Angular framework adoption being high, performance management of the application is community driven indirectly driving better job opportunities. The Angular Certification Training aims at covering all these new concepts around Enterprise Application Development.
Recommend
About Joyk
Aggregate valuable and interesting links.
Joyk means Joy of geeK