

Building the fastest Raspberry Pi NAS, with SATA RAID
source link: https://www.jeffgeerling.com/blog/2020/building-fastest-raspberry-pi-nas-sata-raid
Go to the source link to view the article. You can view the picture content, updated content and better typesetting reading experience. If the link is broken, please click the button below to view the snapshot at that time.
Building the fastest Raspberry Pi NAS, with SATA RAID
December 4, 2020
Since the day I received a pre-production Raspberry Pi Compute Module 4 and IO Board, I've been testing a variety of PCI Express cards with the Pi, and documenting everything I've learned.
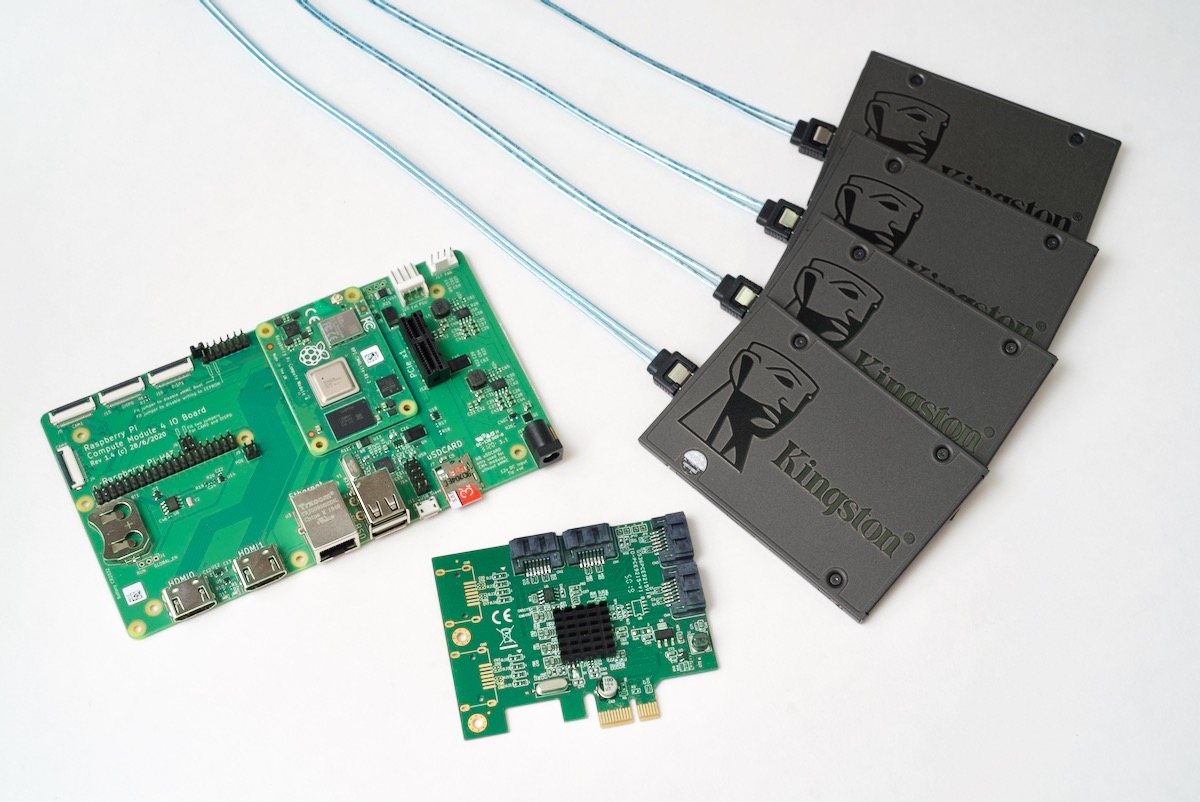
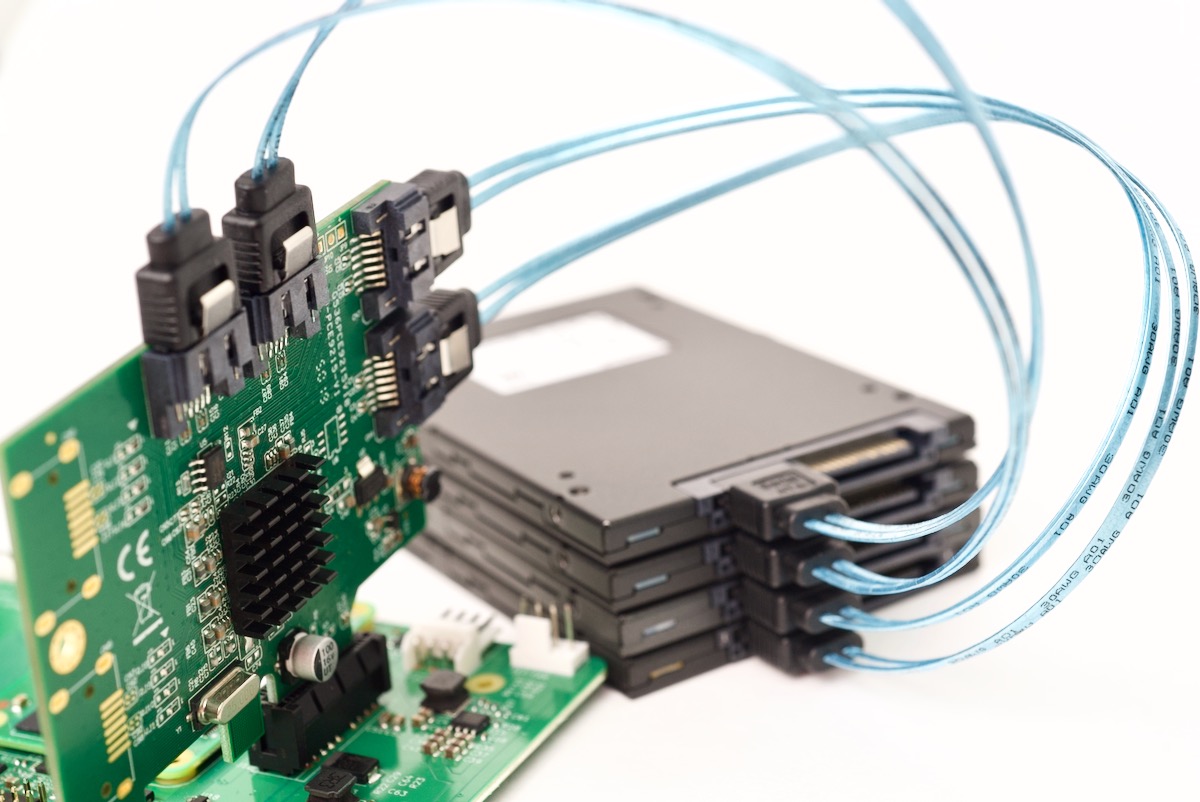
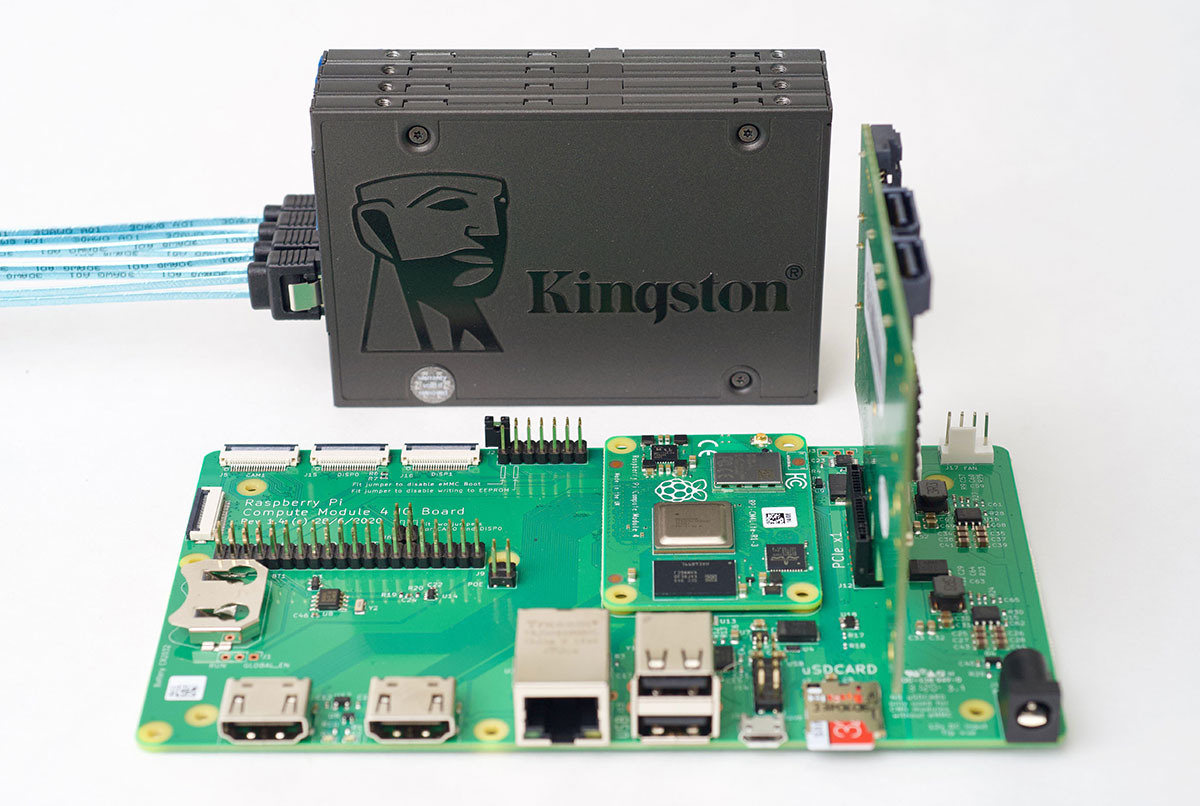
The first card I tested after completing my initial review was the IO Crest 4-port SATA card pictured with my homegrown Pi NAS setup below:
But it's been a long time testing, as I wanted to get a feel for how the Raspberry Pi handled a variety of storage situations, including single hard drives and SSD and RAID arrays built with mdadm.
I also wanted to measure thermal performance and energy efficiency, since the end goal is to build a compact Raspberry-Pi based NAS that is competitive with any other budget NAS on the market.
Besides this GitHub issue, I documented everything I learned in the video embedded below:
The rest of this blog post will go through some of the details for setup, but I don't have the space in this post to compile all my learnings here—check out the linked issue and video for that!
Getting the SATA card working with the Pi
Raspberry Pi OS (and indeed, any OS optimized for the Pi currently, like Ubuntu Server for Pi) doesn't include all the standard drivers and kernel modules you might be used to having available on a typical Linux distribution.
And the SATA kernel modules are not included by default, which means the first step in using a PCIe card like the IO Crest (which has a Marvell 9215 chip—which is supported in the kernel) is to compile (or cross-compile, in my case) the kernel with CONFIG_ATA and CONFIG_SATA_AHCI enabled.
I have full directions for recompiling the kernel with SATA support on the Pi itself, too!
Once that's done, you should be able to see any drives attached to the card after boot using lsblk, for example:
$ lsblk
NAME        MAJ:MIN RM   SIZE RO TYPE MOUNTPOINT
sda           8:0    1 223.6G  0 disk
sdb           8:16   1 223.6G  0 disk
mmcblk0     179:0    0  29.8G  0 disk
├─mmcblk0p1 179:1    0   256M  0 part /boot
└─mmcblk0p2 179:2    0  29.6G  0 part /
nvme0n1     259:0    0 232.9G  0 disk
(Wait... how is there also an NVMe drive there?! Well, I'm also testing some PCI multi-port switches with the Pi—follow that issue for progress.)
Partition the drives with fdisk
For each of the drives that were recognized, if you want to use it in a RAID array (which I do), you should add a partition. Technically it's not required to partition before creating the array... but there are a couple small reasons it seems safer that way.
So for each of my devices (sda through sdd), I ran fdisk to create one primary partition:
$ sudo fdisk /dev/sda
n    # create new partition
p    # primary (default option)
1    # partition 1 (default option)
2048    # First sector (default option)
468862127    # Last sector (default option)
w    # write new partition table
There are ways you can script fdisk to apply a given layout to multiple drives at the same time, but with just four drives, it's quick enough to go into fdisk, then press n, then press 'enter' for each of the defaults, then w to write it, and q to quit.
Create a RAID device using mdadm
At this point, we have four independent disks, each with one partition spanning the whole volume. Using Linux's Multiple Device admin tool (mdadm), we can put these drives together in any common RAID arrangement.
I'm going to create a RAID 10 array for my own use—you can check out the associated video linked above for the reasons why I chose RAID 10 instead of something else.
# Install mdadm.
sudo apt install -y mdadm

# Create a RAID 10 array using four drives.
sudo mdadm --create --verbose /dev/md0 --level=10 --raid-devices=4 /dev/sd[a-d]1

# Create a mount point for the new RAID device.
sudo mkdir -p /mnt/raid10

# Format the RAID device.
sudo mkfs.ext4 /dev/md0

# Mount the RAID device.
sudo mount /dev/md0 /mnt/raid10
Troubleshooting mdadm issues
I ran into a few different issues when formatting different sets of disks. For example, when I was trying to format four HDDs the first time, I got:
mdadm: super1.x cannot open /dev/sdd1: Device or resource busy
mdadm: /dev/sdd1 is not suitable for this array.
mdadm: create aborted
And further, I would get:
mdadm: RUN_ARRAY failed: Unknown error 524
And the solution I found in this StackOverflow question was to run:
echo 1 > /sys/module/raid0/parameters/default_layout
I also ran into the message Device or resource busy when I tried formatting four SSDs, and it would always be a different device that was listed as the one being busy. It looked like a race condition of some sort, and after some Googling, I found out that's exactly what it was! The post mdadm: device or resource busy had the solution—disable udev when creating the volume, for example:
$ sudo udevadm control --stop-exec-queue
$ sudo mdadm --create ...
$ sudo udevadm control --start-exec-queue
You may also want to watch the progress and status of your RAID array while it is being initialized or at any given time, and there are two things you should monitor:
- Get the detailed status of an MD device:
sudo mdadm --detail /dev/md0 - Get the current status of MD:
cat /proc/mdstat
And if all else fails, resort to Google :)
Making the MD device persistent after boots
To make sure mdadm automatically configures the RAID array on boot, persist the configuration into the /etc/mdadm/mdadm.conf file:
# Configure mdadm to start the RAID at boot:
sudo mdadm --detail --scan | sudo tee -a /etc/mdadm/mdadm.conf
And to make sure the filesystem is mounted at boot, add the following line to the bottom of your /etc/fstab file:
# Add the following line to the bottom of /etc/fstab:
/dev/md0 /mnt/raid1/ ext4 defaults,noatime 0 1
Reset the disks after finishing mdadm testing
One other thing I had to do a number of times during my testing was delete and re-create the array, which is not too difficult:
# Unmount the array.
sudo umount /mnt/raid10

# Stop the device.
sudo mdadm --stop /dev/md0

# Zero the superblock on all the members of the array.
sudo mdadm --zero-superblock /dev/sd[a-d]1

# Remove the device.
sudo mdadm --remove /dev/md0
Then also make sure to remove any entries added to your /etc/fstab or /etc/mdadm/mdadm.conf files, since those would cause failures during startup!
Benchmarks
The first thing I wanted to test was whether a SATA drive—in this case, a Kingston SATA 3 SSD—would run faster connected directly through a SATA controller than it ran connected through a USB 3.0 controller and a UASP-enabled USB 3.0 to SATA enclosure.
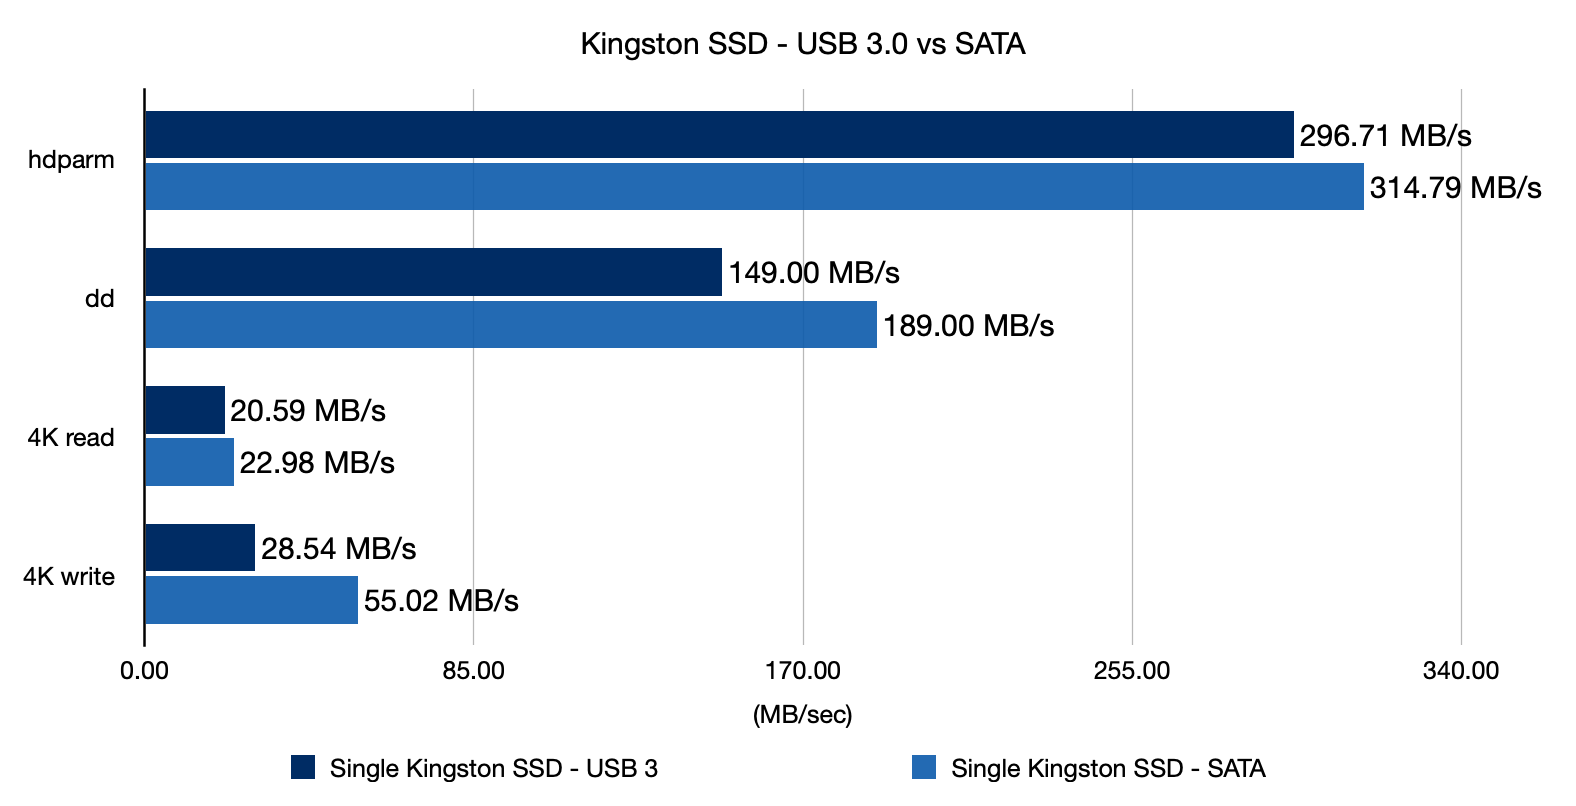
As you can see, connected directly via SATA, the SSD can give noticeably better performance on all metrics, especially for small file random IO, which is important for many use cases.
Connected through USB 3.0, a SATA SSD is no slouch, but if you want the best possible performance on the Pi, using direct NVMe or SATA SSD storage is the best option.
Next I wanted to benchmark a single WD Green 500GB hard drive. I bought this model because it is pretty average in terms of performance, but mostly because it was cheap to buy four of them! To keep things fair, since it couldn't hold a candle to even a cheap SSD like the Kingston, I benchmarked it against my favorite microSD card for the Pi, the Samsung EVO+:
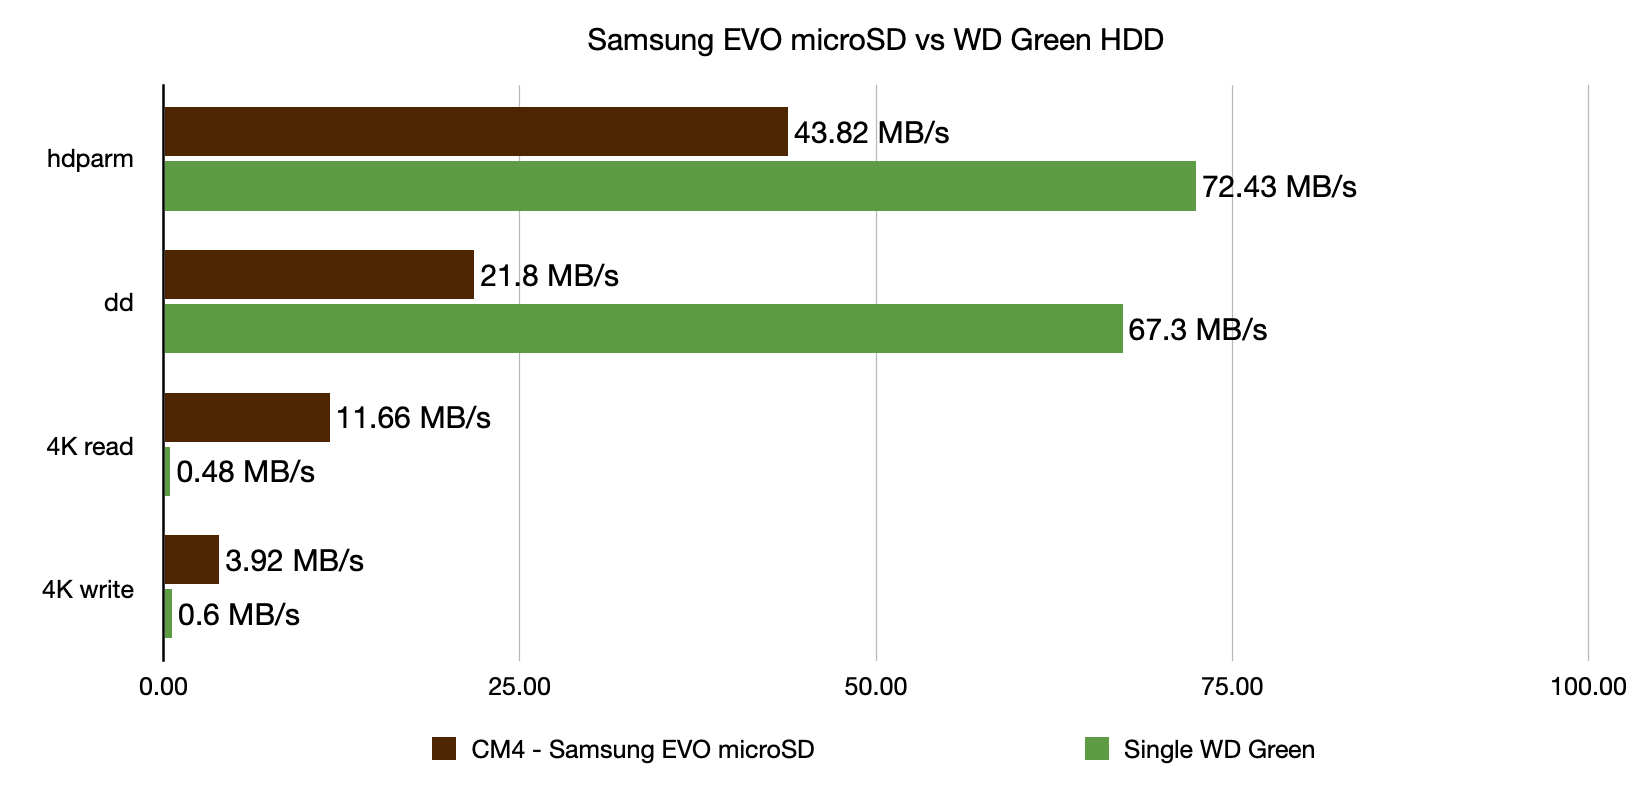
While the hard drive does put through decent synchronous numbers (it has more bandwidth available over PCIe than the microSD card gets), it gets obliterated by the itsy-bitsy microSD card on random IO!
But putting slower hard drives into RAID can give better performance, so I next tested all four WD Green drives in RAID 0 and RAID 10:
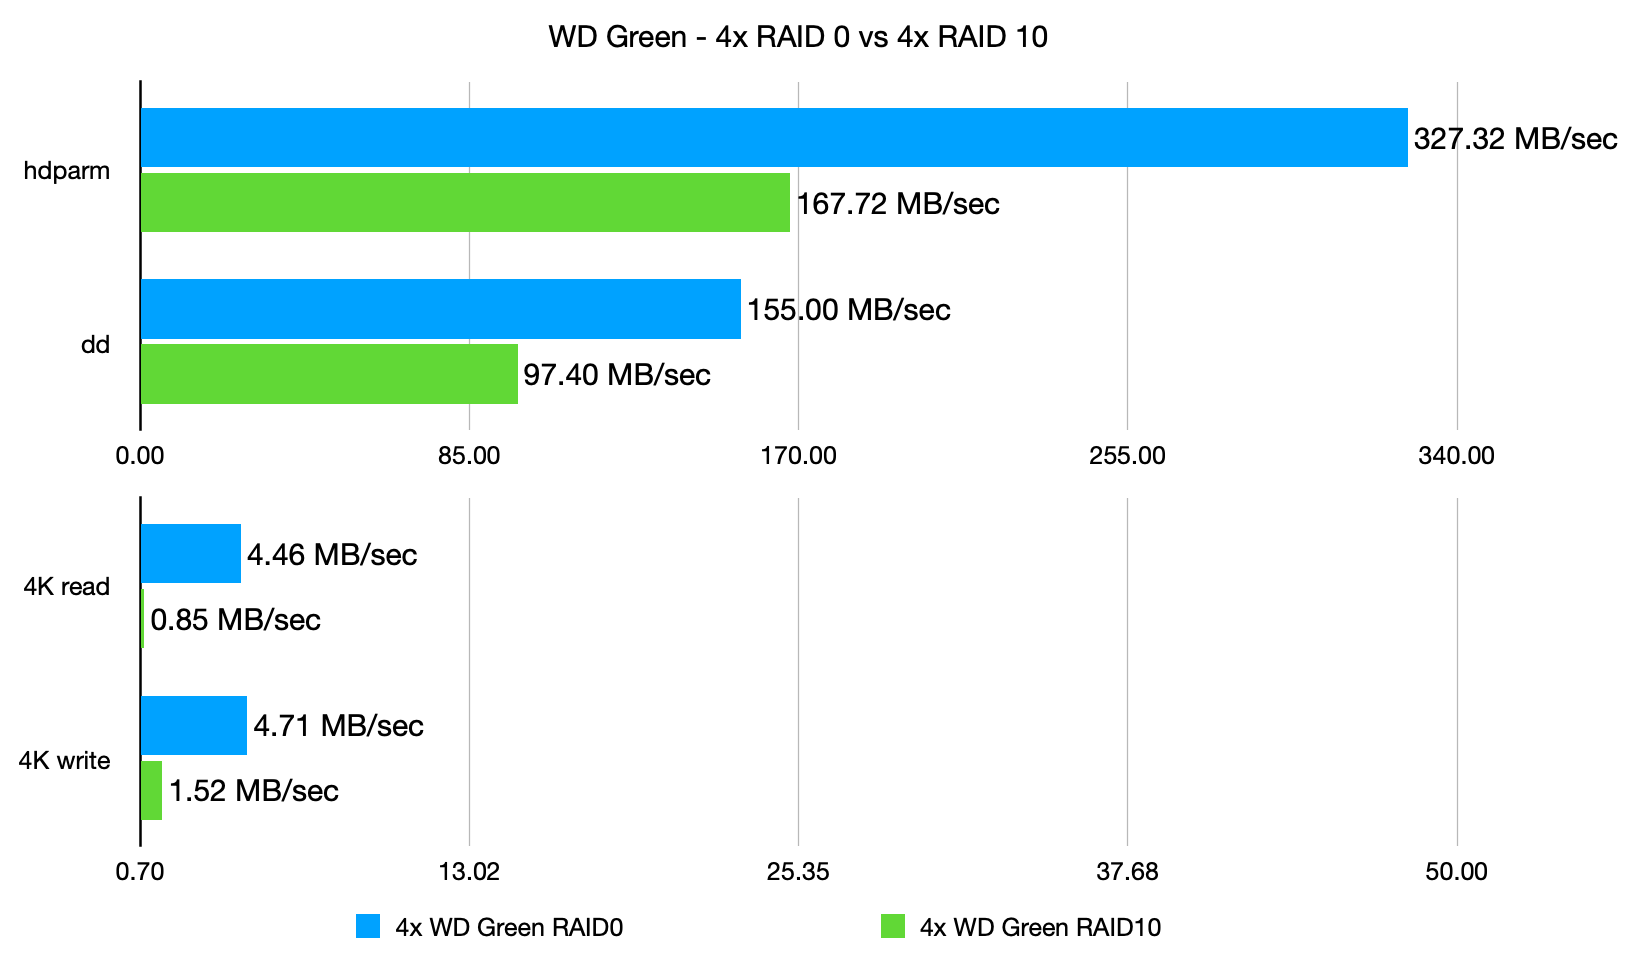
And, as you'd expect, RAID 0 basically pools all the drives' performance metrics together, to make for an array that finally competes with the tiny microSD card for 4K performance, while also besting the Kingston SSD for synchronous file copies.
RAID 10 backs off that performance a bit, but it's still respectable and offers a marked improvement over a single drive.
But I decided to go all out (well, at least within a < $100 budget) and buy three more Kingston SSDs to test them in the same RAID configurations:

And it was a little surprising—since the Raspberry Pi's PCI Express 1x 2.0 lane only offers around 5 Gbps theoretical bandwidth, the maximum real-world throughput you could get no matter how many SSDs you add is around 330 MB/sec.
So there are other IO pressures that the Pi reaches that make RAID for SATA SSDs less of a performance option than for spinning hard drives. In some of my testing, I noticed what looked like queueing of network packets as the Pi had to move network traffic to the RAID array disks, and I'm guessing the Pi's SoC is just not built to pump through hundreds of MB of traffic indefinitely.
Speaking of network traffic, the last test I did was to install and configure both Samba and NFS (see Samba and NFS installation guides in this issue), to test which one offered the best performance for network file copies:
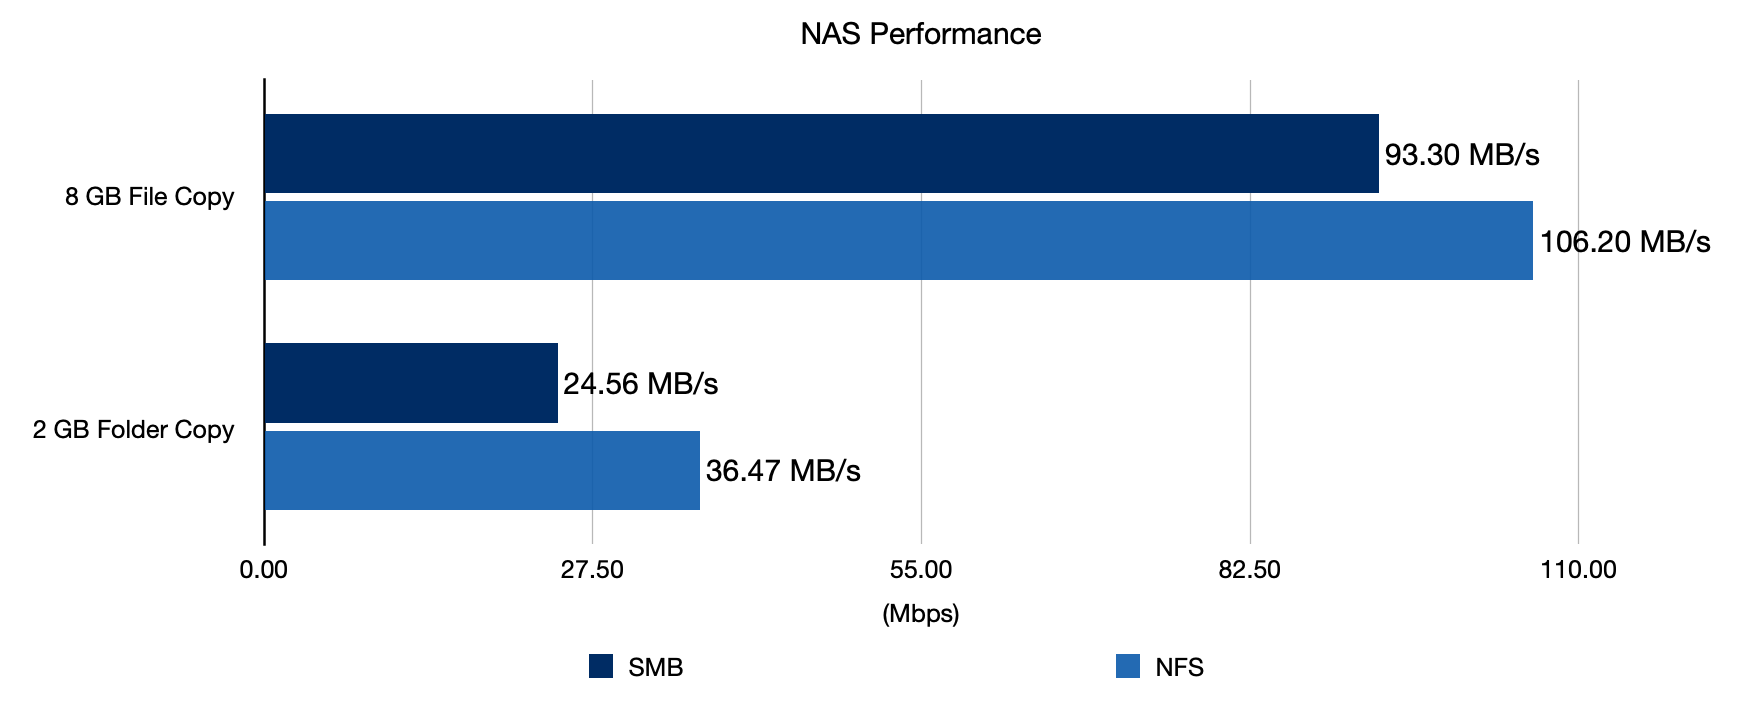
It looks like NFS holds the crown on the Pi, though if you use Windows or Android/iOS primarily, you might see slightly different results or have a harder time getting NFS going than Samba.
Conclusion
I think the Compute Module 4, with it's built-in Gigabit networking and ability to use one or more PCI Express cards, is the first Raspberry Pi that I would consider 'good' for running a reliable and performant NAS.
In my case, it's already faster than the old Mac mini I have been using as a NAS for years, which has only USB 2.0 ports, limiting my file copies over the network to ~35 MB/sec!
But I would definitely like someone to design a nice case that holds the Pi, a specialized (smaller) IO board, a PCIe SATA adapter, a fan, and four SATA drives—ideally designed in a nice, compact form factor!
Here are links (Amazon affiliate links—gotta pay the bills somehow!) to all the different products I used to build my SATA RAID array:
Recommend
About Joyk
Aggregate valuable and interesting links.
Joyk means Joy of geeK