

Web-based AR app development tutorial with WebXR
source link: https://www.devbridge.com/articles/ar-app-development-tutorial/
Go to the source link to view the article. You can view the picture content, updated content and better typesetting reading experience. If the link is broken, please click the button below to view the snapshot at that time.
Web-based AR app development tutorial with WebXR
Marius NoreikisWhat is augmented reality?
What do blockbuster sci-fi movies like The Terminator, Avatar, and Star Wars all have in common? Struggling to answer? They all have augmented reality (AR) technology helping the main protagonists (and antagonists). The Terminator scanning people to measure their clothes, military execs examining Na’vi’s tree in a world of Avatar, or Chewbacca playing a game of Dejarik are all examples of AR. In simplest of explanations, AR is digital content overlaid on top of a physical world.
Luckily, one does not have to be a sci-fi character to experience AR. Ever caught a virtual monster in Pokemon GO? Use Foursquare? Maybe you tried out the virtual IKEA option to see how furniture looks in your flat? Well, there you go!
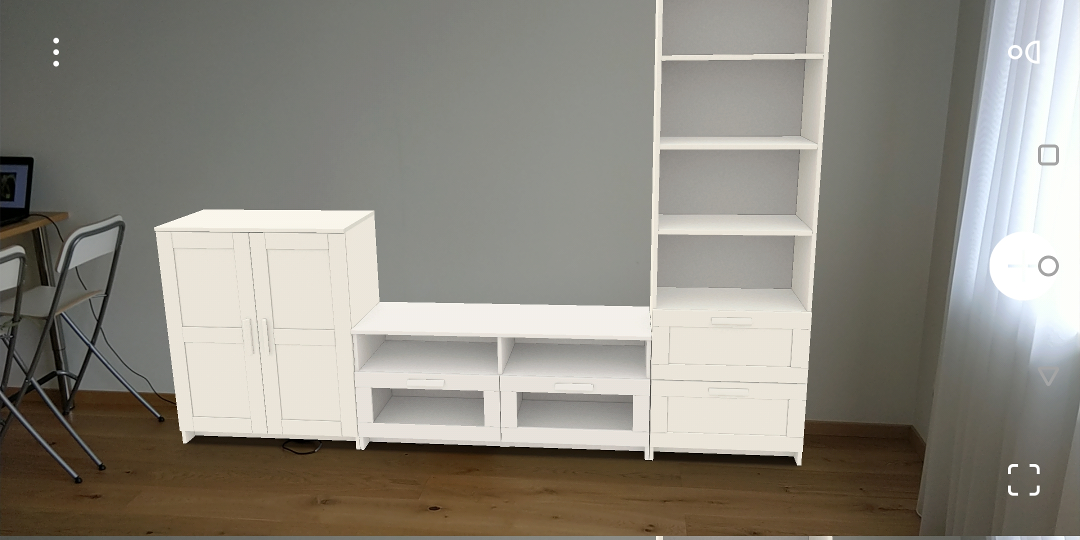
Fitting furniture with IKEA Place AR application
While AR gained popularity from the movies, it originated from (and still plays an important role) in the industry realm. In fact, AR is an important piece of technology in an era of Industry 4.0 and is starting to surpass Virtual Reality (VR). Reports from IDC and Statista forecast the AR and VR market to reach $20 billion in 2020 within the industrial market, accounting for nearly two-thirds of the value. Others speculate that the market will surpass $100 billion in the next five years.
Initially, one needed special-purpose hardware devices to use AR. Over time, AR went from using smart handheld devices and smart glasses to the web. Early AR toolkits and libraries for the web offered limited functionality and suffered poor interoperability and high fragmentation. Commercial solutions such as XR+ and 8th Wall showed promise but required users to sign up for vendor lock-in, proving a blocker for some. The World Wide Web Consortium (W3C) released a specification for WebXR with a native web browser API for AR and VR. The specification gained tremendous interest within major browser vendors, some offering initial implementations of the draft specification.
In this blog, I’ll go over the business benefits of AR, review how to overcome mobile complexities, and provide a detailed tutorial on how to develop an AR webpage using WebXR.
What are the benefits of AR?
The recently introduced concept of Industry 4.0 defines AR as one of the key enabling technologies alongside the Internet of Things (IoT), robotics, big data, and cloud computing. Its high-level purpose is bridging a gap between physical and virtual worlds. Some typical examples of industrial AR include presenting IoT data in real-time, facilitating on-site maintenance, improving employee training, and safety.
For example, with the help of AR, industrial property managers can overlay building information models (BIM) or digital twins inside a physical building. Property managers are able to carry out building maintenance on-site with the assistance of AR apps, including:
- analyzing wiring, ventilation, and heating systems, or data from nearby sensors.
- performing actions, such as adjusting climate control at that particular point of the building.
- creating and generating location-based feedback, such as identifying and documenting defects within a venue or noting maintenance requests.
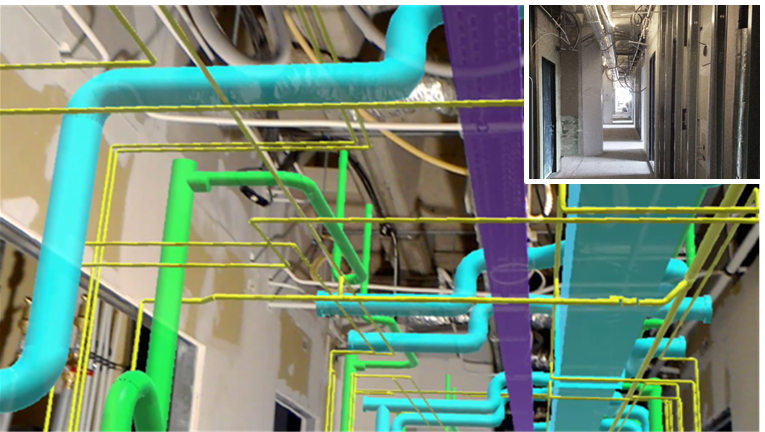
BIM model overlaid within a building using AR. Image courtesy INSITER
Not surprisingly, maintenance is another area benefitting from AR. In large industrial spaces, such as power plants, mines, or factories, AR can provide guidance for maintenance workers. Mercedes-Benz recently started using Microsoft HoloLens as an AR remote assistance tool to improve the speed and safety of repair and maintenance work.
An AR maintenance application could efficiently:
- navigate workers to places that require maintenance, display, and warn about hazardous areas.
- assist the maintenance process by identifying and annotating various parts of machinery under maintenance.
- present related instructions in place.
- create a communication channel between an on-site maintenance worker and an off-site expert, who may be helping with the maintenance task.
Remote access teams also benefit from AR. For example, training for nuclear plant employees can be (and most probably should be) carried out remotely within a simulated environment that, with the help of AR, reassembles the real machinery and simulates tasks that normally be carried out under hazardous conditions. In recent years, remote access has become even more important due to global disasters, such as military conflicts or pandemics that impact traveling between sites and scheduling on-site business meetings. Luckily, AR can easily circumvent problems by bringing interactive 3D prototypes of products across the globe (e.g., a jet engine manufacturer sending 3D scans and models of real-world engines to be thoroughly analyzed in AR by a plane manufacturer off-site).
The impact of AR on industries will likely continue to grow in the years to come. Manufacturers, service providers, retailers, and industries will invest in AR and expect a steady growth of usage of AR within industry and business processes. Similar to how videoconferencing enabled remote group meetings, AR will further enable remote work.
A closer look at mobile AR app development
There is no shortage of prospective use cases for AR. However, is the technology truly ready to tackle the corresponding challenges? Luckily, the answer is yes. Thanks to Microsoft’s HoloLens, along with Apple and Google’s reliable, free to use AR toolkits (ARCore and ARkit), developers are able to quickly build mobile AR applications.
When developing a mobile AR app, a developer still has to rely on native mobile application development toolkits for both major mobile operating systems (i.e., Android and iOS) in order to reach a wide audience. Furthermore, apps must be obtained and installed through the respective app stores.
Unity stepped in, unifying the AR world by releasing the AR Foundation framework. The framework supports developing mobile games with a single codebase for both platforms but requires familiarity with the Unity game engine and developing an AR game (including knowledge of Unity licensing). Even if you happen to be a Unity developer, you still need to require app users to download a large app from an app store.
Fortunately, WebXR will soon solve both issues by bringing AR directly to your mobile web browser. WebXR is a World Wide Web Consortium (W3C) specification describing how to interface with Virtual Reality (VR) and AR devices on the web. While still in a working draft, it already deprecates the previous WebVR specification used solely for VR devices and introduces APIs for AR. Simply put, WebXR aims to introduce simple and unified development of VR and AR experiences on the web.
The four main responsibilities of WebXR are to:
- Render input from the phone's camera onto a background.
- Estimate the phone's position and rotation relative to the real world.
- Detect real-world surfaces, like tabletops, floors, and walls.
- Provide a frame loop for rendering augmented content.
How to build web-based augmented reality applications with WebXR
Now that you know what AR is, its importance for business, and a newly formed initiative for bringing AR to the web, let’s go over how to build an AR application using WebXR. I’ll showcase how to make a simple webpage with an AR view to display an animated 3D object.
While WebXR provides means to understand real-world elements (i.e., plane detection, tracking of position, rotation), it does not define how to augment the world. Typically, you’ll want to render three-dimensional life-like objects that blend seamlessly into the world and need a 3D rendering engine to draw some nice-looking assets rather than using floating tags. In this tutorial, I’ll use a state-of-the-art 3D rendering engine for JavaScript three.js.
Prerequisites
To start developing with WebXR, you will need a mobile device that supports AR. Google provides an extensive list of supported Android devices, which support WebXR via Chrome 81+. In the case of iOS, WebXR is currently supported via Mozilla WebXR Viewer. For this tutorial, I will be using a smartphone with an Android 10 operating system.
You will also need your favorite text editor/IDE to write JavaScript code, nodejs for serving the developed web pages, and a Chrome desktop browser to debug the application while running on an actual mobile device. It is really simple and useful to debug a mobile web app from your desktop. In the case of Android, this requires setting up Android Development Bridge and using Chrome’s inspect devices function. There is a simple guide on how to do it.
Pro tip: You may need to choose to inspect fallback in case your desktop or mobile browser versions differ.
The code
Let’s start by creating a simple HTML page, calling it webxr-starter.html0:
<!doctype html>
<html>
  <head>
    <meta charset='utf-8'>
    <meta name='viewport' content='width=device-width, initial-scale=1, user-scalable=no'>
    <meta name='mobile-web-app-capable' content='yes'>
    <meta name='apple-mobile-web-app-capable' content='yes'>
    <link rel='stylesheet' href='css/style.css'>
    <title>WebXR</title>
  </head>
  <body>
    <div id="overlay">
      <div class="info-area">
        <div id="info"></div>
        <button id="xr-button" disabled>XR not found</button>
      </div>
    </div>
    <script type="module">
      // WebXR content will go here
    </script>
  </body>
</html>
Here’s the code accompanied by a basic stylesheet css/style.css:
div.info-area {
  z-index: 2;
  background-color: rgba(255, 255, 255, 0.90);
  padding: 10px;
  text-align: center;}

button {
  width: 100px;
  height: 35px;
  margin: 15px;
}
The code below shows how to prepare a bare-bones webpage for adding WebXR functionality. Commonly, a WebXR application includes a button (in our case, the #xr-button) to start the AR experience, rather than starting AR as soon as the page loads. You will be adding code to the currently empty JavaScript module, starting at line 19, and defining a few global variables to help control the WebXR session.
// button to start XR experience
let xrButton = document.getElementById('xr-button');

// to control the xr session
let xrSession = null;

// reference space used within an application
let xrRefSpace = null;

// Canvas OpenGL context used for rendering
let gl = null;
You’ll need to define an entry function checkXR() for identifying if the user's browser supports WebXR and a helper function checkSupportedState() for setting appropriate button listeners for when WebXR is supported.
function checkXR() {
  if (!window.isSecureContext) {
    document.getElementById("warning").innerText = "WebXR unavailable. Please use secure context";
  }
  if (navigator.xr) { // check to see if WebXR is supported
    navigator.xr.addEventListener('devicechange', checkSupportedState);
    checkSupportedState();
  } else {
    document.getElementById("warning").innerText = "WebXR unavailable for this browser";
  }
}
function checkSupportedState() {
  navigator.xr.isSessionSupported('immersive-ar').then((supported) => {
    if (supported) {
      xrButton.innerHTML = 'Enter AR';
      xrButton.addEventListener('click', onButtonClicked);
    } else {
      xrButton.innerHTML = 'AR not found';
    }
    xrButton.disabled = !supported;
  });
}
In checkSupportedState(), check for support of an immersive AR session, which in contrast to an inline session, forces the browser to enter the full-screen immersive mode. If the AR session is supported, hook up the button to start the WebXR session when clicked and add an onButtonClicked() listener.
function onButtonClicked() {
  if (!xrSession) {
      navigator.xr.requestSession('immersive-ar', {
          optionalFeatures: ['dom-overlay'],
          requiredFeatures: ['local'],
          domOverlay: {root: document.getElementById('overlay')}
      }).then(onSessionStarted, onRequestSessionError);
  } else {
    xrSession.end();
  }
}
Request an XR session from the browser, indicating that you will use local reference space, which is suitable if the viewer is not supposed to move much. In other words, WebXR will try to keep the original origin of 3D coordinate space in the same spot. Other modes can be useful depending on application requirements. You can also request a DOM overlay, which basically puts the application into an immersive full-screen mode. WebXR session initiation is asynchronous, so you should pass in success and error callbacks:
function onSessionStarted(session) {
  xrSession = session;
  xrButton.innerHTML = 'Exit AR';

  // Show which type of DOM Overlay got enabled (if any)
  if (session.domOverlayState) {
    document.getElementById('info').innerHTML = 'DOM Overlay type: ' + session.domOverlayState.type;
  }

  session.addEventListener('end', onSessionEnded);
  // create a canvas element and WebGL context for rendering
  let canvas = document.createElement('canvas');
  gl = canvas.getContext('webgl', { xrCompatible: true });
  session.updateRenderState({ baseLayer: new XRWebGLLayer(session, gl) });

  session.requestReferenceSpace('local').then((refSpace) => {
    xrRefSpace = refSpace;
    // start WebXR rendering loop
    session.requestAnimationFrame(onXRFrame);
  });

}

function onRequestSessionError(ex) {
  document.getElementById('info').innerHTML = "Failed to start AR session.";
}
When the session starts, your responsibility is to create an <canvas> element and a WebGL context used to create the XRWebGLLayer. Once that is done, you can start the WebXR loop by requesting the desired reference space and registering onXRFrame callback. To make things consistent, you should also include a callback function to be executed when the session ends:
function onSessionEnded(event) {
  xrSession = null;
  xrButton.innerHTML = 'Enter AR';
  document.getElementById('info').innerHTML = '';
  gl = null;
}
Finally, implement the session loop callback function:
function onXRFrame(t, frame) {
  let session = frame.session;
  session.requestAnimationFrame(onXRFrame);
  let pose = frame.getViewerPose(xrRefSpace);
  if (!pose) {
    return;
  }
  const pos = pose.transform.position;
  info.innerHTML = `x:${pos.x.toFixed(2)} y:${pos.y.toFixed(2)} z:${pos.z.toFixed(2)}`;
}
So far, the callback function retrieves the current WebXR frame and obtains the current pose of the device. The pose represents translation and rotation of the device relative to WebXR space origin and is updated every frame to account for the device's movement. At this moment, one can utilize pose information to start adding augmented 3D content to the scene. For simplicity, display the relative position of the phone on-screen.
As an added bonus, WebXR actually outputs the position in meters. Take that expensive laser range finders! That's the end of the setup needed to run WebXR. Simply trigger the WebXR initialization by calling checkXR(); at the end of your <script> block. Once that’s done, it’s time to run your first WebXR app.
Running and debugging
First, you need a static file server to serve our webxr-starter.html alongside with css/style.css stylesheet. One of the reasons why you need a server is that in order to work, WebXR scripts must be obtained via HTTPS protocol. You can either host the files in your own web server, or if you want to test locally (as I did), create a simple Node.js server by using node-static package:
var static = require('node-static');
const https = require('https');
const fs = require('fs');
const options = {
    key: fs.readFileSync('key.pem'),
    cert: fs.readFileSync('cert.pem')
}
const file = new (static.Server)();
https.createServer(options, function (req, res) {
    req.addListener('end', function () {
        file.serve(req, res);
    }).resume();
}).listen(3000);
You may have noticed that you need to provide an HTTPS certificate for your local server to work. Fortunately, you can produce a self-signed certificate for this purpose. Here is a simple guide to creating a self-signed .pem certificate using openssl. Once that’s done, install dependencies by npm init -y && npm install node-static --save-dev and start your server with npm start.
Open Chrome on your mobile device, navigate to https://<your local ip>:3000/webxr-starter.html, and try out the application. After agreeing to proceed with an unsafe connection (thanks self-signed certificate), you should see your webpage with an “Enter AR" button. Go ahead and press it. You'll see a camera view, and the phone starts tracking your surroundings.


WebXR and Three.js
Next, let's augment your world by plugging in three.js engine to render 3D objects. (Since the main focus of this tutorial is WebXR, I am not going into detail about three.js. There are many good tutorials and documentation of how to use it.) In this blog post, I’ll focus on what needs to be done to make WebXR and three.js work seamlessly together. I'll be using three.js version r120, which can be obtained in GitHub.
In order to demonstrate the WebXR capability detects surfaces, render a special marker, a reticle that will appear on surfaces once detected. Keep the reticle in the middle of the phone's screen, which allows a user to navigate the reticle by moving the phone around while the reticle sticks to detected surfaces. The functionality will also require use of the WebXR hit detection API. When a user taps on the screen, a 3D object will appear in-place of the reticle.
The reticle can easily be rendered with three.js with any object. In our case, let’s use a flat green ring. For the 3D object, use a 3D model from cgtrader. Download the model and, with the help of Blender, convert it into gltf file format. Three.js actually supports various object formats, but why not choose the gltf?!
Let’s work on the code from the previous example. Start by adding simple code for initializing three.js scene and renderer. Note that three.js is being imported as a module from a local directory, which can be accessed by downloading the source code of three.js.
import * as THREE from './three.js/build/three.module.js';
let renderer = null;
let scene = null;
let camera = null;
let reticle = null;
const initScene = (gl, session) => {
  scene = new THREE.Scene();
  camera = new THREE.PerspectiveCamera(75, window.innerWidth / window.innerHeight, 0.1, 1000);
  var light = new THREE.PointLight(0xffffff, 2, 100); // soft white light
  light.position.z = 1;
  light.position.y = 5;
  scene.add(light);
  // create and configure three.js renderer with XR support
  renderer = new THREE.WebGLRenderer({
    antialias: true,
    alpha: true,
    autoClear: true,
    context: gl,
  });
  renderer.setPixelRatio(window.devicePixelRatio);
  renderer.setSize(window.innerWidth, window.innerHeight);
  renderer.xr.enabled = true;
  renderer.xr.setReferenceSpaceType('local');
  renderer.xr.setSession(session);
  // simple sprite to indicate detected surfaces
  reticle = new THREE.Mesh(
    new THREE.RingBufferGeometry(0.15, 0.2, 32).rotateX(-Math.PI / 2),
    new THREE.MeshPhongMaterial({ color: 0x0fff00 })
  );
  reticle.matrixAutoUpdate = false;
  reticle.visible = false;
  scene.add(reticle);
};
An important thing to point out here is the renderer configuration (Lines 18-28); the other code is just a basic scene setup to have lighting and objects in place.
You can render a reticle in the middle of the screen where it hits a surface by casting a virtual ray from the screen center towards the AR world and checking if it intersects with any of the detected surfaces with the help of xrHitTestSource. Make sure to call the scene initialization with initScene(gl, session). Then, the code goes into onSessionStarted():
// here we ask for viewer reference space, since we will be casting a ray
// from a viewer towards a detected surface. The results of ray and surface intersection
// will be obtained via xrHitTestSource variable
session.requestReferenceSpace('viewer').then((refSpace) => {
  session.requestHitTestSource({ space: refSpace }).then((hitTestSource) => {
    xrHitTestSource = hitTestSource;
  });
});
initScene(gl, session);
Hit test source de-initialization that’s done within onSessionEnded():
if (xrHitTestSource) xrHitTestSource.cancel();
xrHitTestSource = null;
You also need to define the variable within the module scope:
let xrHitTestSource = null;
Furthermore, you should request the hit-test WebXR feature; otherwise, requestHitTestSource will throw a runtime exception. Therefore, you need to update requiredFeatures in the session initialization script:
function onButtonClicked() {
  if (!xrSession) {
      navigator.xr.requestSession('immersive-ar', {
          optionalFeatures: ['dom-overlay'],
          requiredFeatures: ['local', 'hit-test'],
          domOverlay: {root: document.getElementById('overlay')}
      }).then(onSessionStarted, onRequestSessionError);
  } else {
    xrSession.end();
  }
}
As a result, you can rewrite your onXRFrame() function to check for surfaces and hook three.js with WebXR estimated space.
function onXRFrame(t, frame) {
  let session = frame.session;
  session.requestAnimationFrame(onXRFrame);
  if (xrHitTestSource) {
    // obtain hit test results by casting a ray from the center of device screen
    // into AR view. Results indicate that ray intersected with one or more detected surfaces
    const hitTestResults = frame.getHitTestResults(xrHitTestSource);
    if (hitTestResults.length) {
      // obtain a local pose at the intersection point
      const pose = hitTestResults[0].getPose(xrRefSpace);
      // place a reticle at the intersection point
      reticle.matrix.fromArray( pose.transform.matrix );
      reticle.visible = true;
    }
  } else {  // do not show a reticle if no surfaces are intersected
    reticle.visible = false;
  }
  // bind our gl context that was created with WebXR to threejs renderer
  gl.bindFramebuffer(gl.FRAMEBUFFER, session.renderState.baseLayer.framebuffer);
  // render the scene
  renderer.render(scene, camera);
}
First, request hit results for a specified source from WebXR frame, which returns an array of intersections between your ray and any detected surfaces, sorted by distance (typically, the array will only contain a single element). Then take the pose in a local space, which will allow you to easily map the reticle's draw matrix into WebXR space (Line 13). Afterward, bind your previously created canvas buffer into three.js renderer and draw the scene (Line 21). If you run the app now, you will see something like this:

Reticle aligned with the floor (detected surface)
As a final step, add a click listener to your screen to initialize a 3D object in place of the reticle. WebXR and three.js make this very easy since you can simply reuse the reticle's position to instantiate our 3D object. Thus, the model placing function may look like this:
function placeObject() {
  if (reticle.visible && model) {
    reticle.visible = false;
    // stop hit testing
    xrHitTestSource.cancel();
    xrHitTestSource = null;
    // we'll be placing our object right where the reticle was
    const pos = reticle.getWorldPosition();
    scene.remove(reticle);
    model.position.set(pos.x, pos.y, pos.z);
    scene.add(model);
  }
}
Initialization of the 3D model, its animation, and click handlers are basic three.js/javascript routines but require many lines of code. As a result, I suggest omitting the code from this text. However, the full source code of this example can be found on GitHub.
That's it! Now you have our full-blown WebXR webpage that can track a phone's pose, detect surfaces, perform hit testing, and render animated 3D objects. In short, you've just brought AR to the web!
Recommend
About Joyk
Aggregate valuable and interesting links.
Joyk means Joy of geeK