

Using audio transcription for cloud recordings Follow
source link: https://support.zoom.us/hc/en-us/articles/115004794983-Using-audio-transcription-for-cloud-recordings-
Go to the source link to view the article. You can view the picture content, updated content and better typesetting reading experience. If the link is broken, please click the button below to view the snapshot at that time.

Overview
Audio transcription automatically transcribes the audio of a meeting or webinar that you record to the cloud. After this transcript is processed, it appears as a separate VTT file in the list of recorded meetings. In addition, you have the option to display the transcript text within the video itself, similar to a closed caption display
The transcript is divided into sections, each with a timestamp that shows how far into the recording that portion of the text was recorded. You can edit the text to more accurately capture the words, or to add capitalization and punctuation, which are not captured by the transcript.
Note: Audio transcription only supports English.
This article includes:
Prerequisites
- Business, Education, or Enterprise license with cloud recording enabled
- Account owner or admin privileges
Note: If you meet the prerequisites above, but do not see the option, contact support to have it enabled.
Enabling audio transcription
Account
To enable the audio transcript feature for all members of your organization:
- Sign in to the Zoom web portal.
- In the navigation menu, click Account Management then Account Settings.
- Navigate to the Cloud recordingoption on the Recording tab and verify that the setting is enabled.
Note: If the setting is disabled, click the Status toggle to enable it. If a verification dialog displays, choose Turn On to verify the change. - In the Advanced cloud recording settings, click the Audio transcript checkbox to enable it, then click Save to confirm the change.
Note: If you want to make this setting mandatory for all users in your account, click the lock icon, and then click Lock to confirm the setting.
Group
To enable the audio transcript feature for all members of a specific group:
- Sign in to the Zoom web portal.
- In the navigation menu, click User Management then Group Management.
- Click the desired Group Name from the list, then click the Settings tab.
- Navigate to the Cloud recording option on the Recording tab and verify that it is enabled.
Notes:- If the setting is disabled, click the Status toggle to enable it. If a verification dialog displays, choose Turn On to verify the change.
- If the option is grayed out, it has been locked at the Account level, and needs to be changed at that level.
- In the Advanced cloud recording settings, click the Audio transcript checkbox to enable it, then click Save to confirm the change.
Note: If you want to make this setting mandatory for all users in this group, click the lock icon, and then click Lock to confirm the setting.
To enable the audio transcript feature for your own use:
- Sign in to the Zoom web portal.
- In the navigation menu, click Settings.
- Navigate to the Cloud recording option on the Recording tab and verify that the setting is enabled.
Notes:- If the setting is disabled, click the Status toggle to enable it. If a verification dialog displays, choose Turn On to verify the change.
- If the option is grayed out, it has been locked at either the Group or Account level, and you will need to contact your Zoom administrator.
- In the Advanced cloud recording settings, click the Audio transcript checkbox to enable it, then click Save to confirm the change.
Generating a transcript
To generate a transcript, start a cloud recording.
After the meeting ends, you will receive an email that lets you know that your cloud recording is available. A short time later, you also receive a separate email letting you know that the audio transcript for the recording is available. These emails include links to view your recordings and transcript.
Note: The audio transcript may take additional time to process after the cloud recording video/audio has processed.
Viewing and editing the transcript
Audio transcripts are saved in VTT format. If you download the VTT file, you can open it with a text editor or word processing application. You can also view or edit transcripts in the web portal.
- Sign in to the Zoom web portal.
- In the navigation menu, click Recordings.
- Click the name of the recorded meeting.
You will see a list of recording files.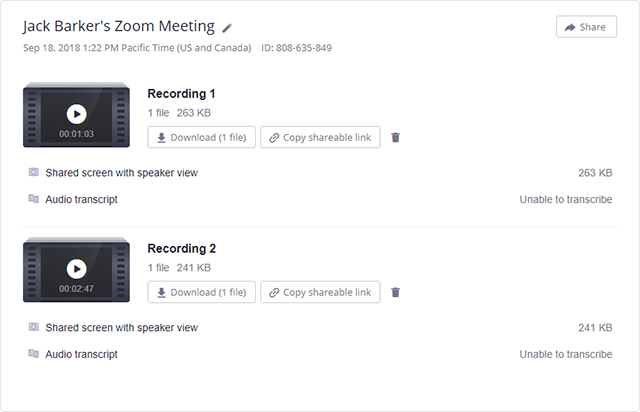
- Click the play icon.
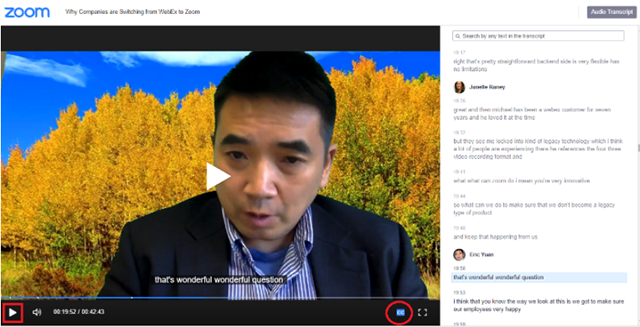
The text of the transcript displays on the right-hand side of the video. - Hover over a phrase you want to edit and click the pencil icon.
Note: If a phrase belongs to an unknown speaker, you can also hover over Unknown Speaker and click the pencil icon to edit the name.
- Make any changes to the text, then click the check mark.
The updated version of the text is displayed when you play the audio or video file.
Displaying the transcript as closed captions
The transcript is automatically embedded within the audio and video file, but is hidden by default. To see the transcript in the audio or video file:
- Sign in to the Zoom web portal.
- In the navigation menu, click Recordings.
- Click the name of the recorded meeting.
You will see a list of recording files. - Click the play icon.
- Click the CC icon at the bottom right of the screen.
The text displays on top of the video, similar to closed captioning.
Searching within the transcript
You can search for text within the transcription and you can search for transcribed recordings that include the text you are searching for.
- Sign in to the Zoom web portal.
- In the navigation menu, click Recordings.
- In the Search by list, choose Keyword.
- Type a word or phrase in the text entry box, then click Search.
Note: This shows the list of meetings that includes the keyword in the transcript. - Click the applicable meeting to view the transcript.
- Click Audio transcript. The text of the transcript displays on the right-hand side of the file.
- Navigate to the Audio Transcript panel on the right and type the keyword into the search box at the top. All instances of the keyword are highlighted.

Recommend
-
8
Audio File Transcription, for Super-Efficient Recording Jul 12 ・3 min read
-
6
Get rid of filler words from your audio recordingsBy using Cleanvoice AI, you agree to our Cookie Policy....
-
4
This journalist’s Otter.ai scare is a reminder that cloud transcription isn’t completely private A reminder of the tradeoffs for ease and simplicity ...
-
2
WhatsApp Announces New Improvements for Audio Recordings in the App Published March 30, 2022 By
-
7
Google has made the I/O 2022 Keynote accessible with audio transcriptionSearch
-
7
India Cloud Security Summit 2022 session recordings
-
9
WhisperAPI$0.15/hr audio transcription API powered by OpenAI WhisperPayment RequiredThis is an affordable, easy-to-use audio transcription API pow...
-
4
Jan 23, 2023 — 18:26 CUT Last Week, on Club MacStories: Audio Transcription Shortcuts, Scrobbling from Wi...
-
7
Local Audio Transcriptionermine.ai – 100% local audio recording & transcriptionClick to begin transcribing
-
5
AliCloud launches AI audio and video transcription tool AliCloud launches AI audio and video transcription tool June 2, 2023 1:31 pm Alibaba Cloud, a subsidiary of Alibaba Group, announced the public be...
About Joyk
Aggregate valuable and interesting links.
Joyk means Joy of geeK